Table of Contents
Advertisement
Advertisement
Table of Contents
Troubleshooting

Related Manuals for Bissell 3011 Series


Summary of Contents for Bissell 3011 Series
- Page 1 CrossWave X7 Repair Guide Model Series – 3011, 3055, 3277,...
- Page 2 What’s in the Guide? • Unit Overview • Common Issues • Basic Troubleshooting • Status Notification Lights • Error Code Troubleshooting • How to Access the Unit Interior • Battery Disconnect Sequence • Battery Reconnect Sequence • Key Internal Components •...
-
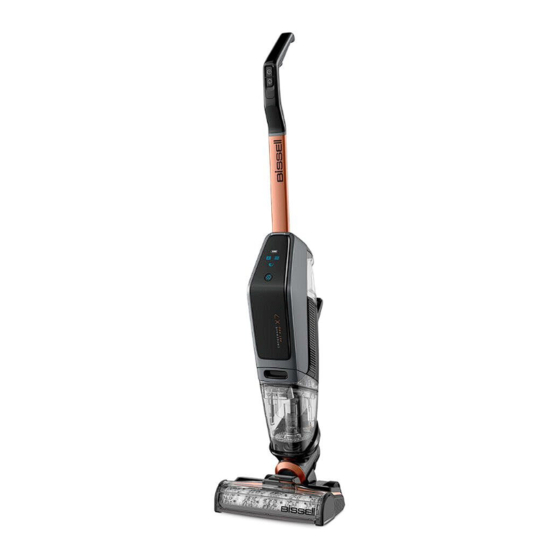
Page 3: Unit Overview
Unit Overview • Model families • 3011, 3041, 3055, 3276, 3279, 3286, 3277, 3287 • 2 year Limited Warranty Power Rating 25.2 V Power Source Cordless Rechargeable Brush System Rotating Charge Time 4 Hours Run Time Up to 30 min Surface Type Area Rugs, Bare Floors, Sealed Hard Floors, Large Area, Multi-Surface, Sealed Wood Floors Cleaning Path Width 9.5"... -
Page 4: Common Issues
• Clean sensors on the unit and dock • Streaking/Unit Not Picking Up • Ensure brush roll is a genuine BISSELL part by confirm the BISSELL logo is stamped on the brush roll tab • Ensure the squeegee is installed on the foot of the unit •... -
Page 5: Basic Troubleshooting
Basic Troubleshooting • General Items to Look for • Ensure filter is dry and properly installed • Ensure nozzle window is properly installed and fully seated • Ensure handle is fully seated • Ensure dirty tank is installed and fully seated •... - Page 6 Status Notification Lights Return...
-
Page 7: Error Code Troubleshooting
Return Error Code Troubleshooting • Add Water • Blinking blue foot light x4 then solid white, blinking amber icon x4, then solid, error sound plays 1 time... - Page 8 Return Error Code Troubleshooting • Empty Dirty Tank • No Tank Present • Absence of white foot light, blinking amber • Absence of white foot light, blinking amber icon x4, then solid, absence of mode icon, icon x4, then solid, blinking red triangle light, auto power off after 10 seconds, error sound no mode icon, error sound plays 1 time, auto plays 1 time...
- Page 9 Return Error Code Troubleshooting • Brush Roll Error • Blinking white foot light, blinking red triangle light, no mode icon light, error sound plays 1 time, auto power off after 10 seconds • Typically indicates that brush is obstructed and causing excess thermal load •...
- Page 10 Return Error Code Troubleshooting • Nozzle Error • Alternating single blinks between white foot light and blue foot light, blinking red triangle light, no mode icon light, auto power off after 10 seconds • Typically indicates a failure in the foot causing the unit to believe the nozzle is not present •...
- Page 11 Return Error Code Troubleshooting • Fan Error • Absence of foot light, blinking red triangle light, blinking red fan icon light, absence of mode icon, error sound 1 time, auto power off after 10 seconds • Typically indicates excessive thermal load in the suction motor fan housing •...
- Page 12 Return Error Code Troubleshooting • Pump Error • Blinking blue foot light, blinking red triangle light, absence of mode icon light, error sound 1 time, auto power off after 10 seconds • Typically indicates an issue with the fluid pump •...
- Page 13 Return Error Code Troubleshooting • Battery Temperature Error • Battery Communication Error • Blinking white battery lights 1 and 3, • Blinking white battery lights 1, 2, and 3, immediate auto power off, error sound 1 immediate auto power off, error sound 1 time, light blinking stops after 10 seconds time, light blinking stops after 10 seconds •...
- Page 14 Return Error Code Troubleshooting • Battery Current Error • Blinking white battery lights 2 and 3, immediate power off, error sound 1 time, light blinking stops after 10 seconds • Replacement Parts Possibly Needed • Battery • Main PCBA...
- Page 15 How to Access the Unit Interior Main Body 1. Remove clean tank by grasping and pulling upward firmly 2. Remove dirty tank by depressing release button and pulling outward 3. Remove handle by depressing small release button on rear on unit and pull upward 4.
- Page 16 How to Access the Unit Interior 4. Lay down and recline unit to locate front cover screws 5. Remove (2) #2 Phillips head screws 6. Gently pry off front cover and remove 7. Remove (2) #2 Phillips head screws holding the left side vent cover, note the top screw is short, and the bottom is longer Front Cover Removed...
- Page 17 How to Access the Unit Interior 8. Remove 9 #2 Phillips head screws from the front of the unit, 8 are identical, 1 is unique 9. Grasp front of unit and gently lift up to split apart, Note: wire locations as the unit comes apart, be aware the motor assembly is pressure fit not screwed in, and the internal wiring might be tight causing little play between the two halves...
- Page 18 How to Access the Unit Interior Foot 1. Depress release button to free brush cover then rotate away from unit and remove 2. Grasp pull tab on brush roll and lift upward to remove Screw Length Marking 3. Remove 2 #2 Phillips head screws in the squeegee bar then gently pry out and remove being mindful of the clip in the lower left corner and upper right corner...
-
Page 19: Battery Disconnect
Battery Disconnect 1. Disconnect power (Black) 2. Disconnect communication connector (Orange) 3. Disconnect P+/P- connector (Yellow) Return... - Page 20 Battery Reconnect 1. Connect P+/P- (Yellow) 2. Connect communication (Orange) 3. Connect power (Black) Return...
- Page 21 Key Internal Components Return...
- Page 22 Available Parts List Filter Dirty Tank Lid with Sensors Dirty Tank Strainer Dirty Tank Multi Surface Brush Roll Foot Nozzle Window Pump cover with foot PCBA Pump Assembly Suction Motor Assembly Main PCBA Handle Assembly Clean tank lid Clean tank with lid Battery assembly Storage tray Brush Motor Assembly...
Need help?
Do you have a question about the 3011 Series and is the answer not in the manual?
Questions and answers