
Subscribe to Our Youtube Channel
Related Manuals for Digital Projection LIGHTNING 30sx+c


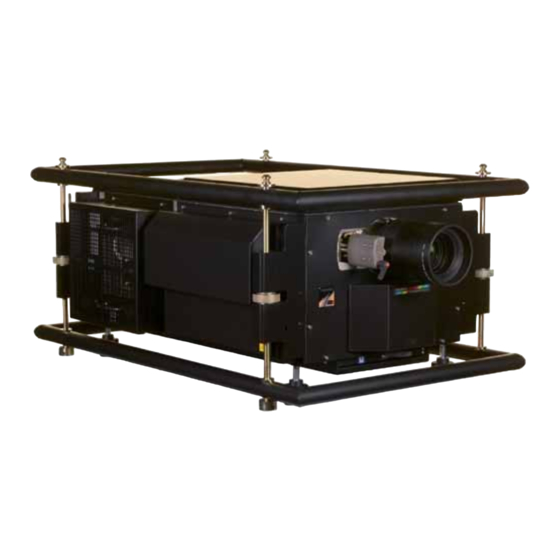
Summary of Contents for Digital Projection LIGHTNING 30sx+c
- Page 1 LIGHTNING 30sx+c, 40sx+c Super High Brightness Digital Video Projector User Manual 105-941A...
- Page 2 LIGHTNING 30sx+c, 40sx+c Digital Projection User Manual Declaration of Conformity: 30sx+c Directives covered by this Declaration 89/336/EEC Electromagnetic Compatibility Directive, amended by 92/31/EEC and 93/68/EEC. 73/23/EEC Low Voltage Equipment Directive, amended by 93/68/EEC. Products covered by this Declaration Large screen video projector type The CE mark was fi...
- Page 3 LIGHTNING 30sx+c, 40sx+c Digital Projection User Manual Declaration of Conformity: 40sx+c Directives covered by this Declaration 89/336/EEC Electromagnetic Compatibility Directive, amended by 92/31/EEC and 93/68/EEC. 73/23/EEC Low Voltage Equipment Directive, amended by 93/68/EEC. Products covered by this Declaration Large screen video projector type The CE mark was fi...
- Page 4 LIGHTNING 30sx+c, 40sx+c Digital Projection User Manual Page iv 105-941A January 2007...
- Page 5 Product revision • Because we at Digital Projection continually strive to improve our products, we may change specifi cations and designs, and add new features without prior notice. Projectors built prior to this revision of the User Manual may therefore not include all the features described.
- Page 6 Handle the power cable carefully and avoid sharp bends. Do not use a damaged power cable. There are no user-serviceable parts inside the lamp module. The whole module should be replaced and returned to Digital Projection for re- furbishment. Take care when removing the lamp module, as it is heavy (>10kg).
- Page 7 LIGHTNING 30sx+c, 40sx+c Digital Projection User Manual Important Information Installation precautions Notes Connect the LAN cable only to a computer LAN connection. Other similar connectors may have a dangerously high voltage source. The projector must be installed only by suitably qualifi ed personnel, in accordance with local building codes.
- Page 8 RF Interference The Federal Communications Commission does not allow any modifi cations or changes to the unit EXCEPT those specifi ed by Digital Projection in this manual. Failure to comply with this government regulation could void your right to operate this equipment.
- Page 9 LIGHTNING 30sx+c, 40sx+c Digital Projection User Manual Important Information Digital Projection Contact details Notes Digital Projection Limited, Greenside Way, Middleton, Manchester M24 1XX, UK. Registered in England No. 2207264, Registered Offi ce: as above +44 (0) 161 947 3300 +44 (0) 161 684 7674 Email enquiries@digitalprojection.co.uk, service@digitalprojection.co.uk...
- Page 10 LIGHTNING 30sx+c, 40sx+c Important Information Digital Projection User Manual Page x 105-941A January 2007...
- Page 11 ..................viii Noise ..............................viii RF Interference ..........................viii European Waste Electrical and Electronic Equipment (WEEE) Directive ..........viii Digital Projection Contact details ......................ix 1. Introduction What’s in the box? ..........................1.2 Key features of the projector ......................1.3 Getting to know the projector ......................
-
Page 12: Table Of Contents
LIGHTNING 30sx+c, 40sx+c Table of Contents Digital Projection User Manual 2. Installation Screen requirements ......................... 2.2 Aspect ratio ............................2.2 Positioning the screen and projector ....................2.4 Choosing a lens ..........................2.5 Choosing a lens using the lens charts ....................2.6 Choosing a lens by calculation ...................... - Page 13 LIGHTNING 30sx+c, 40sx+c Digital Projection User Manual Table of Contents 4. Using the Menus Introduction ............................4.3 Menu structure ..........................4.4 Show mode ............................4.5 Lamp status ............................. 4.5 Input source ............................. 4.5 Warnings ............................4.6 LCD screen blank ..........................4.6 IP addresses ............................
- Page 14 LIGHTNING 30sx+c, 40sx+c Table of Contents Digital Projection User Manual 5. Maintenance Changing the lamp ..........................5.2 Readind the lamp-hours meter ......................5.3 Removing the lamp module ....................... 5.4 Fitting the new lamp module ......................5.4 Changing the fi lter ..........................
- Page 15 1. Introduction Contents What’s in the box? ..........................1.2 Key features of the projector ......................1.3 Getting to know the projector ......................1.4 Chassis – lamp, lens and fi lter ......................1.4 Lamp-hours meter ..........................1.5 Rear panel – connection and control ....................
-
Page 16: Introduction
LIGHTNING 30sx+c, 40sx+c 1. Introduction Digital Projection User Manual What’s in the box? Notes • Make sure your box contains everything listed. If any pieces are missing, contact your dealer. Lenses are optional. Order lenses from your Digital • You should save the original box and packing materials, in case you ever need Projection dealer. -
Page 17: Key Features Of The Projector
The LIGHTNING 30sx+c harnesses the power of Texas Instruments’ new 1400 x 1050 pixel HPO DMD’s™. Like its LIGHTNING predecessors, the 30/40sx+c is destined to be the fi rst choice of professionals who stage prestigious events such as the Grammy®... -
Page 18: Getting To Know The Projector
LIGHTNING 30sx+c, 40sx+c 1. Introduction Digital Projection User Manual Getting to know the projector Notes Chassis – lamp, lens and fi lter For information about how to change the lamp or the fi lter, see section 5. Maintenance. For more detailed information about lenses, see section 2. -
Page 19: Lamp-Hours Meter
LIGHTNING 30sx+c, 40sx+c Digital Projection User Manual 1. Introduction Lamp-hours meter Notes There are two types of Lamp-hours meter, depending on the lamp module that has been fi tted, as shown below. Mercury meter LCD meter display button The LCD Lamp-hours meter has two modes of operation: •... -
Page 20: Rear Panel - Connection And Control
LIGHTNING 30sx+c, 40sx+c 1. Introduction Digital Projection User Manual Rear panel – connection and control Notes For information about how to connect the projector, see Connecting the projector Control in section 2. Installation, Input connections and Connections in section connections 6. -
Page 21: Installation
2. Installation Contents Screen requirements ......................... 2.2 Aspect ratio ............................2.2 ......................2.2 Fitting the image to the DMD ........................2.2 Diagonal screen sizes ......................2.3 Fitting the image to the screen Positioning the screen and projector ....................2.4 Choosing a lens .......................... -
Page 22: Aspect Ratio
LIGHTNING 30sx+c, 40sx+c 2. Installation Digital Projection User Manual Screen requirements Notes Aspect ratio The resolution of the DMD fi tted to the projector is 1400 x 1050 Fitting the image to the DMD pixels. If the source image supplied to the projector is smaller than 1400 x 1050 pixels, then the image will not fi... -
Page 23: Fitting The Image To The Screen
LIGHTNING 30sx+c, 40sx+c Digital Projection User Manual 2. Installation Fitting the image to the screen Notes It is important that your screen is of suffi cient height and width to display images at all the aspect ratios you are planning to use. -
Page 24: Positioning The Screen And Projector
LIGHTNING 30sx+c, 40sx+c 2. Installation Digital Projection User Manual Positioning the screen and projector Notes For optimum viewing, the screen should be a fl at surface perpendicular to the fl oor. The bottom of the screen should be 1.2m (4 feet) above the fl oor and the front row The projector should be of the audience should not have to look up more than 30°... -
Page 25: Choosing A Lens
LIGHTNING 30sx+c, 40sx+c Digital Projection User Manual 2. Installation Choosing a lens Notes A number of lenses are available for use with the projector. Which lens you choose will depend on the screen size, image aspect ratio and projection distance. -
Page 26: Choosing A Lens Using The Lens Charts
LIGHTNING 30sx+c, 40sx+c 2. Installation Digital Projection User Manual Choosing a lens using the lens charts Notes Full width images This chart has a TRF of 1.0, for Use the chart below to choose which lens best suits your application. -
Page 27: 5:4 Full Height Image (Trf = 1.07)
LIGHTNING 30sx+c, 40sx+c Digital Projection User Manual 2. Installation Lens charts continued Notes 5:4 full height image (TRF = 1.07) This chart has a TRF of 1.07, Use the chart below to choose which lens best suits your application. for use with the following... -
Page 28: Choosing A Lens By Calculation
LIGHTNING 30sx+c, 40sx+c 2. Installation Digital Projection User Manual Choosing a lens by calculation Notes For any screen size not listed above, or if you need to be more precise, then use the calculations below. The Throw ratio for a particular •... -
Page 29: Useful Lens Calculations
LIGHTNING 30sx+c, 40sx+c Digital Projection User Manual 2. Installation Useful lens calculations Notes The Throw ratio for a particular The following lens calculations may be useful: lens is fi xed, but assumes that the image fi lls the width of the DMD. -
Page 30: Fitting The Lens
LIGHTNING 30sx+c, 40sx+c 2. Installation Digital Projection User Manual Fitting the lens Notes • Turn the lens release lever anti-clockwise to open the lock. • Turn the zoom drive mechanism anti-clockwise to disengage the drive. Each time a new lens is •... -
Page 31: Shifting The Image
LIGHTNING 30sx+c, 40sx+c Digital Projection User Manual 2. Installation Shifting the image Notes For more information on using The normal position for the projector is at the centre of the screen. However, you the Lens shift feature, see can set the projector above or below the centre, or to one side, and adjust the image section 4. -
Page 32: Mounting The Projector
LIGHTNING 30sx+c, 40sx+c 2. Installation Digital Projection User Manual Mounting the projector Notes The projector is designed to be suspended from a lighting truss by its rigging BEFORE INSTALLING THE frame. However, the four adjustable feet under the chassis allow the projector to be PROJECTOR, READ ALL THE lowered onto a fl... -
Page 33: Stacking Projectors
LIGHTNING 30sx+c, 40sx+c Digital Projection User Manual 2. Installation Stacking projectors Notes The rigging frame is capable of supporting the weight of up to three other projectors, using the built-in frame couplings. The projectors can be stacked on top of each other, or suspended below each other. -
Page 34: Connecting The Projector
Digital Projection MMS1000 or VIP1000. The processing unit processing functions. Sources can be located close to source equipment such as computers, video tape players presented to the projector can and DVD players etc. -
Page 35: Edid Handshaking
LIGHTNING 30sx+c, 40sx+c Digital Projection User Manual 2. Installation EDID handshaking Notes If you are using a computer DVI card or other DVI source that obeys the EDID handshaking protocol, then the card or source will automatically confi gure itself to suit the projector. -
Page 36: Input Connection Examples
LIGHTNING 30sx+c, 40sx+c 2. Installation Digital Projection User Manual Input connection examples Notes More information about pin connections can be found in section 6. Appendix. LIGHTNING DVI video source Cable complexity and interference can be reduced by using the Digilink high bandwidth optical connection system. -
Page 37: Control Connection Examples
LIGHTNING 30sx+c, 40sx+c Digital Projection User Manual 2. Installation Control connection examples Notes More information about pin LAN connection connections can be found in All of the projector’s features can be controlled via a LAN connection, using a section 6. Appendix. -
Page 38: Power Connection
LIGHTNING 30sx+c, 40sx+c 2. Installation Digital Projection User Manual Power connection Notes USA power input Make sure the main power switch is off before connecting the power cable. Firmly push in the Hubbell connector, then turn clockwise to lock. Use only the power cable provided. -
Page 39: Getting Started
3. Getting Started Contents Switching the power on ........................3.2 Using the touch screen ........................3.2 Switching the lamp on ........................3.3 Adjusting the lamp power ......................... 3.3 Adjusting the projected image ......................3.4 Switching the power off ........................3.6 105-941A January 2007 Page 3.1... -
Page 40: Switching The Power On
LIGHTNING 30sx+c, 40sx+c 3. Getting Started Digital Projection User Manual Switching the power on Notes • Connect the power cable between the mains supply and the projector. For more information about • Push the main power switch upwards to switch on the power. -
Page 41: Switching The Lamp On
LIGHTNING 30sx+c, 40sx+c Digital Projection User Manual 3. Getting Started Switching the lamp on Notes • Press the LAMP button on the Main menu.. • Whenever you switch the lamp Press the LAMP ON button. on, the projector will reset The projector will reset momentarily, whilst the lamp strikes. -
Page 42: Adjusting The Projected Image
LIGHTNING 30sx+c, 40sx+c 3. Getting Started Digital Projection User Manual Adjusting the projected image Notes For more detailed information If you have no video source connected to the projector, then you can display a test about all the touch screen... - Page 43 LIGHTNING 30sx+c, 40sx+c Digital Projection User Manual 3. Getting Started • Press the IMAGE button on the Main menu. Notes • Press the CONTRAST, BRIGHTNESS or GAMMA buttons. For more detailed information about all the touch screen • Touch and drag the red sliders up and down, or for fi ne adjustment, press the menus, see the next section: arrow heads.
-
Page 44: Switching The Power Off
LIGHTNING 30sx+c, 40sx+c 3. Getting Started Digital Projection User Manual Switching the power off Notes • Press the LAMP button on the Main menu. Always allow the lamp to cool • Press LAMP OFF. Hold the button pressed until the button turns to yellow, then for 5 minutes before: release. -
Page 45: Using The Menus
4. Using the Menus Contents Introduction ............................4.3 Menu structure ..........................4.4 Show mode ............................4.5 Lamp status ............................. 4.5 Input source ............................. 4.5 Warnings ............................4.6 LCD screen blank ..........................4.6 IP addresses ............................ 4.6 Lamp menu ............................4.7 Lamp power ............................. - Page 46 LIGHTNING 30sx+c, 40sx+c 4. Using the Menus Digital Projection User Manual Confi guration menu ......................... 4.18 Networking confi guration ......................... 4.18 ......................4.18 Ethernet confi guration choices ..................4.19 Making the IP address and Netmask settings ............................. 4.19 Example ..........................4.20...
-
Page 47: Introduction
LIGHTNING 30sx+c, 40sx+c Digital Projection User Manual 4. Using the Menus Introduction Notes All of the projector’s features can be controlled using: Do not try to operate the • the menus on the touch screen or touch screen using anything harder than your fi... -
Page 48: Menu Structure
LIGHTNING 30sx+c, 40sx+c 4. Using the Menus Digital Projection User Manual Menu structure Lens menu (p8) Controls Move Zoom Focus Image menu (p9) Menu buttons... Shutter open Controls Test patterns Shutter close Centre Lamp menu (p6) Calibration Menu buttons... Controls... -
Page 49: Show Mode
LIGHTNING 30sx+c, 40sx+c Digital Projection User Manual 4. Using the Menus Show mode Main menu Show mode indicators When the projector is fi rst switched on, the control panel will be in Show mode, as Lamp status shown below: Warnings... -
Page 50: Warnings
LCD screen blank To blank the LCD screen, press and hold the Digital projection logo at the top of the screen for about two seconds. On release, the screen will blank. To restore the display, press anywhere on the screen. -
Page 51: Lamp Menu
LIGHTNING 30sx+c, 40sx+c Digital Projection User Manual 4. Using the Menus Lamp menu Lamp menu Controls Press the LAMP button on the Main menu: Lamp power slider Menu buttons... Shutter open Shutter close Lamp on Lamp off Maximum power Minimum power... -
Page 52: Lamp/Lens Memories
LIGHTNING 30sx+c, 40sx+c 4. Using the Menus Digital Projection User Manual Lamp/Lens memories Notes Press the LAMP/LENS MEMORIES button. The Lamp/Lens memories are useful if you need to swap repeatedly and easily between the settings for a number of different lenses, or venues. -
Page 53: Lens Menu
LIGHTNING 30sx+c, 40sx+c Digital Projection User Manual 4. Using the Menus Lens menu Lens menu Controls Press the LENS button on the Main menu: Move Zoom Focus Menu buttons... Shutter open Shutter close Centre Calibration Stop all movement Lamp/Lens memories (lamp menu) -
Page 54: Image Menu
LIGHTNING 30sx+c, 40sx+c 4. Using the Menus Digital Projection User Manual Image menu Image menu Controls Press the IMAGE button on the Main menu: Test patterns Menu buttons... Shutter open Shutter close Contrast Brightness Gamma Test patterns Advanced image setup... -
Page 55: Shutter Open/Closed
LIGHTNING 30sx+c, 40sx+c Digital Projection User Manual 4. Using the Menus Image menu, continued Notes When Test patterns are Alignment pattern selected, the actual colours displayed may depend on the settings of the contrast, brightness and gamma controls. It may be necessary to set all brightness controls to 0.0, and... -
Page 56: Contrast
LIGHTNING 30sx+c, 40sx+c 4. Using the Menus Digital Projection User Manual Contrast Image menu... Press the CONTRAST button: Contrast Controls To adjust the OVERALL, RED, GREEN or BLUE contrast settings, touch and drag Contrast sliders the sliders up and down or for fi ne adjustment, press the arrow heads. To reset a slider to its midpoint (1.0), press on the numerical value. -
Page 57: Brightness
LIGHTNING 30sx+c, 40sx+c Digital Projection User Manual 4. Using the Menus Image menu, continued Image menu... Brightness Brightness Controls Press the BRIGHTNESS button: Brightness sliders To adjust the OVERALL, RED, GREEN or BLUE brightness settings, touch and Menu buttons... drag the sliders up and down or for fi ne adjustment, press the arrow heads. To reset Shutter open a slider to its midpoint (0.0), press on the numerical value. -
Page 58: Gamma
LIGHTNING 30sx+c, 40sx+c 4. Using the Menus Digital Projection User Manual Gamma Image menu... Press the GAMMA button. Gamma Controls Parametric slider User Presets Menu buttons... Shutter open Shutter close Contrast Brightness Gamma Test patterns Advanced image setup Notes The buttons of the Main menu are always visible at the bottom of the display. -
Page 59: Advanced Image Setup
LIGHTNING 30sx+c, 40sx+c Digital Projection User Manual 4. Using the Menus Advanced image setup Image menu... Advanced image setup Press the ADVANCED IMAGE SETUP button on the Image menu: Controls Input preset Input window Input pan Menu buttons... Shutter open... -
Page 60: Input Window
LIGHTNING 30sx+c, 40sx+c 4. Using the Menus Digital Projection User Manual Input window Notes Press the arrow heads to select a portion of the video image to be displayed, hiding The Input adjust controls allow or revealing more or less of the image, as shown on the next page. -
Page 61: Image Orientation
LIGHTNING 30sx+c, 40sx+c Digital Projection User Manual 4. Using the Menus Image orientation Notes Press the IMAGE ORIENTATION button on the Advanced image menu: The Image Orientation controls allow the projected image to be fl ipped for rear or refl ected projection, or to correct for incorrectly oriented images. -
Page 62: Confi Guration Menu
LIGHTNING 30sx+c, 40sx+c 4. Using the Menus Digital Projection User Manual Confi guration menu Confi g menu Menu buttons... Press the CONFIG button on the Main menu: Networking confi g Detailed status Touchscreen calibration Reset IP addresses Notes The buttons of the Main menu are always visible at the bottom of the display. -
Page 63: Making The Ip Address And Netmask Settings
LIGHTNING 30sx+c, 40sx+c Digital Projection User Manual 4. Using the Menus Making the IP address and Netmask settings Confi g menu... Network confi guration... Ethernet #1 Settings... IP address Netmask Menu buttons... Confi gure wireless LAN Notes Do not make changes to the networking confi... -
Page 64: Wireless Lan
LIGHTNING 30sx+c, 40sx+c 4. Using the Menus Digital Projection User Manual Confi guration menu, continued Confi g menu... Network confi guration... Wireless LAN Wireless LAN Basic networking confi guration Settings... IP address • Follow the confi guration instructions exactly as described on the previous page Netmask for Ethernet #1 . - Page 65 LIGHTNING 30sx+c, 40sx+c Digital Projection User Manual 4. Using the Menus Encryption Confi g menu... Network confi guration... • Press the ENCRYPTION button. Wireless LAN... Encryption Settings... SSID Channel WEP key Mode Menu buttons... Confi gure ethernet #1 Confi gure wirelss LAN...
-
Page 66: Detailed Status
LIGHTNING 30sx+c, 40sx+c 4. Using the Menus Digital Projection User Manual Confi guration menu, continued Confi g menu Menu buttons... Detailed status Networking confi g Detailed status Press the DETAILED STATUS button. Touchscreen calibration The Software release version and the total number of hours of operation are shown. -
Page 67: Engineering & Maintenance Menu
The log fi les cannot be accessed from the projector touch screen. However, in the event of a problem with the projector, the log fi les can be downloaded to a remote computer via a network connection, and emailed to Digital Projection for analysis. To open a log fi le on a remote computer: •... - Page 68 LIGHTNING 30sx+c, 40sx+c 4. Using the Menus Digital Projection User Manual Page 4.24 105-941A January 2007...
- Page 69 5. Maintenance Contents Changing the lamp ..........................5.2 Readind the lamp-hours meter ......................5.3 Removing the lamp module ....................... 5.4 Fitting the new lamp module ......................5.4 Changing the fi lter ..........................5.5 Cleaning the projector and lens ...................... 5.6 105-941A January 2007 Page 5.1...
-
Page 70: Changing The Lamp
LIGHTNING 30sx+c, 40sx+c 5. Maintenance Digital Projection User Manual Changing the lamp Notes The lamp should be changed after 750 hours of use, as indicated on the lamp -hours Always allow the lamp to meter. The meter is located on the front of the lamp module, and is accesible inside cool for 5 minutes before the lamp compartment door. -
Page 71: Readind The Lamp-Hours Meter
LIGHTNING 30sx+c, 40sx+c Digital Projection User Manual 5. Maintenance Readind the lamp-hours meter Notes There are two types of Lamp-hours meter, depending on the lamp module that has been fi tted, as shown below. Mercury meter LCD meter display button The LCD Lamp-hours meter has two modes of operation: •... -
Page 72: Removing The Lamp Module
LIGHTNING 30sx+c, 40sx+c 5. Maintenance Digital Projection User Manual Removing the lamp module Notes • Press the LAMP button on the Main menu. Take care when removing the • Press LAMP OFF and hold for 3 seconds. The lamp will ramp down to minimum lamp module, as it is heavy and go off after a further 3 seconds. -
Page 73: Changing The Fi Lter
LIGHTNING 30sx+c, 40sx+c Digital Projection User Manual 5. Maintenance Changing the fi lter Notes • Press the LAMP button on the Main menu. The fi lter should be changed • Press LAMP OFF and hold for 3 seconds. The lamp will ramp down to minimum regularly: and go off after a further 3 seconds. -
Page 74: Cleaning The Projector And Lens
LIGHTNING 30sx+c, 40sx+c 5. Maintenance Digital Projection User Manual Cleaning the projector and lens Notes Turn the projector off before cleaning. Clean the cabinet periodically with a damp cloth. If heavily soiled, use a mild Never use strong detergents detergent. -
Page 75: Appendix
6. Appendix Contents Troubleshooting ..........................6.4 Specifi cations ............................6.6 Part numbers ............................ 6.6 Optical ............................. 6.6 Electrical ............................6.7 Physical ............................6.7 Lens Data ............................6.8 Connections ............................6.10 DVI-D connection ..........................6.10 LAN connection ..........................6.11 ....................6.11 10BaseT Unshielded Twisted Pair cable ..........................6.11 Crossed cable Serial control input... - Page 76 LIGHTNING 30sx+c, 40sx+c 6. Appendix Digital Projection User Manual Lens Commands ..........................6.23 ..........................6.23 Lens Stop All ..........................6.23 Lens Move ......................6.24 Lens Goto Absolute Position ......................... 6.24 Lens Goto Centre ........................6.24 Lens Calibrate Zoom PSU Commands ..........................
- Page 77 LIGHTNING 30sx+c, 40sx+c Digital Projection User Manual 6. Appendix 105-941A January 2007 Page 6.3...
-
Page 78: Troubleshooting
LIGHTNING 30sx+c, 40sx+c 6. Appendix Digital Projection User Manual Troubleshooting Problem Possible solutions Check that the mains plug is plugged in and that the mains supply is switched on. The projector will not power up. Check any external fuses or breakers. - Page 79 Check that the correct control codes are being used. See this section 6. Appendix, Serial communications protocol In the event that this troubleshooting guide has not solved the problem, then contact your Digital Projection dealer or service centre. 105-941A January 2007 Page 6.5...
-
Page 80: Specifi Cations
LIGHTNING 30sx+c, 40sx+c 6. Appendix Digital Projection User Manual Specifi cations Part numbers Projector USA models 30sx+c: 105-838 40sx+c: 106-692 Rest of World models 30sx+c: 105-839 40sx+c: 106-693 Lenses 0.73 : 1 fi xed lens 105-863 1.45 - 1.82 : 1 zoom lens 105-834 1.82 - 2.55 : 1 zoom lens... -
Page 81: Electrical
LIGHTNING 30sx+c, 40sx+c Digital Projection User Manual 6. Appendix Electrical Input DVI-D single Pixel clock up to 165MHz Outputs DVI-D single loop through Control inputs 1 x LAN 1 x Wireless LAN 1 x RS232 serial Mains voltage 200-240 VAC (±10%), 50/60Hz (single phase) -
Page 82: Lens Data
LIGHTNING 30sx+c, 40sx+c 6. Appendix Digital Projection User Manual Lens Data Optical 105-863 105-834 105-835 105-836 throw ratio 0.73 : 1 fi xed 1.45 - 1.82 : 1 zoom 1.82 - 2.55 : 1 zoom 2.55 - 4.54 : 1 zoom full DMD image width 0.73 : 1... - Page 83 LIGHTNING 30sx+c, 40sx+c Digital Projection User Manual 6. Appendix Optical 105-864 throw ratio 4.54 - 7.27 : 1 zoom full DMD image width 4.54 : 1 2.64 - 11.01m (8.7 - 36.1ft) 7.27 : 1 1.65 - 6.88m (5.4 - 22.6ft)
-
Page 84: Connections
LIGHTNING 30sx+c, 40sx+c 6. Appendix Digital Projection User Manual Connections Notes DVI-D connection Cable complexity and TMDS Data 2- interference can be reduced TMDS Data 2+ by using the Digilink high bandwidth optical connection TMDS Data 2/4 Shield system. Contact your dealer for TMDS Data 4- more information. -
Page 85: Lan Connection
LIGHTNING 30sx+c, 40sx+c Digital Projection User Manual 6. Appendix LAN connection Notes 10BaseT Unshielded Twisted Pair cable The standard wire colours as as follows: Use: White / Orange stripe • a straight cable to connect to a Orange hub or network, or White / Green stripe •... -
Page 86: Serial Control Input
LIGHTNING 30sx+c, 40sx+c 6. Appendix Digital Projection User Manual Serial control input Notes unused Received Data The projector is a DTE, so use: Transmitted Data Data Terminal Ready • a straight cable to connect to a pin view of female connector... -
Page 87: Using Windows Hyperterminal To Connect To The Projector
LIGHTNING 30sx+c, 40sx+c Digital Projection User Manual 6. Appendix Using Windows Hyperterminal to connect to the projector Notes Many features of the projector can be controlled remotely by sending ascii character strings to the serial control input, or via a LAN, using the protocol and syntax described in the following pages. -
Page 88: Remote Communications Protocol
LIGHTNING 30sx+c, 40sx+c 6. Appendix Digital Projection User Manual Remote communications protocol Notes Version 1.2 Patch A Details of how to connect to Each command string sent to the projector should start with character 0x0a and end the projector, using the serial with character 0x0d. -
Page 89: Image Contrast
LIGHTNING 30sx+c, 40sx+c Digital Projection User Manual 6. Appendix Image Contrast Notes Used to set and query image contrast (gain) levels. CALL : “image,contrast,write,r,[r level],g,[g level],b,[b level],o,[level],a,[mode]” : Where [level] is 0.0 to 2.0 in steps of 0.001 : and [mode] is either “on” or “off”... -
Page 90: Image Orientation
LIGHTNING 30sx+c, 40sx+c 6. Appendix Digital Projection User Manual Image Orientation Notes Used to set and query image orientation. CALL : “image,imageorient,write,[orient]” : Where [orient] is one of “normal”, “nsfl ip”, “ewfl ip” or “newsfl ip” RETURNS : “[msg id],ACK,imageorient,[orient]”... -
Page 91: Image Colour Temperature Gain
LIGHTNING 30sx+c, 40sx+c Digital Projection User Manual 6. Appendix Image Colour Temperature Gain Notes Used to set and query image colour temperature levels. CALL : “image,colourtempgain,write,r,[r level],g,[g level],b,[b level]” : Where [level] is 0.0 to 2.0 in steps of 0.001 RETURNS : “[msg id],ACK,colourtempgain,r,[r level],g,[g level],b,[b level]”... -
Page 92: Input Image Window Size
LIGHTNING 30sx+c, 40sx+c 6. Appendix Digital Projection User Manual Input Image Window Size Notes Used to set and query image input window size. CALL : “image,inputimagewindow,write,c,[cols],r,[rows]” : Where [cols] is the number of pixels range 640 to DMD size : and [rows] is the number of lines range 480 to DMD size. -
Page 93: Input Capture Offset
LIGHTNING 30sx+c, 40sx+c Digital Projection User Manual 6. Appendix Input Capture Offset Notes Used to set and query image capture offset. CALL : “image,inputcaptureoffset,write,c,[cols offset],r,[rows offset]” : Where [cols] is the number of pixels offset from centre : and [rows] is the number of lines offset from centre. -
Page 94: Test Patterns
LIGHTNING 30sx+c, 40sx+c 6. Appendix Digital Projection User Manual Test Patterns Notes Used to set and query test patterns. CALL : “image,testpattern,write,[pattern name][vertical rate]” : Where [pattern name] is one of: : black - Full Screen Black : white - Full Screen White... -
Page 95: Degamma Table Select
LIGHTNING 30sx+c, 40sx+c Digital Projection User Manual 6. Appendix Degamma Table Select Notes Used to set and query degamma table settings. CALL : “image,degammaselect,write,[table no.][parametric]” : Where [table no.] is one of: : 0 - Graphics/NTSC : 1 - Graphics Enhanced : 2 - NTSC Enhanced : 3 - PAL/SECAM 2.8... -
Page 96: Picture Mute
LIGHTNING 30sx+c, 40sx+c 6. Appendix Digital Projection User Manual Picture Mute Notes Used to set and query picture mute. CALL : “image,picmute,write,[mode]” : Where [mode] is one of “on” or “off” RETURNS : “[msg id],ACK,picmute,[mode]” : OR : “[msg id],NAK,picmute”... -
Page 97: Lens Commands
LIGHTNING 30sx+c, 40sx+c Digital Projection User Manual 6. Appendix Lens Commands Notes Lens Stop All Used to stop all lens motors. CALL : “lens,stop,write” RETURNS : “[msg id],ACK,stop” : OR : “[msg id],NAK,stop” Lens Move Used to move lens position left-right, up-down and open/close shutter. -
Page 98: Lens Goto Absolute Position
LIGHTNING 30sx+c, 40sx+c 6. Appendix Digital Projection User Manual Lens Goto Absolute Position Notes Used to move lens to absolute co-ordinates. CALL : “lens,goto,write,h,[hpos],v,[vpos],f,[fpos],z,[zpos]” : Where hpos, vpos, fpos and zpos are values probably obtained from a ‘goto read’ NOTE : Any one or all axis may be driven at the same time. -
Page 99: Psu Commands
LIGHTNING 30sx+c, 40sx+c Digital Projection User Manual 6. Appendix PSU Commands Notes Lamp On Used to turn Lamp on and query Lamp state. CALL : “lpsu,on,write,[lamp number]” NOTE : Lamp number currently ignored but must be present : (can be set to 0). -
Page 100: Lamp Power
LIGHTNING 30sx+c, 40sx+c 6. Appendix Digital Projection User Manual Lamp Power Notes Used to set and query Lamp power level. CALL : “lpsu,power,write,[lamp number],[% power]” NOTE : Lamp number currently ignored but must be present : (can be set to 0). -
Page 101: Dimensions
LIGHTNING 30sx+c, 40sx+c Digital Projection User Manual 6. Appendix Dimensions All dimensions in mm 105-941A January 2007 Page 6.27... - Page 102 LIGHTNING 30sx+c, 40sx+c Digital Projection User Manual...
Need help?
Do you have a question about the LIGHTNING 30sx+c and is the answer not in the manual?
Questions and answers