
Related Manuals for Halma Ampac LoopSense


Summary of Contents for Halma Ampac LoopSense
- Page 1 Fire detection and evacuation solutions that save lives. LoopSense Fire Alarm Control Panel (NZS 4512:2010) Operation & On-Site Programming MAN 2998-2...
- Page 2 MAN2998-2 Responding to a Fire Access Level 1 Indicators Controls The OVERRIDE key is pressed to override any delays to outputs Activating the “SILENCE ALARMS. BRIGADE USE ONLY” Key will silence all Alarm Outputs. Access Level 2 The EVACUATE key is pressed to turn ON all alarm devices.
- Page 3 MAN2998-2 Disabling a Zone The following example DISABLES a ZONE. Place the Keyswitch in the ENABLED position. CONTROL MENU 1►ZONE 3|PANEL Press 2|DEVICE 4|GLOBAL CONTROL Then to open the “Control” menu. By following the screen prompts select the type of control, 1 to 4. Once selected simply step through the menu again to implement.
-
Page 4: Table Of Contents
MAN2998-2 Contents About This Manual ..........................7 Introduction ........................7 General Requirements ....................7 References ........................7 Symbols ......................... 7 Introduction ............................8 System Overview......................8 System Components....................... 8 System Functions ..........................9 I/O Control ........................9 Evacuation ........................9 Class Change ........................ - Page 5 MAN2998-2 7.1.5 Sub-Address Point Selection ..................31 7.1.6 Add-On Point Selection ....................31 7.1.7 Panel Input Point Selection....................32 7.1.8 Panel Output Point Selection ..................32 7.1.9 Password User ID Selection ...................32 Menu Structure & Navigation ......................33 Menu > Display ......................33 8.1.1 Menu->Display->About ....................34 Menu >...
- Page 6 MAN2998-2 Complete Menu Structure .....................86 Compatible Devices .......................87 Glossary of Terms ......................89...
-
Page 7: About This Manual
MAN2998-2 1 About This Manual 1.1 Introduction This manual contains all the information required to operate the LoopSense Fire Alarm Control Panel (FACP) and perform on site programming functions. The first step in becoming a proficient operator is to become familiar with and understand the “Menu Structure” (see Section 9) and the keys used to navigate through it. -
Page 8: Introduction
MAN2998-2 2 Introduction 2.1 System Overview The purpose of the FACP is to monitor changes in inputs, report those changes and update selected outputs as programmed using the LoopMaster Configuration software. The FACP processes changes in the inputs fire, fault, pre-alarm, emergency, security, user, transparent and system and has a built-in menu structure to view its status, perform operational tests, and to some degree modify the panel’s configuration and programming without the use of the LoopMaster Configuration software. -
Page 9: System Functions
MAN2998-2 3 System Functions System functions are the key functions that provide the mechanism to change the way the panel responds to a condition, and the way an input/output behaves to a situation. It is therefore important the engineer has a good understanding of the functions described below. 3.1 I/O Control There is a mechanism for controlling the inputs &... -
Page 10: Brigade Silence
MAN2998-2 Light any programmed DBA indicator on a separate LED Index Be reported on the LCD on the Default screen Be logged under the system events The DBA input cannot be silenced using the brigade Silence Alarms key switch 3.8 Brigade Silence The Brigade Silence key-switch shall be connected to CN3 on the BRD82ZICC4-A front panel between pins 2 and 5 by default. -
Page 11: Sounder And Strobe Synchronisation And Silencing Options
MAN2998-2 Alarm devices (sounders, strobes, and beacons) are activated within 3 seconds of a MCP being operated. 3.11 Sounder and Strobe Synchronisation and Silencing Options The FACP supports the Apollo synchronisation scheme. All loop sounders and beacons within the panel are synchronised. -
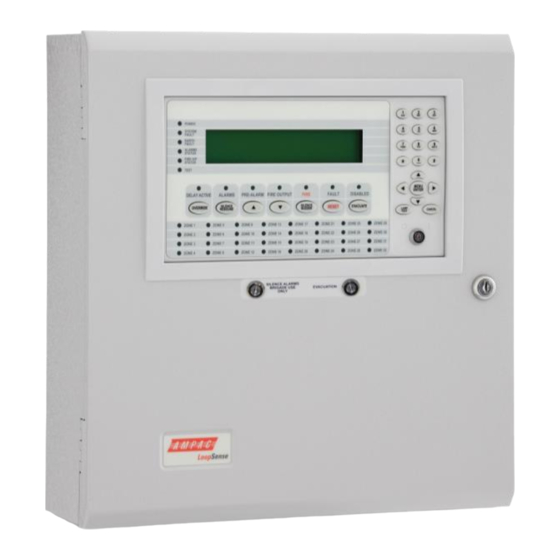
Page 12: Front Panel Controls, Indicators
MAN2998-2 4 Front Panel Controls, Indicators The Front Panel Control Card interfaces to the Main Control Board by way of CN5, and supports; ➢ all the controls and functional indicators ➢ the FACP Reset ➢ the Configuration (CONFIG) control Figure 2: Front Panel Layout 4.1 Levels of Access The FACP supports three levels of access: Access Level 1 (Untrained User):... -
Page 13: Passwords
MAN2998-2 Access Level 3 (Authorised Service Technician/Engineer): All access level 1 and 2 controls, PROGRAMMING, SETUP menus and individual sounder output disable options are active. If ENTER PASSWORD is selected, the password entry screen will be presented allowing the user to enter the access level 3 password. -
Page 14: System Controls & Indicators
MAN2998-2 4.2 System Controls & Indicators The front panel has fourteen push button controls, a key switch and an alpha numeric keypad. Controls, Normal – Enabled (Key Switch) CONTROLS ENABLE KEY SWITCH. = OFF, = ON If the key switch is in the OFF position (access level 1), then the OVERRIDE, PREVIOUS, NEXT, SILENCE BUZZER and LAMP TEST controls are active. - Page 15 MAN2998-2 Alarm - Silence / Resound Alarms Available at access level 2 and above Alarms – The indicator is lit when all the sounders in the system are disabled indicating that re-enablement is available via the SILENCE RESOUND control. Silence Resound – Momentary push button. Used to disable all the alarm devices in the system. Toggle function to re-enable the alarm devices, if the ALARMS indicator is lit.
- Page 16 MAN2998-2 Fire / Silence Buzzer Available at access level 2 for the alarm buzzer, available at access level 1 and above for the fault buzzer Fire – Indicator is illuminated when one or more devices are reporting a FIRE condition or the evacuate control has been activated.
- Page 17 MAN2998-2 ➢ Fault with main power supply ➢ Lit in conjunction with System Fault indicator Reset – Momentary push button. Pressing RESET returns the FACP to its normal default state, by clearing all fire alarm conditions, updating the relevant indicators and outputs. If fault conditions are cleared they shall be re-established within 20 seconds Disabled –...
- Page 18 MAN2998-2 MENU / ENTER, 0-9, *, #, CANCEL and ◄▼▲► - Provides a means for entering the menu system, and carrying out interrogation, control and programming activities Illuminated to show the presence of mains power and flashes when the mains have failed Illuminated when the FACP is unable to provide mandatory functions.
-
Page 19: Front Panel Control Keys
MAN2998-2 4.3 Front Panel Control Keys 4.3.1 Evacuation On the door of the LoopSense a key switch is provided for Evacuation, operating this key switch will cause the system to operate the bells. This will override any other bell isolate or silence condition. 4.3.2 Silence Alarms Brigade Use Only The Brigade Silence input is used for connection with a Bulgin 6083/C key switch labelled “SILENCE ALARMS. -
Page 20: Liquid Crystal Display
MAN2998-2 4.4 Liquid Crystal Display LCD is used to display abnormal conditions and for interrogation, control and programming activities. When the FACP is in its normal state a default screen is displayed. The associated backlight is energised; ➢ In access level 1 during initialisation ➢... -
Page 21: Default Lcd Screens
MAN2998-2 5 Default LCD screens 5.1 Normal Condition The POWER LED is illuminated meaning the mains voltage is present, and all other indicators are off. The 4 x 40 LCD will display the: <DATE> <TIME> ACCESS LEVEL: 1 <USER DESCRIPTOR LINE 1> <USER DESCRIPTOR LINE 2>... -
Page 22: Fire Condition
MAN2998-2 5.2 Fire Condition If an input or device is activated and it is configured to generate a fire condition the FACP responds to the fire as follows: ➢ Common FIRE LED will turn on steady ➢ Assigned zone fire LED will illuminate ➢... -
Page 23: Fault Condition
MAN2998-2 <point location> FIRE <point descriptor> <type> <date> <time> CONTROL* FIRE XXX OF XXX ◄ZONE Pressing the Zone back key or a keypad time out will return the panel to displaying fire in zone mode. Use the ▲ (up) (down) arrows to cycle through the inputs and devices that are in fire. Device Alarm LED activation Due to the limited current available from the analogue loop, the number of alarm LED’s allowed to be illuminated simultaneously is limited to the first 10 devices in fire on each loop;... -
Page 24: Pre-Alarm Condition
MAN2998-2 5.4 Pre-Alarm Condition <point location> PRE-ALARM <point descriptor> <type> <date> <time> CONTROL* PRE-ALARM XXX OF XXX ◄ZONE When a Pre-Alarm event occurs, the following actions take place. ➢ The associated LED will operate ➢ The condition will be reported on the LCD. ➢... -
Page 25: Disabled Condition
MAN2998-2 5.8 Disabled Condition <point location> DISABLED <point descriptor> <type> <date> <time> CONTROL* DISABLED XXX OF XXX ◄ZONE When the user disables an input, output or zone the associated configured outputs will no longer operate and will no longer effect panel conditions. The system registers a disabled condition as follows: ➢... -
Page 26: Test Functions
MAN2998-2 6 Test Functions The FACP provides a set of diagnostic test functions that can be run on various inputs & outputs (like loops, loop devices, LED indicators, LCD display, Sounders etc) to verify whether they operate as they are intended. -
Page 27: Walk Test
MAN2998-2 ➢ The test will not start if there is a genuine alarm condition present. ➢ A fire event is recognised during the test, in which case the test will be aborted and the fire condition will be displayed. If the results do not match those described above, the operator is required to note it and report it to the Ampac Service Centre. -
Page 28: Device Locator
MAN2998-2 ➢ The test condition can be cleared by selecting “REMOVE TEST” from within the Zone Control menu for individual zones ➢ Pressing the RESET key also removes all zones placed under test ➢ The walk test may alternatively be initiated as a System Effect in Cause and Effects. The test will be performed on the zone designated by the Cause and Effect and the programmed Sounders activated by default. -
Page 29: Menu Structure
MAN2998-2 7 Menu Structure 7.1 Menu Layout and Navigation The main menu for the system is as shown below. The accessibility of this menu for the three access levels is as described previously and summarized below. Access Level 1: Menu not accessible Access Level 2: Menu partially accessible. -
Page 30: Generic Point Selection Screens
MAN2998-2 PROGRAMMING – This menu allows the user to modify the configuration of the various inputs & outputs of the panel, loops, add-ons and zones within the panel. It also provides the various Learn options such as Auto Learn. - Move cursor up or down - Move cursor Left or right - Enter currently selected menu item - Select and enter menu item by corresponding number... -
Page 31: Loop Device Point Selection
MAN2998-2 7.1.4 Loop Device Point Selection SELECT DEVICE: XXX <device type> <selected device descriptor> ►D1 Apollo device addresses 1 to 126 can be selected. Device Address Prefixes: ➢ D - Device configured and fitted ➢ M - Missing device configured and not fitted ➢... -
Page 32: Panel Input Point Selection
MAN2998-2 7.1.7 Panel Input Point Selection Panel digital inputs 1 to 4 can be selected. SELECT INPUT: X <input type> <input descriptor> ►I/P1 I/P2 I/P3 I/P4 Panel Input Prefix: ➢ I/P – Panel Input Panel Input Suffix: ➢ - Panel Input Disabled 7.1.8 Panel Output Point Selection 4 panel Supervised Outputs, 3 Relay Outputs, 2 Open Collector Outputs and 2 Auxiliary Outputs can be selected. -
Page 33: Menu Structure & Navigation
MAN2998-2 8 Menu Structure & Navigation The following should be read in conjunction with the complete “Menu Structure”. The primary components of the Menu Structure are; DISPLAY CONTROL EVENTS TOOLS SETUP PROGRAMMING The sections below have been broken down by primary component for ease of explanation 8.1 Menu >... -
Page 34: Menu->Display->About
MAN2998-2 8.1.1 Menu->Display->About If ABOUT is selected the following screen is presented: <custom banner 1> <custom banner 2> <system status> ◄BACK APP:VMM.mm.bb.ccccc CB:XXX 8.2 Menu > Control Access Level 2 – to access this level the operator should use the “Controls Normal – Enable” keyswitch or enter the Password. - Page 35 MAN2998-2 Actions are all context sensitive Disable inputs becomes enable inputs Disable sounders becomes enable sounders Walk test will start walk test and toggle to remove test Silent walk test will start silent walk test and toggle to remove test Pressing ►...
-
Page 36: Menu > Control > Device
MAN2998-2 8.2.2 Menu > Control > Device CONTROL ZONE DEVICE NOTE: SUB ADDR AND REM O/P DEPEND ON THE SELECTED DEVICE DISABLE SUB ADDR / REM I/O PRINT ALARM LED ON SOUNDER DISABLE PRINT SOUNDER DISABLE ALERT EVAC PRINT Selecting DEVICE from the control menu; the user shall be prompted to select loop and device address via generic point selection screens. -
Page 37: Menu >Control > Panel
MAN2998-2 8.2.3 Menu >Control > Panel CONTROL ZONE DEVICE GLOBAL CONTROL PANEL INPUT OUTPUT SUPERVISED O/P RELAY O/P OPEN COLLECTOR O/P AUXILIARY O/P SOUNDER DISABLE PRINT SOUNDER DISABLE ALERT EVAC PRINT 1 DISABLE 2 ON 3 PRINT ADD-ON 8 WAY RELAY 8 WAY SOUNDER SMART TERMINAL 32 INDICATOR... - Page 38 MAN2998-2 8.2.3.2.1 Menu->Control->Panel->Output->Supervised O/P Use the ▼▲ arrows to display the 4 available panel supervised outputs Non-Sounder Outputs: Zzzz Ppp SUP:Oo <status> <output descriptor> <type> <assigned output type> ◄BACK 1:DISABLE 2:ON 3:PRINT Sounder Outputs: Zzzz Ppp SUP:Oo <status> <output descriptor> <type>...
- Page 39 MAN2998-2 Non-Sounder Outputs: <add-on location> <status> <output descriptor> <type> <assigned output type> <add-on type> ◄BACK 1:DISABLE 2:ON 3:PRINT Sounder Outputs: <add-on location> <status> <output descriptor> <type> <assigned output type> <add-on type> ◄BACK 1:DISABLE 2:ALERT 3:EVAC 4:PRINT 8.2.3.4 Menu->Control->Panel->Loop Use the ▼▲ arrows to display the available loops Pppp Lll <status>...
-
Page 40: Menu ->Control > Global Control
MAN2998-2 8.2.4 Menu ->Control > Global Control CONTROL ZONE DEVICE PANEL GLOBAL CONTROL DISABLE SOUNDERS ENABLE SOUNDERS GLOBAL ENABLE REMOVE MANUAL I/O REMOVE WALK TEST GLOBAL CONTROL MENU 1►DISABLE SOUNDERS 4|REMOVE MANUAL I/O 2|ENABLE SOUNDERS 5|REMOVE WALK TESTS 3|GLOBAL ENABLE 8.3 Menu.>... -
Page 41: Menu > Tools
MAN2998-2 8.4 Menu > Tools TOOLS DIRTY DEVICES LOOP STATISTICS LOW% MED% HIGH% RESET COUNT TOOLS MENU 1►DIRTY DEVICES 2|LOOP STATISTICS 8.4.1 Menu->Tools->Dirty Devices The compensation threshold level can be set to the default Low, Medium or High percentage. The selected default Low, Medium or High compensation threshold is displayed, and an asterisk shall appear next to the current selection where the medium threshold is the default. -
Page 42: Menu > Setup
MAN2998-2 Noise level is the average level of noise on the loop. The noise status displayed shall be GOOD, FAIR or BAD based on the preset thresholds. 8.5 Menu > Setup SETUP DATE AND TIME DATE FORMAT DAYLIGHT SAVE ON/OFF TIME FORMAT DAY/NIGHT... -
Page 43: Menu->Setup->Earth Monitoring
MAN2998-2 8.5.2.1 Menu->Setup->Day/Night->Day DAY/NIGHT SETTINGS - SUNDAY CURRENT - DAY: HH:MM NIGHT: HH:MM NEW - DAY: _ NIGHT: DEL▲ ◄BACK APPLY▼ NEXT► Back will return to day/night menu or previous day if not on first day selected. Next will proceed to the day/night settings for each of the remaining six days in sequence after which it will return to the day/night menu. -
Page 44: Menu > Programming
MAN2998-2 8.6 Menu > Programming M N O PROGRAMMING (*) ENTER PASSWORD ZONE DEVICE DELETE EDIT PANEL INPUT OUTPUT LOOP DESCRIPTOR SUPERVISED O/P RELAY O/P OPEN COLLECTOR O/P AUXILIARY O/P SOUNDERS GLOBAL ZONE ACTIVATION ACTIVATION LEARN OPTIONS AUTO LEARN EXTRA DEVICES MISMATCHED DEVICES MISSING DEVICES LEARN... -
Page 45: Menu->Programming->Zone
MAN2998-2 8.6.1 Menu->Programming->Zone When this is selected the user is presented with the generic zone number selection screen followed by the EDIT DESCRIPTION screen. EDIT DESCRIPTOR <descriptor>_ #CLEAR DEL▲ ◄BACK NEXT► Use the alpha-numeric keys to key in descriptor characters. Pressing next (or enter) will update the programming. -
Page 46: Menu->Programming->Device
MAN2998-2 DAY MODE <zone configuration> INHIBIT FIRE OUTPUTS: ENABLED CHANGE▼ ◄BACK NEXT► The screens are then repeated for night mode. Then the user will be prompted to save changes if required. 8.6.2 Menu->Programming->Device DEVICE MENU 1►ADD 2|DELETE 3|EDIT The user may choose to Add, Edit or Delete devices. Once selected, the user will be prompted to select the loop and device to which to perform the selected action using the generic point selection screens. - Page 47 MAN2998-2 EDIT DESCRIPTOR <descriptor>_ #CLEAR DEL▲ ◄BACK NEXT► Edit the descriptor using the alphanumeric keys. Press NEXT► to go to the next field. ENTER ZONE NUMBER: X #CLEAR DEL▲ ◄BACK NEXT► The zone number may then be changed: EDIT ACTION TYPE: FIRE CHANGE▼...
- Page 48 MAN2998-2 DAY MODE: <detector mode> #CLEAR DEL▲ ◄BACK NEXT► For Multi sensor detectors this Day mode screen format is used. Press NEXT► for Night mode. INDICATE PRE-ALARM: ENABLED CHANGE▼ ◄BACK NEXT► Press NEXT► to select if the device should indicate a pre-alarm status at the panel. The user is then prompted to save any changes if they have been made.
- Page 49 MAN2998-2 EDIT ACTION TYPE: FIRE CHANGE▼ ◄BACK NEXT► Press NEXT► to go to the next field. INPUT TYPE: NON-LATCHING CHANGE▼ ◄BACK NEXT► Press NEXT► to go to the next field. EDIT CONTACT STATE: NORMALLY OPEN CHANGE▼ ◄BACK NEXT► Press NEXT► to go to the next field. SUPERVISED: ENABLED CHANGE▼...
- Page 50 MAN2998-2 SELECT SUB ADDRESS: 4 <selected sub address descriptor> 1:I/P1 2:I/P2 3:I/P3 4►O/P1 5:O/P2 6:O/P3 Select 2 SUB ADDRESS and pressing NEXT► displays the generic sub-address selection screen: EDIT DESCRIPTOR LOOP 1 DEVICE 1 OUTPUT 1_ #CLEAR DEL▲ ◄BACK NEXT► Select one of the sub outputs and press enter to edit the output configuration.
-
Page 51: Menu->Programming->Panel
MAN2998-2 RESPOND TO CLASS CHANGE: ENABLED CHANGE▼ ◄BACK NEXT► Press NEXT► to go to the next field. EDIT POST-DELAY: 0 (0-999 seconds) #CLEAR ◄BACK NEXT► Press NEXT► to go to the next field. The user is then prompted to save any changes if they have been made. 8.6.3 Menu->Programming->Panel PANEL MENU 1►INPUT... - Page 52 MAN2998-2 EDIT CONTACT STATE: NORMALLY OPEN CHANGE▼ ◄BACK NEXT► Press NEXT► to go to the next field. SUPERVISED: ENABLED CHANGE▼ ◄BACK NEXT► Press NEXT► to go to the next field. EDIT PRE-DELAY: 0 (0-90 seconds) #CLEAR DEL▲ ◄BACK NEXT► Press NEXT► to go to the next field. The user shall then be prompted to save any changes if they have been made.
- Page 53 MAN2998-2 FIXED ACTIVATION: NONE CHANGE▼ ◄BACK NEXT► Press NEXT► to go to the next field. OUTPUT TYPE: SOUNDER CHANGE▼ ◄BACK NEXT► Press NEXT► to go to the next field. GLOBAL ACTION: <action type> ENABLED CHANGE▼ ◄BACK NEXT► Press CHANGE▼ to enable or disable the displayed global action. Press NEXT►...
-
Page 54: Menu->Programming->Sounders
MAN2998-2 EDIT POST-DELAY: 0 (0-999 seconds) #CLEAR ◄BACK NEXT► Press NEXT► to go to the next field. The user is then prompted to save any changes that may have been made. 8.6.3.3 Menu->Programming->Panel->Loop SELECT LOOP: X <selected loop descriptor> ►L1 If there is more then one loop the user is prompted to select the loop using the generic loop selection screen. - Page 55 MAN2998-2 8.6.4.1 Menu->Programming->Sounders->Global Activation GLOBAL <action type> ACTIVATION MODE: EVACUATE CHANGE▼ ◄BACK NEXT► The activation mode for each Global action type can be selected. The activation mode choices are: ➢ EVACUATE ➢ ALERT ➢ ALERT TIMEOUT EVACUATE ➢ DELAYED GLOBAL <action type> ACTIVATION DELAY: 30 (0-999 Sec) #CLEAR...
-
Page 56: Menu->Programming->Learn Options
MAN2998-2 8.6.5 Menu->Programming->Learn Options LEARN OPTIONS MENU 1►AUTO LEARN 3|MISMATCHED DEVICES 2|EXTRA DEVICES 4|MISSING DEVICES ➢ Auto Learn can be used to learn all Loops, Loop Devices, Panel Inputs and outputs connected to the system and store the default configuration for all these points ➢... -
Page 57: Menu->Programming->Version
MAN2998-2 If no extra devices were detected the following screen is displayed for a short period before returning to the previous menu. 8.6.5.3 Menu->Programming->Learn Options->Mismatched Devices If mismatched devices are detected on the system, the following screen is displayed. Zzzz Ppp Lll Dddd.s <detected type>... -
Page 58: Programming Concepts
MAN2998-2 9 Programming Concepts 9.1 Overview The FACP is considered as a collection of inputs and outputs. Examples of inputs are detectors, digital inputs available at the panel, inputs available via loop devices, day/night mode and timers. Examples of outputs are supervised outputs available at the panel, relays available at the panel, loop based sounders, loop based beacons, loop based relays and so forth. -
Page 59: Zone Programming
MAN2998-2 activations (effects) using logical operators and delays, and allows further flexibility of allowing causes to invoke the following system effects: ➢ Zone Disable ➢ Zone Walk Test ➢ Day mode change ➢ Night mode change ➢ Master Reset ➢ Evacuate ➢... - Page 60 MAN2998-2 ➢ Delayed – the output is delayed prior to being activated continuously ➢ Alert – the output will pulse at 1 second on 1 second off ➢ Alert timeout Evacuate - the output is set to alert, then on expiry of the timer the output is set to activate continuously The Global Zone may also be programmed with the above zone output configurable attributes.
- Page 61 MAN2998-2 A fire condition is raised when a confirmation fire alarm signal is received from: ➢ The same device re-entering alarm after the reset ➢ Another device from the same zone (Note: this can override the inhibit time from the first fire alarm signal) The following shall also apply: MCPs bypass this Dependency facility...
- Page 62 MAN2998-2 9.3.1.3 Dependency B Zone Configuration This is a co-incidence facility for confirming the fire alarm condition from a fire detector. Configurable Attributes: ➢ Zone Configuration: DEPENDENCY B ➢ Dependency Timeout: 300 – 1800 seconds (default: 300 seconds) Following the receipt of a fire signal from a detector within a Dependency B zone: ➢...
- Page 63 MAN2998-2 ZoneManager where there is an option to accept confirmation fire alarm signals from co-sited zones or from any zone (co-sited grouping disabled). If only one zone is assigned to a unique co-sited group number, then the confirmation fire alarm signal shall be accepted from within that zone only.
- Page 64 MAN2998-2 ➢ The Dependency C zone configuration and associated Dependency output types are configurable and viewable from within the access level 3 Programming menu at the panel or via LoopMaster 9.3.1.5 Investigation Zone Configuration This is an investigation and coincidence facility for activation of sounder and/or fire outputs. Configurable Attributes: Zone Configuration: INVESTIGATION ➢...
- Page 65 MAN2998-2 The configured Sounder and/or fire outputs shall not operate until one or more of the following occurs during either timeout period: ➢ The fire is confirmed by invoking the OVERRIDE control ➢ A second fire signal is received from another device in any zone ➢...
- Page 66 MAN2998-2 9.3.1.6 AVF Zone Configuration This is an Alarm Verification Facility for confirming a fire alarm condition from a smoke detector within a zone. The AVF zone configuration is programmable and viewable from within the access level 3 Programming menu at the panel or via LoopMaster Configurable Attributes: ➢...
-
Page 67: Global Sounder Programming
MAN2998-2 The following shall also apply: ➢ The EVACUATE control bypasses this AVF facility ➢ Fire calling devices other than smoke detectors bypass the AVF facility (Note: conventional zones programmed with AVF are treated as smoke zones) ➢ Any fire signal within the AVF zone after the Confirmation period has expired shall restart the AVF algorithm 9.3.2 Global Sounder Programming Global Sounder programming allows all sounder outputs in the system to activate according to their... - Page 68 MAN2998-2 ALERT ALERT ALERT (Timeout (Timeout (Timeout EVAC) EVAC) EVAC) ALERT ALERT (Timeout EVAC (Timeout EVAC) EVAC) ALERT ALERT ALERT (Timeout (Timeout (Timeout EVAC) EVAC) EVAC) When Zone 1 enters a Fire condition, all the outputs in Zone one will activate in Evacuate mode, and all surrounding zones will operate in alert mode with the option of timing out to Evacuate mode.
-
Page 69: Sounder Grouping
MAN2998-2 9.3.3 Sounder Grouping Sounder manufacturers’ (Apollo and Hochiki) have implemented separate schemes for activating multiple sounders at the same time. All schemes rely on grouping sounders together, and then using the group number to activate a collection of sounders. If the group is associated with a zone, then zones of sounders can be activated by using the group number. - Page 70 MAN2998-2 ➢ Action Type Global Zone Outputs ➢ Cause and Effects Zone Output programming Sounders which share the same activation attribute settings shall be automatically allocated to a sounder group to facilitate rapid activation. As there are 16 group addresses available, the group containing the largest amount of sounders shall be allocated to the first group address, and then the second largest group shall be allocated to the second group address and so on until all 16 group addresses are filled.
- Page 71 MAN2998-2 ➢ Group 3 assignment is set by selecting the “Responds to Class Change” attribute at device output level ➢ Group 4 assignment to the Global Zone and is programmable at device output level ➢ The zone activation mode (Evacuate, Alert, Alert/Evac, Delayed) is programmable at zone level ➢...
-
Page 72: Aaf Grouping
MAN2998-2 9.3.4 AAF Grouping The Alarm Acknowledgement Facility (AAF) at the panel is supported by assigning an AAF Group number to an XP95 AAF device facilitating association with trigger devices assigned to the same AAF group. Supported AAF trigger devices include all alarm calling loop devices excluding I/O devices, Manual Call Points and Heat detectors. -
Page 73: Dual Stage Multi-Sensor
MAN2998-2 ➢ LOCAL SOUNDER ACTIVATED shall change to LOCAL SOUNDER SILENCED ➢ The AAF INVESTIGATION event shall be logged and printed (stored in Pre-Alarm log) Zzzz AAF INVESTIGATION <zone descriptor> LOCAL SOUNDER SILENCED XXX SECS ZONE INV ALARM XXX OF XXX DEVICE►... - Page 74 MAN2998-2 DUAL STAGE ALGORITHM Start Analogue Value Alarm? DUAL STAGE 2? Night Mode? Status = PRE-ALARM (Use Timeout 1) Status = INV-ALARM Start Timer (Use Timeout 2) Read Discovery Heat Value Heat Value Status = FIRE Alarm? Analogue Value Master Reset? Alarm? Status = NORMAL Timeout?
-
Page 75: Discovery Sounder Beacon
MAN2998-2 9.3.6 Discovery Sounder Beacon The following features are supported for the Apollo Discovery Sounder Beacon: ➢ Group Control – See 8.2.4.1 Apollo Sounder Grouping ➢ Independent Sounder/Beacon control - Supported in LoopSense ➢ Tone Selection - Supported in LoopSense, Configured via LoopMaster ➢... - Page 76 MAN2998-2 Alarm condition activates only when a ‘smoke’ alarm signal is received from the AM device zone circuit or an AM group associated loop smoke detector. Following the receipt of a smoke alarm signal from a trigger device in an AM Group or the AM zone circuit: ➢...
- Page 77 MAN2998-2 The following sub-addressing scheme to display the relevant AM statuses at the panel: ADDRESS DESIGNATED POINT SUPPORTED STATUSES STATUS CATEGORY A.0 (Main Address) XP95 AM DEVICE *{Standard Device Faults} FAULT LOOP ISOLATOR ON NORMAL NORMAL NORMAL A.1 (Sub-Address 1) HUSH INPUT HUSH INPUT FAULT FAULT...
-
Page 78: Configuration Programming
MAN2998-2 9.4 Configuration Programming The configuration programming allows the user to assign the attributes of the physical components of the system. If the configuration does not match what is physically connected to the FACP, then the FACP reports a fault condition and details the differences. The configuration of the individual system components can be done using the PC Configuration Manager software or via on-site programming. -
Page 79: Loop Level
MAN2998-2 9.4.3 Loop Level Attributes are: ➢ Loop termination Single-Ended or Redundant ➢ Loop Descriptor ➢ Sounder Group Assignments... -
Page 80: Zone Level
MAN2998-2 9.4.4 Zone Level Attributes are: ➢ Zone Descriptor ➢ Zone output Activation Mode for each action type ➢ Zone input Day and Night Zone Configuration – normal, investigation, dependency A, dependency B and dependency C, AVF (NZS4512 only) ➢ Input/Device Level ➢... -
Page 81: Output Level
MAN2998-2 9.4.5 Output Level Attributes are: ➢ Type Descriptor ➢ Output type for panel and add-on outputs: • Un-Monitored – digital output operation, not monitored for fault conditions • Monitored – digital output operation, monitored for fault conditions • Sounder – sounder output operation, monitored for fault conditions •... -
Page 82: On Site Programming / Auto Learn
MAN2998-2 9.5 On site programming / Auto learn. On-site programming will allow the following to be set ➢ Set date and time, date and time format and daylight savings enable/disable ➢ With zones – descriptor, zone input configuration, sounder global/zone activation for individual action types ➢... -
Page 83: Software Download
MAN2998-2 9.6 Software Download The software application for the FACP shall be able to be downloaded via the configuration software. The boot-loader software that must be resident in the FACP to facilitate the download shall also be able to be downloaded from the configuration software. The boot-loader and application files shall be downloaded separately. -
Page 84: Event Logging
MAN2998-2 10 Event Logging Events are logged into one of eight event type categories. Individual storage is pre-allocated for each event type amounting to a total of 1000 events: Event Type Maximum Capacity Fire Fault Disable Pre-Alarm Emergency Security User System If an event exceeds the maximum capacity for that type the oldest event will be discarded allowing the most recent event to be stored. - Page 85 MAN2998-2 All events can be uploaded using the PC configuration software which will format the event record to be viewable using Microsoft Excel or a standard text editor.
- Page 86 MAN2998-2 11 Complete Menu Structure...
- Page 87 MAN2998-2 12 Compatible Devices Note: If an Auto Learn is executed the Auto-Learn Defaults for devices are also listed below AMPAC Auto Type Type Learn Device type Displayed Type (19 Chars) Desc Code Default Optical XP95 Optical XP95 PHOTO PHOTO XP95 Optical with base sounder XP95 PHOTO + SNDR...
- Page 88 MAN2998-2 103h Discovery Ion DISC ION 103h Discovery Ion with base sounder DISC ION + SNDR 10Bh Discovery Carbon Monoxide DISC CO 10Bh Discovery Carbon Monoxide with base sndr DISC CO + SNDR Manual Call Points S90 MCP S90 MCP ...
- Page 89 MAN2998-2 13 Glossary of Terms ACKD : ACKNOWLEDGED AMP HOUR ALM : ALARM COM : RELAY COMMON CONTACT (WIPER) CN : CONNECTOR C/O : CHANGE OVER CONTACTS CPU : COMMON PROCESSOR UNIT EOL : END OF LINE FACP : FIRE ALARM CONTROL PANEL FLT : FAULT GND :...
- Page 90 MAN2998-2 UNCONTROLLED DOCUMENT NOTE: Due to AMPAC’s commitment to continuous improvement specifications may change without notice.