Advertisement
Quick Links
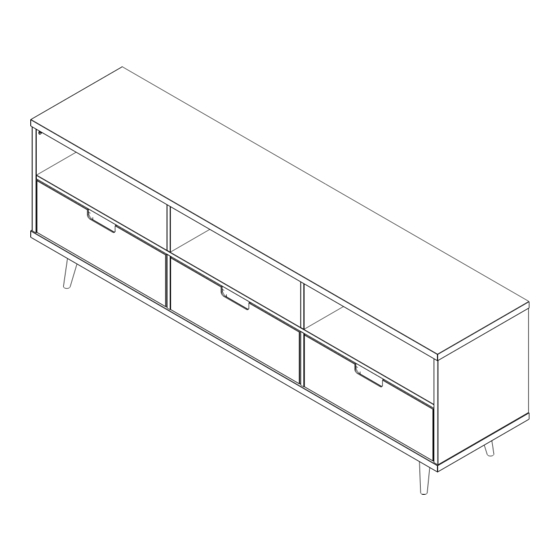
Item #: W70IV3D
Assembly Instruction
Please visit our website for the most current instructions, assembly tips, to report damage
or request parts. www.walkeredison.com
Revised 05/2022 V4
Copyright
2018, by Walker Edison Furniture Co., LLC. All rights reserved.
P.1
c
Advertisement

Related Manuals for Walker Edison Ivy W70IV3D


Summary of Contents for Walker Edison Ivy W70IV3D
- Page 1 Item #: W70IV3D Assembly Instruction Please visit our website for the most current instructions, assembly tips, to report damage or request parts. www.walkeredison.com Revised 05/2022 V4 Copyright 2018, by Walker Edison Furniture Co., LLC. All rights reserved.
- Page 2 Maintenance Guide To maintain long term performance and easy gliding of your solid wood drawers, we recommend applying wax to the wooden guide rails. 1. Bee's wax is recommended or Paraffin wax from a standard candle can be used. 2. Apply the wax by rubbing it on the wooden guide rails where there is wood-on-wood contact when opening and closing the drawer.
- Page 3 (3x) Part# Description Part# Description Top panel 01 pcs Back panel 01 pcs Shelf 01 pcs Drawer front 03 pcs Base 01 pcs Drawer left side 03 pcs Center upper panel 02 pcs Drawer right side 03 pcs Center bottom panel 02 pcs Drawer bottom 03 pcs...
- Page 4 Ø5,5*28mm Cam Bolt Ø14*14mm Cam Lock Screw Ø3,5*30mm Wood dowel Ø8*30mm Ø3,5*16mm Screw Wood dowel Ø8*20mm Screw Ø4*40mm Screw Ø4*16mm Drawer Limiter Wood dowel Ø8*50mm Washer Ø6mm Wall anchor Tape measure and hammer recommended for assembly (not included)
- Page 5 Step 1 Insert wood dowel (D) into parts (2), (4), (5), (6), (7), (8), (12), (13) and (16). Insert wood dowel (K) into part (4). (2x) (3x) (3x) (2x) (2x) Ø 8,0x30 mm Ø 8,0x50 mm Insert wood dowel ( ) into part ( Step 2 Step 2 Attach the Drawer Slide (17) into part (6) and (7) using Screw (I) and a Phillips...
- Page 6 Insert wood dowel ( ) into part ( Step 3 Attach the Drawer Slide (17) into part (5) using Screw (I) and a Phillips head screwdriver. Complete this step twice. (16x) (4x) (180º) Ø 8,0x20 mm Ø 4,0x16 mm Step 4 Attach part (2) in the holes of parts (4) using screw (G) and a Phillips head screwdriver.
- Page 7 Step 5 Attach parts (5) in the holes of part (2) using screw (C) and a Phillips head screwdriver. (6x) Ø 3,5x30 mm Step 6 Attach holes part (6) and (7) in the wood dowels of part (2) using screw (C) and a Phillips head screwdriver.
- Page 8 Step 7 Attach Cam Bolt (A) into the holes in the part (1). Ø 5,5x28 mm Step 8 Attach parts 8, 16 to part 3 using screw (C) and a Phillips head screwdriver. screw (E) to attach piece (J) into part 3. (14x) ( x) (180º)
- Page 9 Step 9 Attach part (1) and (3) in the wood dowels of part (6) and (7) using screw (G) and cam bolt (B) and Phillips head screwdriver. (10x) (12x) Ø 4,0x40 mm Attach part (9) and (10) using screw (E) and hardware (H) and Phillips head Step 10 screwdriver.
- Page 10 Attach part (12) and (13) in the part (11) using screw (C) Step 11 and Phillips head screwdriver. Insert part (14). Attach part (12) and (13) in the part (15) using screw (C) and Phillips head screwdriver. Ø 3,5x30 mm Step 12 P.10...
- Page 11 Step 13 WARNING Serious or fatal crushing injuries can occur from tip-over. To help prevent tip-over, install tip restraints per instructions. If using to support a television or monitor: For use with televisions weighing 35lbs (15.8Kg) or less and no wider than this product. Use with heavier televisions may result in instability causing tip over resulting in death or serious injury.
Need help?
Do you have a question about the Ivy W70IV3D and is the answer not in the manual?
Questions and answers