
Related Manuals for CENTR BW1.1


Summary of Contents for CENTR BW1.1
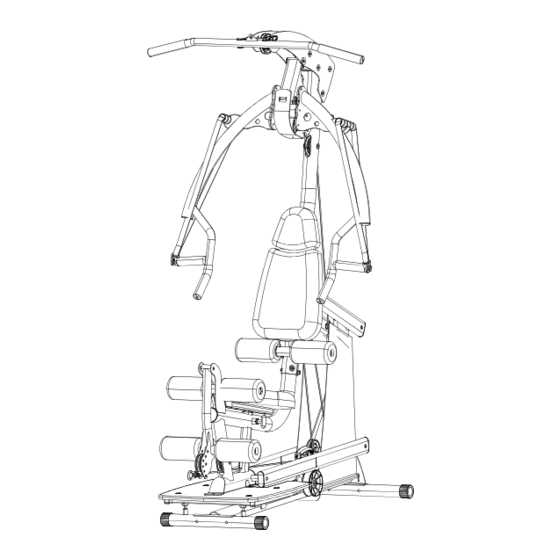
- Page 1 Model: BW1.1 USER MANUAL CENTR BODY WEIGHT HOME GYM MACHINE Record Serial Number Here MADE IN CHINA V07212023...
-
Page 3: Product Warranty
WELCOME Welcome to Centr and thanks for your purchase. We're happy to have you. Please inspect your product and contact us right away if anything is missing or damaged. Your equipment also comes with access to Centr's digital membership, unlocking tools that will fuel your active lifestyle and well-being. -
Page 4: Important Safety Notice
12. Never operate the machine if the machine is not functioning properly. 13. The Centr 1 Home Gym is designed for home use only. Therefore, it does not have a weight stack cover. This means the following for the user: •... -
Page 5: Maintenance
MAINTENANCE WARNING DO NOT place styrofoam or printed materials on the seat pads. Over time, these may stick to the pads and mar the surface. DO NOT leave items sitting on the seat pads, these pads have a special density that takes shape to objects and small objectswill leave imprints in the surface that may take time to come out. - Page 6 ASSEMBLY INSTRUCTIONS PAGE 3...
- Page 7 STEP 1 Attach Front Foot Assembly (#1) to Base Frame Assembly (#2) using: Two (M10x70 Bolts) Attach Rear Foot Assembly (#3) to Base Frame Assembly (#2) using: Two (M10x70 Bolts) Wrench tighten all bolts now. Page 4 5/11...
- Page 8 STEP 2 Attach Slider Assembly (#7) to Weight Selector Tube(#6). Install M5x10 Screw (#106) into Weight Selector Stem (#6) and tighten. Insert two Step Bushings (#40) into the Weight Selector Tube (#6). Attach two 3 ½” Pulleys (#37) and two 1” long Barrel Spacers (#51) to Weight Selector Tube (#6) using: Two (M10x70 Bolts) Wrench Tighten Bolts Now.
- Page 9 STEP 3 Attach Weight Selector Tube (#6) to Base Frame Assembly (#2) using: One (M12x90 Bolt) Wrench tighten bolt so there is a slight drag when moving Weight Selector Tube. Do not over tighten. Page 6 12/11...
- Page 10 STEP 4 One (M16x230 Hex Bolt) Attach Lower Arms (#8) to Base Frame Assembly (#2) using: Attach Upper Arms (#9) to Base Frame Assembly (#2) using: One (M16x230 Hex Bolt) Wrench Tighten bolts so there is a slight drag on the Arms when moved. Do not over tighten.
- Page 11 STEP 5 Three (M10x60 Hex Bolt) Attach Lower Main Frame (#11) to Foot Plate (#65) using: Wrench Tighten Now. Page 8 5/11...
- Page 12 STEP 6 Attach Lower Main Frame (#11) to Lower Arms (#8) using: One (M16x230 Hex Bolt) Wrench Tighten bolt so there is a slight drag when moving Lower Main Frame. Do not over tighten . Page 9 12/11...
- Page 13 STEP 7 Attach Upper Main Frame (#10) to Lower Main Frame (#11) using: Four (M10*90 Allen Head Screws) Attach Upper Main Frame (#10) to Left & Right Upper Arms (#8 & #9) using: One (M16*230 Hex Bolt) Wrench tighten bolts now. Page 10 5/11...
- Page 14 STEP 8 Note: Item 13 may look different from what is represented. Attach Top Beam Plates (#13) and One 3 ½” Pulley (#37) to Upper Main Frame (#10) using: Four (M10*100 Hex Bolts) Two (1” Long barrel Spacers) Finger Tighten Only Attach Lat Bar Holders (#50) and One 3 ½”...
- Page 15 STEP 9 Attach Press Arm Mount (#14) to Top Beam Plates (#13) using: One (M12*100 Hex Bolt) Wrench Tighten bolt #88 so there is a slight drag when moving Press Arm Mount. Do not over tighten . Wrench tighten all bolts installed in Step 8. Attach Pop-Pin Shaft (#47) to Upper Main Frame (#10) Thread Completely and Wrench Tighten.
- Page 16 STEP 10 Attach Press Arm (#18) to Press Arm Mount (#14) using: One (M12*160 Hex Bolt) Wrench Tighten bolt so there is a slight drag when moving Press Arm. Do not over tighten . Page 13 12/11...
- Page 17 STEP 11 Attach Leg Extension Assembly (#24) to Lower Main Frame (#11) using: One (M12*80 Hex Bolt) Wrench Tighten bolt so there is a slight drag when moving Leg Extension Assembly. Do not over tighten . Attach Press Arm Mount Cover Plate (#16) using: One (M5*12 Philips head Screw) Wrench Tighten Now.
- Page 18 STEP 12 Note: Item 20 may look different from what is represented. Attach Back Pad Tilt Frame (#20) to Upper Main Frame (#10) using: One Roller Tube (#21) Two M6*8 Set Screws (#98) Two Foam Rollers (#44) One M6*75 Button Head Screw (#93) Two Large Plastic Washers (#43) One M6 Flat Head Nut (#99) Two End Caps (#45)
- Page 19 STEP 13 Attach Seat Pad (#53) to Seat Stem (#23) using: Two (M10*40 Hex Bolts) Wrench Tighten Now. Slide Seat Stem (#23) into Lower Main Frame (#11) Attach the Lower (#124) and Upper (#125) Back Pads to Back Pad Tilt Frame (#20) using: Two (M10*15 Flat Head Screws) Wrench Tighten Now.
- Page 20 STEP 14 Note: Image may not represent the most recent look of the product. Attach 4 Foam Rollers (#44) to Leg Extension Assembly (#24) & Seat Stem (#23) using: Two Roller Tubes (#21) Four End Caps (#45) Page 17 12/11...
- Page 21 STEP 15 Pulley 1 Pulley2 Pulley 3 Pulley 4 Pulley 5 Pulley 6 Pulley 8 Pulley 11 Pulley 9 Pulley 7 Pulley 10 Began at the top of the machine and run the cable sequentially from pulley #1 to pulley #11, as shown in the above drawing.
- Page 22 STEP 16 Attach Left and Right Shrouds (#38L & #38R) by first slipping the top of each Shroud onto the horns of the upper shroud mount (#5), as shown above. Make sure seams are to the inside. Next, slide rods (#4) into the bottom of each shroud and attach to frame using: Four M6*12 Button Head Screws Note: Be sure to pull the shrouds down taut before tightening the four screws.
- Page 23 STEP 17 Note: Image may not represent the most recent look of the product. Attach Lat Bar (#17) to Spring Clip (#73). Attach Chain (#26) to Spring Clip (#73) on the end of the Cable. Attach Revolving Curl Bar (#25) to Chain (#26) with Spring Clip (#73). Page 20 5/11...
- Page 24 FINAL ADJUSTMENTS AFTER ASSEMBLY Press Arm Stop Macro Cable Adjustment Nut #2 Nut #1 Weight Selector Handle Wooden Platform Weight Selector Rollers Front Rubber Bumper FINAL ADJUSTMENT: (if needed) Below the seat you will find the weight selector. Grab the weight selector handle and pull the spring loaded pin.
- Page 25 WAINING AVHTISSEIIENT ADVERTENCIA Maximum user weight: 250 LBS up to LEVEL 15 300 LBS up to LEVEL 14 THIS PRODUCT ISNOT DESIGNED FOR COMMERCIAL USE. USIHQTHIS PRODUCT IN A COMMERCIAL SETTING CAN RESULT IN 0 PINCH POINTS SERIOUS INJURY � POINTS DE PINCEMENT WARNING O PUNTO DE PELLIZCO AVIRTISSEMENT...
- Page 26 � § )�} 1-,, � � j'.' � "' li:l � ;___J g 1 z. / ·-" _"' �7 ;IJ � � � . � , , ip _t • O i, '• S c • -}!" � ' / � - �...
- Page 28 BW1 PARTS LIST Part # Part Number Description Q'ty GM880200002PT0105 Front Foot Assembly GM880100004PT0105 Base Frame Assembly GM880201001PT0105 Rear Foot Assembly GM880201005PT0105 Shroud Mount Rod, Lower GM880201006PT0105 Shroud Mount Bracket, Upper GM880100005WX Weight Selector Tube GM880200003PT0201 Slider Assembly GM880201003PT0105 Lower Arm GM880201002PT0105 Upper Arm GM880300006PT0105...
- Page 29 0240-475-211 square end cap GM880-881-002 Lat Bar Holder GM880-101-017 Barrel Spacer, 1" Long GM880-101-033 Spacer Tube, 3" long GM880-400-005 Seat Pad AB135-881-009 stopper sleever 0240-450-09 square end cap 0240-063-009 round end cap GM880-881-001 handlebar socket GM880-201-025 sleeve GM880-201-026 axle GM880-880-008RC handle GM880-821-002 grip...
- Page 30 0113-308-158 Flat Head Screw,M8*15 0113-310-209B Flat Head Screw, M10*20 0113-105-128 Philips Head Screw, M5*12 0113-206-208 Button Head Cap Screw,M6*20 0113-005-14 Flat Head Screw,M5*10 0113-205-102B Cap Screw, M5*10 0116-010-008 Flat washer, φ10 0116-012-008 Flat washer, φ12 0116-210-102 Flat washer, φ22*φ10*2 0116-240-258 Flat washer, φ40*φ16.5*2.5 0116-610-008 Arc Washer, φ10...
- Page 32 centr.com...
Need help?
Do you have a question about the BW1.1 and is the answer not in the manual?
Questions and answers