Table of Contents
Advertisement
Quick Links
Advertisement
Table of Contents

Related Manuals for Gorenje ISC645BSC


Summary of Contents for Gorenje ISC645BSC
- Page 1 INDUCTION HOB www.gorenje.com...
-
Page 2: Safety Warnings
Congratulations on the purchase of your new Induction Hob. We recommend that you spend some time to read this Instruction / Installation Manual in order to fully understand how to install correctly and operate it. For installation, please read the installation section. Read all the safety instructions carefully before use and keep this Instruction / Installati on Manual for future reference. - Page 3 Operation and maintenance Electrical Shock Hazard • Do not cook on a broken or cracked cooktop. If the cooktop surface should break or crack,switch the appliance off immediately at the mains power supply (wall switch) and contact a qualified technician. •...
- Page 4 near the appliance, as they may be affected by its electromagnetic field. • Never use your appliance for warming or heating the room. • After use, always turn off the cooking zones and the cooktop as described in this manual (i.e. by using the touch controls). Do not rely on the pan detection feature to turn off the cooking zones when you remove the pans.
- Page 5 dangerous and may result in fire.NEVER try to extinguish a fire with water, but switch off the appliance and then cover flame e.g. with a lid or a fire blanket. • Metallic objects such as knives, forks, spoons and lids should not be placed on the hob surface since they can get hot.
-
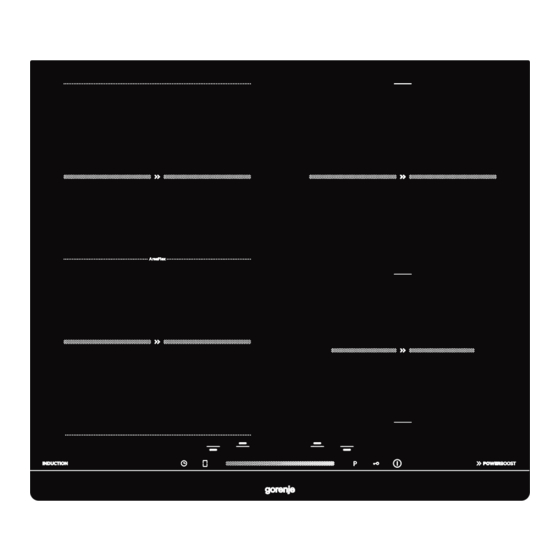
Page 6: Product Overview
Product Overview Top View 1. Heating zone: 190x190 mm 1800W / 2100W (P) 2. Heating zone: 190x190 mm 1800W / 2100W (P) 3. Heating zone: Ø210 mm 2000W / 2600W (P) 4. Heating zone: Ø160 mm 1600W / 1800W (P) 5. -
Page 7: A Word On Induction Cooking
A Word on Induction Cooking Induction cooking is a safe, advanced, efficient, and economical cooking technology. It works by electromagnetic vibrations generating heat directly in the pan, rather than indirectly through heating the glass surface. The glass becomes hot only because the pan eventually warms it up. -
Page 8: Choosing The Right Cookware
Choosing the right Cookware • Only use cookware with a base suitable for induction cooking. Look for the induction symbol on the packaging or on the bottom of the pan. • You can check whether your cookware is suitable by carrying out a magnet test. -
Page 9: Using Your Hob
The base diameter of induction cookware Cooking zone Minimum (mm) 160mm 190mm 210mm Flex zone Using your Hob SETTING THE MAXIMUM TOTAL APPLIANCE POWER The induction hob is equiped with Power management system. The maximum power of the hob is limited to 7200 W. This setting can be reduced to 2300 W, 2800 W, 3000 W or 3700 W. -
Page 10: To Start Cooking
When you have selected the new maximum power value, save the new setting by pressing the timer button. The message "Pn" appears on the display of the timer for a few seconds. The new maximum power value is set. If a lower maximum total power is set, it is not possible to set a high power level on all cooking zones simultaneously. -
Page 11: When You Have Finished
• Slide from right to left ,the power decreases from one step each time until the step • Slide from left to right, the power increases by one step each time until step 9. If the display flashes alternately with the heat setting This means that: •... -
Page 12: Locking The Controls
Beware of hot surfaces residual heat indicator “H” will show which cooking zone is hot to touch. It will disappear when the surface has cooled down to a safe temperature. It can also be used as an energy saving function if you want to heat further pans, use the hotplate that is still hot. - Page 13 Setting the timer to switch off the one required heating area Select the cooking zone by touching the zone you want to set the timer, (for example, 25 minutes) Set the power level to 6 by slider To touch the timer control , will show default “00” and single digit "0" flashing, you can slide the slider from 0 to 5, then touch the timer control again, ten digit "0"...
- Page 14 Select the source for which you want to cancel the timer, slide the slider to cancel the timer and "00" will be displayed. When the timer period is finished, the cooking zone switches off automatically and indicates "H". Other cooking zones continue to function normally if they were lit independently. Setting a timer to turn more than one cooking zone off If you use this function for more than one heating zone, the timer indicator will show the...
- Page 15 When the cooking timer expires, the corresponding heating zone will be switch off automatically and show “H”. Note: If you want to change the time setting of the timer when it start, you should repeat the procedure from step 1. Using the Boost "Boost"...
- Page 16 Restrictions when using the Boost (P) All of the cooktop has a maximum power. When the Boost function is enabled and not to exceed the maximum power, the electronic control automatically reduces the level of cooking another heating zone The 4 cooking zones are divided into two groups (a) and (b). Flexible area of your cooktop Flexible area-Group a •...
-
Page 17: Over Temperature Protection
Great area To enable flexible area as one large area, just press the button To adjust the powe Press the following against key the flexible area as two independent areas.The cooking zones will operate independently of each other. Over -Temperature Protection A temperature sensor equipped can monitor the temperature inside the Induction hob. -
Page 18: Cooking Guidelines
People with a heart pace maker should consult with their doctor before using this unit. Liquid Overflow Protection When around 140ml liquid overflow on the control panel and keeps on more than 3 buttons for about 10 seconds,the induction hob will stop working automatically. -
Page 19: Heat Settings
For stir-frying 1. Choose an induction compatible flat-based wok or a large frying pan. 2. Have all the ingredients and equipment ready. Stir- frying should be quick. If cooking large quantities, cook the food in several smaller batches. 3. Preheat the pan briefly and add two tablespoons of oil. 4. -
Page 20: Care And Cleaning
Care and Cleaning What? How? Important! • When the power to the cooktop is Everyday soiling on 1. Switch the power to the switched off, there will be no ‘hot glass (fingerprints, cooktop off. surface’ indication but the cooking marks, stains left by 2. -
Page 21: Hints And Tips
Hints and Tips Problem Possible causes What to do The induction hob No power. Make sure the induction hob is cannot be turned on. connected to the power supply and that it is switched on. Check whether there is a power outage in your home or area. -
Page 22: Failure Display And Inspection
The induction hob or Technical fault. Please note down the error a cooking zone has letters and numbers, switch turned itself off the power to the induction hob unexpectedly, a tone off at the wall, and contact a sounds and an error qualified technician. -
Page 23: Technical Specification
Please do not disassemble the unit by yourself to avoid any dangers and damages to the induction hob. Technical Specification Cooking Hob ISC645BSC Cooking Zones 4 Zones Supply Voltage 220-240V~, 50/60Hz Installed Electric Power 7200W Product Size L×W×H (mm) 590X520X56 Building-in Dimensions A×B (mm) - Page 24 Note: The safety distance between the hotplate and the cupboard above the hotplate should be at least 50 0mm. A(mm) B(mm) C(mm) min. 500 min. 20 min. 20 Air intake Air exit 5 mm Before you install the hob, make sure that •...
-
Page 25: Before Locating The Fixing Brackets
When you have installed the hob, make sure that • the power supply cable is not accessible through cupboard doors or drawers • there is adequate flow of fresh air from outside the cabinetry to the base of the hob •... - Page 26 4. The wall and induced heating zone above the table surface shall withstand heat. 5. To avoid any damage, the sandwich layer and adhesive must be resistant to heat. Flush-mount installation into the worktop Appliances without faceted edges or decorative frames, are suitable for flush mounting. lnstalling the appliance The appliance may only be installed into a temperature- and water-resistant countertop, such as a countertop made of (natural) slone (marble, granite), or solid wood (the edges...
- Page 27 Removing the built-in appliance Disconnect the appliance from the powermains. Use a suitable tool to remove the silicone gasket from the perimeter. Remove the appliance by pushing it upwards from the bottom side. WARNING! Do not attempt to remove the appliance from the upper side of countertop. WARNING! The service department shall only be responsible for repair and servicing of the cooking hob.
-
Page 28: Connecting The Hob To The Mains Power Supply
WARNING! lf the oven is installed under a flush-mounted cooking hob, then the worktop thickness should be at least 40 mm. Connecting the hob to the mains power supply This hob must be connected to the mains power supply only by a suitably qualified person. - Page 29 The power supply should be connected in compliance with the relevant standard, or a single-pole circuit breaker – The metod of connection is shown below. Use Power line H07RN-F, 4 x 1,5 mm² L = Black and Brown L1 = Black N = Blue and Grey L2 = Brown N = Blue and Grey...
- Page 30 www.gorenje.com...
Need help?
Do you have a question about the ISC645BSC and is the answer not in the manual?
Questions and answers