Table of Contents
Advertisement
Quick Links
Rifton Stander Size 1
Thank you
for choosing the Rifton Stander system.
This quick reference guide will help you
with basic adjustments.
For more details and important
WARNING
safety information and
warnings, please consult the product manual.
KZ22 Rev.00
© 2023 Rifton Equipment
Quick Reference Guide
Rifton PO Box 260 Rifton NY 12471 www.rifton.com
Body support tilt
To prevent falls or other
WARNING
injury, ensure all straps are
secure and knobs tight before tilting client to
a standing position.
Grasp the handle firmly and squeeze
the double trigger to adjust the body
support angle.
*
Upper trunk support
SUPINE ONLY
Adjust the upper trunk support
height by squeezing the two white
triggers together and moving it to
the desired location.
Headrest
SUPINE ONLY
The headrest is the top section of the
upper trunk support. Optional head
laterals slide into the slots behind the
headrest. Loosen the knob to adjust
independently in height as well as width.
Hip abduction
Loosen the knob behind the user's hip to
adjust abduction angle, and tighten in
the desired position.
Knob
Thigh length
Loosen the inner knob (A) behind
the leg support segment to adjust
the thigh length.
TIP: Align the user's hips at the
labeled hip marking, then adjust
the thigh length followed by the
lower leg length. Align the center of
the user's knee with the knee strap
attachment points (B).
Lower leg length
Loosen the outer knob (C) behind the
leg pad to adjust the lower leg length.
Ankle plantar flexion/dorsiflexion
Use the knob on the outer side of
the ankle to adjust ankle plantar
flexion/dorsiflexion.
**
Sandals
Loosen the knob under the sandal to
rotate the sandal or move it forward
or backward.
The front and rear foot straps have
magnetic buckles. Adjust the length of
the heel cup using the velcro strap.
Supine
The Rifton stander system can be configured for prone or supine use. Review
the available components to determine which your stander can be used for.
Additional components can be obtained from www.rifton.com.
Straps have color coded tags. Use components with
positioning, and components with
To avoid falls or strangulation, always ensure the correct straps and supports are
WARNING
used in each configuration. The infographic to the left shows the minimum straps
and supports required for safe positioning in prone and supine standing.
These minimum supports are denoted throughout this guide by
Brakes
Product can tip over if used
WARNING
incorrectly. Always engage
brakes during transfers and standing.
Release
Lock
2
1
A
A
Prone
GREEN
BLUE
tags for prone positioning.
*
for supine and
Height Adjustment
Grasp the handle on top of the column,
and squeeze the white trigger to unlock
and adjust the height.
B B
C
tags for supine
*
for prone.
Advertisement
Table of Contents

Subscribe to Our Youtube Channel
Related Manuals for Rifton S411


Summary of Contents for Rifton S411
- Page 1 Quick Reference Guide Rifton PO Box 260 Rifton NY 12471 www.rifton.com The Rifton stander system can be configured for prone or supine use. Review the available components to determine which your stander can be used for. Additional components can be obtained from www.rifton.com.
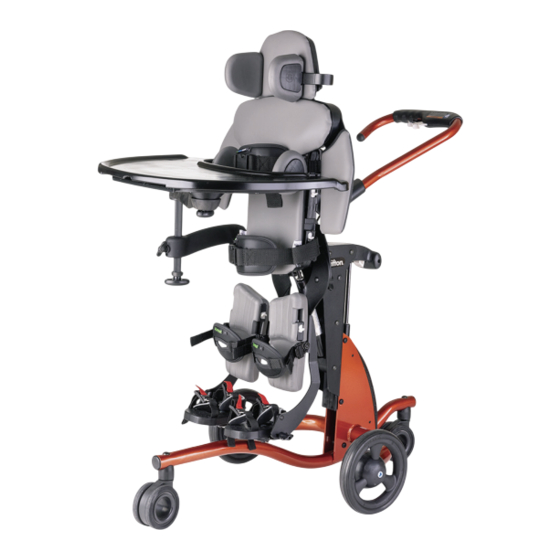
- Page 2 Tray Loosen the knob that faces forward to adjust tray height. Tray Height Tray adjustments Loosen all three knobs that face downward to rotate and position the tray. The knob under the center of the tray also allows some angle adjustment. 3 knobs for rotation Medial/Lateral thigh supports...
Need help?
Do you have a question about the S411 and is the answer not in the manual?
Questions and answers