Advertisement
Quick Links
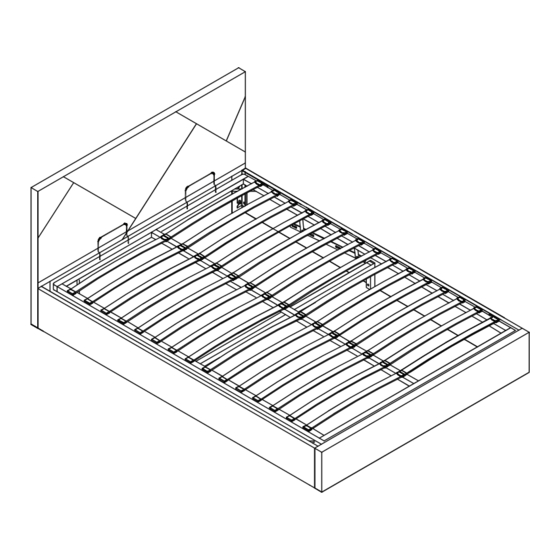
Assembly Instructions
Important before assembly:
Read these instructions carefully before assembling or using the product.
Please check the contents of the boxes before attempting to assemble this product. The instructions will
have a checklist of parts and fittings.
Assemble the product as close to its intended final location/room as possible.
Health & Safety:
This product or some parts of this product will be heavy. Please use an assistant when lifting.
Please keep small parts out of reach of children.
Always use on a level, even surface.
DO NOT jump on the product or any of its parts.
DO NOT use this product if any parts are missing, damaged or worn.
DO NOT use this product unless all fixings are secured.
Further instructions are on the following pages.
Please keep these instructions for future reference.
Chicago Ottoman Bed
.
.
www.happybeds.co.uk
Page 1 of 10
Advertisement

Related Manuals for Happy Beds Chicago


Summary of Contents for Happy Beds Chicago
- Page 1 Chicago Ottoman Bed Assembly Instructions Important before assembly: Read these instructions carefully before assembling or using the product. Please check the contents of the boxes before attempting to assemble this product. The instructions will have a checklist of parts and fittings.
- Page 2 No Part List No Part List Mattress stoppers Headboard 1 pc 2 pcs 1 pc Footboard 1 pc Fabric base cover Double 28 pcs 1 pc Bentwood slats Side rail - LH King 30 pcs Fabric hand strap Side rail - RH 1 pc 1 pc “U”...
- Page 3 HARDWARE NEEDED FOR BED ASSEMBLY (PACK A) Hardware List Hardware List Bolt (M8x20mm) for 12 pcs fitting hook bracket (G&H) Hook bracket 2 pcs to side rail Bolt (M6x20mm) for 2 pcs Hook bracket 12 pcs fitting bracket (9) to headboard and footboard Bolt (M6x45mm) for Bolt (M8x35mm) for...
- Page 4 Step 1: 12 pcs Hook bracket 2 pcs Bolts (M8x20mm) Allen key for 1 pc Hook bracket 2 pcs M8 bolts Headend A x3 Headend Footend Footend A x3 Step 2: 12 pcs Bolts (M8x35mm) Allen key for 1 pc M8 bolts I x3 I x3...
- Page 5 Step 3: 4 pcs Bolts (M6x20mm) Allen key for 1 pc M6 bolts & B x2 Step 4: 8 pcs Bolts (M6x20mm) 4 pcs Bolts (M6x45mm) Allen key for 1 pc M6 bolts & C x2 & Make certain the bed is squared up as shown in the diagram then tighten all bed...
- Page 6 Step 5: Fit the fabric base cover (11) evenly around the inside of the bed. Step 6: Bolts (M8x35mm) 8 pcs Allen key for 1 pc M8 bolts & & I x4 Page 6 of 10...
- Page 7 Step 7: Spring Washer for Flanged M8 lock-nuts 6 pcs 6 pcs M8 bolts for gas-lift piston Spanner for flanged Flat Washer for 6 pcs 1 pc M8 bolts M8 lock-nuts Allen Key for 1 pc Bolts (M8x50mm) 6 pcs M8 bolts This view is looking from underneath the slat frame Please ensure that the ten holes are...
- Page 8 Step 9: Flanged M8 lock-nuts 2 pcs for gas-lift piston Slide gas-lift piston stem Spanner for flanged 1 pc (x) onto the axle (y) then M8 lock-nuts fit the flange lock-nut (N). Tighten nut with spanner (O)- do not over-tighten A small gap must be left so stem can move freely - this is important, see...
- Page 9 Step 11: Flanged M8 lock-nuts Spanner for flanged 2 pcs 1 pc for gas-lift piston M8 lock-nuts SMALL GAP Slide gas-lift cylinder stem (x) onto the axle (y) then fit the flange lock-nut (N). Tighten nut with spanner (O) do not over-tighten.
-
Page 10: Technical Specifications
Technical Specifications Overall Dimensions (LWH mm) Double: 2030 x 1430 x 980 King: 2130 x 1580 x 980 Internal Dimensions (LWH mm) Double: 1930 x 1380 x 200 King: 2030 x 1530 x 200 Distance between slats (mm) Double: King: Ottoman Piston Strength Floor to top of slat Double &...
Need help?
Do you have a question about the Chicago and is the answer not in the manual?
Questions and answers