Table of Contents
Advertisement
Available languages
Available languages
Quick Links
Advertisement
Chapters
Table of Contents

Related Manuals for Amica PGR 640 TC A


Summary of Contents for Amica PGR 640 TC A
- Page 1 PGA4.1ZpZtApUtCb retro / PGR 640 TC A PGA4.1ZpZtApUtCi retro / PGR 640 TC I (EN) OPERATING MANUAL.........2 (IT) MANUALE D’USO...........24 IO-HOB-1235 / 8508750 (11.2021 / v3)
- Page 2 DEAR CUSTOMER, Your hob is exceptionally easy to use and extremely efficient. After reading these Operating Instructions, operating the appliance will be easy. Before being packaged and leaving the manufacturer, the appliance was thoroughly checked with regard to safety and functionality. Before using the appliance, please read these Operating Instructions carefully By following these instructions carefully you will be able to avoid any problems in using the appliance.
-
Page 3: Table Of Contents
TABLE OF CONTENTS SAFETY INSTRUCTIONS FOR USE INSTALLING OPERATION CLEANING AND MAINTENANCE TROUBLESHOOTING... -
Page 4: Safety Instructions For Use
SAFETY INSTRUCTIONS FOR USE Note.The appliance and its accessible parts become hot during use. Care should be taken to avoid touching heating elements. Children less than 8 years of age shall be kept away unless continuously supervised. This appliance can be used by children aged from 8 years and above and persons with reduced physical, sensory or mental capabilities or lack of experience and knowledge if they have been given supervision or instruction concern-... - Page 5 SAFETY INSTRUCTIONS FOR USE Caution: The cooking process has to be supervised. A short term cooking process has to be supervised continuously. Warning: Use only hob guards designed by manufacturer of the cooking appliance or indicated by the manufacturer of the appliance in the instructions for use as suitable or hob guards incorporated in the appliance.
- Page 6 NOTES ON SAFETY ● IF YOU SUSPECT A GAS LEAK, DO NOT: light matches, smoke, turn on or off any electrical devices (door bell, light switch, etc.) and use other electrical or mechanical equipment that can produce an electrical or impact spark. In such a case, immediately close the valve on the gas cylinder or the gas system shut-off valve, ventilate the room and call a qualified person to remove the cause of the leak.
- Page 7 HOW TO SAVE ENERGY Using energy responsibly not only saves money but also helps the environment. So let’s save energy! And this is how you can do it: ● Use proper pans for cooking. Pans with thick, flat bases can save up to 1/3 on electric energy.
- Page 8 DISPOSAL OF THE APPLIANCE UNPACKING The appliance was packed In accordance with European to protected it from damage Directive 2012/19/UE and Pol- during of transport. After ish legislation regarding used unpacking, please dispose electrical and electronic goods, of all elements of packaging this appliance is marked with in a way that will not cause the symbol of the crossed-out...
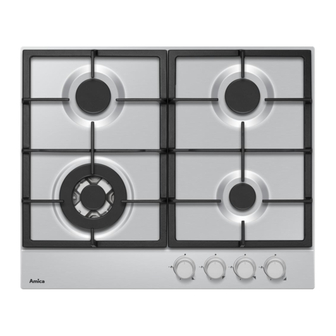
- Page 9 DESCRIPTION OF THE APPLIANCE Gas hob PG*4.1* 1,2,3,4 - top burners 5 - burner knobs with igniter switch 6 - grids...
- Page 10 SPECIFICATION height 52 mm depth 520 mm width 590 mm weight of the appliance 10,3 kg The appliance is equipped with burners: 1 - WOK burner, heat load - 2.8 kW 2 - medium large burners, heat load - 1.8 kW 3 - small burner, heat load - 1.0 kW Class of the appliance...
-
Page 11: Installing
INSTALLING The following instructions are intended for a qualified professional installer. These instructions are intended to provide the most professional installation and maintenance of the appliance. l Before you install the appliance, make sure that the local distribution conditions (gas type and pressure) and the appliance configuration is appropriate. l Configuration details are given on the appliance nameplate. - Page 12 INSTALLING Install gas hob B/B* 500x20 mm 500x10 mm 500x10 mm min 30 mm *optional...
- Page 13 INSTALLING ● prepare an opening in the worktop of a kitchen cabinet, as per the installation drawing ● connect the hob to a gas and electrical system in accordance with the instructions supplied, ● loosely attach fixing brackets to the bottom of the hob, ●...
- Page 14 INSTALLING The appliance has an G 1/2" threaded pipe Tips for the installer connector to connect it to the gas system. The LPG (propane-butane) hob version has The installer must: the connector terminated with a hose tip Have appropriate qualification ●...
- Page 15 INSTALLING Adapt the hob to a particular type of gas This may be performed by an installer with the appropriate qualifications only. If the gas, which the hob will be supplied with is different from the gas type specified by the manufacturer, i.e.
- Page 16 INSTALLING SOMIPRESS burner. (indicated "SOMIPRESS." on the burner body) Burner Type of gas auxiliary medium large G20 2H 20 mbar 0,72 0,98 1,17 0,55 + 2 x 0,75 G20 2E 20/25 mbar G30/31 3+ 28-30/37 mbar 0,52 0,67 0,83 0,37+ 2 x 0,55 G30-3B/P-30 mbar Once converted, place a sticker indicating the gas type for which the appliance is intended.
- Page 17 INSTALLING In order to check the flame, heat up the burner Adjust the valves on a full flame for about 10 min., and then turn the burner knob to an economic flame To adjust the valves turn the burner knob to position.
-
Page 18: Operation
OPERATION Cookware lid: Burner operation Lid prevents heat from escaping and thus reduces heating time. To achieve significant energy savings, use the appliance as instructed in these operating instructions, make the appropriate adjustments and use suitable pots. Do not use cookware that protrude Potential energy savings: over the edges of the hob. - Page 19 OPERATION Using the hob equipped with igniter knobs Repeat the above step if flame does ("Zp" model) not ignite. If flame is extinguished, the flame- ● push down the knob of a selected burner failure device will cut off gas supply until you feel resistance and turn left to within about 60 seconds.
- Page 20 OPERATION Adjust flame “Zt” Flame from a properly adjusted burner is pale blue with a clearly outlined inner cone. You can adjust flame by setting the knob to different positions. large flame small flame ( "economic") lburner off (no gas supply) This example shows you and to operate the knob and adjust flame size.
- Page 21 OPERATION In the event a gas leak risk 1 gas system 2 gas system shut-off valve A valve "open" B valve "closed" In the event of a fault ● turn off the burners ● close the gas system shut-off valve ●...
-
Page 22: Cleaning And Maintenance
CLEANING AND MAINTENANCE Make sure that burner is correctly re- Proper routine maintenance and cleaning assembled after cleaning. of the appliance can significantly extend its trouble-free operation. CORRECT B e f o r e c l e a n i n g o r o t h e r maintenance work, always unplug the appliance or use the main electrical system circuit breaker... -
Page 23: Troubleshooting
TROUBLESHOOTING In the event of any fault: ● turn off the appliance ● disconnect the power supply ● have the appliance repaired ● based on the instructions given in the table below, some minor issues can be corrected by the user. Please check the consecutive points in the table before you refer the repair to customer service. - Page 24 EGREGIO CLIENTE, Il piano cottura Amica è la combinazione di un’incredibile facilità d’uso con un’ottima efficacia. Dopo la lettura del manuale, l’uso del piano cottura non creerà alcun problema. Ogni piano di cottura che esce dalla fabbrica, prima dell’imballaggio, viene accuratamente revisionato presso i banchi prova dal punto di vista della sicurezza e della funzionalità.
- Page 25 INDICE INDICAZIONI RIGUARDANTI LA SICUREZZA D’USO INSTALLAZIONE PULIZIA E MANUTENZIONE PROCEDIMENTO IN CASO DI EMERGENZA...
-
Page 26: Indicazioni Riguardanti La Sicurezza D'uso
INDICAZIONI RIGUARDANTI LA SICUREZZA D’USO Attenzione. L’apparecchio e i suoi elementi acces- sibili diventano caldi durante il funzionamento. Porre una particolare attenzione a non toccare gli elementi riscaldanti. I bambini dall’età inferiore a 8 anni do- vrebbero essere tenuti ad una distanza adeguata o sotto stretta sorveglianza. - Page 27 INDICAZIONI RIGUARDANTI LA SICUREZZA D’USO Per la pulizia del piano cottura non usare apparecchi per la pulizia a vapore. Attenzione. Il processo di cottura deve essere sorve- gliato. Il processo di cottura breve deve essere costan- temente monitorato. Attenzione. Utilizzare solo dispositive di protezione progettati dal produttore dell’apparecchio o quelli indicati dal produttore nel manuale d'uso.
- Page 28 ISTRUZIONI DI SICUREZZA ● Si vieta a persone non qualificate di effettuare modifiche o riparazioni della cucina. ● Si vieta di aprire le manopole della cucina senza avere in mano un fiammifero acceso o un dispositivo per l’accensione del gas. ●...
- Page 29 COME RISPARMIARE ENERGIA Chi utilizza l’energia in modo responsabile, proteg- ge non solo il budget dome- stico, ma agisce anche con consapevolezza a favore dell’ambiente naturale. Per cui sosteniamolo, rispar- miamo l’energia elettrica! Il che si ottiene, procedendo nel seguente modo: l Utilizzo delle stoviglie appropriate per cucinare.
- Page 30 ELIMINAZIONE DEGLI APPAREC- DISIMBALLAGGIO CHI USATI Questo elettrodomestico è Per il trasporto l’apparecchio marchiato in conformità alla è stato protetto con imballo Direttiva Europea 2002/96/CE contro eventuali danni. Dopo e alla Legge polacca sull’appa- il disimballaggio dell’appa- recchiatura elettrica ed elettro- recchio, si prega di eliminare nica usata con il simbolo di un gli elementi dell’imballo in un...
- Page 31 DESCRIZIONE DEL PRODOTTO Piano cottura a gas PG*4.1* 1,2,3,4 - bruciatori superficiali 5 - manopole del bruciatore con l'interruttore di accensione 6 - griglie d’appoggio...
- Page 32 DATI TECNICI altezza 52 mm profondità 520 mm larghezza 590 mm peso della cucina 10,5 kg ll piano di cottura è dotato di bruciatori: 1 - bruciatore WOK, carico termico - 2,8 kW 2 - bruciatori medi, carico termico - 1,8 kW 3 - bruciatore piccolo, carico termico - 1,0 kW Categoria dell’apparecchio...
-
Page 33: Installazione
INSTALLAZIONE Le seguenti istruzioni sono destinate al tecnico installatore qualificato. Le presenti istruzioni mirano ad assicurare la massima professionalità delle operazioni di installazione e di ma- nutenzione. l Prima dell’installazione assicurarsi che le condizioni locali di distribuzione (tipologia del gas e la sua pressione) e l’impostazione dell’apparecchio siano idonei. l Le condizioni di impostazione dell’apparecchio sono indicate sulla targhetta dati. - Page 34 INSTALLAZIONE Installazione dei piani cottura a gas B/B* 500x20 mm 500x10 mm 500x10 mm min 30 mm *a seconda del modello...
- Page 35 INSTALLAZIONE ● effettuare l’intaglio nel piano di lavoro secondo lo schema di montaggio, ● allacciare il piano cottura alla reti di alimentazione del gas ed elettrica in conformità alle istruzioni d’uso della cucina. ● avvitare leggermente dalla parte inferiore del piano, ●...
- Page 36 INSTALLAZIONE Il piano è dotato di un raccordo filettato dal diametro G 1/2” che serve per l’allacciamento Indicazioni per l’installatore alla rete del gas. Nella versione con il gas L’installatore deve: liquido (propano-butano) sul raccordo è av- ● Essere in possesso dell’autorizzazione vitato l’ugello per il tubo 8 x 1 mm.
- Page 37 INSTALLAZIONE Commutazione su un altro tipo di gas Tale operazione può essere effettuata esclusivamente da un tecnico installatore autorizzato. Se il gas che deve alimentare la cucina differisce da quello previsto e per cui è stato preimpostato l’apparecchio ovvero G 20 (GZ 50) 20 mbar, occorre sostituire l’ugello del bruciatore e regolare la fiamma.
- Page 38 INSTALLAZIONE Bruciatore tipo SOMIPRESS. (secondo la marcatura „SOMIPRESS.” sul corpo del bruciatore) Tipo di gas Ugello del bruciatore /diametro piccolo medio grande G20 2H 20 mbar 0,72 0,98 1,17 0,55 + 2 x 0,75 G20 2E 20/25 mbar G30/31 3+ 28-30/37 mbar 0,52 0,67 0,83...
- Page 39 INSTALLAZIONE Per controllare la fiamma occorre scaldare Regolazione delle valvole il bruciatore a fiamma massima per circa 10 minuti, dopo di che girare la manopola della La regolazione delle valvole va effettuata valvola in posizione “fiamma economica”. La sul bruciatore acceso in posizione “fiamma fiamma non si deve spegnere né...
-
Page 40: Uso
Coperchio della pentola: Uso dei bruciatori superficiali Il coperchio sul pentola impedisce la fuga del calore abbreviando il tempo di scaldamento. L’uso corretto, l’impostazione di adeguati parametri operativi e l’utilizzo di stoviglie appropriate consentono di conseguire notevoli risparmi energetici. Non usare sul piano di cottura sto- I r i s p a r m i e n e r g e t i c i a m m o n t a n o viglie che fuoriescano dai suoi lati. - Page 41 U s o d el p i an o co t tu r a do tato d el In caso di insuccesso ripetere l’o- dispositivo di accensione nella manopola perazione sopra descritta. (marcatura “Zp”) La protezione antiriflusso interrom- pe l’afflusso del gas nel caso in cui ●...
- Page 42 Selezione della fiamma “Zt” La fiamma dei bruciatori correttamente regolati è azzurra con dal cono interno ben delineato. La dimensione della fiamma dipende dall’impostazione della manopola. fiamma grande fiamma piccola (detta “economica”) l bruciatore chiuso (afflusso del gas chiuso) Sull’esempio dell’uso del bruciatore è stato dimostrato l’uso corretto, che consiste nella selezione della fiamma adeguata.
- Page 43 Procedimento in caso di pericolo di perdita di gas incombusti 1 installazione del gas 2 valvola di chiusura dell’installazione del gas A valvola “accesa” B valvola “spenta” In ogni situazione di emergenza occorre: ● spegnere i bruciatori ● spegnere la valvola di chiusura dell’installazione del gas ●...
-
Page 44: Pulizia E Manutenzione
PULIZIA E MANUTENZIONE Accertarsi che tutti gli elementi del L’attenzione nella pulizia e manutenzione del bruciatore siano stati correttamente piano cottura influiscono notevolmente sul inseriti dopo la pulizia. rendimento e sulla durata della cucina. CORRETTO Prima di procedere alla pulizia o ad altre operazioni di manutenzione occorre scollegare l’apparecchio dall’alimentazione. -
Page 45: Procedimento In Caso Di Emergenza
PROCEDIMENTO IN CASO DI EMERGENZA In ogni situazione di emergenza occorre: ● disattivare i gruppi funzionali del piano di cottura ● staccare l’alimentazione elettrica, ● segnalare il guasto ● l’utente può eliminare personalmente certi guasti minori, osservando le indicazioni ripor- tate nella tabella sottostante, prima di rivolgersi al servizio di assistenza verificare i punti indicati nella tabella.
Need help?
Do you have a question about the PGR 640 TC A and is the answer not in the manual?
Questions and answers