Advertisement
Instructions for Models:
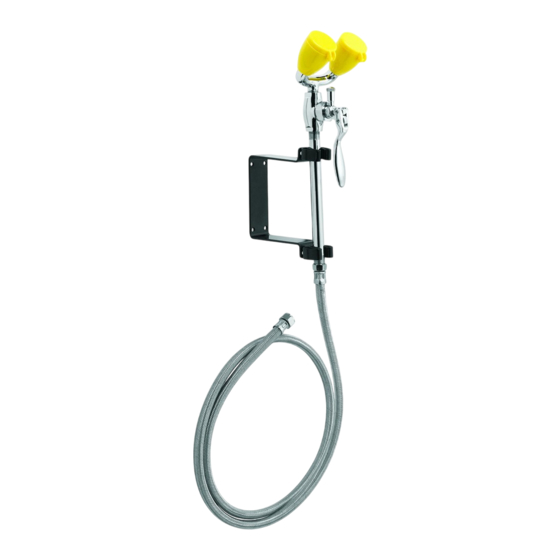
SEF-9200
Works With:
SPEAKMAN SC-581X / 583X / 585X Faucets
Ferguson ProFlo PF1118
Fiat 830AA
Need Help?
For additional assistance or service call:
SPEAKMAN Company
400 Anchor Mill Road
New Castle, DE 19720
PHONE: 800-537-2107
EMAIL: customerservice@speakmancompany.com
WEB: www.speakmancompany.com
92-SEF-9200-R1
What You Need To Know:
Tools:
Required:
*Tape Measure
*Pencil
*5/16"Allen
Wrench
*Level
*Phillips
*Adjustable
Screwdriver
Wrench
*Thread Sealant
Tape
Important Notes:
Be sure to read instructions thoroughly before beginning
installation. Do not overtighten any connections or damage
may occur. The supply line for plumbed eyewash units shall
provide an uninterruptible supply of flushing fluid at a
minimum of 30 psi flowing pressure. If a shut off valve is
installed in the cold supply line of the sink fitting (which
supplies the eyewash) for maintenance purposes, provisions
shall be made to prevent unauthorized shut off. The sink
fitting does not have to be turned on for the eyewash to
operate. ANSI Z358.1 requires that all emergency
equipment shall be tested weekly to verify proper operation
and inspected annually to assure conformance with ANSI
Z358.1-2009 requirements.
Safety Tips:
Cover your drain to prevent loss of parts. Always wear
proper eye protection.
Maintenance:
The eyewash valve has a rubber seat washer, which may
require periodical maintenance. The eyewash unit can be
cleaned using a mild soap and warm water solution. Rinse
thoroughly and dry immediately with a soft, clean cloth for
best results.
①
1
After shutting off water supplies, remove the
Cold Supply Stop from Faucet.
①
2
After cleaning the seat, thread the Stop Adapter
into the Cold Supply Stop location of Faucet.
Wrench tighten.
①
3
Tighten the Threaded Insert to create a seal
between the Sink Fitting and the Adapter using
a 5/16" Allen Wrench in the base of the
Adapter.
①
4
After applying Thread Sealant Tape, thread the
Vacuum Breaker Assembly (1) onto the Stop
Adapter. Wrench tighten.
①
1
①
Attach Hose end to the the Vacuum Breaker
5
Assembly. Wrench tighten.
①
6
After reviewing the Roughing In Diagram, select
a suitable location for installation. Using the
Mounting Bracket as a template, transfer
mounting locations to wall using a pencil. Be
sure Bracket is level and plum.
Advertisement
Table of Contents

Subscribe to Our Youtube Channel
Related Manuals for Speakman SEF-9200


Summary of Contents for Speakman SEF-9200
- Page 1 Works With: installation. Do not overtighten any connections or damage may occur. The supply line for plumbed eyewash units shall SPEAKMAN SC-581X / 583X / 585X Faucets provide an uninterruptible supply of flushing fluid at a Ferguson ProFlo PF1118 minimum of 30 psi flowing pressure. If a shut off valve is Fiat 830AA ①...
- Page 2 The eyewash is activated by squeezing the Handle (1) until it locks into the ON position. To deactivate, the Handle is squeezed while lifting Note: Dimensions shown are for SPEAKMAN SC-5811 the Stay-Open Plunger (2). service sink. Dimensions shown for reference only.
Need help?
Do you have a question about the SEF-9200 and is the answer not in the manual?
Questions and answers