
Subscribe to Our Youtube Channel
Related Manuals for TUYA BAB-1413 Pro


Summary of Contents for TUYA BAB-1413 Pro
- Page 1 Zigbee Zigbee Thermostat Radiator Valve (TRV) Thermostat Radiator Valve (TRV) Model: BAB-1413 Pro Model: BAB-1413 Pro...
-
Page 2: Table Of Contents
Deutsche Willkommen Produkt Paketliste Version Technische Daten Produktbeschreibung Merkamle Abmessungen Kurzanleitung Zum Startbildschirm Installa�on Betrieb APP Verbinden English Italiana Welcome Benvenuto Product package list Elenco Dei Pacche� Del Prodo�o version versione Da� Tecnici Technical Date Product descrip�on Descrizione Del Prodo�o Cara�eris�che Features Dimensione... -
Page 3: Welcome
Giacomini Adapter × 1 PC RAV Adapter × 1 PC M28 Adapter × 1 PC Note: Not include Tuya Zigbee Gateway. TECHNICAL DATA Zigbee Thermostat radiator valve (TRV) is a self-regula�ng valve fi�ed to hot water hea�ng system radiator to control the temperature of a room by Power Supply: 3 V, 2×AA Ba�eries, Packaging not have ba�ery. -
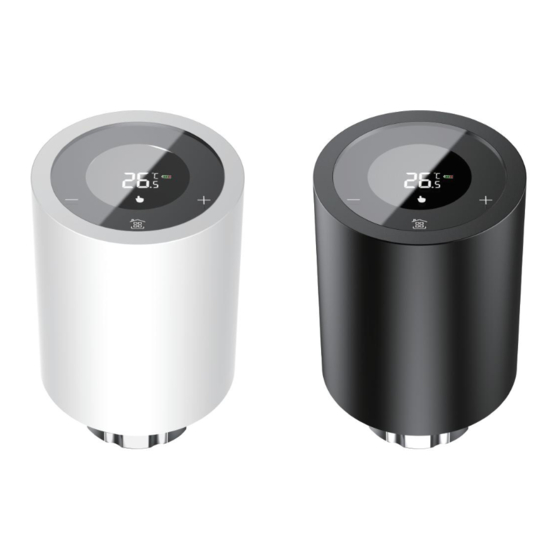
Page 4: Features
FEATURES HOME SCREEN QUICK REFERENCE 1. Good looking and modern product shape,and LCD touch screen. 2. Self-developed unique motor, sound decibel is less than 25dB, maximum stroke is 5.5mm and the s�ck is thick, 8mm in diameter. Week Hour Minute Open valve 3. - Page 5 INSTALLATION Then yellow arrow to yellow arrow, �ghten the housing clockwise (Figure 4). A�er power on, the screen is fully displayed (Figure 5); and the screen displays Step 1: Power on. the current temperature a�er full display. Touch “ + ” or “ - ” to adjust the set Turn the case counterclockwise (Figure 1), and then pull the case out (Figure 2);...
- Page 6 OPERATION Step 3: Install the adapter Install the adapter on your valve as the picture below. If you don't need an 1. Power on adapter, please ignore this step. A�er installing the ba�ery, it will automa�cally turn on. It can't be turned off �ll the ba�ery is removed.
- Page 7 d. ECO mode 6. Ba�ery When the ba�ery is fully charged, “ ” is displayed. When the ba�ery is Press “ ” to select the ECO mode “ ”. If the ECO mode is displayed, the default low, “ ” is displayed. temperature is 20 °C.
- Page 8 The default se�ng for the schedule 9. Advanced op�ons se�ngs Long press “ - ” and “ ” for 3s at the same �me to enter the advanced From Monday to Friday Saturday Sunday op�ons se�ngs, the screen displays “ A1 ” (work), 2 seconds later, display (Screen display the number (Se�ngs and op�ons, by “...
-
Page 9: Installa�On
Step 1: Download your APP Energy-saving mode 00: off, 01: on Search for “ Tuya Smart” or “ Smartlife ” in the Apple Store or Google Play or scan Energy saving mode temperature 5-35 °C the QR code above and follow the instruc�ons of the APP to complete the Low temperature protec�on... - Page 10 When the Zigbee gateway recognizes the Zigbee Thermostat Valve (Figure 12), click the device icon. About 5 seconds later, the device is configured successfully (Figure 13). Now you can control the device through the APP. Flash Figure 10 Figure 11 Figure 12 Figure 13...
- Page 11 APP INTERFACE DESCRIPTION Se�ng Child lock Set temprature Current temprature Mode AFTER-SALES SERVICE IN WARRANTY PERIOD One week Your thermostat is guaranteed for 12 months since the date of purchase. Service programming beyond the warranty period would need extra charges. For more details, please Advanced op�on contact us directly.
-
Page 12: Willkommen
Giacomini Adapter × 1 PC RAV Adapter × 1 PC M28 Adapter × 1 Stück Hinweis: Tuya Zigbee Gateway nicht im Lieferumfang enthalten. TECHNISCHE DATEN Stromversorgung: 3 V, 2 x AA-Ba�erien, Verpackung ohne Ba�erie. Umgebungsfeuch�gkeit: 5~95% rela�ve Lu�feuch�gkeit (nicht kondensierend) Maximaler Hub: 5,5 mm Genauigkeit: ±0.5 °C... -
Page 13: Produktbeschreibung
PRODUKTBESCHREIBUNG MERKMALE 1. Gut aussehende und moderne Produk�orm und LCD-Touchscreen. 2. Selbst entwickelter einzigar�ger Motor, Schalldezibel beträgt weniger als 25 dB, maximaler Hub beträgt 5,5 mm und der Stock ist dick, 8mm im Durchmesser. 3. Geeignet für eine Vielzahl von Ven�len. 4. -
Page 14: Kurzanleitung Zum Startbildschirm
KURZANLEITUNG ZUM STARTBILDSCHIRM INSTALLATION Schri� 1: Einschalten. Drehen Sie das Gehäuse gegen den Uhrzeigersinn (Abbildung 1) und ziehen Sie es dann heraus (Abbildung 2). Legen Sie zwei 3-V-Ba�erien in das Ven�l ein Woche Stunde Protokoll Ven�l öffnen (Abbildung 3). Temperatureinheit Programmierung) Abbildung 1 Abbildung 2... - Page 15 Ziehen Sie dann den gelben Pfeil zum gelben Pfeil und ziehen Sie das Gehäuse im Schri� 3: Installieren Sie den Adapter Uhrzeigersinn fest (Abbildung 4). Nach dem Einschalten wird der Bildschirm Installieren Sie den Adapter wie im Bild unten an Ihrem Ven�l. Wenn Sie keine vollständig angezeigt (Abbildung 5).
-
Page 16: Betrieb
BETRIEB d. Energiesparmodus 1. Einschalten Drücken Sie „ “ , um den ECO-Modus „ “ auszuwählen. Wenn der ECO-Modus Nach dem Einlegen des Akkus schaltet er sich automa�sch ein. Es kann erst angezeigt wird, beträgt die Standardtemperatur 20 °C. Wenn die Raumtemperatur ausgeschaltet werden, wenn der Akku en�ernt wurde. - Page 17 Die Standardeinstellung für den Zeitplan 6. Ba�erie Wenn der Akku vollständig geladen ist, wird „ “ angezeigt. Wenn die Von Montag bis Freitag Samstag Sonntag Ba�erie schwach ist, wird „ “ angezeigt. (Bildschirmanzeige (Bildschirmanzeige⑥) (Bildschirmanzeige⑦) Zeit ①②③④⑤) 7. Hitze erzwingen Anzeige Halten Sie die +-Taste 3 Sekunden lang gedrückt.
- Page 18 9. Erweiterte Op�onseinstellungen Erkennung der Öffnung des Alles EIN: EIN, Aus: AUS Ven�lkopfes Drücken Sie gleichzei�g lange „ - “ und „ “ 3s, um die erweiterten Op�onseinstellungen aufzurufen. Auf dem Bildschirm wird „ A1 “ (Arbeit) Totzonentemperatur 0.5-5 °C angezeigt.
-
Page 19: App Verbinden
APP VERBINDEN Schri� 1: Laden Sie Ihre APP herunter Suchen Sie im Apple Store oder bei Google Play nach „ Tuya Smart “ oder Flash „ Smartlife “ oder scannen Sie den obigen QR-Code und befolgen Sie die Anweisungen der APP, um die Installa�on abzuschließen. - Page 20 BESCHREIBUNG DER APP-SCHNITTSTELLE Wenn das Zigbee-Gateway das Zigbee-Thermostatven�l erkennt (Abbildung 12), klicken Sie auf das Gerätesymbol. Etwa 5 Sekunden später ist das Gerät erfolgreich konfiguriert (Abbildung 13). Jetzt können Sie das Gerät über die APP steuern. Einstellung Kindersicherung Temperatur einstellen Aktuelle Temperatur Modus Eine Woche...
- Page 21 KUNDENDIENST IN DER GARANTIEZEIT Für Ihren Thermostat gilt eine Garan�e von 12 Monaten ab Kaufdatum. Für Serviceleistungen, die über den Garan�ezeitraum hinausgehen, fallen zusätzliche Kosten an. Für weitere Einzelheiten kontak�eren Sie uns bi�e direkt.
-
Page 22: Benvenuto
Ada�atore RAVL × 1 PC Ada�atore Caleffi × 1 PC Ada�atore Giacomini × 1 PC Ada�atore M28 × 1 PC Nota: non includere Tuya Zigbee Gateway. DATI TECNICI Alimentazione: 3 V, 2 ba�erie AA, confezione senza ba�eria. Umidità ambiente: 5~95% RH (senza condensa) Model: BAB-1413 Pro Modello:... -
Page 23: Dimensione
PRODUCT DESCRIPTION CARATTERISTICHE 1. Forma del prodo�o bella e moderna e touch screen LCD. 2. Motore unico auto-sviluppato, il decibel del suono è inferiore a 25 dB, la corsa massima è di 5,5 mm e il bastoncino è spesso, 8 mm di diametro. 3. -
Page 24: Installazione
RIFERIMENTO RAPIDO SCHERMATA HOME INSTALLAZIONE Passaggio 1: accensione. Ruotare la custodia in senso an�orario (Figura 1), quindi estrarla (Figura 2); Inserire due ba�erie da 3 V nella valvola (Figura 3). Ora minuto Se�mana Valvola aperta Figura 1 Figura 2 Figura 3 Programmazione Unità... - Page 25 Passaggio 3: installare l'ada�atore Poi freccia gialla a freccia gialla, serrare l'alloggiamento in senso orario (Figura 4). Dopo l'accensione, lo schermo è completamente visualizzato (Figura 5); e lo Installare l'ada�atore sulla valvola come mostrato nell'immagine qui so�o. Se schermo visualizza la temperatura corrente dopo la visualizzazione completa. non hai bisogno di un ada�atore, ignora questo passaggio.
-
Page 26: Operazione
OPERAZIONE d. Modalità ecologica Premere “ ” per selezionare la modalità ECO “ ”. Se viene visualizzata la 1. Accendere modalità ECO, la temperatura predefinita è 20 °C. Quando la temperatura Dopo aver installato la ba�eria, si accenderà automa�camente. Non può essere ambiente è... - Page 27 6. Ba�eria programmazione se�manale dal lunedì al venerdì al ma�no Quando la ba�eria è completamente carica, viene visualizzato “ ”. Quando la Sabato Domenica ba�eria è scarica, viene visualizzato “ ”. FDal lunedì al venerdì (Visualizzazione sullo (Visualizzazione sullo (Schermo①②③④⑤) Tempo schermo⑥) schermo⑦)
- Page 28 9.Impostazioni delle opzioni avanzate Temperatura della zona morta 0.5-5 °C Premere a lungo “-” e “ ” per 3 secondi contemporaneamente per accedere 00: spento Modalità di risparmio energe�co alle impostazioni delle opzioni avanzate, lo schermo visualizza “A1” (lavoro), 2 01: acceso secondi dopo, visualizzare il numero (Impostazioni e opzioni, con “+”...
- Page 29 CONNETTI L'APP Passaggio 1: scarica la tua APP Cerca “Tuya Smart” o “Smartlife” nell'Apple Store o Google Play o scansiona il Veloce codice QR qui sopra e segui le istruzioni dell'APP per completare l'installazione. Codice QR “Tuya Smart” Codice QR “Smart Life”...
- Page 30 DESCRIZIONE DELL'INTERFACCIA DELL'APP Quando il gateway Zigbee riconosce la valvola termosta�ca Zigbee (Figura 12), fare clic sull'icona del disposi�vo. Dopo circa 5 secondi, il disposi�vo è configurato corre�amente (Figura 13). Ora puoi controllare il disposi�vo tramite l'APP. Collocamento Blocco bambini Impostare la temperatura Temperatura a�uale Modalità...
- Page 31 SERVIZIO POST-VENDITA IN PERIODO DI GARANZIA MODELLO: BAB-1413 PRO Il termostato è garan�to per 12 mesi dalla data di acquisto. Servizio oltre il periodo di garanzia sarebbero necessari cos� aggiun�vi. Per maggiori de�agli, per favore conta�aci dire�amente.
Need help?
Do you have a question about the BAB-1413 Pro and is the answer not in the manual?
Questions and answers