
Subscribe to Our Youtube Channel
Related Manuals for Teledyne Lecroy M21


Summary of Contents for Teledyne Lecroy M21
- Page 1 M21 Video Generator / Analyzer – Quick Start Guide M21 Video Analyzer/Generator for HDMI 8K & DisplayPort UHBR Quick Start Guide Rev. C October 18, 2023 P/N 934512-00 - Rev. C...
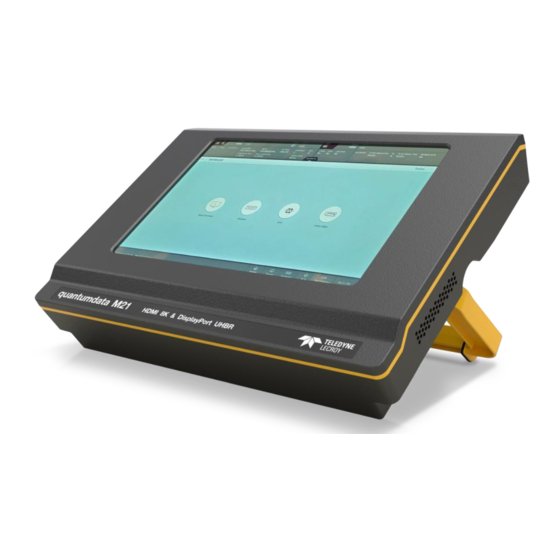
- Page 2 M21 Video Generator / Analyzer. The M21 is a handheld HDMI Video Generator and Analyzer for 8K and a DisplayPort Analyzer for UHBR data rates. The M21 has a large embedded touch screen for control and status. The M21 can also be managed through the Video Protocol Suite (VPS) graphical user interface running on a host PC connected to the M21 over an Ethernet cable.
- Page 3 M21 Video Generator / Analyzer – Quick Start Guide M21 Rear Edge October 18, 2023 P/N 934512-00 - Rev. C...
- Page 4 2 Physical Interfaces of the M21 Protocol Analyzer / Generator This section describes the administration, video and audio interfaces on the M21 test instrument. Table 2-1 below describes the video interfaces on the M21 test instrument. Table 2-1: M21 Video Interfaces...
-
Page 5: Digital Audio Interface
▪ Audio: LPCM. 2.1 Digital Audio interface Table 2-2 below describes the distinct digital audio interface supported on the M21. Note audio transmission is supported only through the HDMI Tx interface. Table 2-2: M21 HDMI RCA SPDIF Output Audio Interface... -
Page 6: Administrative Interface
M21 Video Generator / Analyzer – Quick Start Guide 2.3 Administrative Interface The M21 test instrument is equipped with ports for control and administration. These are described below: • RJ45 Ethernet – For control through the external VPS GUI connected from a host PC or for command line control. -
Page 7: Sd Card Slot
M21 Video Generator / Analyzer – Quick Start Guide 2.4 SD Card Slot The M21 test instrument is equipped with an SD card slot. The SDCard is used for loading bitmaps, reports, and for recovery in the event of a failed upgrade. -
Page 8: Getting Started
3.2 Getting the M21 Up and Running Use the following procedures to get your M21 up and running. 1. Remove the M21 from the shipping box and lay it flat on your desktop or benchtop. 2. Connect the M21 wall power adapter with the USB-C connector October 18, 2023 P/N 934512-00 - Rev. - Page 9 3. Connect the other end of the power supply cable with the USB-C connector to the port on the back of the M21 labeled “DC In 15V 3A.” This connector is located on the back of the unit as shown below.
-
Page 10: General Operation
M21 Video Generator / Analyzer – Quick Start Guide 4 General Operation Once powered up the M21 is ready for testing your HDMI or DisplayPort devices. This section provides a brief overview of the application screens on the embedded touch screen display. -
Page 11: Home Screen
GUI as shown below: 4.2.3 Status Bar The M21 has a status bar on the top of the screen. The Tx status is on the left half and the Rx status is on the right half of the screen. - Page 12 M21 Video Generator / Analyzer – Quick Start Guide The items in the Top Status Bar are described in the Table below. Top Status Bar Type Status Item Function Video HDMI (only) Generator FRL or TMDS (TX) Indicates whether the HDMI video generator is in the FRL mode or TMDS mode.
- Page 13 M21 Video Generator / Analyzer – Quick Start Guide Video Mode: Indicates whether the video analyzer is Analyzer HDMI or DisplayPort receiving HDMI or DisplayPort stream. For (RX) For HDMI: FRL or TMDS HDMI FRL and DisplayPort the number of For DP: HBR or UHBR Lanes and the Lane rate is shown.
- Page 14 M21 Video Generator / Analyzer – Quick Start Guide 4.3 Running Basic Tests on Sink Devices This Quick Start Guide does not cover detailed procedures for most common operations. However, the following information will get you started conducting some of the more common operations for testing sinks.
- Page 15 M21 Video Generator / Analyzer – Quick Start Guide 3. Navigate to the Pattern screen to select a test pattern for transmission. Select the desired test pattern. October 18, 2023 P/N 934512-00 - Rev. C...
- Page 16 M21 Video Generator / Analyzer – Quick Start Guide 4. Navigate to the Audio screen to select an audio format for transmission. Select the desired LPCM configuration or compressed clip. 4.4 Running Basic Tests on HDMI Source Devices This Quick Start Guide does not cover detailed procedures for most common operations.
- Page 17 M21 Video Generator / Analyzer – Quick Start Guide Analyzer application screen is shown below. October 18, 2023 P/N 934512-00 - Rev. C...
- Page 18 M21 Video Generator / Analyzer – Quick Start Guide 2. To monitor the HDMI DDC channel, navigate to the ACA application screen. The ACA application screen is shown below. October 18, 2023 P/N 934512-00 - Rev. C...
- Page 19 M21 Video Generator / Analyzer – Quick Start Guide October 18, 2023 P/N 934512-00 - Rev. C...
- Page 20 M21 Video Generator / Analyzer – Quick Start Guide 5 Managing the M21 with VPS GUI from a PC The normal operation of the M21 is through the embedded touch screen display. However, you can also control the M21 through the external Video Protocol Suite (VPS) GUI installed on a Windows host PC.
- Page 21 M21 Video Generator / Analyzer – Quick Start Guide October 18, 2023 P/N 934512-00 - Rev. C...
- Page 22 VPS GUI Manager application. Note 1: The screen shot above shows access to the M21 System software. There will also be a link to the M21 VPS GUI Manager October 18, 2023 P/N 934512-00 - Rev. C...
- Page 23 Manager software on your Windows Host PC in a convenient location. Note 2: If you are going to be upgrading the M21 system software, download the M21 system firmware and save on a convenient location on your host Windows PC.
- Page 24 M21 Video Generator / Analyzer – Quick Start Guide October 18, 2023 P/N 934512-00 - Rev. C...
- Page 25 This procedure describes how to connect your Windows Host PC running the VPS GUI Manager application to the M21. You can either connect to the M21 from your Windows Host PC through a network or you can connect directly using the provided Ethernet cable. You can connect from the external VPS running on the Windows Host PC to the M21 instrument either through a local host name or an IP address.
- Page 26 Windows Host PC to the M21 Using a Network IP Address with DHCP You can establish a connection to the M21 from your Windows Host PC running the VPS GUI Manager application using an IP address obtained from the network with DHCP. Use the procedures below.
- Page 27 Host PC Running ATP Manager w/ Ethernet Connection thru LAN 2. From the M21 embedded touch screen, select Dashboard to access the Administration utilities for setting the IP address. Refer to the screen shot below.
- Page 28 M21 Video Generator / Analyzer – Quick Start Guide The Administration utilities screen appears as shown below. 3. Select System Settings and then Instrument Network Settings. The Systems Settings menu will be presented. 4. Enable DHCP using the slide button. Green-On indicates that DHCP is enabled.
- Page 29 M21 Video Generator / Analyzer – Quick Start Guide 5. Power cycle the M21 to obtain an IP address from the network. The external VPS GUI Manager will automatically connect to the M21 when the M21 boots up. 5.4 Connecting with VPS GUI Manager from the...
- Page 30 M21 Video Generator / Analyzer – Quick Start Guide 3. From the external VPS GUI Manager, access the System Settings screen and click on Instrument Network Settings. The System Settings screen appears. October 18, 2023 P/N 934512-00 - Rev. C...
- Page 31 M21 Video Generator / Analyzer – Quick Start Guide 4. On the external VPS GUI Manager, access the Edit Instrument dialog box from the three dot menu of the M21 instrument icon as shown below. Enter the local host name of the M21 instrument that you are connecting to in the IP address field as shown below.
- Page 32 Analyzer / Video Generator modules. Failure to do so may result in issues during upgrade. Follow the procedure below to upgrade your M21. You will first have to install the VPS GUI Manager application on your Windows Host PC using the procedures provided in the previous section. Also, you will have to have downloaded the M21 system firmware when you downloaded the VPS GUI software.
- Page 33 M21 Video Generator / Analyzer – Quick Start Guide 2. Download the M21 System software from the Teledyne LeCroy downloads page: https://teledynelecroy.com/support/softwaredownload/. 3. Navigate to the M21 software downloads page using the screens indicated below. October 18, 2023 P/N 934512-00 - Rev. C...
- Page 34 M21 Video Generator / Analyzer – Quick Start Guide 4. Select the M21 release and download to your Windows Host PC and store in a convenient location. October 18, 2023 P/N 934512-00 - Rev. C...
- Page 35 M21 Video Generator / Analyzer – Quick Start Guide 5. If not already done, establish an Ethernet connection from the host Windows PC to the M21 instrument. Use the procedures provided in the previous section. Note: You can connect via an IP address or a host name. Refer to the procedures in the previous section.
- Page 36 M21 Video Generator / Analyzer – Quick Start Guide The M21 firmware will be transferred to the M21. 9. Finish by browsing to the location where you have installed the system firmware on your host PC (example below). Click Open and follow the prompts to upgrade your M21.
- Page 37 M21 Video Generator / Analyzer – Quick Start Guide 10. Once you get confirmation that the upgrade has finished, you will be instructed to power cycle the M21. You can now use your M21. October 18, 2023 P/N 934512-00 - Rev. C...
Need help?
Do you have a question about the M21 and is the answer not in the manual?
Questions and answers