
Related Manuals for Jensen JHD22


Summary of Contents for Jensen JHD22
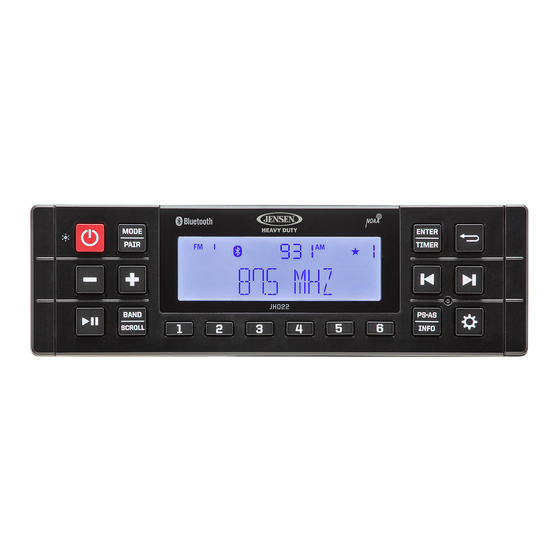
- Page 1 JHD22 AM/FM/WX/BT/PA/USB Heavy Duty Radio Installation and Operation Manual ENTER TIMER PS AS INFO...
-
Page 2: Table Of Contents
CONTENTS Introduction .................................3 Safety Information .............................4 Installation ................................4 Wiring ..................................6 Basic Operation ..............................7 Tuner Operation ............................... 10 Bluetooth Operation ............................12 Care and Maintenance ..........................14 Troubleshooting .............................. 15 Specifications ..............................16 FCC Notes ................................17... -
Page 3: Introduction
INTRODUCTION Hardware Kit Contents System Features Features of Jensen JHD22 mobile audio system include: ENTER • 14 Characters Alpha-Numeric Segmented LCD TIMER • AM/FM (US/Europe /Japan/Russia) Tuner with 30 Presets PS AS (12AM, 18FM) INFO Din Sleeve • Weatherband Tune... -
Page 4: Safety Information
SAFETY INFORMATION INSTALLATION This unit is designed for installation in vehicle cabs with When Driving Keep the volume level low enough to be aware of the road an existing 1-DIN radio opening. In many cases, a special and traffic conditions. installation kit will be required to mount the radio to the dashboard. - Page 5 • Avoid installing the unit where it will be subjected to 4. Place the radio in front of the dashboard opening so the wiring can be brought through the mounting sleeve. high temperatures from direct sunlight, hot air, or from a heater, or subject to excessive dust, dirt or vibration.
-
Page 6: Wiring
WIRING Removing the Unit To remove the radio after installation, remove the plastic end caps, insert the removal keys straight back until they click, and then pull the radio out. If removal keys are inserted at an angle, they will not lock properly to release the unit. Sleeve Removal Key Removal Key... -
Page 7: Basic Operation
BASIC OPERATION NOTE: Weatherband mode will be skipped when the Region menu option is set to “Europe/ Russia / Japan”. Reset The RESET button (8) should be activated for the following ENTER TIMER reasons: • Initial installation of the unit when all wiring is completed. •... - Page 8 of available options (Lock/Unlock > Connect/ Disconnect Treble Level Press the or buttons to adjust the Treble level range from > Delete and List loops). Press ENTER/TIMER button to “-7” to “+7”. select options. Balance • Lock/Unlock: Press ENTER/TIMER button to lock Press the or buttons to adjust the Balance between the or unlock device.
- Page 9 • Reset System Defaults: Press the ENTER/TIMER button and NOTE: LCD panels may take longer to respond when subjected to cold temperatures for an extended period of time. In Press or buttons to select Confirm. Press the ENTER/ addition, the visibility of the characters on the LCD may TIMER to return the unit to factory default set up values.
-
Page 10: Tuner Operation
PA Operation Select a Band • Connect PA Microphone (JMICHFP) with a 4-PIN connector Press the BAND/SCROLL button (17) to change between FM1, FM2, FM3, AM1 and AM2. to the 4-PIN socket on the rear of the unit. Manual Tuning •... - Page 11 Automatically Store / Preset Scan (AS/PS) "WB-1", WB-2", "WB-3", "WB-4", "WB-5", "WB-6" or "WB-7". The seven frequencies are shown in the following table: Automatically Store WB Frequencies Select an AM or FM band. Press and hold the AS•PS button (10) for 2 seconds to automatically select 6 strong stations.
-
Page 12: Bluetooth Operation
Press the or buttons to choose Lock/ over a range of up to 10 meters. Unlock, Disconnect or Delete for this device. LOCK/UNLOCK: The JHD22 can store up to 5 devices for • Bluetooth connection. The devices are stored in FIFO (First in First Out) order. - Page 13 2. Press and hold the MODE/PAIR button (2) for three seconds to make the JHD22 available on your Bluetooth device. Navigate the List 3. On your Bluetooth device, select JHD22 once it becomes Press ENTER/TIMER Press ENTER/TIMER BT Device available to pair and connect your device. Enter the Device 1 pairing password (0000), if requested.
-
Page 14: Care And Maintenance
Ignition button (2) to return to Bluetooth mode and resume mobile phone audio playback. The most common source of noise in reception is the ignition system. This is a result of the radio being placed close to the NOTE: If a Bluetooth device is disconnected due to the power ignition system (engine). -
Page 15: Troubleshooting
TROUBLESHOOTING Symptom Cause Solution No power The vehicle’s accessory switch is not on If the power supply is properly connected to the vehicle’s accessory terminal, switch the ignition key to “ACC”. Fuse is blown Replace the fuse. No sound Volume too slow Adjust volume to audible level. -
Page 16: Specifications
SPECIFICATIONS FM Radio Frequency Coverage (USA) ................................... 87.5 to 107.9 MHz Frequency Coverage (Europe/ Russia/ Japan) ............................87.5 to 108 MHz Sensitivity (S/N = 30dB) ........................................2.2μV Stereo Separation ..........................................>25 dB AM/MW Frequency Range (USAl) ....................................530-1710 kHz Frequency Range (Europe/ Russia/ Japan) .............................. 522-1629 kHz Sensitivity (S/N=20dB) ........................................30 dB General Frequency band(s) (for Bluetooth) ................................2.4~2.4835GHz... -
Page 17: Fcc Notes
FCC NOTES WARNING! Changes or modifications to this unit not expressly approved by the party responsible for compliance could void the user’s authority to operate the equipment. NOTE: This equipment has been tested and found to comply with the limits for a Class B digital device, pursuant to Part 15 of the FCC Rules. - Page 18 ASA Electronics Corporation www.asaelectronics.com www.jensenheavyduty.com ©2022 ASA Electronics Corporation...
Need help?
Do you have a question about the JHD22 and is the answer not in the manual?
Questions and answers