
Related Manuals for Jensen JCR-310


Summary of Contents for Jensen JCR-310
- Page 1 AM/FM Stereo Dual Alarm Clock Radio With Top Loading CD Player USER MANUAL JCR-310 PLEASE READ THIS USER MANUAL COMPLETELY BEFORE OPERATING THIS UNIT AND RETAIN THIS BOOKLET FOR FUTURE REFERENCE.
-
Page 2: Dear Jensen® Customer
The serial number of this product is found on its bottom cover. You should note the serial number of this unit in the space provided as a permanent record of your purchase to aid in identification in the event of theft of loss. Model Number: JCR-310 Serial Number: ____________________... -
Page 3: Important Safety Instructions
WARNINGS WARNING: To reduce the risk of fire or electric shock, do not expose this appliance to rain or moisture. CAUTION: Use of controls or adjustments or performance of procedures other than those specified may result in hazardous radiation exposure. CAUTION - TO REDUCE THE RISK OF ELECTRIC SHOCK, DO NOT REMOVE COVER (OR BACK). - Page 4 Clean only with a dry cloth. Do not block any ventilation openings. Install in accordance with the manufacturer’s instructions. The appliance should be situated so that its location or position does not interfere with its proper ventilation. For example, the appliance should not be situated on a bed, sofa, rug, or similar surface that may block the ventilation openings;...
- Page 5 SAVE THESE INSTRUCTIONS IMPORTANT NOTE Avoid installing the unit in locations described below: • Places exposed to direct sunlight or close to heat radiating appliances such as electric heaters. • Places subject to constant vibration. • Dusty, humid or moist places. •...
-
Page 6: Compliance With Fcc Regulations
ON AC VOLTAGE Before use, check that the rated voltage of your unit matches your local voltage. • ON CONDENSATION When left in a heated room where it is warm and damp, water droplets or • condensation may form inside the CD player. When there is condensation inside the unit, the unit may not function normally. -
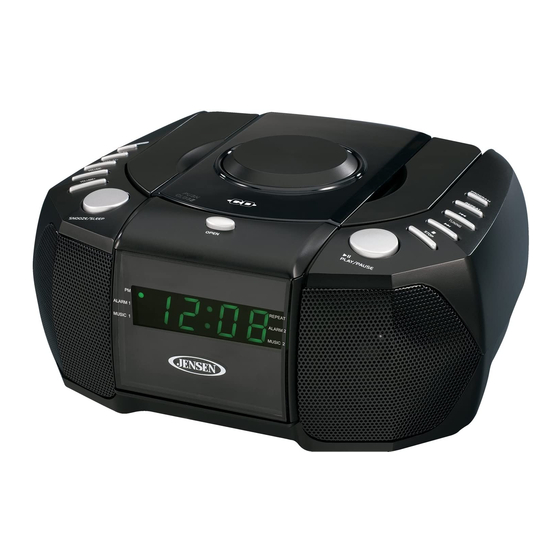
Page 7: Location Of Controls
LOCATION OF CONTROLS CD Door SPEAKERS Power On/Standby ; FUNCTION button PM Indicator DISPLAY button ALARM 1 - Beeping Indicator TIME SET/MEMORY/MEM+ button MUSIC 1 - Wake to CD/Radio/AUX Alarm Indicator ALARM 2/VOLUME- button REPEAT Indicator ALARM 1/VOLUME+ button ALARM 2 - Beeping Indicator SNOOZE /SLEEP button MUSIC 2 - Wake to CD/Radio/AUX Alarm Indicator... -
Page 8: Power Source
POWER SOURCE This unit operates using standard 120V~ 60Hz AC household power and 2 “AA” size (UM-3) batteries (Not included) for alarm clock backup. A. AC POWER CONNECTION 1. Plug the AC power cord into a standard 120V~ 60Hz AC wall outlet. Tap the Power On/Standby button to turn on the unit. - Page 9 3.) If you select Wake to music from Radio, make sure your AM/FM radio station is set to the station you want to be woken up to. The JCR-310 will play the last radio station you listened to when the wake time is reached.
-
Page 10: Listening To Radio
To stop the music alarm immediately, tap the Power button. SNOOZE FUNCTION When the alarm sounds, it can be temporarily stopped by pressing the SNOOZE button. The alarm sound will be suspended but the relative alarm indicator will keep flashing. The alarm will turn off for 9 minutes and then come again. - Page 11 Recalling a Preset Station 1. Tap the / FUNCTION button to turn on the unit. 2. Tap the / FUNCTION button to select AM or FM radio receiving mode. 3. To select desired preset channel, tap the MEM+ button repeatedly. CD OPERATION This CD player not only plays commercial CDs, but also self-compiled CD-R/RW discs.
- Page 12 3. In clock display mode, tap the DISPLAY button to show the current track number on the display. The current track number will revert back to show the time after 30 seconds. 4. To stop the CD playback, press the STOP button once.
-
Page 13: Sleep Timer Function
SLEEP TIMER FUNCTION The sleep timer allows you to turn the unit off after a designated time is reached. 1. To activate the sleep timer, turn the unit on and either load a CD, tune to the desired radio station or listening to music via AUX IN. 2. -
Page 14: Care And Maintenance
CARE AND MAINTENANCE Avoid operating your unit under direct sunlight or in hot, humid or dusty places. Keep your unit away from heating appliances and sources of electrical noise such as fluorescent lamps or motors. If drop-outs or interruptions occur in the music during CD play, or if the CD fails to play at all, its bottom surface may require cleaning. -
Page 15: Specifications
Unit not in CD function Select CD mode. mode. CD disc does not Audio disc is installed Insert audio disc with label play incorrectly. side up. It the disc is self-compiled, the Use better quality blank media media used and retest. compatible with the player. - Page 16 90 DAY LIMITED WARRANTY AND SERVICE VALID IN THE U.S.A ONLY SPECTRA MERCHANDISING INTERNATIONAL, INC. warrants this unit to be free from defective materials or factory workmanship for a period of 90 days from the date of original customer purchase and provided the product is utilized within the U.S.A. This warranty is not assignable or transferable.
- Page 17 IF THE UNIT IS OUTSIDE THE WARRANTY PERIOD, please include a check for $20.00 to cover the cost of repair, handling and return postage. All out of warranty returns must be sent prepaid. It is recommended that you contact SPECTRA first at 1-800-777-5331 or by email at custserv@spectraintl.com for updated information on the unit requiring service.
Need help?
Do you have a question about the JCR-310 and is the answer not in the manual?
Questions and answers
hot to turn off the alarms I & II
To turn off alarms I and II on the Jensen JCR-310:
1. Tap the ALARM 1 or ALARM 2 button repeatedly until "OFF" mode is selected.
2. Wait a few seconds to confirm. The corresponding alarm indicator (ALARM 1 or ALARM 2) will turn off.
This disables the alarm for the next day.
This answer is automatically generated
What does the code "OP" stand for and how do I clear it?
How to turn the alarms off completely?
To turn off alarms on the Jensen JCR-310, follow these steps:
1. After setting the alarm time, tap the ALARM button to toggle the alarm on or off.
2. Ensure the alarm indicator on the display is turned off to confirm the alarm is deactivated.
This answer is automatically generated
@Mr. Anderson