
Subscribe to Our Youtube Channel
Related Manuals for Power Fist JOBSITE 195A


Summary of Contents for Power Fist JOBSITE 195A
- Page 1 V1.0 9125766 Please read and understand all instructions before use. Retain this manual for future reference.
- Page 2 This page is intentionally left blank.
- Page 3 V1.0 ARC WELDER/GENERATOR 9125766 SPECIFICATIONS Starting Watts 6,500 Watts Running Watts 6,000 Watts Voltage Rating 120/240V AC Amperage Rating 54/27A Receptacles (4) 120V AC (20A GFCI) and a 240V AC (30A) twist lock Skill Level Medium Welding Style MMA (ARC) AC/DC Output Generator: AC Welding Machine: DC...
- Page 4 9125766 ARC WELDER/GENERATOR V1.0 HAZARD DEFINITIONS Please familiarize yourself with the hazard notices found in this manual. A notice is an alert that there is a possibility of property damage, injury or death if certain instructions are not followed. This notice indicates an immediate and specific hazard that will result in DANGER! severe personal injury or death if the proper precautions are not taken.
- Page 5 V1.0 ARC WELDER/GENERATOR 9125766 PERSONAL PROTECTIVE EQUIPMENT Always wear impact safety goggles that provide front and side protection for the eyes. Eye protection equipment should comply with CSA Z94.3-07 or ANSI Z87.1 standards based on the type of work performed. Wear the appropriate type of full-face shield in addition to safety googles, as the work can create glare or infrared/ultraviolet light.
- Page 6 9125766 ARC WELDER/GENERATOR V1.0 Wear fire resistant earplugs when welding overhead to prevent spatter or slag from falling into ear. This tool can cause hearing damage. Wear hearing protection gear with an appropriate Noise Reduction Rating to withstand the decibel levels PROTECTIVE CLOTHING Wear a leather apron or jacket, leather welding gloves and full foot protection.
- Page 7 V1.0 ARC WELDER/GENERATOR 9125766 The user can take the additional precaution of informing another person in the work area of the potential danger, so that person can watch for indications that the user is suffering from oxygen deprivation. PERSONAL PRECAUTIONS Control the tool, personal movement and the work environment to avoid personal injury or damage to tool.
- Page 8 9125766 ARC WELDER/GENERATOR V1.0 Disconnect all electrical devices, tools and appliances from the generator before starting or stopping the engine. Failure to do so can damage the welder/generator and connected electrical devices, tools and appliances. Welding requires helmets with full face protection per CSA standard Z94.3.1.
- Page 9 V1.0 ARC WELDER/GENERATOR 9125766 16. Never dip the electrode in water for cooling. Remove the electrode from the holder when not in use. 18. Do not point the electrode at yourself or bystanders. 19. Do not use a welding machine to thaw frozen pipes. 20.
- Page 10 9125766 ARC WELDER/GENERATOR V1.0 The ground clamp. The electrode. Any metal parts on the electrode holder. The output terminals. Insulate yourself from the electrical current and ground using electrical insulating mats or covers big enough to prevent physical contact with the workpiece or ground.
- Page 11 V1.0 ARC WELDER/GENERATOR 9125766 when storing. Such preventive safety measures reduce the risk of starting the tool accidentally. Always be aware of the position of your hands relative to the welding machine. Avoid awkward hand positions where a sudden slip could cause a hand to move into the electrode.
- Page 12 9125766 ARC WELDER/GENERATOR V1.0 Do not perform any welding work on containers that held flammable or toxic substance, until they are cleaned by a person trained in removing toxic and flammable substances and vapours per the American Welding Standard AWS F4.1. Open a container before performing any welding work on it.
- Page 13 V1.0 ARC WELDER/GENERATOR 9125766 ELECTROMAGNETIC FIELDS WARNING! Stop welding immediately and move away from the welding machine if you feel faint, dizzy, nausea or shocks. Seek medical attention. Electromagnetic Fields (EMF) can interfere with electronic devices such as pacemakers. Anyone with a pacemaker should consult with their doctor before working with or near an arc welding unit.
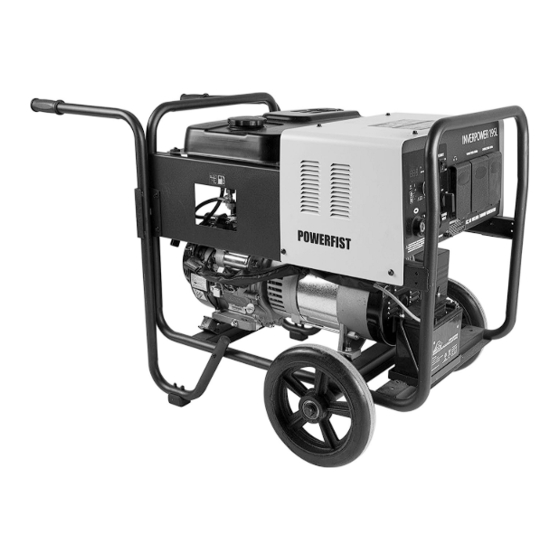
- Page 14 9125766 ARC WELDER/GENERATOR V1.0 Bolt seal, Fuel cup seal and Solenoid Seal) IDENTIFICATION KEY FIGURE 1. Welding Control Power Outlets Electrode Holder and Panel Power Lead Cable Battery Fuel Tank Cap Engine Muffler Fuel Valve Generator Motor Air Filter Fuel Tank Earth Clamp and Ground Lead Cable www.princessauto.com / 1-800-665-8685...
- Page 15 V1.0 ARC WELDER/GENERATOR 9125766 FIGURE 2. Digital Display Meter Positive Output Auxiliary Power/ Socket (+) Circuit Breaker Amperage dial Welding power Circuit Breaker ON/OFF Switch switch W. 240V (30A) Twist AC 120V Outlet Ground Bolt Lock (NEMA #5-20) Negative Output Socket (-) Amperage LED Indicator Arc Force...
- Page 16 9125766 ARC WELDER/GENERATOR V1.0 ASSEMBLY & INSTALLATION ASSEMBLY Raise the generator frame approximately 12 inches above the ground and place on blocks capable of holding the generator's weight. Slide an M8 flat washer onto four M8 x 25 bolts. Position the axle under the frame and FIGURE 4.
- Page 17 V1.0 ARC WELDER/GENERATOR 9125766 Inspect the generator and remove any packaging inside the frame. Make sure spark plug, muffler, fuel cap and air filter are in place and secured. Make sure the spark plug lead is securely connected to the spark plug, otherwise unintentional sparking can result, causing a fire or an electric shock.
- Page 18 9125766 ARC WELDER/GENERATOR V1.0 required. An improper connection can damage the house’ s electrical system, generator and any attached appliances or cause a fire. GENERATOR OPERATIONS PRE-OPERATION CHECKS WARNING! Do not start or run the generator in an enclosed area, even if doors or windows are open.
- Page 19 V1.0 ARC WELDER/GENERATOR 9125766 A generator installed on a trailer may be ground by attaching a length of 10 AWG wire from the generator's ground terminal to a bare metal spot on the trailer frame. Make sure any coatings are removed from the spot. Use tools with GFCI protection with this set-up when possible.
- Page 20 9125766 ARC WELDER/GENERATOR V1.0 Press the circuit breaker button below the outlet and it will pop out, disconnecting the outlet from the electrical circuit. Press again to pop it back in to restore power to the outlet. Turn off the generator immediately if an appliance becomes sluggish, stops suddenly or acts in an abnormal manner.
- Page 21 V1.0 ARC WELDER/GENERATOR 9125766 continues to run, but power is no longer supplied to the outlets until the generator is reset. The engine overload indicator light may turn on for a few seconds when attaching a load due to a power surge. This is normal. RESETTING THE GENERATOR The circuit breakers automatically turn OFF when the wattage of connected electronic devices exceeds the generator’...
- Page 22 9125766 ARC WELDER/GENERATOR V1.0 Insert the dinse connector into the negative output socket. The electrode has negative polarity in this configuration. Connect the earth clamp to the positive output socket. DCEN welding imparts more heat into the workpiece, creating a deeper molten pool for easier penetration.
- Page 23 V1.0 ARC WELDER/GENERATOR 9125766 residue from the flux that forms a slag covering over the weld metal must be chipped away after welding. These electrodes are identified by the wire diameter and by a series of letters and numbers. The letters and numbers identify the metal alloy and the intended use of the electrode.
- Page 24 9125766 ARC WELDER/GENERATOR V1.0 Connect the dinse connector of the electrode holder cable to the positive output socket for DCEP welding. Connect the dinse connector of the electrode holder cable to the negative output socket for DCEN or AC welding. Connect the earth ground cable to the other polarity output socket.
- Page 25 V1.0 ARC WELDER/GENERATOR 9125766 ELECTRODE SIZE The size of the electrode generally depends on the thickness of the section being welded and the thicker the section the larger the electrode required. The table gives the maximum size of electrodes that maybe used for various thicknesses of section based on using a general-purpose type 6013 electrode (see Table 1).
- Page 26 9125766 ARC WELDER/GENERATOR V1.0 the shortest arc that gives a good surface to the weld. An arc that is too long reduces weld penetration, produces spatter and creates a rough surface finish. An excessively short arc will cause sticking of the electrode and result in poor quality welds.
- Page 27 V1.0 ARC WELDER/GENERATOR 9125766 Maintain the tool’ s labels and name plates. These carry important information. If unreadable or missing, contact Princess Auto Ltd. for replacements. Clear the vents of any dirt, dust and debris on a regular basis to prevent the tool from overheating.
- Page 28 9125766 ARC WELDER/GENERATOR V1.0 BATTERY MAINTENANCE Avoid the risk of battery short circuits during transport, storage or disposal by isolating both terminals with adhesive tape or pack the battery in a plastic bag or a cardboard box. Charge batteries in a designated, well-ventilated area to avoid gas buildup. The longest life and best performance can be obtained if the battery pack is charged when the air temperature is between 50 to 86°F (10 to 30°C).
- Page 29 V1.0 ARC WELDER/GENERATOR 9125766 DISPOSAL Recycle a tool damaged beyond repair at the appropriate facility. TROUBLESHOOTING Visit a Princess Auto Ltd. location for a solution if the tool does not function properly or parts are missing. If unable to do so, have a qualified technician service the tool.
- Page 30 9125766 ARC WELDER/GENERATOR V1.0 Unstable Arc during DC welding. Arc length too long. Shorten the arc length. Workpiece dirty, contaminated Remove moisture and materials like paint, grease, or moisture. oil and dirt, including mill scale from base metal. Loose electrode cable or Check to ensure that all connections are tight.
- Page 31 V1.0 ARC WELDER/GENERATOR 9125766 Uneven weld appearance Unsteady hand, wavering hand. Use two hands where possible to steady up, practice your technique. Electrode welds with different or unusual arc characteristic Incorrect polarity. Change the polarity, check the electrode manufacturer for correct polarity. Distortion −...
- Page 32 9125766 ARC WELDER/GENERATOR V1.0 PARTS BREAKDOWN PARTS LIST Description Description Power outlet cover Inverter PCB Power outlet cover Support bracket Welding power switch PFC inductor Output socket Circuit Breaker Engine power switch Over-current protector Amperage dial GFCI Outlet Shock absorber 1 120/240V (30A) twist lock Front panel PCB Insulation sleeve...
- Page 33 V1.0 ARC WELDER/GENERATOR 9125766 Description Description Battery Bracket Foot Rubber shock-absorber Cotter Pin Hook 2 Generator Battery Handle cover Flat washer Support plate Wheel Right-handle assembly Hook 1 Control panel Axle Rubber handle grip Frame Fuel Tank Page 33 www.princessauto.com / 1-800-665-8685...
- Page 34 9125766 ARC WELDER/GENERATOR V1.0 APPENDIX A WELDING SHADE GUIDE www.princessauto.com / 1-800-665-8685 Page 34...
- Page 35 V1.0 ARC WELDER/GENERATOR 9125766 APPENDIX B WATTAGE REFERENCE CHART Wattage listed is approximate only. Check tool or appliance for actual wattage. Determine the equipments wattage (Volts x Amps = Watts). If starting watts are not listed on the tool, add the running watts again. Tool or Appliance Rated Watts (Running) Surge Watts (Starting)
- Page 36 9125766 ARC WELDER/GENERATOR V1.0 APPENDIX C WIRING DIAGRAM www.princessauto.com / 1-800-665-8685 Page 36...
- Page 37 V1,0 9125766 Vous devez lire et comprendre toutes les instructions avant d'utiliser l'appareil. Conservez ce manuel afin de pouvoir le consulter plus tard.
- Page 38 Cette page a été laissée blanche intentionnellement.
- Page 39 V1.0 SOUDEUSE À L’ A RC/GÉNÉRATRICE 9125766 SPÉCIFICATIONS Puissance de démarrage (W) 6 500 Watt Puissance de fonctionnement (W) 6 000 Watt Source d’énergie 120/240 Vca Intensité de courant nominale 54/27 A Prise de courant (4) 120 Vca (20 A DDFT) et (1) 240 Vca (30 A) verrouillable par rotation Niveau de compétence Moyen...
- Page 40 9125766 SOUDEUSE À L’ A RC/GÉNÉRATRICE V1.0 SÉCURITÉ AVERTISSEMENT! Veuillez lire et comprendre toutes les instructions avant d’utiliser cet outil. L’opérateur doit respecter les précautions élémentaires pour réduire le risque de blessure corporelle ou de dommage à l’équipement. DÉFINITIONS DE DANGER Veuillez vous familiariser avec les avis de danger qui sont présentés dans ce manuel.
- Page 41 V1.0 SOUDEUSE À L’ A RC/GÉNÉRATRICE 9125766 Les étincelles et le laitier résultant du soudage peuvent provoquer un incendie. Enlevez la matière combustible à une distance de 12 m (39 pi) de l'appareil de soudage. Assurez-vous de disposer d'un extincteur à la portée de la main (voir Précautions pour éviter les incendies et les explosions).
- Page 42 9125766 SOUDEUSE À L’ A RC/GÉNÉRATRICE V1.0 Protégez vos yeux contre la lumière provoquée lors du soudage en portant un casque de soudeur muni d'un filtre dont la teinte convient au type de soudage que vous effectuez. Le processus de soudage produit une lumière blanche intense, ainsi qu'une lumière infrarouge et ultraviolette dont les rayons peuvent causer des brûlures à...
- Page 43 V1.0 SOUDEUSE À L’ A RC/GÉNÉRATRICE 9125766 Ne portez pas de vêtements ou d'équipement de protection effiloché, huileux ou graisseux, puisqu'il peut s'allumer sous la chaleur du laitier et des étincelles projetés. Portez des vêtements épais qui ne laissent aucune surface de peau exposée.
- Page 44 9125766 SOUDEUSE À L’ A RC/GÉNÉRATRICE V1.0 N’utilisez pas l’outil si vous êtes fatigué ou sous l’effet de drogues, d’alcool ou de médicaments. N’utilisez pas l’outil si vous devez étirer les bras pour vous en servir. Une stabilité et un équilibre appropriés sont nécessaires afin d’avoir un meilleur contrôle en cas de situations inattendues.
- Page 45 V1.0 SOUDEUSE À L’ A RC/GÉNÉRATRICE 9125766 Tous les utilisateurs doivent comprendre le fonctionnement de toutes les commandes et savoir comment arrêter la génératrice rapidement en cas d’urgence. Évitez de placer quoi que ce soit sur la soudeuse/génératrice lorsqu’elle est en marche. Débranchez tous les dispositifs, outils et appareils électriques de la génératrice avant de démarrer ou d’arrêter le moteur.
- Page 46 9125766 SOUDEUSE À L’ A RC/GÉNÉRATRICE V1.0 Ne manipulez pas le métal chaud ou les tiges des électrodes avec les mains nues. Une telle manipulation pourrait entraîner des brûlures. 12. N'utilisez pas l’appareil à souder si vos mouvements sont limités ou s'il existe un risque de chute.
- Page 47 V1.0 SOUDEUSE À L’ A RC/GÉNÉRATRICE 9125766 avec des surfaces mises à la masse. Il y a un risque plus élevé de décharge électrique si votre corps est mis à la masse. N’exposez pas la machine de soudure à la pluie, à la neige, au gel ou à d’autres conditions humides ou mouillées.
- Page 48 9125766 SOUDEUSE À L’ A RC/GÉNÉRATRICE V1.0 Ne dépassez pas le cycle de service ou l'ampérage nécessaire en fonction du type de soudage. Un ampérage excessif peut avoir pour effet de détériorer l'isolant de protection, provoquant ainsi un risque de choc (voir Spécifications).
- Page 49 V1.0 SOUDEUSE À L’ A RC/GÉNÉRATRICE 9125766 N’usée jamais un machine de soudure avec une électrode qui présente des craquelures ou usée. Remplacez la électrode de l’outil avant de l’utiliser. Ne dirigez jamais la machine de soudure vers votre personne. Cela pourrait causer une blessure.
- Page 50 9125766 SOUDEUSE À L’ A RC/GÉNÉRATRICE V1.0 substances et des émanations toxiques et inflammables conformément à la American Welding Standard AWS F4.1. Ouvrez le contenant avant d'effectuer des travaux de soudage sur celui-ci. La chaleur produite lors du soudage provoquera une expansion de l'air et des gaz.
- Page 51 V1.0 SOUDEUSE À L’ A RC/GÉNÉRATRICE 9125766 Le rôle du guetteur d'incendie se poursuit au moins 30 minutes après qu'on ait terminé le soudage pour s'assurer qu'aucun incendie n'est causé par des étincelles couvantes ou par de la matière éjectée. CHAMPS ÉLECTROMAGNÉTIQUES AVERTISSEMENT! Interrompez immédiatement le soudage et éloignez- vous de la machine de soudure si vous êtes sur le point de vous...
- Page 52 9125766 SOUDEUSE À L’ A RC/GÉNÉRATRICE V1.0 DÉBALLAGE AVERTISSEMENT! Ne faites pas fonctionner l’outil s’il manque des pièces. Remplacez les pièces manquantes avant l’utilisation. Le non-respect de cet avertissement peut entraîner une défectuosité et des blessures corporelles. Retirez les pièces et les accessoires de l’emballage et vérifiez s’il y a des dommages.
- Page 53 V1.0 SOUDEUSE À L’ A RC/GÉNÉRATRICE 9125766 GUIDE D’ I DENTIFICATION FIGURE 1. Panneau de Prises électriques Porte-électrode et commandes de câble d’alimentation Batterie soudage Moteur Silencieux Capuchon Moteur de Filtre à air du réservoir génératrice Prise de terre et de carburant câble de mise à...
- Page 54 9125766 SOUDEUSE À L’ A RC/GÉNÉRATRICE V1.0 FIGURE 2. Affichage du Prise de 120 Vca Boulon de mise à la multimètre masse Prise de sortie numérique négative (-) Alimentation Molette de réglage auxiliaire/disjoncteur Prise de sortie de l’intensité de positive (+) Disjoncteur courant Interrupteur...
- Page 55 V1.0 SOUDEUSE À L’ A RC/GÉNÉRATRICE 9125766 Témoin à DEL d’intensité de courant Force de l’arc Témoin à DEL d’alimentation AA. Bouton de pénétration de l’arc AB. Sélecteur ARC/TIG AC. Indicateur à DEL de surcharge thermique FIGURE 3. ASSEMBLAGE ET INSTALLATION ASSEMBLAGE Soulevez le cadre de la génératrice à...
- Page 56 9125766 SOUDEUSE À L’ A RC/GÉNÉRATRICE V1.0 Séparez la poignée droite et la poignée gauche en fonction de l’orientation du support de poignée supérieur. Positionnez la poignée gauche contre le cadre de la génératrice et alignez les trous de boulon dans le panneau latéral ainsi que sur les tubes du cadre du bas.
- Page 57 V1.0 SOUDEUSE À L’ A RC/GÉNÉRATRICE 9125766 Les câbles de batterie ne sont pas compris à moins de figurer sur la liste dans la section du contenu à déballer. La polarité de chacun des câbles de batterie est affichée sur un couvercle de caoutchouc au point de branchement de chaque côté...
- Page 58 9125766 SOUDEUSE À L’ A RC/GÉNÉRATRICE V1.0 UTILISATIONS DE LA GÉNÉRATRICE VÉRIFICATIONS PRÉALABLES À L’UTILISATION AVERTISSEMENT! Ne mettez pas en marche et ne faites pas fonctionner la génératrice dans un lieu fermé, même si des portes ou des fenêtres sont ouvertes. Les gaz d’échappement du moteur contiennent du monoxyde de carbone, un gaz toxique qui est inodore et incolore.
- Page 59 V1.0 SOUDEUSE À L’ A RC/GÉNÉRATRICE 9125766 Une génératrice installée sur une remorque peut être mise à la terre en fixant une longueur de fil de 10 AWG à partir de la borne de masse de la génératrice jusqu’à une surface nue en métal du cadre de remorque. Assurez-vous que tout enduit a été...
- Page 60 9125766 SOUDEUSE À L’ A RC/GÉNÉRATRICE V1.0 Reliez les appareils, un à la fois, en commençant par l'appareil présentant le courant nominal le plus élevé. La plupart des moteurs d'appareils requièrent plus que leur puissance nominale en watts pour démarrer. Ne dépassez pas la limite de courant spécifiée pour une douille.
- Page 61 V1.0 SOUDEUSE À L’ A RC/GÉNÉRATRICE 9125766 essai tous les mois par la suite (consultez Soin et entretien – Vérification et réinitialisation de la prise à disjoncteur différentiel de fuite à la terre). Une prise DDFT ne fournira pas de protection contre une décharge électrique si la génératrice n’est pas correctement mise à...
- Page 62 9125766 SOUDEUSE À L’ A RC/GÉNÉRATRICE V1.0 RÉINITIALISATION DE LA GÉNÉRATRICE Les disjoncteurs se ferment automatiquement lorsque la puissance des appareils électroniques branchés excède la sortie nominale de la génératrice. Cela peut être causé par une surcharge des circuits de la génératrice ou par une réduction de l’efficacité...
- Page 63 V1.0 SOUDEUSE À L’ A RC/GÉNÉRATRICE 9125766 Insérez le connecteur Dinse dans la prise de courant de sortie négative. La électrode possède une polarité négative dans cette configuration. Reliez la prise de terre à la prise de courant de sortie positive. Le soudage à...
- Page 64 9125766 SOUDEUSE À L’ A RC/GÉNÉRATRICE V1.0 courant électrique permet de créer un arc entre le matériau de base et une électrode ou « baguette » consommable. La tige de l’électrode est fabriquée d’un matériau compatible avec le matériau de base à souder, et est recouverte d’un fondant qui produit des vapeurs gazeuses servant de gaz protecteur et procure une couche de laitier, deux éléments qui protègent la surface de soudage contre la contamination atmosphérique.
- Page 65 V1.0 SOUDEUSE À L’ A RC/GÉNÉRATRICE 9125766 PRÉPARATION DU SOUDAGE MMA Consultez la documentation transmise par le fabricant des électrodes pour déterminer le réglage adéquat. Une électrode peut être compatible avec le DCEN, le DCEP ou le CA. Activez la source d’alimentation et sélectionnez la fonction de soudage au moyen du sélecteur.
- Page 66 9125766 SOUDEUSE À L’ A RC/GÉNÉRATRICE V1.0 Tenez l'électrode légèrement au-dessus de la pièce à travailler pour entretenir l'arc tout en la déplaçant à une vitesse constante af i n de créer un dépôt uniforme de soudure (Fig. 9). Pour terminer la soudure, interrompez l'arc en retirant FIGURE 10.
- Page 67 V1.0 SOUDEUSE À L’ A RC/GÉNÉRATRICE 9125766 La soudeuse peut utiliser des électrodes E6011 CC+, E6013 CC+ et E7018 CC+. Consultez les instructions du fabricant d’électrodes pour connaître le courant approprié à votre application. ÉPAISSEUR MOYENNE DU MATÉRIAU DIAMÈTRE MAXIMAL COURANT NOMINAL RECOMMANDÉ...
- Page 68 9125766 SOUDEUSE À L’ A RC/GÉNÉRATRICE V1.0 VITESSE DE DÉPLACEMENT On recommande de déplacer l'électrode dans la direction du joint soudé, et ce, à une vitesse qui produira une passe de la taille requise. Pendant ce temps, on déplace l'électrode vers le bas afin de produire continuellement un arc de la longueur prescrite.
- Page 69 V1.0 SOUDEUSE À L’ A RC/GÉNÉRATRICE 9125766 VÉRIFICATION ET CORRECTION DE LA PRISE À DISJONCTEUR DIFFÉRENTIEL DE FUITE À LA TERRE Vérifiez la prise de disjoncteur de fuite à la terre à l’aide d’un appareil de vérification pour disjoncteur différentiel de fuite à la terre. Lisez le mode d’emploi de l’appareil de vérification pour disjoncteur différentiel de fuite à...
- Page 70 9125766 SOUDEUSE À L’ A RC/GÉNÉRATRICE V1.0 • Si vous utilisez un appareil, arrêtez la génératrice et débranchez l’appareil. Branchez l’appareil dans une prise fonctionnelle pour vous assurer qu’il ne constitue pas la source du problème. Consultez un électricien qualifié pour remplacer la prise de disjoncteur de fuite à...
- Page 71 V1.0 SOUDEUSE À L’ A RC/GÉNÉRATRICE 9125766 NETTOYAGE DE LA GÉNÉRATRICE Consultez le manuel du moteur pour connaître les instructions avant de commencer à nettoyer la génératrice. Des méthodes de nettoyage inappropriées peuvent causer des dommages au moteur. Débranchez tout l’équipement connecté à la génératrice. Déconnectez la batterie et mettez-la de côté...
- Page 72 9125766 SOUDEUSE À L’ A RC/GÉNÉRATRICE V1.0 GÉNÉRATRICE PROBLÈME CAUSE(S) POSSIBLE(S) SOLUTION(S) Aucun L’interrupteur principal n’est Tournez l’interrupteur principal à courant n’est pas fermé. la position ON (marche). produit. Mauvais contact avec la Ajustez la base de la douille. prise électrique. Ajustez selon les exigences dans le La vitesse nominale de la manuel.
- Page 73 V1.0 SOUDEUSE À L’ A RC/GÉNÉRATRICE 9125766 Arc instable lors du soudage à c.c. Arc trop long. Réduisez la longueur de l'arc. Pièce à travailler sale, Éliminez l'humidité et les matériaux comme la contaminée ou humide. peinture, la graisse, l'huile et la saleté, incluant la calamine produite lors du meulage du métal de Desserrez le câble d’électrode base.
- Page 74 9125766 SOUDEUSE À L’ A RC/GÉNÉRATRICE V1.0 Manque de pénétration Chaleur insuffisante Augmentez l'ampérage ou utilisez une électrode plus grosse. Technique de soudage déficiente Utilisez la technique de soudage prescrite ou demandez de l'aide afin de pouvoir utiliser la Préparation du joint qui laisse bonne technique.
- Page 75 V1.0 SOUDEUSE À L’ A RC/GÉNÉRATRICE 9125766 RÉPARTITION DES PIÈCES LISTE DES PIÈCES Description QTÉ Description QTÉ Couvercle de prise électrique Ventilateur Couvercle de prise électrique Filtre de PCB Interrupteur d’alimentation de Plaque supérieure soudage Onduleur de PCB Prise de sortie Ferrure d’appui Interrupteur d’alimentation du Bobine d’induction PFC...
- Page 76 9125766 SOUDEUSE À L’ A RC/GÉNÉRATRICE V1.0 Description QTÉ Description QTÉ Couvercle de réservoir de Crochet 1 carburant Essieu Moteur Cadre Silencieux Pied Ensemble côté gauche Goupille fendue Cylindre de carbone Génératrice Support de batterie Revêtement de poignée Amortisseur en caoutchouc Plaque de support Crochet 2 Ensemble de poignée droite...
- Page 77 V1.0 SOUDEUSE À L’ A RC/GÉNÉRATRICE 9125766 ANNEXE A GUIDE DES TEINTES POUR LE SOUDAGE Page 41 www.princessauto.com / 1-800-665-8685...
- Page 78 9125766 SOUDEUSE À L’ A RC/GÉNÉRATRICE V1.0 ANNEXE B TABLEAU DE RÉFÉRENCE DE LA PUISSANCE EN WATTS Les puissances en watts sont des approximations seulement. Vérifiez la puissance véritable de l’outil ou de l’appareil. Déterminez la puissance des équipements (V x A = W). Si la puissance en W au démarrage n’est pas indiquée sur l’outil, ajoutez encore la puissance en W en fonctionnement.
- Page 79 V1.0 SOUDEUSE À L’ A RC/GÉNÉRATRICE 9125766 Outil ou appareil Puissance nominale (en Puissance de W) (en cours de marche) surcharge (en W) (au démarrage) Rabot sur table – 6 po 1 800 W Scie circulaire à table/scie radiale – 10 2 000 W Compresseur d’air –...
- Page 80 9125766 SOUDEUSE À L’ A RC/GÉNÉRATRICE V1.0 ANNEXE C SCHÉMA DE CÂBLAGE www.princessauto.com / 1-800-665-8685 Page 44...
- Page 81 V1.0 9125766 Please read and understand all instructions before use. Retain this manual for future reference.
- Page 82 This page is intentionally left blank.
- Page 83 V1.0 FUEL ENGINE FOR 9125766 9125766 SPECIFICATIONS Engine Displacement 420cc Torque Rating 26.5 N-m / 2,500 RPM Start Type Power Switch or Recoil Pull Number of Cylinders Stroke Bore & Stroke 90 x 60 mm Compression Ratio 8.8:1 Shaft Diameter Ø26 mm Shaft Length 45.5 mm...
- Page 84 9125766 FUEL ENGINE FOR 9125766 V1.0 SAFETY WARNING! Read and understand all instructions before using this tool. The operator must follow basic precautions to reduce the risk of personal injury and/or damage to the equipment. HAZARD DEFINITIONS Please familiarize yourself with the hazard notices found in this manual. A notice is an alert that there is a possibility of property damage, injury or death if certain instructions are not followed.
- Page 85 V1.0 FUEL ENGINE FOR 9125766 9125766 Do not operate any tool when tired or under the influence of drugs, alcohol or medications. Avoid unintentional starts. Make sure the rocker switch is set to OFF before connecting the welding machine to a power supply. SPECIFIC SAFETY WARNING! DO NOT let comfort or familiarity with product (gained from repeated use) replace strict adherence to the tool safety rules.
- Page 86 9125766 FUEL ENGINE FOR 9125766 V1.0 lethal if left untreated. Evacuate all people to an area with clean air and seek immediate medical attention for any person experiencing the following symptoms: • Unconsciousness • Shortness of breath • Dizziness • Headache •...
- Page 87 V1.0 FUEL ENGINE FOR 9125766 9125766 Lead-acid generates oxygen and hydrogen gas as part of their normal function. Hydrogen becomes explosive when concentrations exceed 4.1 percent. Remove any source of ignition such as an open flame or a device like a heater from the area. Sparks may also ignite the gas. Lead batteries contain sulfuric acid, also referred to as electrolyte or battery acid.
- Page 88 9125766 FUEL ENGINE FOR 9125766 V1.0 The engine comes assembled. Check that the filter is in place. See Maintenance – Service the Air Filter The throttle lever can adjust the motor speed using a cable or as a manual lever. The throttle’...
- Page 89 V1.0 FUEL ENGINE FOR 9125766 9125766 ENGINE OPERATIONS Check the engine’ s condition before operating to maximize the user’ s safety and the service life of the engine. Ensure that the engine is level and the switch is in the OFF position before beginning the pre-operation checks. BEFORE STARTING THE ENGINE WARNING! Do not start or run engine in an enclosed area, even if the doors or windows are open.
- Page 90 9125766 FUEL ENGINE FOR 9125766 V1.0 Turn the fuel knob to the ON position. Move the choke lever to the CLOSED position if the engine is cold. The choke is unnecessary when restarting a warm engine. Move the throttle lever away from MIN. position, about 1/3 of way toward the MAX.
- Page 91 V1.0 FUEL ENGINE FOR 9125766 9125766 Move the throttle lever to the MIN. position. Turn the engine switch to the OFF position Turn the fuel valve to the OFF position. BATTERY PREPARATION NOTICE! Before using your tool for the first time, discharge the battery and then charge the battery pack completely.
- Page 92 9125766 FUEL ENGINE FOR 9125766 V1.0 MAINTENANCE SCHEDULE This schedule applies to normal operating conditions. If you operate your engine under severe conditions, such as sustained high-load or high- temperature operation or use in unusually wet or dusty conditions, consult a qualified technician for recommendations applicable to your individual needs and use.
- Page 93 V1.0 FUEL ENGINE FOR 9125766 9125766 additives. Gasoline with up to 10% ethanol (gasohol) or up to 15% MTBE (methyl tertiary butyl ether) may be used if required. If the engine is routinely operated at altitudes over 5,000 ft (1,524 meters), it will be necessary to have a qualified technician modify the engine for increased performance.
- Page 94 9125766 FUEL ENGINE FOR 9125766 V1.0 Fill the tank to approximately 1.5 in. (38 mm) below the top of the fuel tank to allow for fuel expansion. Take care to not overfill the tank. It may be necessary to lower the fuel level depending on operating conditions. Reinsert the fuel tank cap and tighten.
- Page 95 V1.0 FUEL ENGINE FOR 9125766 9125766 SAE 10W-30 is recommended for general, all- temperature use. Other viscosities shown on the chart may be used when the average temperature in your area is within the indicated range. Using 10W-30 oil when the temperature is above 27°C (80°F) may increase oil FIGURE 2.
- Page 96 9125766 FUEL ENGINE FOR 9125766 V1.0 Screw the dipstick back into place. Wipe up any spilled oil. Dispose of oil soaked rags in a proper hazardous waste container. IMPORTANT! Used oil must be disposed of properly. Do not pour it on the ground, down a drain or throw it in the trash.
- Page 97 V1.0 FUEL ENGINE FOR 9125766 9125766 Clean the mounting threads of debris and old oil. Coat the filter's seal with fresh oil. Screw the filter clockwise by hand onto the mounting threads until hand- tight. Then tighten another 3/4 turn. Check the oil filter manufacturer's instructions to determine if further tightening is necessary.
- Page 98 9125766 FUEL ENGINE FOR 9125766 V1.0 Clean dirty air filter with warm water and mild soap or a non- flammable solvent. Replace the water as necessary, until the water is no longer dirty. Do not use a flammable solvent to clean the foam filter.
- Page 99 V1.0 FUEL ENGINE FOR 9125766 9125766 NOTICE! When the carburetor has been modified for high altitude operation, the air fuel mixture will be too lean for low altitude use. Operation at altitudes below 5,000 ft (1,524 m) may cause the engine to overheat and result in serious engine damage.
- Page 100 9125766 FUEL ENGINE FOR 9125766 V1.0 Clean the sediment cup with a non-flammable solvent or detergent and rinse. Allow to dry. Some chemicals will damage the o-ring material. Check for compatibility or replace the o-ring. 10. Reassemble the sediment cup and o-ring. •...
- Page 101 V1.0 FUEL ENGINE FOR 9125766 9125766 Black exhaust smoke or high fuel consumption. REPLACEMENT PARTS The emission control systems on the engine is designed, built and certified to conform to Canadian emission regulations. Genuine parts are recommended when servicing the engine. Genuine replacement parts are manufactured to the same standards as the original parts.
- Page 102 9125766 FUEL ENGINE FOR 9125766 V1.0 Non-Gasket Style - Tighten an additional 1/16 turn more with a spark plug wrench or to the recommended torque if listed in the Specifications. Reconnect the spark plug lead to the spark plug. ADJUSTING THE ENGINE IDLE SETTING NOTICE! The engine speed is set by the factory.
- Page 103 V1.0 FUEL ENGINE FOR 9125766 9125766 Clean the terminals and rinse off the battery's outer surface before recharging. Brush away from yourself when cleaning debris from the battery and terminals to avoid potential contamination. Fill sulfuric acid (electrolyte) to the prescribed level before charging to reduce the chances of the electrolyte heating up excessively.
- Page 104 9125766 FUEL ENGINE FOR 9125766 V1.0 Take the following precautions if storing your engine for more than 30 days. • Store in a clean dry area. • Change the oil while the engine is still warm. • Clean debris from the engine’ s surface. •...
- Page 105 V1.0 FUEL ENGINE FOR 9125766 9125766 Run the engine outdoors for 10 minutes to ensure that treated gasoline has replaced the untreated gasoline in the carburetor. Stop the engine. STORING THE ENGINE WITH FUEL WARNING! Keep the engine away from ignition sources such as sparks, the open flame of a pilot light when storing with fuel in the tank.
- Page 106 9125766 FUEL ENGINE FOR 9125766 V1.0 TRANSPORTING WARNING! Transport the engine with an empty fuel tank or with the fuel valve lever secured in the OFF position. Keep the engine level when transporting to reduce the possibility of fuel leakage. Keep the engine level when transporting to reduce the possibility of fuel leakage.
- Page 107 V1.0 FUEL ENGINE FOR 9125766 9125766 TROUBLESHOOTING Visit a Princess Auto Ltd. location for a solution if the tool does not function properly or parts are missing. If unable to do so, have a qualified technician service the tool. Problem(s) Possible Cause(s) Suggested Solution(s) Engine will...
- Page 108 9125766 FUEL ENGINE FOR 9125766 V1.0 Problem(s) Possible Cause(s) Suggested Solution(s) Engine White smoke: White smoke: emits Engine overloaded. Reduce the load on the smoke. engine. Fuel Contaminated Replace fuel with clean fuel. Black smoke: Black smoke: Engine overloaded. Reduce the load on the Dirty air filter.
- Page 109 V1.0 FUEL ENGINE FOR 9125766 9125766 Problem(s) Possible Cause(s) Suggested Solution(s) Motor starts Motor is damaged. slow and Have a qualified technician The battery has insufficient doesn't reach service the tool. charge. operation Follow instructions to charge speed. Battery is worn out. the battery in Care &...
- Page 110 V1,0 9125766 Vous devez lire et comprendre toutes les instructions avant d'utiliser l'appareil. Conservez ce manuel afin de pouvoir le consulter plus tard.
- Page 111 Cette page a été laissée blanche intentionnellement.
- Page 112 V1.0 MOTEUR DE SOUDEUSE À L’ A RC/GÉNÉRATRICE POUR 9125766 9125766 SPÉCIFICATIONS Cylindrée du moteur 420 cm cubes Couple nominal 26,5 N-m / 2 500 tr/min Type de démarrage Interrupteur d’alimentation ou lanceur à rappel Nombre de cylindres Course Alésage et course 90 à...
- Page 113 9125766 MOTEUR DE SOUDEUSE À L’ A RC/GÉNÉRATRICE POUR 9125766 V1.0 Les instructions et les règles de sécurité de ce manuel s’ajoutent aux règles de sécurité et aux instructions du manuel de l’équipement. SÉCURITÉ AVERTISSEMENT! Veuillez lire et comprendre toutes les instructions avant d’utiliser cet outil.
- Page 114 V1.0 MOTEUR DE SOUDEUSE À L’ A RC/GÉNÉRATRICE POUR 9125766 9125766 SÉCURITÉ PERSONNELLE AVERTISSEMENT! Portez de l’équipement de protection individuelle homologué par l’ A ssociation canadienne de normalisation (CSA) ou l’ A merican National Standards Institute (ANSI). ÉQUIPEMENT DE PROTECTION INDIVIDUELLE Portez toujours des lunettes antiprojections qui offrent une protection frontale et latérale pour les yeux.
- Page 115 9125766 MOTEUR DE SOUDEUSE À L’ A RC/GÉNÉRATRICE POUR 9125766 V1.0 Retirez les débris accumulés du silencieux et dans la zone du cylindre. Les débris combustibles comme les feuilles, l’herbe, les buissons, etc. peuvent prendre feu s’ils viennent en contact avec un moteur chaud.
- Page 116 V1.0 MOTEUR DE SOUDEUSE À L’ A RC/GÉNÉRATRICE POUR 9125766 9125766 AVERTISSEMENT! La batterie contient un acide puissant. Évitez tout contact avec la peau et les yeux. En cas de contact, lavez-vous la peau ou rincez-vous les yeux immédiatement avec de l’eau pendant 30 minutes sans interruption.
- Page 117 9125766 MOTEUR DE SOUDEUSE À L’ A RC/GÉNÉRATRICE POUR 9125766 V1.0 peau en cas de fuite ou d’éclaboussure. L’acide peut également constituer une menace s’il est inhalé ou ingéré accidentellement. L’acide peut détruire les vêtements habituels et blesser la peau qui se trouve en dessous. Portez des lunettes de sécurité...
- Page 118 V1.0 MOTEUR DE SOUDEUSE À L’ A RC/GÉNÉRATRICE POUR 9125766 9125766 ASSEMBLAGE ET INSTALLATION AVANT LA PREMIÈRE UTILISATION AVIS! Le moteur ne contient pas d’huile au moment de son expédition. Avant de démarrer le moteur, ajoutez de l’huile conformément aux instructions présentées dans ce manuel.
- Page 119 9125766 MOTEUR DE SOUDEUSE À L’ A RC/GÉNÉRATRICE POUR 9125766 V1.0 La polarité de chacun des câbles de batterie est affichée sur un couvercle de caoutchouc au point de branchement de chaque côté du moteur de démarrage. Enlevez les écrous à oreilles des bornes positive (+) et négative (-) de la batterie.
- Page 120 V1.0 MOTEUR DE SOUDEUSE À L’ A RC/GÉNÉRATRICE POUR 9125766 9125766 Vérifiez le niveau d’huile moteur. Si le moteur tourne avec un niveau d’huile insuffisant, celui-ci risquerait d’être endommagé. Regardez autour et sous le moteur afin de détecter les signes de fuites d’huile ou d’essence.
- Page 121 9125766 MOTEUR DE SOUDEUSE À L’ A RC/GÉNÉRATRICE POUR 9125766 V1.0 Tirez légèrement sur la poignée de démarreur jusqu’à ce que vous sentiez une résistance, puis tirez la poignée brusquement. Le moteur doit tourner, puis démarrer. Évitez que la poignée du démarreur ne revienne en frappant le moteur.
- Page 122 V1.0 MOTEUR DE SOUDEUSE À L’ A RC/GÉNÉRATRICE POUR 9125766 9125766 Réglez l’interrupteur à gâchette de l’outil à la position OFF (arrêt) avant d’installer ou d’enlever la batterie. Cela sert à éviter les blessures causées par les démarrages accidentels. Vérifiez le niveau d’alimentation de la batterie avant chaque utilisation. ENTRETIEN DU MOTEUR La section suivante comprend un calendrier d’entretien, des méthodes d’inspection de routine et des méthodes d’entretien simples qui font appel à...
- Page 123 9125766 MOTEUR DE SOUDEUSE À L’ A RC/GÉNÉRATRICE POUR 9125766 V1.0 vous présentera des recommandations adaptées à vos besoins et à votre usage particulier. Période d’entretien normale Avant Premier 3 mois 6 mois Annuellement chaque mois ou ou 50 ou 100 ou 300 utilisation/ les 20...
- Page 124 V1.0 MOTEUR DE SOUDEUSE À L’ A RC/GÉNÉRATRICE POUR 9125766 9125766 contenant jusqu’à 10 % d’éthanol (gazohol) ou jusqu’à 15 % d’ETBM (éther méthylique ter-butylique) peut être utilisée, au besoin. Si le moteur fait normalement l’objet d’une utilisation à des altitudes supérieures à...
- Page 125 9125766 MOTEUR DE SOUDEUSE À L’ A RC/GÉNÉRATRICE POUR 9125766 V1.0 Faites le plein à l’extérieur ou dans un endroit bien aéré et essuyez immédiatement tout carburant déversé. Le carburant peut endommager la peinture et le plastique. Arrêtez le moteur et placez l’équipement sur une surface de niveau. Laissez refroidir le moteur durant au moins 2 minutes avant de retirer le capuchon du réservoir de carburant.
- Page 126 V1.0 MOTEUR DE SOUDEUSE À L’ A RC/GÉNÉRATRICE POUR 9125766 9125766 • N’oubliez pas de vérifier l’étanchéité du joint torique lorsque le moteur est ravitaillé. L’anneau pourrait ne pas reposer correctement en place. HUILE MOTEUR AVIS! Les huiles sans détergent et pour moteurs à 2 temps endommageront un moteur à...
- Page 127 9125766 MOTEUR DE SOUDEUSE À L’ A RC/GÉNÉRATRICE POUR 9125766 V1.0 Réinsérez la jauge d’huile dans le goulot de remplissage jusqu’à ce qu’elle repose sur le rebord de l’orifice. Ne vissez pas le bouchon de remplissage d’huile dans l’orifice. Retirez la jauge d’huile et vérifiez si le niveau d’huile se situe entre les marques «...
- Page 128 V1.0 MOTEUR DE SOUDEUSE À L’ A RC/GÉNÉRATRICE POUR 9125766 9125766 Retirez la jauge d’huile. Placez un récipient approprié sous le bouchon de vidange d’huile. Retirez le bouchon de vidange d’huile et laissez l’huile s’écouler dans le récipient approprié. Installez le bouchon de vidange d’huile et serrez-le à...
- Page 129 9125766 MOTEUR DE SOUDEUSE À L’ A RC/GÉNÉRATRICE POUR 9125766 V1.0 Arrêtez le moteur, puis vérifiez le niveau d’huile. Ajoutez plus d’huile au besoin. ENTRETIEN DU FILTRE À AIR AVIS! Si vous faites fonctionner le moteur avec un filtre à air endommagé ou sans filtre à...
- Page 130 V1.0 MOTEUR DE SOUDEUSE À L’ A RC/GÉNÉRATRICE POUR 9125766 9125766 changement de filtre. Cela est dû à l’excès d’huile provenant du filtre; le phénomène est temporaire. Réinstallez le filtre dans le carter et fixez-le en place. Installez le filtre à air sur le carburateur et fixez-le en place avec une vis. RÉGLAGE DU CARBURATEUR N’ajustez jamais le carburateur.
- Page 131 9125766 MOTEUR DE SOUDEUSE À L’ A RC/GÉNÉRATRICE POUR 9125766 V1.0 INSTALLATION DE LA TROUSSE POUR HAUTE ALTITUDE ATTENTION! Portez des gants de latex ou de caoutchouc lorsque vous manipulez le bac de sédimentation. Le bac pourrait contenir du carburant, ce qui provoquera une irritation de la peau. Une exposition prolongée et répétée du carburant sur la peau peut avoir pour effet de sécher et de fendiller la peau.
- Page 132 V1.0 MOTEUR DE SOUDEUSE À L’ A RC/GÉNÉRATRICE POUR 9125766 9125766 Remplacez le gicleur principal par le gicleur principal de remplacement nécessaire en fonction de votre plage d’altitude (pièce 1A ou 2A). Nettoyez le bac de sédimentation au moyen d’un solvant ou d’un détergent ininflammable et rincez-le ensuite.
- Page 133 9125766 MOTEUR DE SOUDEUSE À L’ A RC/GÉNÉRATRICE POUR 9125766 V1.0 PROBLÈMES POUVANT INFLUENCER LES ÉMISSIONS Si vous êtes conscient des symptômes suivants, faites inspecter et réparer votre moteur par un technicien qualifié. Démarrage difficile ou calage après le démarrage. Ralenti brusque.
- Page 134 V1.0 MOTEUR DE SOUDEUSE À L’ A RC/GÉNÉRATRICE POUR 9125766 9125766 Vérifiez l’écartement à l’aide d’une jauge de bougies. Au besoin, rétablissez l’écartement (consultez Spécifications). Corrigez cet écart en courbant doucement l’électrode. Vérifiez l’éclateur après chaque ajustement. Installez la bougie à la main jusqu’à ce qu’elle soit serrée. Évitez de déformer le filetage de la bougie.
- Page 135 9125766 MOTEUR DE SOUDEUSE À L’ A RC/GÉNÉRATRICE POUR 9125766 V1.0 Chargez les batteries dans un endroit désigné, bien aéré afin d’empêcher toute accumulation de gaz. Pour prolonger la durée utile et obtenir le meilleur rendement qui soit, chargez le bloc-batterie lorsque la température ambiante se situe entre 10 et 30 °C (50 et 86 °F).
- Page 136 V1.0 MOTEUR DE SOUDEUSE À L’ A RC/GÉNÉRATRICE POUR 9125766 9125766 AVIS ! Ne nettoyez pas l'extérieur du moteur au moyen d'un tuyau d'arrosage ou d'une laveuse à pression. L'eau peut s'infiltrer dans le moteur au travers du filtre à air ou de l'ouverture du silencieux et endommager le cylindre.
- Page 137 9125766 MOTEUR DE SOUDEUSE À L’ A RC/GÉNÉRATRICE POUR 9125766 V1.0 • Videz tout le carburant du réservoir de carburant dans un récipient approprié aux fins d’entreposage. • Débranchez le câble de bougie et recouvrez son extrémité au moyen d’un ruban isolant.
- Page 138 V1.0 MOTEUR DE SOUDEUSE À L’ A RC/GÉNÉRATRICE POUR 9125766 9125766 AJOUT D’UN STABILISATEUR POUR L’ESSENCE Remplissez le réservoir de carburant avec de l’essence fraîche. Si le réservoir n’est que partiellement rempli, l’air qu’il contient favorisera la détérioration du carburant pendant l’entreposage. Ajoutez du stabilisateur pour essence.
- Page 139 9125766 MOTEUR DE SOUDEUSE À L’ A RC/GÉNÉRATRICE POUR 9125766 V1.0 additifs à base d’alcool peut subir une démixtion d’essence, d’alcool et d’eau s’il est entreposé pendant plus que quelques semaines. SORTIE D’ENTREPOSAGE Vérifiez le moteur de la façon décrite dans la section Utilisation - Avant de démarrer du moteur.
- Page 140 V1.0 MOTEUR DE SOUDEUSE À L’ A RC/GÉNÉRATRICE POUR 9125766 9125766 circuitées si elles viennent en contact avec des objets de métal. En plus d’endommager la batterie, vous augmentez les risques d’incendie. MISE AU REBUT Recyclez tout outil endommagé et impossible à réparer dans une installation prévue à...
- Page 141 9125766 MOTEUR DE SOUDEUSE À L’ A RC/GÉNÉRATRICE POUR 9125766 V1.0 Problème(s) Cause(s) possible(s) Solution(s) proposée(s) Le moteur ne Le moteur est froid. Placez l’étrangleur à la position démarre pas. fermée (CLOSED) jusqu’à ce qu’il Le robinet de carburant soit chaud et placez-le ensuite à est à...
- Page 142 V1.0 MOTEUR DE SOUDEUSE À L’ A RC/GÉNÉRATRICE POUR 9125766 9125766 Problème(s) Cause(s) possible(s) Solution(s) proposée(s) Le moteur Les éléments filtrants sont Nettoyez ou remplacez les manque de bouchés. éléments filtrant. puissance. Essence viciée, moteur Vidangez le réservoir de conservé sans traiter ou carburant et le carburateur.
- Page 143 9125766 MOTEUR DE SOUDEUSE À L’ A RC/GÉNÉRATRICE POUR 9125766 V1.0 MACHINE DE SOUDURE Problème(s) Cause(s) possible(s) Solution(s) proposée(s) La machine de Vérifiez si la source L’alimentation fournie est soudure ne d’alimentation est toujours interrompue. démarre pas. disponible. Les composants du moteur Demandez à...
- Page 144 V1.0 MOTEUR DE SOUDEUSE À L’ A RC/GÉNÉRATRICE POUR 9125766 9125766 Problème(s) Cause(s) possible(s) Solution(s) proposée(s) L’outil émet des Vérifiez si les composants Les pièces du machine de sons de l’outil sont obstrués ou soudure pourraient se frotter inhabituels. désalignés. Lubrifiez, réparez ou se coincer.
Need help?
Do you have a question about the JOBSITE 195A and is the answer not in the manual?
Questions and answers