Table of Contents
Advertisement
Available languages
Available languages
Quick Links
For further information, please go to www.mi.com
Manufactured for: Xiaomi Communications Co., Ltd.
Manufactured by: Dreame (Tianjin) Information Technology Co., Ltd. (a Mi Ecosystem company)
Address: Room 2112-1-1, South District, Finance and Trade Center, No.6975 Yazhou Road, Dongjiang Bonded Port Area, Tianjin Pilot Free Trade Zone, Tianjin, China
Para más información, visite la página web www.mi.com.
Fabricado para: Xiaomi Communications Co., Ltd.
Fabricado por: Dreame (Tianjin) Information Technology Co., Ltd. (una compañía de Mi Ecosystem)
Dirección: Room 2112-1-1, South District, Finance and Trade Center, No.6975 Yazhou Road, Dongjiang Bonded Port Area, Tianjin Pilot Free Trade Zone, Tianjin, China
Per ulteriori informazioni, visitare il sito www.mi.com
Fabbricato per: Xiaomi Communications Co., Ltd.
Fabbricato da: Dreame (Tianjin) Information Technology Co., Ltd. (una società Mi Ecosystem)
Indirizzo: Room 2112-1-1, South District, Finance and Trade Center, No.6975 Yazhou Road, Dongjiang Bonded Port Area, Tianjin Pilot Free Trade Zone, Tianjin, Cina
Pour en savoir plus, rendez-vous sur le site www.mi.com.
Fabriqué pour: Xiaomi Communications Co., Ltd.
Fabricant: Dreame (Tianjin) Information Technology Co., Ltd. (une société Mi Ecosystem)
Adresse: Room 2112-1-1, South District, Finance and Trade Center, No.6975 Yazhou Road, Dongjiang Bonded Port Area, Tianjin Pilot Free Trade Zone, Tianjin, Chine
Für weitere Informationen besuchen Sie bitte www.mi.com.
Hergestellt für: Xiaomi Communications Co., Ltd.
Hersteller: Dreame (Tianjin) Information Technology Co., Ltd. (ein Unternehmen von Mi Ecosystem)
Adresse: Room 2112-1-1, South District, Finance and Trade Center, No.6975 Yazhou Road, Dongjiang Bonded Port Area, Tianjin Pilot Free Trade Zone, Tianjin, China
Дополнительную информацию см. на веб-сайте www.mi.com.
Изготовлено для: Сяоми Техкоммуникации Ко., Лтд. (Китай)
Изготовитель: Dreame (Tianjin) Information Technology Co., Ltd. (компания Mi Ecosystem)
Адрес: Room 2112-1-1, South District, Finance and Trade Center, No.6975 Yazhou Road, Dongjiang Bonded Port Area, Tianjin Pilot Free Trade Zone, Tianjin, China (Тяньцзинь, Китай)
詳細については、 www.mi.com をご覧ください。
販売元:Xiaomi Communications Co., Ltd.
製造元:Dreame (Tianjin) Information Technology Co., Ltd. (Mi Ecosystem 企業)
所在地:Room 2112-1-1, South District, Finance and Trade Center, No.6975 Yazhou Road, Dongjiang Bonded Port Area, Tianjin Pilot Free Trade Zone, Tianjin, China
A/S 가 필요하시면 구매처나 현지 공식 A/S 센터로 연락하거나 www.mi.com/kr/ 에 방문하여 확인하십시오 .
의뢰업체 : Xiaomi Communications Co., Ltd.
제조업체 : Dreame (Tianjin) Information Technology Co., Ltd. (Mi 에코시스템 컴퍼니 )
주소 : Room 2112-1-1, South District, Finance and Trade Center, No.6975 Yazhou Road, Dongjiang Bonded Port Area, Tianjin Pilot Free Trade Zone, Tianjin, China
Więcej informacji: www.mi.com
Wyprodukowano dla: Xiaomi Communications Co., Ltd.
Producent: Dreame (Tianjin) Information Technology Co., Ltd. (spółka Mi Ecosystem)
Adres: Room 2112-1-1, South District, Finance and Trade Center, No.6975 Yazhou Road, Dongjiang Bonded Port Area, Tianjin Pilot Free Trade Zone, Tianjin, Chiny
www.mi.com للمزيد من المعلومات، يرجى االنتقال إلى موقع
Xiaomi Communications Co., Ltd :الجهة المصن ّع لها
.
)Mi Ecosystem (إحدى شركاتDreame )Tianjin( Information Technology Co., Ltd :الجهة المصن ّعة
.
, تيانجين، الصينRoom 2112-1-1, South District, Finance and Trade Center, No.6975 Yazhou Road, Dongjiang Bonded Port Area, Tianjin Pilot Free Trade Zone :العنوان
Ga voor meer informatie naar www.mi.com
Geproduceerd voor: Xiaomi Communications Co., Ltd.
Geproduceerd door: Dreame (Tianjin) Information Technology Co., Ltd. (een Mi Ecosystem-bedrijf)
Adres: Room 2112-1-1, South District, Finance and Trade Center, No.6975 Yazhou Road, Dongjiang Bonded Port Area, Tianjin Pilot Free Trade Zone, Tianjin, China
Mi Vacuum Cleaner G10 User Manual
Manual de usuario de Mi Vacuum Cleaner G10
Manuale utente Mi Vacuum Cleaner G10
Manuel d'utilisation de Mi Vacuum Cleaner G10
Mi Handstaubsauger G10 Benutzerhandbuch
Руководство пользователя Пылесоса Mi G10
Mi ハンディクリーナー G10 取扱説明書
Mi 무선청소기 G10 사용 설명서
Instrukcja obsługi odkurzacza Mi G10
Mi منG10 دليل مستخدم المكنسة الكهربائية
Gebruikershandleiding Mi Stofzuiger G10
Made in China
· 01
· 29
· 57
· 85
· 113
· 141
· 169
· 197
· 225
· 253
· 281
Advertisement
Table of Contents

Related Manuals for Xiaomi Mi G10


Summary of Contents for Xiaomi Mi G10
- Page 1 Adres: Room 2112-1-1, South District, Finance and Trade Center, No.6975 Yazhou Road, Dongjiang Bonded Port Area, Tianjin Pilot Free Trade Zone, Tianjin, Chiny www.mi.com للمزيد من المعلومات، يرجى االنتقال إلى موقع Xiaomi Communications Co., Ltd :الجهة المصن ّع لها )Mi Ecosystem (إحدى شركاتDreame )Tianjin( Information Technology Co., Ltd :الجهة المصن ّعة...
-
Page 2: Safety Instructions
Safety Instructions This product is for household use only. Read this manual carefully before use, and retain it for future reference. This appliance can be used by children aged from 8 years and above and persons with reduced physical, sensory or mental capabilities or lack of experience and knowledge if they have been given supervision or instruction concerning use of the appliance in a safe way and understand the hazards involved. - Page 3 Safety Instructions Only use the BLJ24W308080P-V battery charger provided with the appliance. The dust compartment cover, pre-filter, cyclone assembly, and HEPA filter must all be properly installed prior Only use the P2046-7S1P-BC/P2046-7S1P-BCA battery pack provided with the appliance. to using the vacuum cleaner. If the charger or battery becomes damaged, it must be replaced with a genuine component purchased from Make sure the vacuum cleaner is unplugged when not used for extended periods as well as prior to the manufacturer or after-sales service department.
-
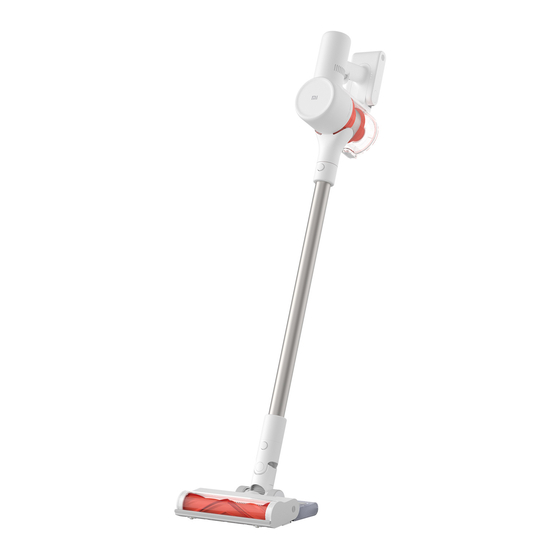
Page 4: Product Overview
Product Overview Product Overview Accessories List Component Name Charging Port Display Screen Charging Contacts × 2 Battery Status Indicator Dust Compartment Release Switch Power Button Press to turn on Release to turn off Smart High Torque Brush Bar Crevice Nozzle Charger 2-in-1 Charging &... -
Page 5: How To Install
Product Overview How to Install Display Screen Installing the Accessories onto the Vacuum Cleaner Insert until it clicks into place Battery Level Indicator Lock/Unlock Status Green: Battery level > 20% Red: Battery level ≤ 20% Suction Level Button Electronic Lock Button Press to switch the suction levels Press to lock/unlock the vacuum cleaner Note: If the vacuum cleaner experiences a malfunction, the display screen will show an error message. -
Page 6: Battery Status Indicator
How to Install Charging Installing the 2-in-1 Charging & Storage Mount Battery Status Indicator Notes: Fully charge the vacuum cleaner before using it for the first time. 1. The 2-in-1 charging & storage mount should be installed in a 3. Use a power drill with an 8 mm drill bit to drill a hole into each Blinking This will take about 4 hours. -
Page 7: How To Use
How to Use Setting Language Working Modes Using Different Accessories 2. Continuous Mode Press the button to enable Continuous Mode, then press the Press and hold the button for 3 seconds to open the language The vacuum cleaner has two working modes, you can select the 2-in-1 Brush Nozzle: For vacuuming curtains, sofas, vehicle power button to turn the vacuum cleaner on. -
Page 8: Care And Maintenance
How to Use How to Use Care & Maintenance Using Different Accessories Using the Mopping Function Maintenance Precautions 3. Attach the smart high torque brush bar to the water tank by lining up the magnets on each component until they snap Crevice Nozzle: For vacuuming narrow crevices and areas around Notes: Always use genuine parts to keep your warranty from being... - Page 9 Care & Maintenance Cleaning the Dust Compartment, Pre-filter, and 2. Press the dust compartment bottom cover release button, then 3. Push the dust compartment release switch in the direction 4. Remove the pre-filter first, then lift the handle of the cyclone Cyclone Assembly empty the contents.
- Page 10 Care & Maintenance Installing the Dust Compartment, Pre-filter, and 5. Rinse the pre-filter, cyclone assembly, and dust compartment Wipe the contact points of the vacuum cleaner with a soft dry 3. Slightly tilt the dust compartment so its slot aligns with the clip with water until they are clean, then set each component aside to cloth if they are dirty.
- Page 11 Care & Maintenance Cleaning the HEPA Filter 2. Remove the HEPA filter from the vacuum cleaner by pulling it 4. Allow the HEPA filter to thoroughly dry for at least 24 hours. 2. Reinstall the dust compartment. down in the direction shown in the figure. Note: It is recommended to clean the HEPA filter once every 4 to 6 months.
- Page 12 Care & Maintenance Cleaning the Smart High Torque Brush Bar Cleaning the Mini Electric Brush 1. Turn the lock counterclockwise until it stops, then remove 3. After extended use, the roller brush may become dirty and 1. Use a coin to turn the lock counterclockwise until you hear a 3.
-
Page 13: Battery Pack
Care & Maintenance Cleaning the Water Tank and Mop Pad Water Dispenser Filter Battery Pack 3. Remove the mop pad from the water tank. Notes: The water dispenser filter should be replaced if the water tank The vacuum cleaner contains a removable rechargeable When the vacuum cleaner is charging or not in use, remove the dispenses water too slowly or becomes clogged. -
Page 14: Specifications
Specifications Specifications Vacuum Cleaner Rechargeable Lithium-ion Battery Pack Model MJSCXCQPT Rated Voltage 25.2 V Battery Model P2046-7S1P-BC/P2046-7S1P-BCA Nominal Capacity 3000 mAh Charging Voltage 30.8 V Nominal Capacity 3000 mAh Nominal Voltage 25.2 V Rated Capacity 2800 mAh Rated Power 450 W Dust Compartment Capacity Max. - Page 15 Error Possible Cause Solution Error Possible Cause Solution Fully charge the vacuum cleaner, then The charger is not connected to the vacuum Make sure the charger is plugged in It is out of battery or has low battery. resume use. cleaner.
-
Page 16: Troubleshooting
Troubleshooting Instrucciones de seguridad Este producto es exclusivo para uso doméstico. Lea detenidamente este manual antes de usar el If the vacuum cleaner is not working properly, the screen display will show an error message. Please refer to the troubleshooting table below to find your solution based on the error message. - Page 17 Instrucciones de seguridad Utilice únicamente el tipo de batería aprobado (modelo P2046-7S1P-BC/P2046-7S1P-BCA). No hacerlo, podría La tapa del compartimento para el polvo, el prefiltro, el ciclón y el filtro HEPA deben estar bien instalados provocar que la batería de ion de litio se incendie. antes de usar la aspiradora.
-
Page 18: Descripción Del Producto
Descripción del producto Lista de accesorios Nombre del componente Puerto de carga Pantalla de visualización Contactos de carga × 2 Indicador del estado Botón para extraer de la batería el compar timento Botón de encendido de polvo Pulsar para encender Soltar para apagar Barra del cepillo de alto par Boquilla para... -
Page 19: Cómo Instalar
Descripción del producto Cómo instalar Pantalla de visualización Instalar los accesorios en la aspiradora Insértelo hasta que encaje en su sitio. Indicador del nivel de batería Estado de bloqueo/desbloqueo Verde: Nivel de la batería > 20 % Rojo: Nivel de la batería ≤ 20 % Botón de nivel de succión Botón de bloqueo electrónico Pulsar para cambiar los niveles de succión... - Page 20 Cómo instalar Carga Instalar el soporte de carga y almacenamiento 2 en 1 Indicador del estado de la batería Notas: Cargue completamente la aspiradora antes de usarla por primera 1. El soporte de carga y almacenamiento 2 en 1 debe ser instalado 3.
-
Page 21: Modo De Uso
Modo de uso Configuración del idioma Modos de funcionamiento Uso de los diferentes accesorios 2. Modo Continuo Presione el botón para activar el modo Continuo. Luego pulse Mantenga pulsado el botón durante 3 segundos para abrir La aspiradora tiene dos modos de funcionamiento. Puede Boquilla del cepillo 2 en 1: Para aspirar cortinas, sofás, interiores el botón de encendido para poner en marcha la aspiradora. -
Page 22: Cuidado Y Mantenimiento
Modo de uso Cuidado y mantenimiento Uso de los diferentes accesorios Usar la función de fregado Advertencias de mantenimiento 3. Conecte la barra del cepillo de alto par inteligente al depósito de agua, alineando los imanes de cada componente hasta que Boquilla para hendiduras: Para aspirar hendiduras estrechas Notas: Utilice siempre piezas originales para evitar que se anule la... - Page 23 Cuidado y mantenimiento Limpieza del compartimento para el polvo, el 2. Pulse el botón para extraer la tapa inferior del compartimento 3. Mueva el interruptor de liberación del compartimento para el 4. Quite primero el prefiltro, luego levante el mango del ciclón prefiltro y el ciclón de polvo y vacíe el contenido.
- Page 24 Cuidado y mantenimiento Instalación del compartimento para el polvo, el 5. Enjuague con agua el prefiltro, el ciclón y el compartimiento Limpie los puntos de contacto de la aspiradora con un trapo seco 3. Incline ligeramente el compartimento de polvo para que sus de polvo hasta que estén limpios.
- Page 25 Cuidado y mantenimiento Limpieza del filtro HEPA 2. Extraiga el filtro HEPA de la aspiradora tirando hacia abajo, en la 4. Deje secar el filtro HEPA durante, al menos, 24 horas. 2. Vuelva a instalar el compartimento de polvo. dirección que se muestra en la imagen. Nota: Se recomienda limpiar el filtro HEPA una vez cada 4 o 6 meses.
- Page 26 Cuidado y mantenimiento Limpieza de la barra del cepillo de alto par inteligente Limpieza del minicepillo eléctrico 1. Gire en sentido contrario a las agujas del reloj hasta que se 3. Tras un uso prolongado, puede que el rodillo se ensucie, por lo 1.
- Page 27 Cuidado y mantenimiento Limpieza del depósito de agua y la almohadilla de la Filtro del dispensador de agua Pack de batería 3. Extraiga la almohadilla de la mopa del depósito de agua. mopa En caso de que el depósito de agua suministre el agua muy La aspiradora contiene un pack de batería de ion de litio Notas: lentamente, o si se obstruye, debería sustituir el filtro del...
-
Page 28: Especificaciones
Especificaciones Especificaciones Aspiradora Pack de batería de ion de litio recargable Modelo MJSCXCQPT Tensión nominal 25,2 V Modelo de batería P2046-7S1P-BC/P2046-7S1P-BCA Capacidad nominal 3000 mAh Tensión de carga 30,8 V Capacidad nominal 3000 mAh Tensión nominal 25,2 V Capacidad nominal 2800 mAh Capacidad del Potencia nominal 450 W 0,6 L máx. -
Page 29: Preguntas Frecuentes
Preguntas frecuentes Error Posible causa Solución Error Posible causa Solución Cargue completamente la aspiradora y No tiene batería o le queda poca. Asegúrese de que el cargador esté bien reanude el uso. El cargador no está conectado a la aspiradora. conectado. -
Page 30: Solución De Problemas
Solución de problemas Istruzioni di sicurezza Questo prodotto è destinato esclusivamente all'utilizzo domestico. Leggere attentamente il Si la aspiradora no funciona con normalidad, en la pantalla aparecerá un mensaje de error. Consulte la tabla siguiente para encontrar la solución al problema en función del mensaje de error. presente manuale prima dell'uso del dispositivo e conservarlo per ogni riferimento futuro. - Page 31 Istruzioni di sicurezza Utilizzare esclusivamente il caricabatterie originale (modello: BLJ24W308080P-V) in dotazione con il Prima di utilizzare l'aspirapolvere, è necessario installare correttamente il coperchio del vano polvere, il pre- prodotto. filtro, il sistema ciclonico e il filtro HEPA. Utilizzare esclusivamente il tipo di batteria approvato (modello: P2046-7S1P-BC/P2046-7S1P-BCA). Assicurarsi che l'aspirapolvere sia scollegato dalla corrente quando non viene utilizzato per lunghi periodi di Se il caricabatterie o la batteria vengono danneggiati, è...
-
Page 32: Panoramica Del Prodotto
Panoramica del prodotto Elenco accessori Nome componente Porta di ricarica Schermo di 2 contatti di ricarica visualizzazione Indicatore di stato della Interruttore di rilascio batteria vano polvere Pulsante di accensione Premere per accendere Rilasciare per spegnere Barra della spazzola a coppia Ugello per fessure Caricabatterie Supporto di ricarica e appoggio 2-in-1... -
Page 33: Installazione
Panoramica del prodotto Installazione Schermo di visualizzazione Installazione degli accessori nell'aspirapolvere Inserire fino a udire un clic che indica il posizionamento corretto Indicatore livello batteria Stato di blocco/sblocco Verde: livello batteria > 20% Rosso: livello batteria ≤ 20% Pulsante livello di aspirazione Pulsante di blocco elettronico Premere per selezionare i livelli di Premere per bloccare/sbloccare... - Page 34 Installazione Ricarica Installazione del supporto di ricarica e appoggio 2-in-1 Indicatore di stato della batteria Note: Caricare completamente l'aspirapolvere prima di utilizzarlo per 1. Il supporto di ricarica e appoggio 2-in-1 deve essere installato in 3. Utilizzare un trapano elettrico con una punta da 8 mm per Spento Intermittente Acceso...
- Page 35 Modalità d'utilizzo Impostazione della lingua Modalità di funzionamento Uso degli accessori 2. Modalità continua Premere il pulsante per attivare la modalità continua, quindi Tenere premuto il pulsante per 3 secondi per aprire l'elenco L'aspirapolvere include due modalità di funzionamento. È possibile Ugello a spazzola 2-in-1: per aspirare tende, divani, interni di veicoli, premere il pulsante di accensione per attivare l'aspirapolvere.
-
Page 36: Cura E Manutenzione
Modalità d'utilizzo Cura e manutenzione Uso degli accessori Utilizzo della funzione lavapavimenti Precauzioni di manutenzione 3. Fissare la barra della spazzola a coppia elevata smart al serbatoio dell'acqua allineando i magneti su ciascun componente Utilizzare sempre parti originali per evitare che la garanzia Ugello per fessure: per aspirare fessure e zone strette intorno a Note: finché... - Page 37 Cura e manutenzione Pulizia del vano polvere, del pre-filtro e del sistema 2. Premere il pulsante di rilascio del coperchio inferiore del vano 3. Spingere l'interruttore di rilascio del vano polvere nella direzione 4. Rimuovere prima il pre-filtro, quindi sollevare l'impugnatura del ciclonico polvere, quindi svuotare il contenuto.
- Page 38 Cura e manutenzione Installazione del vano polvere, del pre-filtro e del 5. Sciacquare il pre-filtro, il sistema ciclonico e il vano polvere Se i punti di contatto dell'aspirapolvere sono sporchi, pulirli con 3. Inclinare leggermente il vano polvere in modo che il relativo con acqua finché...
- Page 39 Cura e manutenzione Pulizia del filtro HEPA 2. Rimuovere il filtro HEPA dall'aspirapolvere tirandolo verso il 4. Lasciare asciugare completamente il filtro HEPA per almeno 2. Reinstallare il vano polvere. basso nella direzione mostrata nella figura. 24 ore. Nota: Si consiglia di pulire il filtro HEPA una volta ogni 4-6 mesi. 1.
- Page 40 Cura e manutenzione Pulizia della barra della spazzola a coppia elevata smart Pulizia della mini spazzola elettrica 1. Ruotare il blocco in senso antiorario fino all'arresto, quindi 3. Dopo un uso prolungato, la spazzola a rullo può diventare molto 1. Usare una monetina per ruotare il blocco in senso antiorario 3.
- Page 41 Cura e manutenzione Pulizia del serbatoio dell'acqua e del panno Filtri dell'erogatore d'acqua Batteria 2. Svuotare il serbatoio dell'acqua. 3. Rimuovere il panno lavapavimenti dal serbatoio dell'acqua. lavapavimenti Se il serbatoio dell'acqua eroga l'acqua troppo lentamente o si L'aspirapolvere contiene una batteria ricaricabile agli ioni di litio Note: intasa, è...
-
Page 42: Specifiche Tecniche
Specifiche tecniche Aspirapolvere Batteria agli ioni di litio ricaricabile Modello MJSCXCQPT Tensione nominale 25,2 V Modello batteria P2046-7S1P-BC/P2046-7S1P-BCA Capacità nominale 3000 mAh Tensione di ricarica 30,8 V Capacità nominale 3000 mAh Tensione nominale 25,2 V Capacità nominale 2800 mAh Potenza nominale 450 W Capacità... -
Page 43: Domande Frequenti
Domande Frequenti Errore Possibile causa Soluzione Errore Possibile causa Soluzione Caricare completamente l'aspirapolvere, Assicurarsi che il caricabatterie sia La batteria è completamente o quasi scarica. Il caricabatterie non è collegato all'aspirapolvere. quindi riprendere l'uso. collegato correttamente. Entra in modalità di protezione da Attendere che l'aspirapolvere si raffreddi, La spia della batteria non si La batteria è... -
Page 44: Risoluzione Dei Problemi
Risoluzione dei problemi Consignes relatives à la sécurité Ce produit est conçu pour une utilisation domestique uniquement. Lisez attentivement ce manuel Se l'aspirapolvere non funziona correttamente, lo schermo di visualizzazione mostra un messaggio di errore. Per trovare una soluzione in base al messaggio di errore, consultare la tabella di risoluzione dei problemi riportata di seguito. - Page 45 Consignes relatives à la sécurité Utilisez uniquement le type de batterie approuvé (modèle P2046-7S1P-BC/P2046-7S1P-BCA). Le compartiment à poussière, le préfiltre, l’ensemble cyclone et le filtre HEPA doivent être correctement installés avant utilisation de l’aspirateur. Si le chargeur ou la batterie est endommagé(e), vous devez le/la remplacer par une pièce dédiée achetée Veillez à...
-
Page 46: Présentation Du Produit
Présentation du produit Liste des accessoires Nom du composant Port de recharge Écran d’affichage Contacts de charge x 2 Voyant d’état de la Bouton de batterie déverrouillage du Bouton d’alimentation compartiment à Appuyez pour allumer poussière Relâchez pour éteindre Barre de brosse intelligente à Suceur pour Chargeur Station de charge et de stockage 2-en-1... -
Page 47: Procédure D'installation
Présentation du produit Procédure d’installation Écran d’affichage Installation des accessoires sur l’aspirateur Insérez jusqu’à entendre un déclic Indicateur du niveau de batterie État verrouillé/déverrouillé Vert : Niveau de batterie > 20 % Rouge : Niveau de batterie ≤ 20 % Bouton de niveau d’aspiration Bouton de verrouillage électronique Appuyez pour changer le niveau Appuyez pour verrouiller/déverrouiller d’aspiration... - Page 48 Procédure d’installation Recharge Installation de la station de charge et de stockage Voyant d’état de la batterie 3. Utilisez une perceuse électrique avec une fraise de 8 mm pour Remarques : 2-en-1 percer un trou à chaque emplacement indiqué sur le patron Chargez entièrement la batterie de l’aspirateur avant la première Arrêt Clignotant...
- Page 49 Utilisation Configuration de la langue Modes de fonctionnement Utilisation des différents accessoires 2. Mode continu Appuyez sur le bouton pour activer le mode continu. Appuyez Appuyez et maintenez le bouton enfoncé pendant 3 secondes L’aspirateur dispose de deux modes de fonctionnement. Suceur brosse 2-en-1 : Pour l’aspiration de rideaux, canapés, ensuite sur le bouton marche/arrêt pour allumer l’appareil.
-
Page 50: Entretien Et Maintenance
Utilisation Entretien et maintenance Utilisation des différents accessoires Utilisation de la fonction lavage Précautions concernant la maintenance 3. Fixez la barre de brosse intelligente à couple élevé au réservoir d’eau en alignant les aimants situés sur chacune de ces pièces Utilisez toujours des pièces d’origine, faute de quoi la garantie Suceur pour fentes : Pour l’aspiration de fentes étroites et autour Remarques :... - Page 51 Entretien et maintenance Nettoyage du compartiment à poussière, du 2. Appuyez sur le bouton de déverrouillage du capot inférieur du 3. Poussez l’interrupteur de déverrouillage du compartiment à 4. Retirez d’abord le préfiltre, puis levez la poignée de l’ensemble préfiltre et de l’ensemble cyclone compartiment à...
- Page 52 Entretien et maintenance Installation du compartiment à poussière, du 5. Rincez le préfiltre, l’ensemble cyclone et le compartiment à Essuyez les points de contact de l’aspirateur avec un chiffon doux 3. Inclinez légèrement le compartiment à poussière pour que poussière avec de l’eau jusqu’à ce qu’ils soient propres. Ensuite, et sec s’ils sont sales.
- Page 53 Użytkowanie Ustawianie języka Tryby pracy Używanie różnych akcesoriów 2. Tryb ciągły W trybie czuwania odkurzacza nacisnąć przycisk , aby włączyć Nacisnąć i przytrzymać przycisk przez 3 sekundy, aby otworzyć Odkurzacz ma dwa tryby pracy, które można wybierać w zależności Dysza ze szczotką 2 w 1: do odkurzania zasłon, sof, wnętrz tryb ciągły, a następnie nacisnąć...
-
Page 54: Pielęgnacja I Konserwacja
Użytkowanie Pielęgnacja i konserwacja Używanie różnych akcesoriów Korzystanie z funkcji mycia Wskazówki dotyczące konserwacji 3. Przymocować wysokoobrotową szczotkę z wałkiem smart do zbiornika na wodę, dopasowując magnesy na każdym elemencie Dysza szczelinowa: do odkurzania wąskich szczelin i obszarów Uwagi: Zawsze używaj oryginalnych części, aby uniknąć unieważnienia gwarancji. aż... - Page 55 Pielęgnacja i konserwacja czyszczenie pojemnika na kurz, filtra wstępnego i 2. Nacisnąć przełącznik zwalniania dolnej pokrywy pojemnika na 3. Nacisnąć przełącznik zwalniania dolnej pokrywy pojemnika na 4. Wyjąć filtr wstępny, a następnie unieść uchwyt zespołu zespołu cyklonowego kurz, a następnie opróżnić zawartość zbiornika. kurz w kierunku wskazanym przez strzałkę, a następnie delikatnie cyklonowego, obrócić...
- Page 56 Pielęgnacja i konserwacja Montaż pojemnika na kurz, filtra wstępnego i 5. Spłukiwać filtr wstępny, zespół cyklonowy i pojemnik na kurz Jeśli punkty stykowe odkurzacza są zabrudzone, należy przetrzeć 3. Lekko przechylić pojemnik na kurz tak, aby jego szczelina wodą do momentu, aż będą czyste, a następnie odłożyć wszystkie je miękką, suchą...
-
Page 57: Czyszczenie Filtra Hepa
Pielęgnacja i konserwacja Czyszczenie filtra HEPA 2. Wyjąć filtr HEPA z odkurzacza, pociągając go w dół, jak pokazano 4. Pozostawić filtr HEPA do całkowitego wyschnięcia na co 2. Ponownie zamontować pojemnik na kurz. na rysunku. najmniej 24 godziny. Uwaga: zaleca się czyszczenie filtra HEPA co 4–6 miesięcy. 1. - Page 58 Pielęgnacja i konserwacja Czyszczenie wysokoobrotowej szczotki z wałkiem Czyszczenie miniszczotki elektrycznej 3. Po dłuższym użytkowaniu wałek czyszczący może być smart zabrudzony. Należy go umyć. 1. Użyć monety, aby obrócić blokadę w kierunku przeciwnym do 3. Po umyciu pozostawić wałek czyszczący do całkowitego ruchu wskazówek zegara, aż...
- Page 59 Pielęgnacja i konserwacja Czyszczenie zbiornika na wodę i wkładu myjącego Filtr dozownika wody Akumulator 2. Opróżnić zbiornik na wodę. 3. Zdemontować wkład myjący ze zbiornika na wodę. Uwagi: Filtr dozownika wody należy wymienić, jeżeli zbiornik dozuje wodę W odkurzaczu znajduje się wyjmowany akumulator litowo-jonowy. Na czas ładowania odkurzacza lub gdy nie jest on używany należy zbyt wolno lub zatyka się.
-
Page 60: Dane Techniczne
Dane techniczne Odkurzacz Akumulator litowo-jonowy Model MJSCXCQPT Napięcie znamionowe 25,2 V Model akumulatora P2046-7S1P-BC/P2046-7S1P-BCA Pojemność nominalna 3000 mAh Napięcie ładowania 30,8 V Pojemność znamionowa 3000 mAh Napięcie nominalne 25.2 V Pojemność znamionowa 2800 mAh Moc znamionowa 450 W Pojemność pojemnika na kurz Maks. -
Page 61: Pytania I Odpowiedzi
Pytania i odpowiedzi Błąd Prawdopodobna przyczyna Rozwiązanie Błąd Prawdopodobna przyczyna Rozwiązanie Akumulator jest rozładowany lub nie jest Całkowicie naładuj odkurzacz, a następnie Należy sprawdzić, czy ładowarka jest Ładowarka nie jest podłączona do odkurzacza. dostatecznie naładowany. wznów użytkowanie. podłączona prawidłowo. Urządzenie weszło w tryb ochrony przed Należy odczekać, aż... -
Page 62: Rozwiązywanie Problemów
Rozwiązywanie problemów تعليمات السالمة Jeśli odkurzacz nie działa prawidłowo, na wyświetlaczu pojawi się komunikat o błędzie. Prosimy o zapoznanie się z poniższą tabelą . ً هذا المنتج لالستخدام المنزلي فقط. اقرأ هذا الدليل بعناية قبل االستخدام واحتفظ به للرجوع إليه مستقبال rozwiązywania problemów, aby znaleźć... - Page 63 تعليمات السالمة ال تستخدم المكنسة الكهربائية اللتقاط السوائل القابلة لالشتعال أو سريعة االشتعال، مثل البنزين أو مزيل البقع أو األمونيا أو منظفات األحواض تحذير خطر نشوب حريق: ال تضع أي نوع من العطر على فلتر المكنسة الكهربائية. من المعروف أن هذه األنواع من المنتجات تحتوي على مواد .كيميائية...
- Page 64 نظرة عامة حول المنتج قائمة الملحقات اسم المكون منفذ الشحن شاشة العرض عدد 2 موصل شحن مؤشر حالة البطارية مفتاح تحرير حجرة الغبار زر التشغيل اضغط للتشغيل حرر إليقاف التشغيل شريط الفرشاة ذو عزم الدوران العالي الذكي شق فوهة شاحن 1 حامل...
- Page 65 نظرة عامة حول المنتج طريقة التركيب شاشة العرض تثبيت الملحقات يف المكنسة الكهربائية أد خ ِل الملحقات إلى أن تستقر يف مكانها مؤشر مستوى البطارية حالة القفل/إلغاء القفل 20% > أخضر: مستوى البطارية 20% ≤ أحمر: مستوى البطارية زر مستوى الشفط زر...
- Page 66 طريقة التركيب الشحن 1 تركيب حامل الشحن والتخزين 2 يف مؤشر حالة البطارية :مالحظات .اشحن هذا المكنسة الكهربائية بالكامل قبل استخدامها للمرة األولى تشغيل وميض إيقاف 3. استخدم مثقاب كهربائي مع رأس مثقاب يبلغ 8 مم لحفر حفرة يف كل 1.
- Page 67 طريقة االستخدام أوضاع العمل إعداد اللغة استخدام ملحقات مختلفة 2. الوضع المستمر لتمكين الوضع المستمر، ثم اضغط على زر الطاقة لتشغيل اضغط على الز تحتوي المكنسة الكهربائية على وضعي عمل، يمكنك اختيار الوضع المطلوب لمدة 3 ثوان ٍ لفتح قائمة اللغات، ثم اضغط اضغط...
- Page 68 طريقة االستخدام العناية والصيانة استخدام وظيفة المسح استخدام ملحقات مختلفة 3. قم بتثبيت شريط الفرشاة ذي عزم الدوران العالي الذكي بخزان المياه عن احتياطات الصيانة .طريق محاذاة المغناطيس على كل مكون حتى يلتصقان م ع ً ا .استخدم دائ م ً ا قطع الغيار األصلية إلبقاء الضمان ساري ً ا :مالحظات...
- Page 69 العناية والصيانة 4. أزل الفلتراألولي أوال ً ، ثم ارفع مقبض مجموعة الفرازة المخروطية،وادره .2. اضغط على زر تحرير الغطاء السفلي لحجرة الغبار، ثم أفرغ المحتويات تنظيف حجرة الغبار والفلتر األولي ومجموعة الفرازة 3. ادفع مفتاح تحرير حجرة الغبار يف االتجاه الذي يشير إليه السهم، بعدها، قم يف...
- Page 70 العناية والصيانة 3. قم بإمالة حجرة الغبار قليال ً حتى تتوافق فتحتها مع المشبك الموجود على امسح نقاط التالمس يف المكنسة الكهربائية بقطعة قماش جافة وناعمة إذا 5. اشطف الفلتر األولي ومجموعة الفرازة المخروطية وحجرة الغبار بالماء حتى تثبيت حجرة الغبار والفلتر األولي ومجموعة الفرازة .كانت...
- Page 71 العناية والصيانة ) بكفاءة عالية من المكنسةHEPA( 2. أزل فلتر تنقية جسيمات الهواء ) بكفاءة عاليةHEPA( تنظيف فلتر تنقية جسيمات الهواء 24 ) بكفاءة عالية يجف تما م ً ا لمدةHEPA( 4. دع فلتر تنقية جسيمات الهواء .2. قم بإعادة تثبيت حجرة الغبار .الكهربائية...
- Page 72 العناية والصيانة تنظيف شريط الفرشاة ذو عزم الدوران العالي الذكي تنظيف الفرشاة الكهربائية الصغيرة .3. بعد االستخدام الممتد، قد تصبح الفرشاة الدوارة متسخة ويجب غسلها 1. أدر القفل يف عكس اتجاه عقارب الساعة حتى يتوقف، ثم أزل الفرشاة 3. بعد الغسيل، دع الفرشاة الدوارة تجف جي د ًا عن طريق وضعها واقفة يف 1.
- Page 73 العناية والصيانة .3. قم بإزالة الممسحة من خزان المياه تنظيف خزان المياه والممسحة علبة البطارية فلتر موزع الماء :مالحظات تحتوي المكنسة الكهربائية على علبة بطارية ليثيوم أيون القابلة لإلزالة وإلعادة يجب استبدال فلتر موزع الماء إذا كان خزان المياه يوزع المياه ببطء شديد أو أثناء...
- Page 74 المواصفات مكنسة كهربائية علبة بطارية ليثيوم أيون القابلة للشحن 8.03 فولت جهد الشحن MJSCXCQPT الطراز 0003 مللي أمبير/ساعة السعة االستيعابية االسمية P2046-7S1P-BC/P2046-7S1P-BCA طراز البطارية 054 واط الطاقة المق د ّرة 2.52 فولت الجهد المق د ّر 0082 مللي أمبير/ساعة تصنيف السعة 2.52 فولت...
- Page 75 األسئلة الشائعة الحل السبب المحتمل خطأ الحل السبب المحتمل خطأ .اشحن المكنسة بالكامل، ثم استأنف التشغيل .بطارية المكنسة فارغة أو منخفضة .تأكد من أن الشاحن موصل بشكل صحيح .الشاحن ليس موصال ً بالمكنسة الكهربائية انتظر إلى أن تبرد المكنسة الكهربائية ثم أعد تم...
- Page 76 Veiligheidsinstructies استكشاف األخطاء وإصالحها Dit product is alleen bestemd voor huishoudelijk gebruik. Lees de handleiding vóór gebruik إذا لم تعمل المكنسة الكهربائية بشكل صحيح، ستعرض شاشة العرض رسالة خطأ. يرجى الرجوع إلى جدول استكشاف األخطاء وإصالحها أدناه للعثور على الحل .الخاص...
- Page 77 0 °C tot 40 °C. Doet u dit niet, dan kan de batterij beschadigd raken. dat is aangeschaft bij de fabrikant of de klantenservice. Gebruik alleen accessoires en vervangende onderdelen die door Xiaomi zijn goedgekeurd. Gebruik de stofzuiger niet om ontvlambare of brandbare vloeistoffen op te zuigen, zoals benzine, De klep van het stofcompartiment, het voorfilter, de cyclooneenheid en het HEPA-filter moeten allemaal bleekmiddel, ammoniak of afvoerreinigers.
-
Page 78: Lijst Met Accessoires
Productoverzicht Productoverzicht Lijst met accessoires Naam van onderdeel Oplaadpoort Weergavescherm Oplaadcontactpunten × 2 Indicator batterijstatus Ontgrendelingsknop van het stofcompartiment Aan-uitknop Indrukken om in te schakelen loslaten om uit te schakelen Slimme borstelstang met hoge Spleetmondstuk Oplader 2-in-1-steun voor opladen en opbergen koppel (inclusief schroef ×... - Page 79 Productoverzicht Installatie Weergavescherm De accessoires op de stofzuiger plaatsen Insteken totdat deze op zijn plaats klikt Batterijniveau-indicator Vergrendelings-/ ontgrendelingsstatus Groen: Batterijniveau > 20% Rood: Batterijniveau ≤ 20% Knop voor het zuigniveau Knop voor elektronische vergrendeling Druk deze knop in om tussen zuigniveaus te schakelen Druk deze knop in om de stofzuiger te vergrendelen/ontgrendelen...
- Page 80 Installatie Opladen De 2-in-1-steun voor opladen en opbergen installeren Indicator batterijstatus Opmerkingen: Laad de stofzuiger vóór het eerste gebruik volledig op. Dit duurt 1. De 2-in-1-steun voor opladen en opbergen moet op een koele, 3. Gebruik een boormachine met een boor van 8 mm om een gat in Knipperend ongeveer 4 uur.
- Page 81 Gebruik Taal instellen Werkingsmodi Verschillende accessoires gebruiken 2. Continue modus Als de stofzuiger in de stand-bymodus staat, drukt u op de knop Houd de knop 3 seconden ingedrukt om de lijst met talen De stofzuiger heeft twee werkingsmodi die u kunt selecteren, 2-in-1-borstelopzetstuk: Voor het stofzuigen van gordijnen, om de Continue modus in te schakelen.
-
Page 82: Verzorging En Onderhoud
Gebruik Gebruik Verzorging en onderhoud Verschillende accessoires gebruiken De dweilfunctie gebruiken Voorzorgsmaatregelen voor het onderhoud 3. Bevestig de slimme borstelstang met hoge koppel aan het waterreservoir door de magneten van elk onderdeel uit te lijnen Spleetmondstuk: Voor het stofzuigen van smalle spleten en Opmerkingen: Gebruik altijd originele onderdelen om te voorkomen dat uw totdat ze in elkaar klikken. - Page 83 Verzorging en onderhoud Het stofcompartiment, het voorfilter en de 2. Druk op de ontgrendelingsknop van de bodemklep van het 3. Druk de ontgrendelingsknop van het stofcompartiment in de 4. Verwijder eerst het voorfilter, til vervolgens de hendel van cyclooneenheid reinigen stofcompartiment en verwijder de inhoud.
- Page 84 Verzorging en onderhoud Het stofcompartiment, het voorfilter en de 5. Spoel het voorfilter, de cyclooneenheid en het stofcompartiment Veeg eventuele vuile contactpunten van de stofzuiger af met een 3. Kantel het stofcompartiment een beetje, zodat de sleuf is met water tot deze schoon zijn. Leg vervolgens elk onderdeel weg zachte, droge doek.
- Page 85 Verzorging en onderhoud Het HEPA-filter reinigen 2. Verwijder het HEPA-filter uit de stofzuiger door het naar 4. Laat het HEPA-filter minstens 24 uur helemaal drogen. 2. Plaats het stofcompartiment opnieuw. beneden te trekken in de richting die in de afbeelding wordt Opmerking: Het wordt aanbevolen om het HEPA-filter eens in weergegeven.
- Page 86 Verzorging en onderhoud De slimme borstelstang met hoge koppel reinigen De elektrische miniborstel reinigen 1. Draai de vergrendeling tegen de klok in totdat deze niet 3. Na langdurig gebruik kan de rolborstel vies worden, waarna deze 1. Gebruik een munt om het slot tegen de klok in te draaien totdat 3.
- Page 87 Verzorging en onderhoud Het waterreservoir en het dweilopzetstuk reinigen Het filter van de waterdispenser Batterij 3. Verwijder het dweilopzetstuk van het waterreservoir. Opmerkingen: Het filter van de waterdispenser moet worden vervangen als het De stofzuiger bevat een verwijderbare oplaadbare lithium- Wanneer de stofzuiger wordt opgeladen of niet wordt gebruikt, waterreservoir te langzaam water afgeeft of verstopt raakt.
- Page 88 Specificaties Specificaties Stofzuiger Oplaadbare lithium-ionbatterij Model MJSCXCQPT Nominale spanning 25,2 V Batterijmodel P2046-7S1P-BC/P2046-7S1P-BCA Nominale capaciteit 3000 mAh Oplaadspanning 30,8 V Nominale capaciteit 3000 mAh Nominale spanning 25,2 V Nominaal vermogen: 2800 mAh Nominaal vermogen 450 W Capaciteit van het stofcompartiment Max.
-
Page 89: Veelgestelde Vragen
Veelgestelde vragen Fout Mogelijke oorzaken Oplossing Fout Mogelijke oorzaken Oplossing Laad de stofzuiger volledig op en hervat Zorg ervoor dat de oplader juist is De batterij is leeg of bijna leeg. De oplader is niet aangesloten op de stofzuiger. het gebruik. aangesloten. -
Page 90: Problemen Oplossen
Problemen oplossen Als de stofzuiger niet goed werkt, wordt op het scherm een foutmelding weergegeven. Raadpleeg de onderstaande tabel voor probleemoplossing om op basis van de foutmelding de juiste oplossing te vinden. Foutpictogram Foutbericht Oplossing Verwijder eventuele blokkades uit het stofcompartiment, de verlengstang en/of de Luchtweg is geblokkeerd slimme borstelstang met hoge koppel.
Need help?
Do you have a question about the Mi G10 and is the answer not in the manual?
Questions and answers