
Related Manuals for Catler KM 8013


Summary of Contents for Catler KM 8013
- Page 1 STAND MIXER Instructions for use STAND MIXER Návod k obsluze KUCHYŇSKÝ ROBOT Návod na obsluhu KUCHYNSKÝ ROBOT Használati útmutató KONYHAI ROBOTGÉP Instrukcja obsługi ROBOT KUCHENNY KUCHENNY KM 8013...
- Page 2 STAND MIXER...
-
Page 3: Table Of Contents
TABLE OF CONTENTS Catler Recommends Safety First Know Your Stand Mixer KM 8013 Stand Mixer Description Description of Accessories Operating Your Stand Mixer KM 8013 Before First Use Tilt-Back Head Turning On and Off Speed Control Using with the Blending Beaker... - Page 4 Congratulations on the purchase of your new KM 8013 stand mixer. CONGRATULATIONS...
-
Page 5: Catler Recommends Safety First
CATLER RECOMMENDS SAFETY FIRST We understand the importance of safety and that’s why we put your safety first from the initial design concept to the production itself. Nevertheless, we ask you to be careful when using electrical equipment and to observe the following guidelines: •... - Page 6 Vibrations during operation may cause the appliance to move. • Never use multiple attachments simultaneously. • Do not use this appliance with a programmable switch, timer switch or any other device that automatically switches the appliance on. CATLER RECOMMENDS SAFETY FIRST...
- Page 7 Do not use adapter plugs or extension cords to connect the appliance to a power socket. • To prevent electric shock, do not immerse the appliance, its base or the power cord in water or other liquids. CATLER RECOMMENDS SAFETY FIRST...
- Page 8 All repairs or adjustments must be performed at the nearest Catler authorised service centre. • Any maintenance other than routine cleaning must be entrusted to an authorised Catler service centre. •...
-
Page 9: Know Your Stand Mixer Km 8013
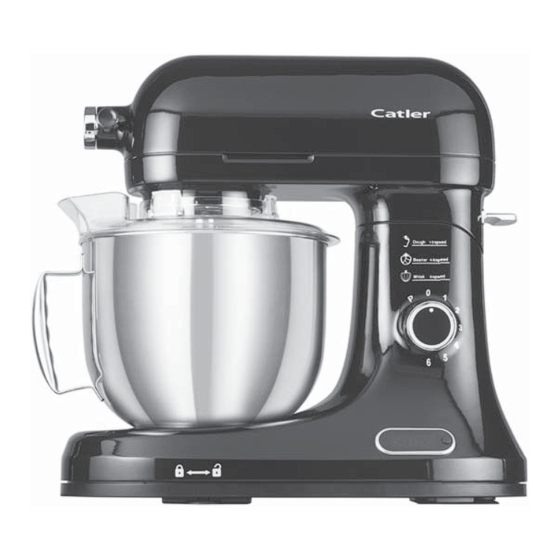
KNOW YOUR STAND MIXER KM 8013 STAND MIXER DESCRIPTION 1. Front cover 9. Lock button to lift and lower the tilt-back 2. Locking screw head 3. Drive shaft 10. Speed Control 4. Protective cover 11. Display 5. Blending beaker 12. Scale control button 6. -
Page 10: Description Of Accessories
DESCRIPTION OF ACCESSORIES MEAT GRINDER 1. Hopper 2. Meat grinder 3. Plunger 4. Grinding discs 5. Screw cap 6. Grinding blade 7. Screw shaft 8. Sausage attachment 9. Separator 10. Meat roll attachment 11. Cap KNOW YOUR STAND MIXER KM 8013... - Page 11 CUTTING AND GRATING ATTACHMENT 1. Plunger 2. Grating attachment 3. Coarse grater 4. Fine grater 5. Slicer KNOW YOUR STAND MIXER KM 8013...
-
Page 12: Operating Your Stand Mixer Km 8013
OPERATING YOUR STAND MIXER KM 8013 BEFORE FIRST USE TURNING ON AND OFF Before first use, remove all packaging Place the stand mixer on a firm, level and and advertising labels/stickers from the clean work surface at a sufficient distance appliance. Make sure you have removed all from the power outlet. - Page 13 Turn the rotary knob to position P and Fast whisking at hold the rotary knob in this position. Whisk maximum speed When you release the rotary knob to position 0, the stand mixer stops. OPERATING YOUR STAND MIXER KM 8013...
-
Page 14: Using With The Blending Beaker
Take the bowl by the handle and rotate it inserted in the base. anticlockwise to remove it from the base. 4. Place the protective cover on the tilt-back 13. Remove blend from the bowl. head from below, with the filling funnel OPERATING YOUR STAND MIXER KM 8013... -
Page 15: Using The Meat Grinder
(with the screw power outlet. shaft end pointing forward). 14. Remove the hopper from the filling funnel and put the bowl with the processed ingredients aside. OPERATING YOUR STAND MIXER KM 8013... -
Page 16: Using The Sausage Attachment
8. Now insert the power plug into a power of mixture in the casing, it could break socket. A short audible warning sounds during cooking or frying. and the speed control flashes. 9. Put the sausage making mixture in the hopper. OPERATING YOUR STAND MIXER KM 8013... -
Page 17: Using The Meat Roll Attachment
10. Turn the speed control dial to set the attachment’s internal chamber. Select required speed. We recommend that you a grater according to the ingredients set the initial speed to 1–3 and adjust as processing method. needed. OPERATING YOUR STAND MIXER KM 8013... -
Page 18: Using The Scale
12. Hold the cutting and grating attachment While the stand mixer is in scale mode, it is with one hand and release the locking not possible to adjust the speed. screw with the other. Carefully remove OPERATING YOUR STAND MIXER KM 8013... -
Page 19: Tips And Advice On Preparing The Dough
The minimum quantity is 3 egg whites (about 100 g) or 500 g of cream. The recommended speed is 5 to 6 and whisk for 1 to 5 minutes depending on the final consistency and amount of ingredients. OPERATING YOUR STAND MIXER KM 8013... -
Page 20: Care And Cleaning
them in warm water with a small amount of CARE AND CLEANING washing-up liquid for about 10 minutes. Before cleaning the appliance, always DISASSEMBLING AND CLEANING disconnect the plug of the power cord from THE MEAT GRINDER the mains socket and let it to cool down. When the meat grinder has been removed from the stand mixer, unscrew the screw WARNING! -
Page 21: Storage
warm water with a small amount of neutral washing-up liquid. Rinse in clean water properly and wipe dry. To clean the grinding chamber and the filling funnel, you can also use a fine bottle brush. DISASSEMBLING AND CLEANING THE CUTTING AND GRATING ATTACHMENT When the cutting and grating attachment has been removed from the stand mixer, carefully remove the grater the grinding... -
Page 22: Troubleshooting
TROUBLESHOOTING This chapter describes the most common problems you may encounter while using this appliance. If your problem is either not stated here or persists, stop using the appliance, unplug the power cord and contact your authorized service centre. UNDER NO CONDITION SHOULD YOU REPAIR OR DISASSEMBLE THE APPLIANCE YOURSELVES. - Page 23 INSTRUCTIONS AND INFORMATION ON DISPOSING OF USED PACKAGING MATERIALS Dispose of used packaging material at a site designated for waste in your municipality. DISPOSING OF USED ELECTRICAL AND ELECTRONIC EQUIPMENT This symbol on products or original documents means that used electric or electronic products must not be added to ordinary municipal waste.
- Page 24 WWW.CATLER.EU...
Need help?
Do you have a question about the KM 8013 and is the answer not in the manual?
Questions and answers