Magna-Matic MAG-8200 Series Original Instructions Manual
Professional lawn mower blade sharpeners and all options sets
Hide thumbs
Also See for MAG-8200 Series:
- Quick setup manual (10 pages) ,
- Install instructions manual (9 pages)

Subscribe to Our Youtube Channel
Related Manuals for Magna-Matic MAG-8200 Series


Summary of Contents for Magna-Matic MAG-8200 Series
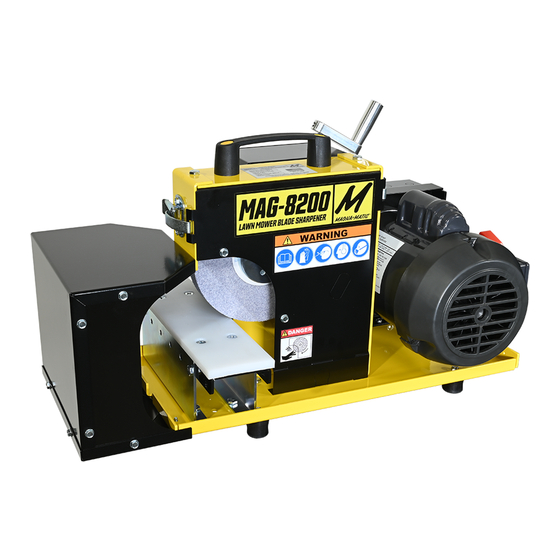
- Page 1 Original Instructions MAG-8200 SERIES PROFESSIONAL LAWN MOWER BLADE SHARPENERS AND ALL OPTIONS SETS...
-
Page 2: Box Inventory
THANK YOU, We sincerely appreciate your decision to make Magna-Matic your lawn mower blade sharpener. We understand there are other choices in the marketplace, and we are extremely confident that after the first few blades you sharpen, it will be evident you’ve chosen the best machine for the job. Rest assured that if you have a question or problem you will have complete customer support for all of our products. - Page 3 Water-Cooled Option (1) Water tray • (1) Splash guards for grit guard (left and right) • (4) Rubber feet for water tray, hardware, and corner supports • (1) Coolant tank with pump installed inside • (1) Coolant filter sock • (1) 30”...
-
Page 4: Warning / Caution
All parts should be properly repaired or replaced. Do not use this tool if the switch does not turn it on or off. • Never Leave Tool Unattended - Turn the power off. Don’t leave the tool until it comes to a complete stop. • Read “A Primer on Grinding Wheel Safety” https://www.magna-matic.com MAG-8200 LAWNMOWER BLADE SHARPENER... -
Page 5: Safety Labels
SAFETY LABELS SAFETY COLOR DEFINITION DANGER Interaction with the hazard will cause severe injury or death. WARNING Interaction with the hazard could cause severe injury or death. CAUTION Interaction with the hazard could cause minor or moderate injury. SAFETY SAFETY DEFINITION DEFINITION ICON... - Page 6 ASSEMBLY & TESTING CAUTION TURN OFF AND UNPLUG BEFORE SERVICING! GRIT GUARD ASSEMBLY 1. Use #10 self-tapping screws to assemble the grit guard. 2. Start with the sides, they only fit one possible way, check that the holes line up. 3.
- Page 7 ON/OFF switch is in the OFF POSITION, plug the MAG-8200 into a 15 amp, 110 volt outlet. Switch the ON/OFF switch to the ON POSITION to test the motor. The motor should achieve FULL speed in 1-2 seconds. If it does not, (see page ******) or contact MAGNA-MATIC (800-328-1110).
- Page 8 2. Use the two catch clamps to remove the black front cover. 3. Locate your spanner wrench and arbor wrench (both supplied by Magna-Matic.) 4. The arbor wrench fits into a square notch in the arbor behind the grinding wheel 5.
- Page 9 IMPORTANT - PLEASE READ! MOUNTING 1” WIDE GRINDING WHEEL = ONLY ARBOR NUT 1” WIDE WHEEL + FLAT WHITE TABLE = CONVENTIONAL FLAT BLADES IMPORTANT - PLEASE READ! MOUNTING 1/2” WIDE GRINDING WHEEL = SPACER + ARBOR NUT 1/2” WIDE WHEEL + ROUNDED METAL TABLE = CURVED MULCHING BLADES MOUNTING ORDER 1.
- Page 10 MAG-8200 directly to the stand table top. For mounting water-cooled units, follow the water-cooled mounting instructions. IMPORTANT STAND NOTE: The MAG-8200 Series mounts in the same orientation as the MAG-8000. So when you follow your MAG-10400 Stand instructions “STEP 7”.
- Page 11 WATER-COOLED ASSEMBLY...
- Page 12 STEP 2 Caulk around each foot’s nut and in corners with angle nuts STEP 1 Caulk top of each rubber foot. Button head screws must go through table top, rubber foot, and water tray, then put the nut on and tighten MAG-8200 LAWNMOWER BLADE SHARPENER...
- Page 13 STEP 3 Install grit guard and front/rear splash guards on to the water tray. Caulk the corners of the water tray well.
- Page 14 STEP 4 Set MAG-8200 into water tray. The sharpener’s rubber feet should sit on and cover the nylon nuts of the water try’s rubber feet. Use #10 button screws and nylon nuts to connect top of grit guard to sharpener. MAG-8200 LAWNMOWER BLADE SHARPENER...
- Page 15 STEP 5 Two #10 Screws connect the rear of MAG-8200 to rear of water tray and use the loop to retain the clear vinyl hose...
-
Page 16: Tank Preparation
TANK PREPARATION LOOK LOOK 1. REMOVE filter sock from tank INSIDE THE TANK INSIDE THE TANK 2. REMOVE 30” vinyl clear tubing from tank 3. REMOVE foam packaging from tank 4. CHECK to see if pump pre-filter and clear vinyl tube are still connected to pump. These are both slip on connections, but can sometimes come apart during shipping. - Page 17 Tips & Questions about the Coolant What is the best way to test the newly assembled water-cooling system? Fill the tank with just 2 gallons of water - then run the pump and check for leaks before you add coolant. Do I need that much liquid in the tank? If you are not a heavy user, you can fill your tank with 3 gallons of water then slowly add a little coolant and then check with the refractometer to hit 3 BRIX.
-
Page 18: Angle Adjustment
If you do this adjustment with the machine on you risk grinding into your worktables. This will alter the angle that the sharpener will grind on the blade. If you accidentally grind into either table, turn the insert around so you have a fresh surface again. Or visit magna-matic.com and purchase new worktables. The grinding wheel must ALWAYS... - Page 19 CHANGING TABLE INSERTS IMPORTANT: You will only need about a 1/4 turn to loosen or tighten. 1. Use the supplied 3/16” hex T-handle wrench to loosen the vise. 2. Remove the current table seated in the framework. 3. Notice how the steel insert plate fits into the framework of the two aluminum arms of the modular worktable.
- Page 20 How to Set the four possible angle settings. 30° bring table to top setting, level with first half-circle. • 35° lower table to second half-circle • 40° lower table to third half-circle • 45° push table so it bottoms out as low as it will go. •...
- Page 21 30° 30° 35° 35° You can set the angle by looking into the half-circle sights or you can insert the t-handle as a stop to set the angle. 40° 40° 45° 45°...
- Page 22 CONVENTIONAL BLADES CAUTION LAWN MOWER BLADES HAVE SHARP EDGES - ALWAYS WEAR PROTECTIVE GLOVES AND SAFETY GLASSES! SHARPENING A LAWN MOWER BLADE (1” wide WHEEL or 2” wide BELT) Be sure to wear protective clothing while handling and sharpening lawn mower blades. Wear safety glasses and protective gloves.
- Page 23 Keep constant pressure downward maintain flat contact with blade underside and worktable Apply pressure into the grinding wheel Slide the blade back and forth across the grinding wheel MAG-8200 Sharpener Left-Handed Overhead-View Blade Right-Handed Blade...
- Page 24 MULCHING BLADES WARNING WHEN USING ELECTRIC TOOLS, BASIC SAFETY PRECAU- TIONS SHOULD ALWAYS BE FOLLOWED TO REDUCE THE RISK OF FIRE, ELECTRIC SHOCK, AND PERSONAL INJURY. CAUTION LAWN MOWER BLADES HAVE SHARP EDGES - ALWAYS WEAR PROTECTIVE GLOVES AND SAFETY GLASSES! SHARPENING A CURVED MULCHING LAWN MOWER BLADE Be sure to wear protective clothing while handling and sharpening lawn mower blades.
- Page 25 MULCHING BLADES In these images the safety guards have been removed to provide a better view of blade position in the MAG-8000. NEVER OPERATE WITHOUT GUARDS IN PLACE Always maintiain contact between the blade and rounded worktable. Do not lift the blade off the table You will have more control if you only “pull”...
- Page 26 Locate your span- ner wrench and arbor wrench (both supplied by Magna-Matic.) The arbor wrench fits into a square notch in the arbor behind the grinding wheel, and the spanner wrench fits into the two holes in the arbor nut.
- Page 27 IMPORTANT - PLEASE READ! MOUNTING 1” WIDE GRINDING WHEEL = ONLY ARBOR NUT 1” WIDE WHEEL + FLAT WHITE TABLE = CONVENTIONAL FLAT BLADES MOUNTING ORDER 1. WHEEL 2. ARBOR NUT IMPORTANT - PLEASE READ! MOUNTING 1/2” WIDE GRINDING WHEEL = SPACER + ARBOR NUT 1/2”...
- Page 28 ABRASIVE BELT REPLACEMENT CAUTION TURN OFF AND UNPLUG BEFORE SERVICING! Be sure the MAG-8200 power cord is unplugged. Remove the front steel grinding wheel cover by releasing the two catch clamps on each side of the grinding cavity. Use the crank handle to raise up the contact wheel.
- Page 29 CHANGING FROM A BELT TO A GRINDING WHEEL CAUTION TURN OFF AND UNPLUG BEFORE SERVICING! Be sure the MAG-8200 power cord is unplugged. Remove the front steel grinding wheel cover by releasing the two catch clamps on each side of the grinding cavity. Use the crank handle to raise up the contact wheel.
- Page 30 UPGRADING TO THE BELT GRINDER OPTION CAUTION TURN OFF AND UNPLUG BEFORE SERVICING! This will guide you through the steps to upgrade your 8200 into the 2” wide belt grinder. Do this conversion on a work bench or larger table so you have room to work. The motor is tethered to the body, so you need a place to set the motor next to the body.
- Page 31 Remove rear adjustment cover 3 screws on pulley side. 4 on rear of cover 4 Socket screws connect pivot bearing block to adjustment truck. Install 1/2” long socket screw with 1/4” nut in yellow body. Knockout the oval blank to expose the pivot bearing block.
- Page 32 Connect the two springs to the yellow body Insert the idler pulley assembly into the pivot bearing block. Replace rear adjustment cover Reinstall the motor Install belt, and covers. Mount the contact wheel in the same manner Insert the idler pulley assembly into the pivot you would install a grinding wheel.
- Page 33 MAG-8200 DRIVE BELT REPLACEMENT CAUTION TURN OFF AND UNPLUG BEFORE SERVICING! GENERAL CARE: Keep the MAG-8200 clean, use compressed air to blow the machine off periodically. Use mild soapy water to clean powder coated surfaces and Lexan® guards. Remove large build-ups of grit in the grit guard, and inside the MAG-8200 body.
- Page 34 Understanding the Rotary Lawn Mower Blade Cutting Tip Cutting Edge Lift IMPORTANT NOTES: Welding, straightening, sharp corners, and overheating the lawn mower blade may create fractures that break the blade under normal use and may cause injury. Lift Cutting Diameter 30°...
- Page 35 Blade Tip Geometry. What part of a rotary lawn mower blade cuts the grass? Training Video It is a common misconception that lawn mower blades cut like a knife. It actually has more in common with the way circular saw teeth cut. The confusion comes from the two shapes; a lawn mower blade looks like a rectangle, and the circular saw is a circle.
- Page 36 MAG-8200 SPECIFICATIONS MAG-8000 (North America) LxWxH 25” x 14” x 15” Weight 90 lbs Ship Weight 95 lbs Motor Specs US MOTORS® Horse Power Motor RPM 3450 Duty Cycle Continuous Hertz Volts Phase Single Amps (run) Capacitors Dual Motor Type Industrial - Totally Enclosed Insulation Class F...
-
Page 37: Troubleshooting
TROUBLESHOOTING PROBLEM CAUSE SOLUTION Fan guard bent/dam- Motor fails to start aged and contacting Replace fan guard fan. Motor has been running, Fuse or circuit breaker Replace fuse or reset the breaker. then fails to start tripped. Motor has been running, Motor overloaded or Inspect to see that the load is free. -
Page 38: Warranty
WARRANTY MAGNA-MATIC CORPORATION (the “Manufacturer”) warrants Manufacturer’s products (the “Products”) will be free from defects in manufacture by Manufac- turer (the “Warranty”). The Warranty will be effective and valid for a period of one (1) or two (2) years, as indicated on the Warranty certificate or Manufacturer’s website (http://www.magna-matic.com), beginning on the date in which Manufacturer ships the Product (the “Warranty Period”) from manufacturer’s facility...
Need help?
Do you have a question about the MAG-8200 Series and is the answer not in the manual?
Questions and answers