
Related Manuals for Magna-Matic MAG-9000 Series


Summary of Contents for Magna-Matic MAG-9000 Series
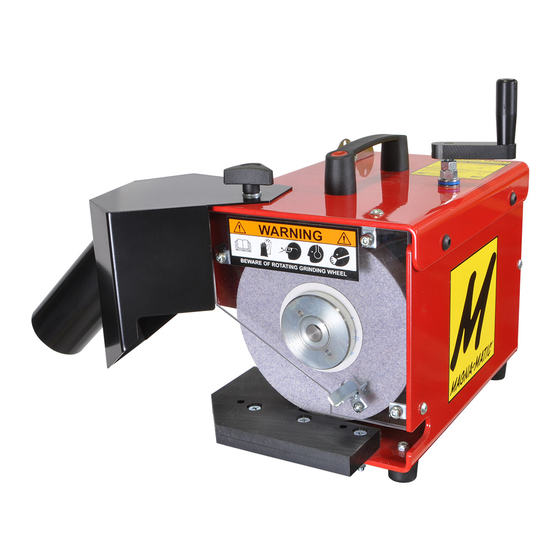
- Page 1 Original Instructions for Magna-Matic Lawn Mower Blade Sharpeners MAG-9000 SERIES [gen7] MAG-8000 SERIES [gen6]...
-
Page 2: Box Inventory
THANK YOU, We sincerely appreciate your decision to make Magna-Matic your lawn mower blade sharpener. We understand there are other choices in the marketplace, and we are extremely confident that after the first few blades you sharpen, it will be evident you’ve chosen the best machine for the job. - Page 3 Please be sure all the items are in the box and inspect for shipping damage, or for missing parts. Contact Magna-Matic right away to remedy any problems due to shipping. 800-328-1110 IMPORTANT - There is a transport bolt that must be removed before use! The bolt goes through the two uprights and the pivot plate.
-
Page 4: Warning / Caution
All parts should be properly repaired or replaced. Do not use this tool if the switch does not turn it on or off. Never Leave Tool Unattended - Turn the power off. Don’t leave the tool until it comes to a complete stop. Read “A Primer on Grinding Wheel Safety” http://www.magna-matic.com... -
Page 5: Safety Labels
SAFETY LABELS SAFETY COLOR DEFINITION DANGER Interaction with the hazard will cause severe injury or death. WARNING Interaction with the hazard could cause severe injury or death. SAFETY SAFETY DEFINITION DEFINITION ICON ICON Keep clear of the WARNING grinding wheel. DANGER Contact will cause severe cuts or... - Page 6 ASSEMBLY IMPORTANT - There is a transport bolt that must be removed before use! The bolt goes through the two uprights and the pivot plate. If this bolt is not removed it will be impossible to adjust the grinding wheel. First remove the grit guard, loosen the 5/16”...
- Page 7 Ensure the MAG-8000 ON/OFF switch is in the OFF POSITION, plug the MAG-8000 into a 20 amp, 110 volt outlet. Switch the ON/OFF switch to the ON POSITION to test the motor. The motor should achieve FULL speed in 1-2 seconds. If it does not, (see page 19) or contact MAGNA-MATIC (800-328-1110).
- Page 8 ANGLE ADJUSTMENT WARNING WHEN USING ELECTRIC TOOLS, BASIC SAFETY PRECAUTIONS SHOULD ALWAYS BE FOLLOWED TO REDUCE THE RISK OF FIRE, ELECTRIC SHOCK, AND PERSONAL INJURY. IMPORTANT - ALWAYS turn the MAG-8000 OFF when changing or adjusting worktable inserts. New [gen6] worktables (blade rest) The new change to the MAG-8000 [gen6] is the implementation of worktable inserts.
- Page 9 Worktable Set-up The base of the worktable inserts are slotted. Slide the worktable insert into the vice (shown below) Once in place at the desired angle position, tighten the bolt in the worktable vice. DO NOT OVER-TIGHTEN (only a 1/4 to 1/2 turn is required to clamp the insert.) The spanner wrench has a 12 point hex wrench used for the bolt to tighten the insert in place.
- Page 10 30 DEGREE ANGLE MOST BASIC ANGLE - READ FOLLOWING INFO! 30 degrees is the most consistent and easiest angle to maintain in the MAG-8000. It is also the industry average angle on most blades. If you are looking for the most simple way to consistently sharpen your lawn mower blades, use 30 degrees according to following instructions.
- Page 11 Visual example of setting a 45º over the life of a grinding wheel Due to the changing geometry of a grinding wheel’s diameter it is necessary to move the worktable insert to different positions over the life of the wheel. Each image below shows one inch diameter grinding wheel increments.
- Page 12 MULCHING BLADES WARNING WHEN USING ELECTRIC TOOLS, BASIC SAFETY PRECAUTIONS SHOULD ALWAYS BE FOLLOWED TO REDUCE THE RISK OF FIRE, ELECTRIC SHOCK, AND PERSONAL INJURY. CAUTION LAWN MOWER BLADES HAVE SHARP EDGES - ALWAYS WEAR PROTECTIVE GLOVES AND SAFETY GLASSES! Be sure to wear protective clothing before handling and sharpening lawn mower blades.
- Page 13 MULCHING BLADES In these images the safety guards have been removed to provide a better view of blade position in the MAG-8000. NEVER OPERATE WITHOUT GUARDS IN PLACE You will have more control if you only “pull” mulching Training Video blades across the grinding wheel.
- Page 14 CONVENTIONAL BLADES WARNING WHEN USING ELECTRIC TOOLS, BASIC SAFETY PRECAUTIONS SHOULD ALWAYS BE FOLLOWED TO REDUCE THE RISK OF FIRE, ELECTRIC SHOCK, AND PERSONAL INJURY. CAUTION LAWN MOWER BLADES HAVE SHARP EDGES - ALWAYS WEAR PROTECTIVE GLOVES AND SAFETY GLASSES! Be sure to wear protective clothing while handling and sharpening lawn mower blades.
- Page 15 TIP: Use 3-4 of Keep constant pressure downward to your fingers to maintain flat contact with the worktable. apply the down- ward pressure, and your thumb to apply the in- ward pressure. Apply pressure into the grinding wheel to remove material.
- Page 16 Be sure the MAG-8000 power cord is unplugged. Remove the grit guard see (page 6.) Locate your spanner wrench and arbor wrench (both supplied by Magna-Matic.) The arbor wrench fits into a square notch in the arbor, behind the grinding wheel, and the spanner wrench fits into the two holes in the arbor nut.
- Page 17 MAG-8000 SERVICE & CARE CAUTION TURN OFF AND UNPLUG BEFORE SERVICING! GENERAL CARE: Keep the MAG-8000 clean, use compressed air to blow the machine off periodically. Use mild soapy water to clean powder coated surfaces and Lexan® guards. Remove large build-ups of grit in the grit guard, and inside the MAG-8000 body.
- Page 18 MAG-8000 SPECIFICATIONS MAG-8000 (North America) MAG-8000 (Euro) LxWxH 24” x 12” x 17” 60.9 x 30.5 x 43.1 cm Weight 80 lbs 36 kg Ship Weight 1 box 85 lbs 38 kg Motor Specs BALDOR®/LEESON® BALDOR®/LEESON® Horse Power Motor RPM 3450 2850 Duty Cycle...
-
Page 19: Troubleshooting
TROUBLESHOOTING PROBLEM CAUSE SOLUTION Fan guard bent/damaged and Motor fails to start Replace fan guard, if possible, straighten it. contacting fan. Motor has been running, then fails Fuse or circuit breaker tripped. Replace fuse or reset the breaker. to start Motor has been running, then fails Inspect to see that the load is free. - Page 20 MAG-8000 LAWNMOWER BLADE SHARPENER...
- Page 21 Bearing collar (2) 8000-36 Pivot shaft 8000-23 Pivot plate H-18N50SPT-Z/A #10 sheet metal screw (8) See info and pricing here: H-31WFZ 5/16 flat washer (15) www.magna-matic-direct.com 9000-58 Carry handle H-25C75HSZ 1/4-20x3/4 bolt (5) H-31C75HSZ 5/16-18x3/4 bolt (13) 8000-60 Knob 8000-54...
- Page 22 MAG-8000 PARTS KEY MAG-8000 Adjustment Parts Key Key # Part # Description H-37N200KSS Shoulder bolt for crank handle 9000-14 Crank handle 9000-13 Crank base H-37CNFZ 3/8-16 zinc nut (2) 8000-49 Threaded adjusting rod H-18FNINFZ #10-32 nylon nut H-18WFZSS #10 flat washer (3) 8000-46 Adjustment block 8000-47...
- Page 23 MAG-8000 PARTS KEY...
- Page 24 MAG-9000 into a 20 amp, 110 volt outlet. Switch the ON/OFF switch to the ON POSITION to test the motor. The motor should achieve FULL speed in 3-4 seconds. If it does not (see page 31 or contact MAGNA-MATIC - 800-328-1110). MAG-9000 LAWNMOWER BLADE SHARPENER...
-
Page 25: Angle Adjustment
ANGLE ADJUSTMENT ADJUSTING THE EDGE ANGLE MAG-9000 30 Degree Reference Point - When the grinding wheel is lowered to the worktable (almost cutting the work table corner) you will produce a 30 degree angle on the lawn mower blade. As the grinding wheel wears and reduces in diameter, continue to lower the grinding wheel to almost touch the worktable (1/32”... - Page 26 CONVENTIONAL BLADES WARNING WHEN USING ELECTRIC TOOLS, BASIC SAFETY PRECAUTIONS SHOULD ALWAYS BE FOLLOWED TO REDUCE THE RISK OF FIRE, ELECTRIC SHOCK, AND PERSONAL INJURY. CAUTION LAWN MOWER BLADES HAVE SHARP EDGES - ALWAYS WEAR PROTECTIVE GLOVES AND SAFETY GLASSES! Be sure to wear protective clothing while handling and sharpening lawn mower blades.
- Page 27 CONVENTIONAL BLADES TIP: Use 3-4 of your Keep constant pressure downward to fingers to apply the maintain flat contact with the worktable. downward pressure, and your thumb to apply the inward pressure. Training Video Apply pressure into the grinding wheel to remove material.
- Page 28 Be sure the MAG-9000 power cord is unplugged. Using a 5/32” Allen wrench remove the (3) screws of the front Lexan® guard. Locate your spanner wrench and arbor wrench (both supplied by Magna-Matic.) The arbor wrench fits into a square notch in the arbor behind the grinding wheel, and the spanner wrench fits into the two holes in the arbor nut.
- Page 29 MAG-9000 WIRING DIAGRAMS CAUTION TURN OFF AND UNPLUG BEFORE SERVICING!
- Page 30 MAG-9000 SPECIFICATIONS MAG-9000 (North America) MAG-9000 (Euro) LxWxH 12”x 8”x 8” 30.5 x 20.3 x 20.3cm Weight 48 LBS 20 kg Ship Weight 1 box 52 LBS 23.5 kg Motor Specs BALDOR®/LEESON® BALDOR®/LEESON® Horse Power Motor RPM 3450 2800 Duty Cycle Std / Intermittent Std / Intermittent Hertz...
- Page 31 TROUBLESHOOTING PROBLEM CAUSE SOLUTION Fan guard bent/damaged and Motor fails to start Replace fan guard, if possible, straighten it. contacting fan. Motor has been running, then fails Fuse or circuit breaker tripped. Replace fuse or reset the breaker. to start Motor has been running, then fails Inspect to see that the load is free.
- Page 32 MAG-9000 LAWNMOWER BLADE SHARPENER...
- Page 33 Arbor nut H-25FNFZ 1/4-28 nut (4) 9000-08 Front lexan guard 9000-02 Motor pivot bracket 9000-21 Spanner wrench 9000-01 Body pivot bracket 9000-53 Arbor wrench H-31F75HSZ 5/16-24x3/4 bolt (2) H-31F100PSSS 5/16-24x1 pointed set screw (2) See info and pricing here: www.magna-matic-direct.com...
- Page 34 Understanding the Rotary Lawn Mower Blade Cutting Tip Cutting Edge Lift IMPORTANT NOTES: Welding, straightening, sharp corners, and overheating the lawn mower blade may create fractures that break the blade under normal use and may cause injury. Lift Cutting Diameter 30°...
- Page 35 The blade will No Tip = Dull tear the grass, resulting in a poor looking lawn. New from Magna-Matic: Industrial Dust Collectors Keep your shop clean and your employees safe with our new dust collection systems for all Magna-Matic sharpeners.
-
Page 36: Warranty
WARRANTY MAGNA-MATIC CORPORATION (the “Manufacturer”) warrants Manufacturer’s products (the “Products”) will be free from defects in manufacture by Manufacturer (the “Warranty”). The Warranty will be effective and valid for a period of one (1) or two (2) years, as indicated on the Warranty certificate or Manufacturer’s website (http://www.magna-matic.com/warrantyguarantee.html), beginning on the date in which Manufacturer ships the Product (the “Warranty Period”) from...
Need help?
Do you have a question about the MAG-9000 Series and is the answer not in the manual?
Questions and answers