Advertisement
Quick Links
OPERATING INSTRUCTIONS
For Magna-Matic Sharpeners
Covering Models:
MAG-8000 Universal Lawn Mower Blade Sharpener
MAG-9000 Lawn Mower Blade Sharpener
Visit us at www.magna-matic.com for more photos
out of your shop for the last 40 years.
of products & other helpful info.
Helping you get the most
Advertisement

Subscribe to Our Youtube Channel
Related Manuals for Magna-Matic MAG-8000


Summary of Contents for Magna-Matic MAG-8000
- Page 1 OPERATING INSTRUCTIONS For Magna-Matic Sharpeners Covering Models: MAG-8000 Universal Lawn Mower Blade Sharpener MAG-9000 Lawn Mower Blade Sharpener Visit us at www.magna-matic.com for more photos of products & other helpful info. Helping you get the most out of your shop for the last 40 years.
- Page 2 THE SAFE WAY IS THE ONLY WAY TO GRIND! Instructions given with this symbol are for personal safety. Be sure you and your employees follow them. A careful operator is the best insurance against accidents. Before handling any equipment read and understand the instructions.
- Page 3 8. Don’t Over-Reach - Keep proper footing and balance at all times. 9. Wear Proper Apparel - Do not wear loose clothing or jew- elry that can get caught in moving parts. Rubber gloves and non-skid foot wear are recommended when working outdoors. Wear protective hair covering to contain long hair.
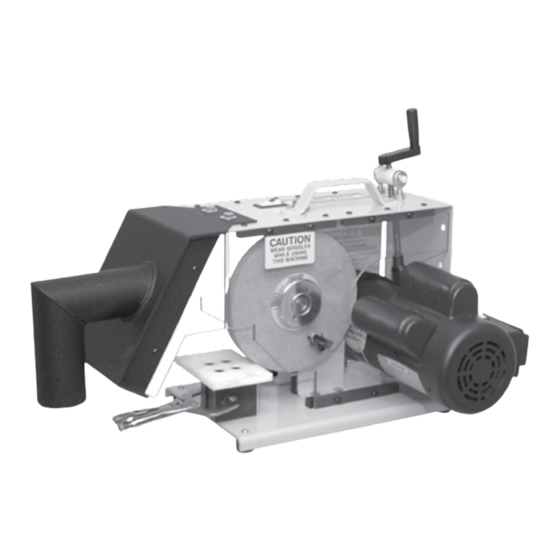
- Page 4 MATIC high-performance service tools. MAG-8000 Universal Lawn Mower Blade Sharpener The MAG-8000 is the latest technology in rotary lawn mower blade sharpening. It holds 3 patents for its revolutionary design. Since its release in 1999 the MAG-8000 has quickly become the standard in the Outdoor Power Equipment Industry.
- Page 5 Step 1: MAG-8000 Unpack the MAG-8000, please keep the box and packag- ing incase of shipping damage or any need for return. When unpacking the MAG-8000 take stock of all the items in the box. Parts Inventory Description Key #...
- Page 6 MAG-8000 Assembly Step 2: First remove the TRANS- PORT BRACKET from the MAG-8000 arbor, keep the transport bracket for any future shipping needs. You will need to remove the black bolt- ing bar to allow clear- ance for the transport bracket to be removed.
- Page 7 Use the hardware in the holes and the Bondhus T-handle wrench. Be sure to tighten 3 bolts under the MAG-8000, and the 6 along the top to secure the bolting bars holding the Lexan® guard. Lastly tighten the grit guard’s Lexan®...
- Page 8 SEE MAG-1000 Instruction Manual for more info on blade balancing. 4. The MAG-8000 will require the 1/2” inch wide grinding wheel to sharpen a mulching blade. Mount the 1/2” wide grind- ing wheel on the MAG-8000. (Arbor spacer req.) 5.
- Page 9 MAG-8000 Use Con’t Step 6: Con’t 9. When using the MAG-8000 for mulching blades keep the blade level, and perpendicular to the rotation of the grind- ing wheel. Pay close attention to the TIP of the blade, see page 25.
- Page 10 SEE MAG-1000 Instruction Manual for more info on blade balancing. 4. The MAG-8000 will require the 1” inch wide grinding wheel to sharpen a conventional blade. Mount the 1” wide grind- ing wheel on the MAG-8000. (1/2” wide grinding wheel may be used for conventional blades) 5.
- Page 11 “forth” or inward fed motion. You will maintain much more con- trol if you only “pull” mulching blades through the MAG-8000. It is critical with both blade types that the operator keeps down- ward pressure “force”...
- Page 12 MAG-8000 Wheel Replacement Be sure the MAG-8000 is unplugged. Using a 1/8” Allen wrench (supplied with MAG-8000) remove the (6) screws of the front Lexan® guard. Locate your spanner wrench and arbor wrench (both supplied by Magna-Matic.) The arbor wrench fits into a square notch in the arbor, behind the grinding wheel, and the spanner wrench fits into the two holes in the arbor nut.
- Page 13 MAG-8000 Care & Service General Care: Keep the MAG-8000 clean, use compressed air to blow the machine off periodically. Use mild soapy water to clean powder coated surfaces and Lexan® guards. Greasing of Bearing Blocks: Care should be taken when re-greasing bearings to avoid over- filling.
- Page 14 (near the mounting hole - not on an edge) and grind it with the MAG-8000, but do not go back and forth - simply keep pressure down on the work table and into the wheel evenly.
- Page 15 MAG-8000 Specifications MAG-8000 MAG-8000 (Euro) Length 24 inches 60.9 cm Width 12 inches 30.5 cm Height 17 inches 43.1 cm Weight 80 LBS 36 kg Ship Weight 1 box 85 LBS 38 kg Motor Specs BALDOR® ELECTRIC BALDOR® ELECTRIC Horse Power...
- Page 16 page page...
- Page 17 Begin The Assembly Step 1: MAG-9000 Unpack the MAG-9000, please keep the box and packaging incase of shipping damage or any need for return. When un- packing the MAG-9000 take stock of all the items in the box. Parts Inventory Description Key # Grit Guard...
- Page 18 MAG-9000 Assembly Step 2: First assemble the grit guard to the MAG-9000 body using the plastic knob located on the top of the MAG-9000. Step 3: Be sure the MAG-9000 is unplugged, and adjust the angle adjustment crank to make sure the grinding wheel freely rotates.
- Page 19 MAG-9000 Use Step 4: Conventional Blades Be sure to wear protective clothing before handling and sharp- ening lawn mower blades. Wear safety glasses and protective gloves. Blade & Sharpener Preparation 1. Clean the blade to its base material, using the MAG-12000 blade cleaner, or alternate cleaning process.
- Page 20 MAG-9000 Use Step 4: Conventional Blades Conventional Blade Sharpening 7. Switch the ON/OFF switch to the ON position. 8. Place the conventional blade on the flat work table and pull and push the blade across the grinding wheel. Keep firm pressure downward on the blade to maintain contact with the surface of the work table.
- Page 21 (3) screws of the front Lexan® guard. Locate your spanner wrench and arbor wrench (both supplied by Magna-Matic.) The arbor wrench fits into a square notch in the arbor, behind the grinding wheel, and the spanner wrench fits into the two holes in the arbor nut.
- Page 22 MAG-9000 Trouble-Shooting The MAG-9000 will not start. Double check that the MAG-9000 is plugged in a 15 amp (mini- mum) circuit. Check all building fuses or circuit breakers. First determine what type of switch your MAG-9000 has. (1987 - 1996 metal toggle switch) (1997 - 2005 plastic lit rocker switch) (2006 - present metal toggle switch) To diagnose a ON/OFF switch problem, (unplug from power...
- Page 23 MAG-9000 Trouble Shooting page page...
- Page 24 MAG-9000 Specifications MAG-9000 MAG-9000 (Euro) Length 12 inches 30.5 cm Width 8 inches 20.3 cm Height 8 inches 20.3 cm Weight 45 LBS 20 kg Ship Weight 1 box 48 LBS 22 kg Motor Specs LEESON® ELECTRIC LEESON® ELECTRIC Horse Power 3450 2850 Duty Cycle...
- Page 25 page page...
- Page 26 Rotary Mower Blade Tip Geometry Consider the following if you sharpen rotary lawn mower blades. The tip of the blade Description Diagram does the majority of the cutting. To Relief 1: produce a tip, three Top View - built reliefs are necessary. into the blade.
- Page 27 page page...
- Page 28 It is constructed of only the finest materials by skilled crafts- men who take pride in their work. MAGNA-MATIC CORP. warrants the tools manufactured and/or repaired to be free of defects in material and workmanship for a period of 365 days after purchase.
Need help?
Do you have a question about the MAG-8000 and is the answer not in the manual?
Questions and answers