
Related Manuals for Fresenius Kabi Agilia SP TIVA


Summary of Contents for Fresenius Kabi Agilia SP TIVA
- Page 1 Agilia SP TIVA Agilia SP TIVA WiFi Syringe Infusion Pumps Applicable to software version 2.2 Instructions For Use For Use in Healthcare Facilities...
- Page 2 Symbol Descriptions Warning Name and address of the (Refer to the Instructions for Use) manufacturer / Date of manufacture Name and address of the Refer to the Instructions for Use manufacturing facility Protection against electric shock: Product reference / part number class II Non-ionizing electromagnetic Product serial number...
-
Page 3: Table Of Contents
Table of Contents INTRODUCTION ....................9 COPE ..................9 NTENDED ..............9 RINCIPLES OF PERATION ............10 NTENDED RODUCTS TO BE NFUSED ..................10 NTENDED SERS ................11 NTENDED ATIENTS ................12 ONTRAINDICATIONS ................12 NVIRONMENT AGILIA CONNECT INFUSION SYSTEM DESCRIPTION ..................15 RONT ) ........15 OTTOM EVICE DENTIFICATION ABEL ...................16 ....................17... - Page 4 4.5.2 Target Concentration................27 4.5.3 Pharmacokinetic Models in the Agilia SP TIVA......... 28 4.5.4 TCI Modes in the Agilia SP TIVA ............. 28 4.5.5 Populations ..................29 INSTALLATION ..............31 YPES OF NSTALLATIONS ............32 SING THE OTATING LAMP ) ..............33 TTACHING THE PUMP 5.3.1...
- Page 5 7.10.1 Near End of Infusion Alert ..............63 7.10.2 End of Infusion .................. 64 7.10.3 Powering off ..................64 7.11 ..................64 NFUSION ODES 7.11.1 Simple Rate..................64 7.11.2 Volume/Time & Dose/Time ..............65 7.11.3 Volume Limit..................66 7.12 ................67 THER UNCTIONS 7.12.1 Priming the Syringe and the Extension Set........
- Page 6 8.26 TCI S ..................97 ETUP OPTIONS ..................98 OMMANDS .................98 PTION ESCRIPTIONS ...................99 ETTINGS 10 DATA COMMUNICATION 10.1 ..................100 VERVIEW 10.2 ...........100 OMMUNICATION VIA GILIA ABLES 10.3 ..............101 OMMUNICATION VIA 10.4 ................101 PLOAD 11 USER TEST 12 ALARMS AND SAFETY FEATURES 12.1 ..................103 NTRODUCTION...
- Page 7 15.5 ..................119 NFUSION 15.6 ................120 ONCENTRATION 15.7 ..................120 ATIENT 15.8 ..............120 RESSURE ANAGEMENT 15.9 ..................121 CCURACY 15.10 U ............123 NITS AND ONVERSION ULES 16 CLEANING AND DISINFECTING 16.1 ........125 HEN TO LEAN AND ISINFECT THE 16.2 ...........125 ECOMMENDED AND ROHIBITED GENTS 16.3 ........126...
- Page 8 22.2 ................142 IMITED ARRANTY 22.3 ........142 ARRANTY ONDITIONS FOR CCESSORIES 23 GUIDANCE AND MANUFACTURER'S DECLARATION ON EMC 23.1 ..........143 LECTROMAGNETIC OMPATIBILITY 23.2 (ESD) ............143 LECTROSTATIC ISCHARGE 23.3 .144 LECTROMAGNETIC OMPATIBILITY AND NTERFERENCE UIDANCE 23.4 ..........146 AND ESSENTIAL PERFORMANCES 24 SERVICING 24.1 ...........152 NFORMATION ON...
-
Page 9: Introduction
The size of a syringe can be 5, 10, 20, 30 or 50-60 mL. Agilia SP TIVA can be used for intermittent or continuous infusions. Agilia SP TIVA is intended for use on only one patient at a time. It can be reused indefinitely on multiple patients throughout its lifetime. -
Page 10: Intended Products To Be Infused
When using Agilia SP TIVA to infuse critical medications, ensure that adequate monitoring is provided, and that backup pumps and syringes are available for immediate use. Only use Agilia SP TIVA for the infusion of fluids that are intended for infusion pumps. Administration Routes The system allows infusion via the following access routes: ... -
Page 11: Intended Patients
Intended Patients Agilia SP TIVA is intended to be used according to healthcare facilities protocols on patients with the following characteristics: Patient Characteristics Male Female Regular infusion: Neonates, pediatrics, adults, elderly TCI infusion: 1 to 100 years old patients Regular infusion: 0.25 kg to 350 kg... -
Page 12: Contraindications
Agilia Partner software to perform technical operations. Use Environment Agilia SP TIVA is intended for use in healthcare facilities, under the supervision of trained healthcare personnel. The pump must be used in the following operational conditions to ensure proper performance: ... -
Page 13: Agilia Connect Infusion System
Agilia Connect Infusion System Agilia range Description Volumetric Infusion Pump Pumps designed to deliver the contents of parenteral Agilia VP range infusion container (bag or bottle) through a line connected to a patient. Syringe Infusion Pump Agilia SP range Pumps designed to deliver the contents of a syringe through a line connected to a patient. - Page 14 Information For a list of compatible accessories, disposables and software, and for ordering information, refer to the System Components booklet.
-
Page 15: Description
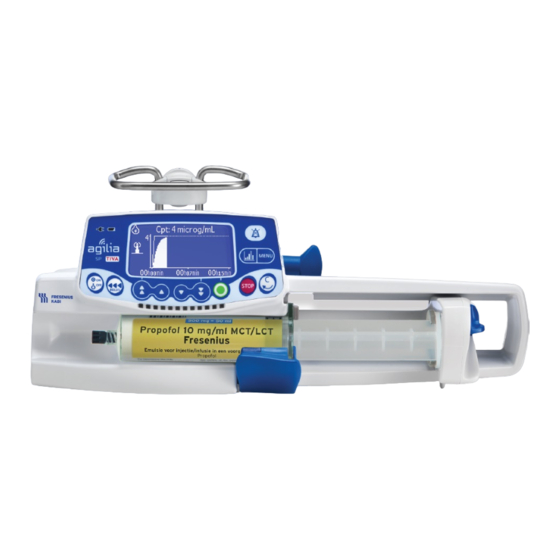
Description Front View Figure 3.1: Front View Legend Handle Plunger Driver Syringe Barrel Clasp Disengagement Lever Syringe Flange Cradle Syringe Guard Bottom View (Device Identification Label) For more information on device identification label symbols, see Symbol Descriptions, page 2. -
Page 16: Back View
Back View Figure 3.2: Back View Legend Release Button Power Cord Inlet Rotating Pole Clamp Infrared Cell RS232 Communication Port Attachment Lock Knob Symbol Location Description Warning See section 18, page 131. Near Power Cord Inlet Warning See section 10, page 100. Near RS232 Communication Port... -
Page 17: Keypad
Keypad 3.4.1 Keypad Description Figure 3.3: Keypad Legend Screen Decrement 3 7 10 Battery Charge Status Indicator Fast Decrement 3 11 Power Supply Indicator Confirm Value / Move to Next Field 3 12 Wi-Fi Symbol Stop 3 13 On / Off Cancel Value / Move Back to Previous 3 14 Field... - Page 18 3.4.2 Keypad Details 3.4.2.1 Selection Keys Description Arrow Keys Keys for selecting volume, time, flow rate and other values. Fast Access to Maximum Value or Top of a List Fast Access to Minimum Value or Bottom of a List Note: ...
-
Page 19: Display And Symbols
Display and Symbols 3.5.1 Infusion Status Symbol Description Infusion in Progress (Basic & TCI + Custom Profiles with a drug list) Symbols for infusion in progress. Infusion in Progress (Custom Profiles with a drug library) This symbol is displayed when the pump is infusing a drug customized with Agilia Vigilant Drug’Lib software. -
Page 20: Navigation Buttons
3.5.3 Navigation Buttons Symbol Description start Start Confirm enter Access Function New ? Access Function and Clear Settings exit Exit Function Change Selection prog Program Function Select / Unselect See More Information Zoom in / Zoom out Move the Event Marker to the Left / Right 3.5.4 Alarms and Safety Features Symbol... -
Page 21: Data Communication
Symbol Description Data Set Loaded A new data set has been loaded to the pump. Packaging The Agilia SP TIVA packaging contains the following: 1 Agilia SP TIVA pump 1 Instructions For Use manual (this document + System Components booklet) ... -
Page 22: Fundamentals
Fundamentals Profiles A profile defines the device configuration and drug library used for a group of patients in a given health care environment. By default, factory settings include only 1 profile (Basic & TCI). Custom profiles can be created and loaded to the pump with Agilia Vigilant Drug’Lib software. -
Page 23: Drug Libraries
4.1.2 Custom Profiles Custom profiles can be configured and loaded to the pump with Agilia Vigilant Drug’Lib software. A custom profile contains the following: a specific device configuration (pump settings that control the mechanical functions of the pump such as alarm volume, and so on) ... -
Page 24: Drugs
Drugs 4.3.1 Infusion Rates A drug can be pre-configured with Agilia Vigilant Drug’Lib software according to one of the following rates: Flow rate: Infusion of a volume over a period of time Dose: Infusion of a specific amount of a drug corresponding to a dose rate 4.3.2 Drug X (mL/h) -
Page 25: Infusion Modes
4.3.4 Infusion Modes An infusion can be started according to the following modes: Infusion Rate Infusion Mode Description Flow Rate Dose Simple Rate Infusion with a programmed rate Volume/Time Infusion of a programmed volume or dose over a ... -
Page 26: Target Controlled Infusion (Tci)
Target Controlled Infusion (TCI) 4.5.1 Introduction to Pharmacokinetic Models With TCI programming mode, the pump software must determine the infusion rate pattern required to achieve and maintain a target drug concentration in a body compartment or tissue. The mathematical model used to achieve this concentration is called a pharmacokinetic model. -
Page 27: Target Concentration
4.5.2 Target Concentration All pharmacokinetic models included in the pump are 3-compartment models that can be represented as follows: Legend Volume of the central compartment (primarily, the blood) Volume of the fast compartment Volume of the slow compartment The partition coefficients that determine the speed at which the drug travels from one compartment to another A constant representing the rate of elimination from the central compartment A constant representing the equilibrium between the plasma and effect sites... -
Page 28: Pharmacokinetic Models In The Agilia Sp Tiva
4.5.3 Pharmacokinetic Models in the Agilia SP TIVA The pharmacokinetic models included in the Agilia SP TIVA were not developed specifically for the device, but they were established and validated by numerous clinical studies. For more information on the pharmacokinetic parameters, refer to the published articles as listed in the Appendix 2: Pharmacokinetic Models, page 158. -
Page 29: Populations
Legend Target Plasma Concentration (Cpt) Plasma Concentration Flow Rate (range) Target Effect-site Plasma Concentration Concentration (Cet) Flow Rate (range) Effect-site Concentration Note 1: With TCI programming mode, the bolus (A) is the initial dose that is delivered to the patient in order to reach the target concentration as quickly as possible. - Page 30 Information The pharmacokinetic models have been determined statistically. Due to inter- and intra-individual variability, you must control the flow rate pattern and make sure it corresponds to the pattern you would administer in a non-TCI mode. This is applicable for all infusion startups and ongoing anaesthetic pump procedures.
-
Page 31: Installation
Installation Types of Installations A pump can be installed on any of the following: Location Comments See section 5.3.1, page 33. On a Pole Pole specifications: Diameter: from 15 to 40 mm See section 5.3.2, page 34. On a Rail Rail specifications: ... -
Page 32: Using The Rotating Pole Clamp
Location Comments Refer to the Agilia Holder Ambulance accompanying documents. In an Agilia Holder Ambulance Do not use accessories that appear to be damaged. For more information on accessories, refer to their respective accompanying documents. Warning The pump must be used in a horizontal and stable position to function properly. -
Page 33: Attaching The Pump(S)
5.2.2.1 Folding the Clamp Down (outward) You can fold the clamp down as follows: 1. Push the release button. 2. Fold the clamp outward. 5.2.2.2 Folding the Clamp Up (inward toward the pump) You can fold the clamp up as follows: 1. -
Page 34: Attaching To A Rail
5.3.2 Attaching to a Rail Only single pumps can be attached to a bed rail or gurney rail. 1. Rotate the pole clamp to the vertical position: see section 5.2.2.3, page 33. 2. Unscrew the clamp, attach to the rail, and screw the clamp until pump is fully secured to the rail. -
Page 35: Attaching Two Pumps Together
5.3.4 Attaching Two Pumps Together You can attach two pumps together either for transport, or before fixing them to a pole. 1. Fold both pumps’ pole clamps up: see section 5.2.2.2, page 33. 2. Slide the slot on the bottom of the upper pump onto the handle of the lower pump. -
Page 36: Getting Started
Getting Started Flowchart Once the pump is installed at the bedside, you must follow the steps below in order to install a syringe and power on the pump. Preparing and priming the syringe and the extension set Section 13.2, page 112. Powering on Section 6.3, page 37. -
Page 37: Using The Pump For The First Time
Using the Pump for the First Time 1. Make sure the pump is correctly installed at the bedside. See section 5, page 31. 2. Plug the pump into the AC power supply. See section 17.1, page 129. 3. Before starting the pump for the first time, you must charge the battery for approximately 6 hours. - Page 38 Screen After Powering on Description The pump is operating on battery. The symbol shows three different charge levels: < 30 % battery charge 30 % - 70 % battery charge > 70 % battery charge No syringe is installed on the pump. ...
-
Page 39: Installing A Syringe
Installing a Syringe Warning This must only be done when the patient is not connected. 1. Open the syringe barrel clasp [A]. 2. Push the disengagement lever [B] down and move the plunger driver to the right. 3. Place the syringe in its cradle, with the flanges correctly inserted in the provided slot. -
Page 40: Operation
Operation Flowchart Selecting a Profile Section 7.2, page 41. Custom Profile Custom Profile Basic & TCI (with a Drug List) (with a Drug Library) Section 4.1.1, page 22. Section 4.1.2, page 23. Section 4.1.2, page 23. Selecting a Selecting a Programming Mode Programming Mode Section 7.3, page 41. -
Page 41: Selecting A Profile
Selecting a Profile You can only select a profile if more than one profile is loaded in the pump. 1. Press to power on the pump. 2. Press the arrow keys to select a profile that corresponds to the target group of patients. (lighthouse) symbol refers to custom profiles that contain drug libraries and have been configured with Agilia Vigilant Drug’Lib software. - Page 42 Flow rate Dose The programming mode that was last used is displayed. 1. Press OK to confirm the programming mode or press C to change it. Flow rate Dose 2. Press the arrow keys to select a new programming mode. 3.
-
Page 43: Selecting A Syringe
Selecting a Syringe The pump automatically detects the size of the installed syringe. 1. Press OK to confirm the displayed syringe, or C to change it. 2. If you have chosen to select another syringe, press the arrow keys to select a new syringe. 3. -
Page 44: Selecting A Drug
Selecting a Drug 7.5.1 Basic & TCI Profile Note: In Basic & TCI, the drug selection step is only applicable with TCI programming mode. 1. Press the arrow keys to select the drug name, and press OK. 2. Press the arrow keys to scroll to the drug’s name, and its associated characteristics. -
Page 45: Programming An Infusion
2. Press OK. A clinical advisory message may appear, if one is configured for the selected drug. 3. Press OK to acknowledge the clinical advisory message and continue programming, or C to change the drug. Programming an Infusion This section describes the programming of an infusion with the Simple Rate infusion mode. - Page 46 A- Basic & TCI profile and Custom Profiles (with a Drug List) 1. Press the arrow keys to select the drug concentration unit, and press OK. 2. Press the arrow keys to select a mass value, and press OK. 3. Press the arrow keys to select a volume value, and press OK. The concentration is automatically calculated and displayed in the unit selected above.
- Page 47 Legend Unauthorized Range Hard Limits Authorized Range Default Value Finite Values Selecting the Drug Concentration Range Finite values 1. Press the arrow keys to select the concentration. 2. Press OK to confirm. 7.6.2.2 Selecting the Patient’s Characteristics Note: This step is only applicable with custom profiles that contain a drug library.
- Page 48 7.6.2.3 Selecting the Infusion Unit Note: This step is only applicable with Basic & TCI profile and custom profiles that contain a drug list. The infusion units for each drug of a drug library are pre-defined with Agilia Vigilant Drug’Lib software. 1.
- Page 49 Selecting an Induction Dose On the induction dose screen: Press no to return to the programming screen. Press Yes to program an induction dose prior to starting the infusion. Selecting the Induction Dose Unit 1. Press the arrow keys to select the concentration. 2.
-
Page 50: Programming Beyond Soft Limits
4. Press start to initiate the induction dose. Once the induction dose is finished, the pump automatically starts the programmed infusion. Interrupting an Induction Dose 1. To pause the induction dose, press The screen displays Continue? 2. Choose one of the following options: ... - Page 51 Overriding a Soft Limit 1. If you reach a soft limit when programming an infusion, the pump displays a message at the top of the screen: = the upper soft limit is exceeded Upper soft max = the lower soft limit is exceeded Lower soft min Flow rate Dose...
-
Page 52: Programming An Infusion (Tci Programming Mode)
7.6.4 Programming an Infusion (TCI Programming Mode) 7.6.4.1 Selecting the Drug Concentration 1. Press the arrow keys to select the concentration. 2. Press OK to confirm. 7.6.4.2 Selecting the Patient’s Characteristics 1. Press the arrow keys to enter the patient's age and press OK. 2. - Page 53 1. Press the arrow keys to enable ("yes") / disable ("no") the flash induction time, then press OK. 2. If Flash is set to "no", press the arrow keys to set the induction time. 3. Press OK. 7.6.4.4 Programming the Infusion Note: For more information on the elements displayed on the TCI programming screen (target concentration, bolus, delay, flow rate range), see section 4.5.4, page 28.
-
Page 54: Starting An Infusion
2. Press OK to continue the infusion, or choose one of the following options: Press to modify the target concentration. Replace the syringe. Starting an Infusion Note: Depending on the programming mode you selected, the screens below may appear. Flow rate Dose 1. -
Page 55: Monitoring An Infusion
Monitoring an Infusion 7.8.1 Monitoring an Infusion when Programmed by Flow Rate Legend Drug Name (Custom profiles only) Infusion Flow Rate (mL/h) To change the flow rate during an infusion, see section 7.9.2, page 59. The flow rate is displayed with the largest font size. Infusion Duration At the current rate, the remaining infusion time in hours and minutes. - Page 56 7.8.2 Monitoring an Infusion when Programmed by Dose Legend Drug Name & Concentration (Custom profiles only) Dose To change the dose during an infusion, see section 7.9.2, page 59. Dose is displayed with the largest font size. Drug Concentration Infusion Flow Rate Syringe Name / Ward Name (configurable) Patient Characteristics Infusion in Progress Symbol...
- Page 57 7.8.3 Monitoring an Infusion when Programmed with TCI During a TCI infusion, you can press to switch from the numerical view to the graphical view. 7.8.3.1 Numerical View Legend TCI Mode Plasma / Effect-site Drug Name & Concentration - Pharmacokinetic Model / Wake up Concentration &...
- Page 58 7.8.3.2 Graphical View Legend TCI Mode Plasma / Effect-site Plasma Concentration (Cp) Evolution Drug Name & Concentration - Pharmacokinetic Model / Dose & Flow rate / Target Concentration (Cet /Cpt) Predicted Plasma Concentration (Cp) Curve Effect-site Concentration (Ce) Evolution...
-
Page 59: Functions During Infusion
Functions During Infusion 7.9.1 Stop Flow rate Dose To stop the infusion, press After 2 minutes, an alarm is generated as a reminder that the infusion is stopped. To restart the infusion, first confirm or modify the programming settings, then start the infusion. See section 7.6, page 45. 7.9.2 Adjusting Infusion parameters: Rate Titration / Target Modification... -
Page 60: Administering A Bolus
Flow rate Dose 7.9.3 Administering a Bolus A bolus is an extra dose that a pump can deliver during an infusion. There are two ways to deliver a bolus dose during an infusion: Direct bolus Programmed bolus Direct Bolus Programmed Bolus Access Key Occlusion... - Page 61 1. During the infusion, press 2. Press bolus to confirm access to bolus function. 3. To administer a direct bolus, press and hold 4. Monitor the volume infused on the main display until the desired bolus is reached. 5. To stop the bolus, release the key.
- Page 62 Flow rate Dose 2. Press the arrow keys to program the bolus volume or dose, and press OK. 3. Press the arrow keys to program the bolus duration (__ h __ min __), and press OK. The flow rate is calculated automatically. Flow rate Dose 4.
-
Page 63: Completing An Infusion
7.10 Completing an Infusion 7.10.1 Near End of Infusion Alert Prior to the end of an infusion, a near end of infusion alert is automatically triggered. The following happens: An audible alarm is triggered. An alarm message appears on the pump screen. ... -
Page 64: 7.10.2 End Of Infusion
7.10.2 End of Infusion When the infusion is complete, the following happens: An audible alarm is triggered. An alarm message appears on the pump screen. The infusion indicator lights flash red. End of infusion settings are configurable with Agilia Vigilant Drug’Lib software (custom profiles), or in the pump options (Basic &... -
Page 65: 7.11.2 Volume/Time & Dose/Time
7.11.2 Volume/Time & Dose/Time You can use this infusion mode to program a volume to be infused (VTBI) over a programmed period of time. When the VTBI is reached, an alarm is triggered. 1. For information on how to access the Volume/Time or Dose/Time menu, see section 8.11, page 83. -
Page 66: 7.11.3 Volume Limit
7.11.3 Volume Limit You can use this infusion mode to set a limit to the volume infused. When the limit is reached, an alarm is triggered. 1. Access the Volume Limit menu, see section 8.12, page 83. Flow rate Dose 2. -
Page 67: Other Functions
7.12 Other Functions 7.12.1 Priming the Syringe and the Extension Set Note: The prime function can be configured with Agilia Vigilant Drug’Lib (custom profiles) or in the pump options (Basic & TCI): Mandatory: A message is displayed and the user is required to prime the line before infusion. - Page 68 Warning Electronically prime the syringe pump system before starting an infusion, or after replacing a near-empty syringe with a replacement syringe. Verify the fluid flow to the patient is OFF, and if available, use the prime function on the syringe pump to remove any mechanical slack in the system.
-
Page 69: 7.12.2 Pre-Programming The Pump
7.12.2 Pre-programming the Pump You can program the pump before installing the syringe. 1. Press to power on the pump. is displayed on top of the pump Syringe installation !!! screen. 2. Make sure the syringe barrel clasp is folded up against the pump. The prog symbol is displayed. -
Page 70: Menus
Menus Overview 8.1.1 Commands Operation Access menu or exit menu Select Confirm (corresponds to enter on the screen) Select / Deselect 8.1.2 Menu Description Stop Menu Symbol Infusion Associated Procedure Required Profile Displaying active profile information, page 72. ... - Page 71 Stop Menu Symbol Infusion Associated Procedure Required View flow rate history Viewing flow rate history, page 86. View pressure history Viewing pressure history, page 87. View concentration history Viewing concentration history, page 88. Syringe Displaying on-pump syringe information, page 89. ...
-
Page 72: Profile
Profile Symbol Procedure Displaying active profile information You can display the active profile name as follows: 1. Press 2. Press the arrow keys to select 3. Press enter. The active profile information is displayed. -
Page 73: Pressure
Pressure Symbol Procedure Modifying the pressure limit The pump pressure limit is pre-defined in the pump options in one of the following modes: 3 levels (low , medium , high The pressure limit is adjustable according to 3 pre-set values. ... - Page 74 4. Press the arrow keys to increase or decrease the pressure limit. 5. Press OK to validate. 6. Press to enable or disable the DPS function (optional). 7. Press OK to confirm. Warning To avoid the presence of air and to minimize the amount of time it takes the pump to recognize an occlusion and generate an alarm while infusing at low rates (e.g., less than 5 mL per hour, and especially flow rates less than 0.5 mL per hour):...
-
Page 75: Keypad Lock Status
Keypad Lock Status Symbol Procedure Locking / Unlocking the keypad You can use this feature to avoid inadvertent key presses. Note: The following features can be activated or deactivated in the pump options: Automatic lock: The keypad will lock automatically at infusion start, or after a time-out. - Page 76 Unlocking the Keypad You can unlock the keypad as follows: 1. Press 2. Press the arrow keys to select 3. Press enter. Unlock code enabled Unlock code disabled 4. Unlock the keypad as follows: If a code is required, press the keys to enter the unlock code. The keypad is unlocked.
-
Page 77: Battery Life
Battery Life Symbol Procedure Viewing the battery life You can view the battery life as follows: 1. Press 2. Use the arrow keys to select The time remaining under current flow rate conditions is displayed. The bar graph shows a visual representation of battery life. The symbol displayed shows the following: ... -
Page 78: Volume Infused / Dose Infused
Volume Infused / Dose Infused Symbol Procedure Viewing and clearing the volume or dose infused Flow rate Dose You can view and clear the volume or dose infused as follows: 1. Press 2. Press the arrow keys to select The total volume, or total dose, infused includes the programmed infusion, induction doses and boluses. -
Page 79: Pause
Pause Symbol Procedure Programming a pause Flow rate and Dose You can program a pause as follows: 1. Press to stop the infusion. 2. Press 3. Press the arrow keys to select 4. Press enter. 5. Press the arrow keys to program the pause duration in hours and minutes, and press OK. -
Page 80: Programmed Bolus
Programmed Bolus Symbol Procedure Programming a bolus To program a bolus, see section 7.9.3.2, page 61. Patient Symbol Procedure Changing a patient’s weight or body surface area Information If the selected dose rate unit is weight-based (kg), the screen displays the patient’s weight. -
Page 81: Day/Night Mode
8.10 Day/Night Mode Symbol Procedure Switching between day mode and night mode This function switches between day mode and night mode The default night mode settings are as follows: The key-press beep is silenced. Infusion indicators and screen brightness are dimmed. Depending on your pump configuration, the switch between day and night mode may be managed either through this menu (manual mode), or according to pre-defined settings (auto mode). - Page 82 Switching from Night Mode to Day Mode You can switch to day mode as follows: 1. Press 2. Press the arrow keys to select 3. Press enter. 4. Press to activate day mode. The screen displays 5. Press OK to confirm.
-
Page 83: Volume/Time & Dose/Time
8.11 Volume/Time & Dose/Time Symbols Procedure Programming a Volume/Time or Dose/Time infusion Volume/Time Dose/Time 1. Press 2. Press the arrow keys to select 3. Press enter. For more information on how to program a Volume/Time or Dose/Time infusion, see section 7.11.2, page 65. 8.12 Volume Limit Symbol... -
Page 84: Alarm Volume
8.13 Alarm Volume Symbol Procedure Adjusting the alarm volume You can adjust the alarm volume as follows: 1. Press 2. Press the arrow keys to select 3. Press enter. 4. Press the arrow keys to select the alarm volume. The pump emits an alarm at the selected volume level. 5. -
Page 85: Volume-Dose History
8.14 Volume-Dose History Symbol Procedure Viewing the infusion history This function allows the user to view the infusion history on the pump. You can view the infusion history as follows: 1. Press 2. Press the arrow keys to select 3. Press enter. 4. -
Page 86: Flow Rate History
8.15 Flow Rate History Symbol Procedure Viewing flow rate history This function allows the user to check the current infusion’s history information in order to verify the dose administered. You can view flow rate history as follows: 1. Press 2. Press the arrow keys to select 3. -
Page 87: Pressure History
8.16 Pressure History Symbol Procedure Viewing pressure history This function allows the user to check the current infusion’s history information in order to verify changes in pressure. You can view pressure history as follows: 1. Press 2. Press the arrow keys to select 3. -
Page 88: Concentration History
8.17 Concentration History Symbol Procedure Viewing concentration history You can view concentration history as follows: 1. Press 2. Press the arrow keys to select 3. Press enter. The following information is displayed: - An event marker (cursor) - The event details (time and target concentration) - The target concentration (dotted line) - The plasma concentration (Cp) evolution (solid line) - The effect-site concentration (Ce) evolution (solid form) -
Page 89: Syringe
8.18 Syringe Symbol Procedure Displaying on-pump syringe information You can display on-pump syringe information as follows: 1. Press 2. Use the arrow keys to select 3. Press enter. The following information is displayed: - Syringe capacity - Syringe brand / name... -
Page 90: View Event Log
8.19 View Event Log Symbol Procedure Viewing the event log The event log displays details of the last events that occurred on the pump. Events are stored in the log even after the pump is powered off and on again. The log can store up to 1500 events. Older events are overwritten. -
Page 91: Date / Time
8.20 Date / Time Symbol Procedure Setting the date and time You can set the date and time as follows: 1. Press 2. Press the arrow keys to select 3. Press enter. 4. Press the arrow keys to set the following: ... -
Page 92: Maintenance
8.21 Maintenance Symbol Procedure Displaying maintenance information You can display maintenance information as follows: 1. Press 2. Press the arrow keys to select 3. Press enter. 4. Press the arrow keys to scroll through the maintenance information. The following information is displayed: ... -
Page 93: Library Information
8.22 Library Information Symbol Procedure Displaying drug library information You can display drug library information as follows: 1. Press 2. Press the arrow keys to select The number of drugs contained in the drug library is displayed. 3. Press enter. All the drugs contained in the drug library are displayed. -
Page 94: Clinical Information
8.23 Clinical Information Symbol Procedure Viewing remaining time before clinical information display If configured for the selected drug with Agilia Vigilant Drug’Lib, a protocol message will be displayed on the pump screen after a pre- defined period of time. You can view the remaining time before clinical information display as follows: 1. -
Page 95: Data Set
8.24 Data Set Symbol Procedure Displaying active data set information You can display active data set information as follows: 1. Press 2. Press the arrow keys to select 3. Press enter. The active data set information is displayed. -
Page 96: Wake Up Concentration
8.25 Wake up Concentration Symbol Procedure Modifying the wake up concentration / Viewing the wake up duration Wake up concentration is the estimated drug concentration at which the patient will wake up. Wake up duration is the time left to reach the wake up concentration. The pump automatically calculates the wake up duration, in accordance with the information entered in this menu. -
Page 97: Tci Setup
8.26 TCI Setup Symbol Procedure Modifying or viewing the induction time You can modify the induction time before the infusion start (plasma mode only). Once the infusion has started, you can only display the programmed induction time. You can modify the induction time as follows: 1. -
Page 98: Options
Options Commands Operation Options access Option selection Confirm (corresponds to enter on the screen) Select / Deselect Selected current values are stored when the device is powered off after programming. To return to the normal menus, power off then power on again. Option Descriptions Four different option groups are available on the pump. -
Page 99: Pump Settings
Pump Settings The following options have different functions that you can select or deselect to customize your Agilia SP TIVA. Default Function Choice Pump Setting Maintenance: display or hide maintenance Disabled [User 2]: Menu items Date / Time: display or hide date/time menu Disabled ... -
Page 100: Data Communication
Pump history retrieval Information Ensure that all hospital information systems have been approved by Fresenius Kabi. For more information, contact your technical services representative. Before connecting the pump to a hospital information system, ask your IT or biomedical department to configure the device. -
Page 101: Data Set Upload
10.3 Communication via Wi-Fi The Wi-Fi option allows the pump to connect to a hospital information system without cables. To know if your pump is equipped with a Wi-Fi module, check for the presence of the Wi-Fi logo on the pump’s keypad. See section 3.4.1, page 17. -
Page 102: User Test
User Test The following protocol provides the user with a quick integrity check guide to ensure that the pump system is functional. Perform this user test before each use of the pump. 1. Check the external appearance of the pump for the absence of cracks or other visible damage. -
Page 103: Alarms And Safety Features
Alarms and Safety Features 12.1 Introduction Agilia SP TIVA has a continuous monitoring system that begins when the pump is started. When an alarm is triggered, a message is displayed on the pump screen. We recommend that the user stand in front of the pump to read the message before acknowledgment. -
Page 104: General Remarks
12.3 General Remarks When two alarms occur at the same time, the higher priority alarm is displayed. When two alarms with the same priority level are triggered at the same time, the pump software assigns them a priority. ... - Page 105 Stops Message Priority Problem / Resolution Infusion? This message displays when the pump is switched ON and OFF more than 5 times after the syringe type and brand have been confirmed. Remove completely Low (!) syringe ! Remove and reinstall the syringe. Note: The key silences the alarm for a duration of 2 minutes.
- Page 106 Stops Message Priority Problem / Resolution Infusion? The time remaining is less than the defined Near end of volume/time !! time duration (adjustable between 1 and 30 minutes), and the remaining VTBI has dropped to less than 10 % of the syringe Medium (!!) capacity.
- Page 107 Stops Message Priority Problem / Resolution Infusion? The infusion settings have been entered, but the infusion has not been started with start key. Check the infusion settings. Medium (!!) Waiting start !! Press start to start the infusion. Note: The key silences the alarm for a duration of 2 minutes.
- Page 108 Stops Message Priority Problem / Resolution Infusion? In-line pressure has reached the following value: 25 mmHg / 2.5 kPa / 0.5 PSI below the programmed threshold (from 50 to 250 mmHg). 50 mmHg / 5 kPa / 1 PSI below the Occlusion Medium (!!) programmed threshold (over 250 mmHg).
- Page 109 Stops Message Priority Problem / Resolution Infusion? Low battery. Connect the pump to a power supply. Medium (!!) Battery pre alarm !! Note: The key acknowledges the alarm. If the pump is not used during an extended Low (!) period, connect to a power supply and wait until the battery is charged.
- Page 110 Warning If the alarms persist when the pump is powered on again, do not use the device on a patient, and contact qualified biomedical engineering staff in your healthcare facility, or your Fresenius Kabi sales representative. 12.4.10Audio-only Information Signals Stops...
- Page 111 Stops Type Comment Activation Infusion? Other non validation 1 beep For each key pressed beep Direct bolus 1 beep Repeated for each mL infused Syringe prime 1 beep Repeated every 5 seconds End of pause 4 beeps At the end of pause - repeated...
-
Page 112: Syringes
For general information on syringes (expiration date, storage, sterility, and so on), refer to the syringe manufacturer’s instructions. Warning Fresenius Kabi cannot accept responsibility for any flow rate errors that are due to changes to syringe specifications introduced by the manufacturer. ... - Page 113 Information The fluid in the syringe and the syringe must be within normal operating temperature conditions: +18 °/+30 °C. It is recommended to prime the set immediately before starting the infusion. Do not use in conjunction with positive pressure infusion devices that could generate back pressure higher than 2000 hPa (1500 mmHg): doing so will damage the administration set and the pump.
- Page 114 13.3 Operations for Syringes 13.3.1 Removing a Syringe 1. Press to stop the infusion. 2. Disconnect the patient. 3. Open the syringe barrel clasp. 4. Press to silence the audible signal for 2 minutes. 5. Push the disengagement lever down and remove the syringe from its cradle.
- Page 115 Figure 13.1: Gravity Infusion (in parallel with a pump) Information Fresenius Kabi recommends the use of a back check valve or positive pressure infusion devices when an infusion on the pump is connected to a gravity line. This will prevent the back-up of IV fluid or medication into the gravity line.
- Page 116 Device Storage 14.1 Precautions for Storage Handle the device with care during storage. Store the device in a cool, dry place. The storage area must be clean and organized. Clean and disinfect the device prior to storage. Warning If the device is not used for an extended period (longer than 2 months), it is recommended that the battery be removed from the device and put...
- Page 117 14.4 Using the Device After Storage The device can be used immediately after storage without any cooling or warm up period. If the battery has been removed for long-term storage, contact your biomedical department in order to reinstall the battery prior to use. We recommend charging the battery for at least 6 hours.
- Page 118 Specifications Information The range of settings and default values described in this section correspond to the factory configuration. Range of settings and default values may be adjusted in the pump options (Basic & TCI configuration). 15.1 Essential Features The pump’s essential features are defined in standard operating conditions: Feature Refer to...
-
Page 119: Infusion Time
15.3 Volume To Be Infused (VTBI) Default Minimum Format Range of Settings Value Increment (0.1 99.9) Volume Limit (100 999) Volume/Time 99.9 Direct Bolus Programmed Bolus 99.9 Applicable for all syringe sizes (50/60 mL, 30 mL, 20 mL, 10 mL, 5 mL) 15.4 Dose To Be Infused (DTBI) Default... -
Page 120: Concentration
15.6 Concentration Default Minimum Format Range of Settings Value Increment 0.01 (0.01 9.99) Concentration Unit 0.01 70000 0.01 (10.0 99.9) (100 70000) Volume of Diluent 2000 Applicable for all syringe sizes (50/60 mL, 30 mL, 20 mL, 10 mL, 5 mL) 15.7 Patient Data Default... -
Page 121: Accuracy
Default Minimum Format Range of Settings Value Increment (50 250) Full Range mmHg (250 900) Maximum mmHg Limit Raise mmHg Threshold Drop mmHg Threshold Note: 1 bar = 750 mmHg = 100 kPa = 14.5 PSI. 15.9 Accuracy Warning... - Page 122 15.9.3 Occlusion Alarm Accuracy Accuracy Occlusion Alarm Threshold Syringe** Rate 50 mmHg 900 mmHg Occlusion Alarm Response 0.1 mL/h < 5 hours < 28 hours Time* 50 mL 1 mL/h < 30 minutes < 3 hours 5 mL/h < 7 minutes <...
-
Page 123: Units Andc
15.10 Units and Conversion Rules 15.10.1 Concentration Units Units Suffix nanog, microg, mg, g mmol Concentration mUnit, Unit /mL, /--mL Units cal, kcal 15.10.2 Dose Units Units nanog/h, nanog/kg/min, nanog/kg/h microg/min, microg/h, microg/kg/min, microg/kg/h mg/min, mg/h, mg/24h, mg/kg/min, mg/kg/h, mg/kg/24h, mg/m²/h, mg/m²/24h g/h, g/kg/min, g/kg/h, g/kg/24h Dose Units... - Page 124 15.10.3 Conversion Rules 1 micro unit = 1000 nano unit 1 m unit = 1000 micro unit 1 k unit = 1000 unit 1 unit/h = 24 unit/24 h 1 unit/min = 60 unit/h Conversion of a dose unit/kg/h (dose) × kg (weight) mL/h = including the unit/kg into unit/mL (concentration)
-
Page 125: Cleaning And Disinfecting
Cleaning and Disinfecting To avoid the risks of infection and microbial transmission, make sure to adequately clean and disinfect the equipment. Warning The disinfecting procedure must be done immediately after cleaning. Disinfecting the pump without prior cleaning is not effective. ... -
Page 126: Instructions For
16.2.2 Prohibited Agents The following cleaning and disinfecting agents are prohibited: Trichloroethylene Abrasive detergents Undiluted alcohol These aggressive agents may damage the plastic parts of the pump and cause it to malfunction. 16.3 Instructions for Cleaning and Disinfecting Follow the instructions provided to ensure effective cleaning and disinfecting of the equipment. - Page 127 Protocol 1. Place the pump on a clean surface or disposable underlay. 2. Use a ready-to-use wipe to remove any major grime. 3. Thoroughly wipe down all exposed surfaces (housing, keyboard, syringe barrel area, syringe guard, plunger driver, disengagement lever, syringe barrel clasp, etc.) of the pump, from top to bottom. You can use the silver handle to lift and move the pump.
- Page 128 3. Set down the pump, and wipe down the silver handle, the attachment lock knob, the screw clamp and the release button. 4. Use a fresh ready-to-use wipe to gently wipe down the back side of the syringe barrel clasp and all exposed surfaces in the syringe barrel area.
-
Page 129: Power Management
Warning The pump and its accessories can only be connected to the AC power supply with the power cord supplied by Fresenius Kabi, or with a power supply accessory from the Agilia product range. Do not use an extension cord when connecting the pump to the AC power supply. -
Page 130: Battery Operating
Information Do not replace with a battery other than the one provided by Fresenius Kabi. Do not use the pump without the battery connected. Do not disconnect the battery when the device is operating on AC or battery power. -
Page 131: Technical Characteristics
Technical Characteristics 18.1 Power Supply It is mandatory to use an Agilia power cord compliant with the IEC 60227 standard. The power cord conductor must have a cross section of at least 0.75 mm 100 V - 240 V ~ / 50 / 60 Hz with functional Power supply earth AC Power... -
Page 132: Sound Levels
18.4 Communication Port The connector located at the back of the device allows data communication with a PC. Serial Cable TTL output Power Input 10 V / 15 W to power supply the product Power Output 5 VDC / 150 mA to power Agilia USB cable 18.5 Infrared Communication The pump is equipped with an infrared cell located at the back of the... -
Page 133: Compliance
18.6.2 Alarms Sound Levels Sound Level (dBA) Alarm Priority High-priority Medium-priority Low-priority 18.7 Compliance Compliant with the following Index of protection against ElectroMedical standards: IP22 ingress of water or particulate Equipment Safety IEC 60601-1 matter IEC 60601-1-8 Compliant with the following Protection against leakage (ElectroMagnetic standard:... -
Page 134: Trumpet Ands
18.9 Trumpet and Start-up Curves The trumpet curve shows the variation of the mean flow rate accuracy over specific observation periods. The variations are presented only as maximum and minimum deviations from the overall mean flow within the observation window. Trumpet curves are presented below for a number of representative flow rates. - Page 135 Legend Measured variance from flow rate Error Flow rate Sampling time: 10 s -1,6 -1,9 -4,4 -6,5 -8,6 Time (minutes) Figure 18.2: Trumpet curves for 2, 5, 11, 19, 31 minutes observation windows (1 mL/h over first 2 hours on 96 hours) 18.9.2 Flow rate: 5 mL/h Legend Instantaneous...
- Page 136 Warning Agilia Wi-Fi pumps must be configured by qualified and appropriately trained staff. Information If communication with the wireless network is interrupted, the pump can be used as intended. For more information, contact your Fresenius Kabi sales representative...
-
Page 137: General Information Specifications
19.2 Specifications 19.2.1 Technical Specifications Description Technology IEEE 802.11 a/b/g/n 2.400 2.500 GHz (2.4 GHz is ISM band) Frequency Band 4.900 5.850 GHz (High Band) OFDM with BPSK, QPSK, 16-QAM, and 64-QAM 802.11b with CCK and Modulation DSSS Wireless Security... - Page 138 Data integrity and quality of service are inherent in the design. The system should be ensured and maintained by a qualified and trained technical user, or a Fresenius Kabi representative.
- Page 139 Remove the power cord. something abnormal (unusual noise, Contact your biomedical department or your abnormal heat or smoke). Fresenius Kabi sales representative immediately. The pump has been dropped or was Do not use the pump. subjected to a force that may have Contact your biomedical department or your Fresenius Kabi sales representative.
- Page 140 Connect the pump to the AC power supply. Then, wait few minutes without touching the keypad until the message At start-up, the pump displays: disappears and the pump starts as usual. "Software is upgrading...". Contact your biomedical department, or your Fresenius Kabi sales representative.
- Page 141 They must be collected separately and disposed of according to local regulations. Information For more information on waste processing regulations, contact your Fresenius Kabi sales representative or the local distributor. For more information on dismantling the device, refer to the technical manual. ...
-
Page 142: Limited Warranty
Warranty 22.1 General Warranty Conditions Fresenius Kabi guarantees that this product is free from defects in material and workmanship during the period defined by the accepted sales conditions, except for the batteries and the accessories. 22.2 Limited Warranty To benefit from the materials and workmanship guarantee from our... -
Page 143: Guidance And Manufacturer's Declaration On Emc
Guidance and Manufacturer's Declaration on 23.1 Electromagnetic Compatibility Warning The Agilia pump and its accessories are intended to be used in the electromagnetic environments specified below. The customer or the user of the Agilia pump should ensure that it is used in such environments. - Page 144 The following environmental conditions related to electrostatic sensitive components (ESD standards) must be observed: Floors coated with wood, tiles or concrete Relative humidity of at least 30% If it is not possible to guarantee this environment, the following additional precautions must be taken: ...
- Page 145 Warning Use of the Agilia pump adjacent to or stacked with other equipment should be avoided because it could result in improper operation. If such use is necessary, this equipment and the other equipment should be observed to verify that they are operating normally. ...
- Page 146 23.4 EMC and essential performances In the case of electromagnetic disturbances, if the essential performance, Section 15.1, page 125, is lost or degraded, the consequences for the patient are as follows: overdose, underdose, delay of therapy, air embolism, trauma, exsanguination. 23.4.1 Table 1 - Guidance and Manufacturer's Declaration - Electromagnetic Emissions...
- Page 147 IEC 60601-1-2 - - - - - - - - - - - - - - Compliance Level Electromagnetic Environment - IEC 60601-2-24 Immunity Test Obtained by Guidance and ANSI/AAMI the Device ID26 Test Level Electrostatic ± 6 kV contact ±...
- Page 148 23.4.3 Table 4 - Guidance and Manufacturer's Declaration - Electromagnetic Immunity Warning The Agilia pump and its accessories are intended to be used in the electromagnetic environments specified below. The customer or the user of the Agilia pump should ensure that it is used in such environments.
- Page 149 23.4.4 Table 6 - Recommended Separation Distances Between Portable and Mobile RF Communication Equipment and the Agilia Pump Information The Agilia pump and its accessories are intended for use in electromagnetic environments in which radiated RF disturbances are controlled. ...
- Page 150 EMC test deviations and suplementary tests 23.4.5 To ensure compatibility with the new EMC standard IEC / EN 60601-1-2 Ed4 and special environments, specific, additional or deviating tests are listed below with respect to the basic tests, in accordance to manufacturer risk analysis. IEC 60601-1-2 Compliance level Electromagnetic...
- Page 151 IEC 60601-1-2 Compliance level Electromagnetic Immunity test IEC 60601-2-24 obtained environment – guidance Test level by the device Electrical Fast ± 2 kV for power ± 2 kV for power Electricity power quality should be that transient / Burst supply lines supply lines of a typical domestic, commercial or IEC 61000-4-4...
-
Page 152: Servicing
3. Pack the device in the provided packaging. 4. Ship the device to Fresenius Kabi. Information Fresenius Kabi is not liable for loss or damage to the device during transport. For more information on servicing, contact your Fresenius Kabi sales representative. - Page 153 These control checks must be performed by trained technical personnel, and are not covered by any contract or agreement provided by Fresenius Kabi. For more information, refer to the technical manual, or contact your Fresenius Kabi sales representative.
- Page 154 Glossary of Terms Term Description Amperes Alternating Current Ampere-hours Amplitude Modulation Amperes per meter American Society of Anesthesiologists Body Mass Index Body Surface Area Measured Concentration meas Predicted Concentration pred Centers for Disease Control Effect-site Concentration Target Effect-site Concentration CISPR Special International Committee on Radio Interference Plasma Concentration Target Plasma Concentration...
- Page 155 Term Description Electroencephalogram Electromagnetic compatibility ErXX Error message Electrostatic Discharge Frequency Modulation H/W/D Height / Width / Depth High Frequency Hectopascals HTTP HyperText Transfer Protocol Hertz International Electrotechnical Commission Instructions for Use Information Technology Intravenous Kilograms Keep Vein Open Lean Body Mass Light Emitting Diode Milliamperes MDAPE...
- Page 156 Term Description Performance Error Product reference / part number Radio Frequency RFID Radio Frequency IDentification RS232 Serial interface connector Serial Number Asynchronous Serial Infrared Target Controlled Infusion TIVA Total Intravenous Anaesthesia Universal Serial Bus Test specification level Volts Volt-Amperes Volts Direct Current Volume Infused Vrms Root Mean Square Voltage...
- Page 157 Appendix 1: Factory Configuration Basic & TCI Basic & TCI Feature Feature Flow Flow Dose Dose rate rate Profile Simple Rate Pressure Volume/Time management Dose / Time Keypad lock status Volume Limit ...
- Page 158 Appendix 2: Pharmacokinetic Models...
- Page 159 a. B.Marsh, M.White, N. Morton, G.N.C. Kenny. Pharmacokinetic model driven infusion of propofol in children. British Journal of Anesthesia. 1991, 67, pp. 41-48. b. J.H. Seo, et al. Influence of a modified propofol equilibration rate constant (Ke0) on the effect-site concentration at loss and recovery of consciousness with the Marsh model.
- Page 160 * if patient age < 13 years ** if patient age is between 13 and 16 years *** if patient age = 13 years **** if patient age = 14 years ***** if patient age = 15 years ****** if patient age = 16 years...
- Page 161 Index Environment 12 Essential Features 118 Agilia Connect Infusion System 13 Event Log 90 Agilia USB Cable 101 Alarm Adjust Volume 84 Factory Configuration 157 List 104 First Use 37 Priority 18, 103 Flash 52 Sound Level 133 Flow Rate 24, 45, 55 Arrow Keys 18 Glossary 154 Battery...
- Page 162 KVO 65, 66 Profile 22 Basic & TCI 22 Custom Profile 23 Display Information 72 Language Selection 99 Select 41 Maintenance 152 Quick-Start 68 Display Information 92 Reminder Message 38 Requirements 152 Menu Recycling 141 Customization 99 Release Notes 164 List 70 Rotating Pole Clamp 32 Models (Pharmacokinetic) 26, 28, 158...
- Page 163 Trumpet Curves 134 Units 123 User Test 102 Users 10 Volume Infused 78 Volume Limit 66, 83 Volume/Time 65, 83 VTBI 65, 119 Wake up Concentration 96 Warranty 142 Wi-Fi 19, 99, 101 Communication 136 Specifications 137...
- Page 164 This document may not be reproduced in whole or in part without the written consent of Fresenius Kabi. ®...
- Page 166 Local Contacts for Servicing Fresenius Kabi AG Fresenius Vial S.A.S 61346 Bad Homburg Le Grand Chemin Germany 38590 Brézins - France...
Need help?
Do you have a question about the Agilia SP TIVA and is the answer not in the manual?
Questions and answers
What pharmacokinetic models are available for the TCI pumps? Do you have Dyck ( Dexmedetomidine ) and Maitre ( Alfentanil ) as well as Eleveld for Propofol and Remifentanil?