Table of Contents
Advertisement
Available languages
Available languages
Quick Links
Model No. 5LCHG11C
Original Instructions
User's Manual of 5th Wheel Scooter G1 pro
Use Camera or QR Scanner to Scan
Or Visit: https://5thwheel.life/pages/contact-us
The illustrations and function descriptions in this user manual are for illustration purposes and reference only, and the products
are subject to the real product. The mentioned technical performance indicators are based on the specific experimental
environment, and the actual indicators may vary depending on the setting and environment. This product needs to be used
with mobile phones or other smart devices. The realization of all functions of this product requires network support, with the
network fee being subject to the supplier's service rate. This product is only used to assist safety management and cannot
replace other safety measures. Do not use this product for any illegal purpose. Some services are provided and supported by
third parties, which may change at any time. Invanti does not provide any guarantee for third-party services. Please read the
terms of the third-party service and privacy policy carefully before use.
The text and logo of 5TH WHEEL are trademarks or registered trademarks of enterprises affiliated with Invanti. Other company,
product or service names mentioned may be trademarks or registered trademarks of their respective owners.
The picture is for reference only.
© 2022 Invanti (Beijing) Technology Co., Ltd all rights reserved.
V1.0
Before using the product, please read this manual.
IMPORTANT! Read carefully and keep for future reference.
Advertisement
Chapters
Table of Contents

Related Manuals for 5th Wheel G1 pro


Summary of Contents for 5th Wheel G1 pro
- Page 1 The text and logo of 5TH WHEEL are trademarks or registered trademarks of enterprises affiliated with Invanti. Other company, product or service names mentioned may be trademarks or registered trademarks of their respective owners.
-
Page 2: Table Of Contents
Welcome Contents Thank you for choosing the 5th Wheel Scooter G1 pro (hereinafter referred to as G1 pro ). Enjoy the pleasure brought by G1 pro ① EN 1-30 ② DE 33-60 ③ FR 64-91 ④ IT 95-122 ⑤ ES... -
Page 3: Safety Instructions
1 Safety Instructions Note: Before using this product, please carefully read the following important safety information. 1.This electric scooter can be used by one adult only. 2.Wear safety helmet and other protective equipment while 5.Do not make dangerous actions or ride with one 6.Avoid obstacle jumps and anticipate and adapt your trajectory Never carry others. - Page 4 9.In the event of bumps or poor road conditions, please use 10.Do not use this product on an oily or icy surface. 13.Use this product in accordance with relevant 14.Avoid using or keeping this product at high or this scooter slowly or get off the scooter and push it forward. instructions in this manual.
- Page 5 17.Engage the kickstand when the vehicle is not in use; Flip up 18.The minimun height of the user is 1.4m, while the maximun 21.The user shall take the time to learn the basics of the 22.Notify your presence when approaching a pedestrian the kickstand before use;...
-
Page 6: Introduction To Functions
2 Introduction to Functions 1. Product Overview 25.Caution, the brake may become hot in use. Do not touch 26.Eliminate any sharp edges caused by use.Do not after use. modify or transform the vehicle, including the steering tube Throttle LED Display and sleeve, stem, folding mechanism and rear brake. -
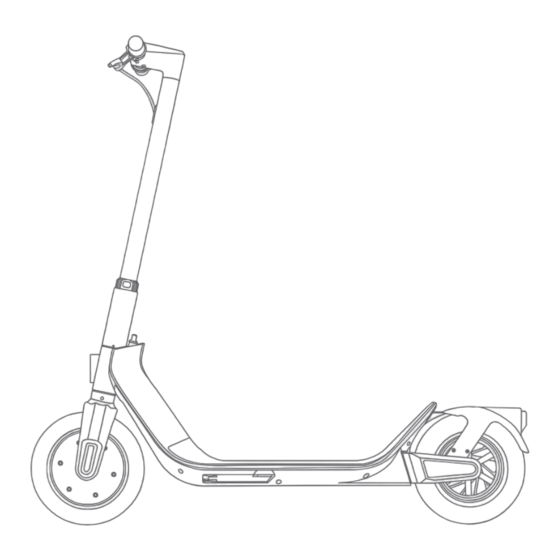
Page 7: Product Display
3 Product Display Accessories Model No. 5LCHG01 Original Instructions User's Manual of 5th Wheel Scooter G1 pro 5th Wheel Scooter Tool kit Unfolded status The picture is for reference only. V1.0 Before using the product, please read this manual. IMPORTANT! Read carefully and keep for future reference. -
Page 8: Scooter Assembly
4.After assembly, check whether the power switch can work 3.When pulling the scooter bar to the correct place, push the 4.Rotate the folding switch to the OFF position and G1 pro is normally. folding switch down to the bottom to fix it. - Page 9 2. Folding Operations 3. About Carrying Note: For safety, it is recommended to fold the scooter after it is shut down. 1.Rotate the folding switch to the ON position. 2.Pull the folding switch upward. 3.Put down the scooter bar. 4.Pull the folding switch outward and lock it by using After folding, you can carry the scooter with one or two hands.
-
Page 10: Riding And Parking
Note: For the riding safety, G1 pro has a non-zero start mode. The accelerator cannot be enabled until the body slides forwards for a certain distance. - Page 11 LED Display Power Switch Cruise Headlight Control Long press the Power switch for 2 second to turn on/off the scooter.Click the power button to switch gears; double click to Alert Wireless Connection switch kilometers/miles; triple click to display accumulated mileage for 5s. Gear Setting Press the power button twice quickly to switch the gear.
-
Page 12: Indication Description
8 Indication Description Brief Use Instructions When the scooter is powered off, press the Power switch briefly to turn it on. LED Headlight Status Indication When the scooter is operating, long press the Power switch to turn it off. During riding the scooter, press the LED headlight switch briefly to turn on the LED headlight and press again to turn it off. -
Page 13: About Charging
10 About the Battery and Charger Kinetic energy recovery Each G1 pro electric scooter is equipped with a dedicated lithium battery and smart charger. Both the Press the brake in the running process to enable the kinetic energy recovery system and convert part of kinetic energy into electrical energy to be stored and used. -
Page 14: App Descriptions
11 App Descriptions 5TH WHEEL App Manual Operation No manual operation is required in case of registering an account of 5TH WHEEL and completing the minimalist connection. The device card will be displayed on the homepage of the 5TH WHEEL App. -
Page 15: Maintenance
12 Maintenance 13 Common Problems and Solutions Lubrication For maintenance, add a small amount of white grease or lubricant to the folded part once every six months. If there is any problem with the scooter, please try to solve it in the following ways. Check the scooter once every three months for screw loosening. -
Page 16: Parameter Configuration
14 Parameter Configuration Wireless Parameter Wireless parameters Product name 5TH WHEEL Scooter G1 pro frequency range 2402~2480 MHz Wireless maximum Model 5LCHG11C +7dBm output power L×W×H 1190mm×575mm×1150 mm 15 Authentication Size After folding L ×W ×H 1190mm×575mm×535 mm Net weight... - Page 17 In this user manual, we make our utmost to describe all the instructions and functions of the G1 pro electric scooter. With constant updates and iteration, the G1 pro electric scooter received may be slightly different from the product features shown in this manual.
-
Page 18: Sicherheitsvorkehrungen
Willkommen 1 Sicherheitsvorkehrungen Vielen Dank, dass Sie sich für den 5TH WHEEL Elektroroller 5LCHG01 (im Folgenden als G1 pro bezeichnet) Bitte lesen Sie die folgenden Sicherheitsvorkehrungen vor der Verwendung sorgfältig durch. entschieden haben. Viel Spaß bei dem Genusserlebnis mit dem G1 pro. - Page 19 10. Fahren Sie nicht auf glatten Straßen (z. B. Straßen mit mit dem G1 pro, ohne beide Hände fest an den Griffen zu höher als 3 cm sind, dies kann den G1 pro zum Umkippen bringen Straßenverhältnissen fahren, reduzieren Sie bitte die Eis, Öl usw.).
- Page 20 Watch for fires WARNUNG Halten Sie die 19.Da sich die Bremsleistung und der Griff zwischen Reifen 15.Bei dem G1 pro handelt es sich um ein spezielles Fahrzeug. 16. Es dürfen keine Lasten am Lenker befestigt werden, Kunststoffabdeckung von Kindern fern, um und Straße bei Nässe verschlechtern, lässt sich die...
- Page 21 21.Nehmen Sie sich die Zeit, die Grundlagen der Benutzung zu 22. Machen Sie sich bemerkbar, wenn Sie sich einem 25. Vorsicht, die Bremse kann sich bei Gebrauch erhitzen. 26. Schleifen Sie alle scharfen Kanten ab, die durch den erlernen. So vermeiden Sie schwere Unfälle, die sich im Fußgänger oder Radfahrer nähern und von ihm nicht Nach dem Gebrauch nicht berühren.
-
Page 22: Über Den Roller
LED-Display LED-Scheinwerfer Model No. 5LCHG01 Original Instructions Hintere Scheibenbremse User's Manual of 5th Wheel Scooter G1 pro 5th Wheel Scooter G1 pro Tool kit The picture is for reference only. V1.0 Before using the product, please read this manual. Stange IMPORTANT! Read carefully and keep for future reference. -
Page 23: Aussehen Des Rollers
1.Klappen Sie den Klappmechanismus des G1 pro auseinander 2. Setzen Sie den Lenker in die Stange ein. und bringen Sie den Ständer nach unten. Klappen Sie den G1 pro auf und befestigen Sie den Klappmechanismus. (Sehen Sie dazu „ Zusammenklappen und Tragen“ für mehr Informationen.) -
Page 24: Ausklappen/Zusammenklappen/Tragen
3.Drücken Sie die Stange nach unten. 4.Ziehen Sie den Knopf zum Zusammenklappen drücken Sie den Knopf zum Zusammenklappen nach unten, Position OFF; der G1 pro ist nun vollständig auseinandergeklappt. heraus und verriegeln Sie ihn mit der Schnalle, um um ihn festzumachen. -
Page 25: Fahren Und Parken
Je mehr Sie den Gashebel nach unten drücken, desto höher wird die Geschwind- igkeit. Hinweis: Aus Sicherheitsgründen ist der G1 pro mit einem Nicht-Nullstart ausgestattet. Das Drücken des Gashebels wird erst dann wirksam, wenn sich der Roller eine gewisse Strecke vorwärts bewegt. -
Page 26: Steuerung
7 Steuerung LED-Display Warnanzeige Gashebel/ Ein/Aus-Schalter Ganganzeige Geschwindigkeitsregler Automatischer Tempomat LED-Scheinwerfer Telefonanschluss Griffüberzug LED-Display Scheibenbremse Fußgängermodus Gang 2 Gang 1 Gang 3 Geschwindigkeit in Echtzeit Geschwindigkeitseinheit Gesamtkilometerstand Akkuleistung... -
Page 27: Anzeigen
8 Anzeigen Ein/Aus-Schalter Drücken Sie lange den Power-Schalter für zwei Sekunden lang, um den Roller ein-/auszuschalten. Klicken Sie auf die LED Headlight Status Indication Power-Taste, um die Gänge zu schalten; Doppelklick auf Kilometer/Meilen wechseln; Dreifacher Klick, um die gesammelten Kilometer für 5s anzuzeigen. Einschalten Ausschalten Gangeinstellung... -
Page 28: Über Das Aufladen
Falls dies nicht der Fall gewesen Falls er unterbrochen oder sein sollte, überprüfen Sie bitte, kurzgeschlossen ist, ersetzen Sie Der Elektroroller G1 pro ist mit einer speziellen Lithiumbatterie und einem speziellen intelligenten ob der Verbindungsdraht zwischen den Anschlussdraht. dem Gashebel und dem LED-Display Ladegerät ausgestattet. -
Page 29: App
11 App 5TH WHEEL APP manuell hinzufügen Wenn Sie sich für ein 5TH WHEEL Konto registrieren und die einfache Verbindung abschließen, müssen Sie Ladegerät das APP nicht manuell hinzufügen, die Gerätekarte wird auf der Startseite der 5TH WHEEL APP angezeigt. -
Page 30: Pflege Und Wartung
12 Pflege und Wartung Schmierung Fügen Sie zur Wartung alle sechs Monate eine kleine Menge weißes Fett oder Schmiermittel in den Klappmecha- nismus ein. Überprüfen Sie den Roller einmal alle drei Monate auf lockere Schrauben. Ziehen Sie lockere Schrauben fest. Batterie Laden Sie vor dem ersten Gebrauch des Elektrorollers die Batterie vollständig auf. -
Page 31: Fehlersuche
13 Fehlersuche 14 Parameter Parameter Produktname 5TH WHEEL Elektroroller G1 pro Modell 5LCHG11C Falls es ein Problem mit dem Roller gibt, versuchen Sie bitte, es auf folgende Weise zu lösen. Länge×Breite×Höhe 1190mm×575mm×1150 mm Abmessungen (Zusammengeklappt) 1190mm×575mm×535 mm Länge×Breite×Höhe 1.Die Displayanzeige ist schwarz. -
Page 32: Konformität
Produkt in der gesamten EU nicht zusammen mit anderem Hausmüll entsorgt werden darf. Der Hersteller behält sich das Recht vor, das Design und die Funktion des Elektrorollers G1 pro und der Dokumente ohne Um mögliche Schäden einer unkontrollierten Abfallbehandlung für die Umwelt oder die menschliche Gesundheit zu vorherige Ankündigung zu ändern. - Page 33 Bienvenue Nous vous remercions d’ avoir choisi le scooter électrique 5TH WHEEL 5LCHG01 (ci-après dénommé G1 pro). Profitez de l’ expérience du plaisir que vous procure le G1 pro. FR-Table des Matières 1.Consignes de Sécurité 2.À propos du Produit 3.Apparence du Produit 4.Guide d’assemblage...
-
Page 34: Consignes De Sécurité
1 Consignes de Sécurité Veuillez lire attentivement les consignes de sécurité suivantes avant d’ utiliser le scooter. 1. Le G1 pro est conçu pour et ne peut être utilisé que par des 2.Veuillez porter un casque de sécurité et d’ autres équipements 5.Ne tentez pas de manœuvres dangereuses et ne... - Page 35 Watch for fires 15. Le G1 pro est un véhicule spécial. Veuillez le conduire sur 16.Ne fixez aucune charge sur le guidon susceptible d’affecter 11.Ne plongez pas le G1 pro dans des flaques d’eau de plus 12.En cas de pluie, de neige, de vent et d’...
- Page 36 17.Engagez la béquille lorsque le véhicule n’ est pas utilisé. 18. L’ utilisateur doit mesurer au minimum 1,4 m et au 21. L’ utilisateur prendra le temps d’ apprendre les bases de 22. Signalez votre présence à l’ approche d’ un piéton ou Relevez la béquille avant l’...
-
Page 37: À Propos Du Produit
2 À propos du Produit 1. Aperçu de l’ appareil 25. Attention, le frein peut devenir chaud en cours 26. Éliminez les éventuels bords coupants causés par d’ utilisation. Évitez de le toucher après utilisation. l’ utilisation. Ne procédez à aucune modification ou Accélérateur Affichage LED transformation du véhicule, y compris du tube et du... -
Page 38: Apparence Du Produit
3 Apparence du Produit Accessoires Model No. 5LCHG01 Original Instructions User's Manual of 5th Wheel Scooter G1 pro 5th Wheel Scooter G1 pro Tool kit Déplié The picture is for reference only. V1.0 Before using the product, please read this manual. -
Page 39: Guide D'assemblage
4.Après le montage, vérifiez si le commutateur d’ 3. Une fois la potence placée au bon endroit, appuyez sur 4.Tournez la poignée de pliage en position OFF ; le G1 pro est alimentation fonctionne normalement. la poignée de pliage pour la fixer. - Page 40 2. À propos du pliage 3. À propos du transport Remarque : Pour des raisons de sécurité, il est recommandé de plier le scooter après l’avoir éteint. 1.Tournez la poignée de pliage en position ON. 2.Tirez la poignée de pliage vers le haut. 3.Abaissez la potence.
-
Page 41: Conduite Et Stationnement
Plus vous appuyez l’ accélérateur vers le bas, plus la vitesse est élevée. Remarque : Pour des raisons de sécurité, le G1 pro est conçu avec un démarrage au pas. L’ accélérateur ne prend effet qu’ après que le scooter a avancé d’ une... - Page 42 Affichage LED Interrupteur d’alimentation Appuyez sur l'interrupteur d'alimentation pendant 2 secondes pour allumer / éteindre le chariot. Cliquez sur le bouton d'alimentation pour changer de rapport; Double - cliquez pour Conversion km / Mile; Double - cliquez pour afficher un Indicateur d’...
-
Page 43: Indicateurs
8 Indicateurs Instructions d’utilisation Lorsque le scooter est éteint, appuyez sur l’interrupteur d’alimentation pour le mettre en marche. Lorsque le scooter est en marche, appuyez sur l’interrupteur d’alimentation pour le mettre à l’arrêt. État du phare à LED Lorsque vous conduisez le scooter, appuyez sur le commutateur du phare à LED pour allumer le phare à LED et appuyez à... -
Page 44: À Propos De La Charge
Appuyez sur le frein pendant que le véhicule est en marche pour activer le système de récupération de Le scooter électrique G1 pro est équipé d’ une batterie au lithium spéciale et d’ un chargeur intelligent l’ énergie cinétique et convertir une partie de l’ énergie cinétique en énergie électrique à stocker et à utiliser. -
Page 45: Application
11 Application Ajout manuel de l’APP 5TH WHEEL Si vous enregistrez un compte 5TH WHEEL et finissez la connexion minimaliste, vous n'avez pas à l'ajouter manuellement et la carte de l'appareil s'affichera sur la page d'accueil de l’APP 5TH WHEEL. -
Page 46: Entretien Et Maintenance
12 Entretien et Maintenance 13 Dépannage Lubrification Pour la maintenance, ajoutez une petite quantité de graisse blanche ou de lubrifiant à la partie pliée une fois tous En cas de problème avec le scooter, essayez de le résoudre de la manière suivante. les six mois. -
Page 47: Paramètres
14 Paramètres Paramètres Nom du produit 5TH WHEEL Scooter électrique G1 pro Batterie au lithium 42 V/10 Ah Modèle 5LCHG11C Durée de la charge Environ 6 à 7 heures Longueur × Largeur 1190mm×575mm×1150 mm Gamme de × Hauteur Paramètres sans fil... - Page 48 Dans le présent manuel d’ utilisation, nous nous efforçons de décrire toutes les instructions et les fonctions du scooter électrique G1 pro. Avec des mises à jour et des itérations constantes, le scooter électrique G1 pro reçu peut être légèrement 7.Sistema di Controllo...
-
Page 49: Precauzioni Di Sicurezza
Leggi attentamente le precauzioni di sicurezza che seguono prima dell'uso. Grazie per aver scelto il monopattino elettrico 5TH WHEEL 5LCHG01 (da qui in avanti denominato G1 pro). Goditi le piacevoli emozioni che il G1 pro è in grado di regalarti. - Page 50 5. Non compiere azioni pericolose e guida sempre il G1 pro 10. Non guidare su strade scivolose (ad esempio in presenza 6.Non passare sopra cordoli alti più di 3 cm, poiché il G1 pro rallenta e guida con attenzione o scendi dal monopattino.
- Page 51 2,2 m; l’ età ne superi la capacità di carico massima. Per evitare il rischio di incendi, non lasciare il G1 pro in veicolo su pendenze. massima dell’ utente deve essere di 70 anni, mentre l’ età...
- Page 52 25. Attenzione, il freno potrebbe surriscaldarsi durante l’ uso. 26. Eliminare eventuali bordi taglienti causati dall'uso. 21. L’ utente deve concedersi del tempo per apprendere le 22. Segnalare la propria presenza quando ci si avvicina a Evitare di toccarlo dopo l’ uso. Evitare di modificare o trasformare il veicolo, compresi il funzioni basilari del veicolo ed evitare così...
-
Page 53: Informazioni Sul Prodotto
Fanale a LED Model No. 5LCHG01 Original Instructions Freno posteriore a disco User's Manual of 5th Wheel Scooter G1 pro 5th Wheel Scooter G1 pro Tool kit The picture is for reference only. V1.0 Before using the product, please read this manual. -
Page 54: Aspetto Del Prodotto
3 Aspetto del Prodotto 4 Guida di Assemblaggio 1.Solleva il meccanismo di ripiegamento del G1 pro e abbassa 2.Inserisci il manubrio nell'attacco. il cavalletto. Apri il G1 pro e fissa il meccanismo di ripiegamento. (Consulta la sezione “Piegamento e trasporto”... -
Page 55: Apertura/Chiusura/Trasporto
4.Ruota la manopola di ripiegamento sulla posizione OFF: 3.Abbassa l'attacco. 4.Tira la manopola di ripiegamento verso l'esterno premendo la manopola di ripiegamento verso il basso. a questo punto la procedura di apertura del G1 pro è completa. e bloccala usando il fermo per completare la procedura. -
Page 56: Guida E Parcheggio
Mentre guidi, tieni entrambi i piedi sulla pedana. La velocità aumenta quanto più l'accelera- tore viene premuto verso il basso. Nota: Il G1 pro è dotato di un sistema di avvio di sicurezza. L'acceleratore inizia a funzionare solo dopo che il monopattino ha percorso una certa... -
Page 57: Sistema Di Controllo
7 Sistema di Controllo Display a LED Indicatore di avvertimento Tasto di accensione Indicatore della Acceleratore/controllo Fanale a LED Controllo automatico della velocità di crociera marcia della velocità Connessione al telefono Rivestimento della Display a LED Freno a disco manopola La modalità... -
Page 58: Indicatori
8 Indicatori Tasto di accensione Stato del fanale LED Premere a lungo l'interruttore di alimentazione per 2 secondi per accendere / spegnere lo scooter. Fare clic sul pulsante di accensione per commutare gli ingranaggi; doppio clic per commutare chilometri/miglia; triplo clic per visualizzare il chilometraggio accumulato per 5s. -
Page 59: Informazioni Sulla Ricarica
Sostituisci l'acceleratore. l'acceleratore al display a LED. Il monopattino elettrico G1 pro è dotato di una batteria al litio e di un caricatore smart speciali. Il Se non lo è, collega correttamente il motore al controller. monopattino e i suoi accessori hanno un codice specifico. Non usare caricabatterie di altre marche con... -
Page 60: App
11 App Aggiungi manualmente con 5TH WHEEL App Se registri il tuo account 5TH WHEEL e completi la connessione semplificata, la scheda del dispositivo Caricabatterie sarà visualizzata sulla home page dell'App 5TH WHEEL senza aggiunta manuale. 1.Scannerizza il codice QR sul tuo telefono o cerca 2.Apri l'App 5thWheel. -
Page 61: Cura E Manutenzione
12 Cura e Manutenzione Lubrificazione Per la manutenzione, applicare una piccola quantità di grasso bianco o lubrificante sulla parte piegata una volta ogni sei mesi. Controllare il monopattino una volta ogni tre mesi per verificare l'allentamento della vite. Stringere la vite allentata. Batteria Quando si prende il monopattino elettrico per la prima volta, ricaricare completamente la batteria prima del primo utilizzo. -
Page 62: Risoluzione Dei Problemi
13 Risoluzione dei Problemi 14 Parameter Configuration Parametri Nome del prodotto 5TH WHEEL Monopattino elettrico G1 pro Modello 5LCHG11C Se si verifica un qualsiasi problema con il monopattino, prova a risolverlo con i suggerimenti che Lunghezza × seguono. 1190mm×575mm×1150 mm larghezza ×altezza... -
Page 63: Dichiarazione Di Conformità
Marchi Registrati e Dichiarazioni Legali 5TH WHEEL e il logo 5TH WHEEL sono marchi di fabbrica della Invanti (Beijing) Technology Co., Ltd, utilizzati su licenza. Android e Google Play sono marchi registrati di Google Inc.; App Store è un marchio di servizi di Apple Inc. I marchi registrati menzionati in questo manuale utente sono di proprietà... - Page 64 Bienvenidos Gracias por elegir el patinete eléctrico 5TH WHEEL 5LCHG01 (en adelante G1 pro). Disfrute de una agradable experiencia con el G1 pro. ES-Contenido 1.Precauciones de Seguridad 2.Acerca del Producto 3.Aspecto del Producto 4.Guía de Montaje 5.Desplegado/plegado/transporte 6.Conducción y Estacionamiento 7.Sistema de Control...
-
Page 65: Precauciones De Seguridad
G1 pro. sujetar los mangos con ambas manos. Mantenga los pies caerse del G1 pro y provocarle lesiones o causar daños en el en el patinete. patinete. Evite, en la medida de lo posible, pasar por agujeros de más de 3 cm. - Page 66 Watch for fires 11. No pase con el G1 pro por charcos de más de 4 cm de 15. El G1 pro es un producto de conducción especial. 16. No coloque ninguna carga en el manillar que pueda afectar 12.
- Page 67 17. Asegure el caballete cuando el vehículo no esté en uso. 18. La altura mínima del usuario es de 1,4 m, y la máxima no 21. Para evitar cualquier accidente grave que pueda 22. Advierta de su presencia al acercarse a un peatón o Suba el caballete antes de usarlo.
-
Page 68: Acerca Del Producto
2 Acerca del Producto 1. Descripción general del producto 25. Precaución, el freno puede calentarse durante el uso. No 26. Elimine los bordes afilados causados por el uso. No lo toque después de utilizarlo. modifique ni transforme el vehículo, incluidos el tubo y Acelerador Pantalla LED el manguito de dirección, la barra del manillar, el... -
Page 69: Aspecto Del Producto
3 Aspecto del Producto Accesorios Model No. 5LCHG01 Original Instructions User's Manual of 5th Wheel Scooter G1 pro 5th Wheel Scooter G1 pro Tool kit Desplegado The picture is for reference only. V1.0 Before using the product, please read this manual. -
Page 70: Guía De Montaje
3. Utilice las herramientas incluidas en el paquete para 4.Tras el montaje, compruebe si el interruptor de encendido 3. Al tirar de la barra del manillar para colocarla en su sitio, 4.Gire el mando de plegado a la posición CERRADO; el G1 pro apretar los tornillos. funciona correctamente. - Page 71 2. Acerca del plegado 3. Sobre el transporte Nota: Por razones de seguridad, se recomienda plegar el patinete después de apagarlo. 1.Gire el mando de plegado a la posición ABIERTO. 2.Tire del mando de plegado hacia arriba. 3.Baje la barra del manillar. 4.Tire del mando de plegado hacia afuera y bloquéelo Nota: Después de plegarlo, transporte el patinete con una o ambas manos.
-
Page 72: Conducción Y Estacionamiento
Cuanto más se presione el acelerador hacia abajo, mayor será la velocidad. Nota: Por razones de seguridad, el G1 pro está diseñado con un arranque distinto de cero. El acelerador actuará únicamente después de que el... - Page 73 Pantalla LED Indicador de advertencia Interruptor de encendido Luz delantera LED Velocidad de crucero automática Pulse el botón de encendido durante 2 segundos para activar / desactivar el scooter. Haga doble clic en Convertir kilómetros por milla; Haga doble clic para mostrar el kilometraje acumulado de 5 segundos. Conexión de teléfono Ajuste de la marcha Pulse el interruptor de encendido dos veces para cambiar de marcha, pasando por la marcha 1, la marcha 2...
-
Page 74: Indicadores
8 Indicadores Instrucciones de uso Cuando el patinete esté apagado, pulse el interruptor de encendido para encenderlo. Cuando el patinete esté en funcionamiento, mantenga pulsado el interruptor de encendido para apagarlo. Estado de la luz delantera LED Cuando conduzca el patinete, pulse el interruptor de la luz delantera LED para encenderla y vuelva a pulsarlo para apagarla. -
Page 75: Acerca De La Carga
Accione el freno durante la marcha para habilitar el sistema de recuperación de energía cinética y convertir El patinete eléctrico G1 pro está equipado con una batería de litio y un cargador inteligente específicos. parte de la energía cinética en energía eléctrica que se almacenará y utilizará. El sistema de recuperación de energía cinética puede mejorar la experiencia de la frenada de emergencia. -
Page 76: Aplicación
11 Aplicación Agregar 5TH WHEEL App manualmente Si registra una cuenta de 5TH WHEEL y completa la conexión simple, no necesita agregarla manualmente, la tarjeta del dispositivo se mostrará en la página de inicio de 5TH WHEEL App。 1. Escanee el código QR con su teléfono o busque 2. -
Page 77: Cuidado Y Mantenimiento
12 Cuidado y Mantenimiento 13 Solución de Problemas Lubricación Para el mantenimiento, añada una pequeña cantidad de grasa o lubricante a las piezas plegables cada seis meses. Si surge algún problema con el patinete, intente solucionarlo de las siguientes maneras. Revise el patinete cada tres meses para comprobar si los tornillos se han aflojado. -
Page 78: Parámetros
14 Parámetros Batería de litio 42 V/10 Ah Parámetros Nombre del producto Patinete eléctrico 5TH WHEEL G1 pro Tiempo de carga Alrededor de 6-7 horas Rango de frecuencia Modelo 5LCHG11C 2400~2480MHz Parámetros inalámbrica Longitud×anchura inalámbricos Potencia de salida 1190mm×575mm×1150 mm ×altura... - Page 79 El fabricante se reserva el derecho de modificar el diseño y el funcionamiento del patinete eléctrico G1 pro y los documentos sin previo aviso. 2021 Invanti (Beijing) Technology Co., Ltd. Todos los derechos reservados.
Need help?
Do you have a question about the G1 pro and is the answer not in the manual?
Questions and answers