Table of Contents

Related Manuals for Dreame H12 Pro


Summary of Contents for Dreame H12 Pro
- Page 1 Dreame H12 Пилосос для вологого та сухого прибирання Посібник користувача Ілюстрації в цьому посібнику наведено лише для ознайом- лення. Будь ласка, звертайте увагу на фактичний продукт.
- Page 2 Що придбали пилосос Dreame для вологого та сухого прибирання Реєстрація Швидкий старт Ласкаво просимо до реєстрації обліко- вого запису Dreame, відсканувавши QR-код. Вам доступні для ознайомлення посібник користувача та спеціальні пропозиції. Ви отримуєте високоякісний продукт, розроблений для оптимальної продуктивності. Якщо у вас виникли запитання щодо...
- Page 3 Зміст Посібник користувача Руководство пользователя User Manual...
- Page 4 • • • • • • • • • • • • • • • • •...
- Page 5 • • ’ • • • • • • • • • 0 /32°F 40 /104°F). /32°F 40 /104F). • HCB3. • • • • • •...
- Page 6 T 3,15A Dreame Trading (Tianjin) Co., Ltd., https://global.dreametech.com https://global.dreametech.com/pages/user-manuals-and-faqs...
- Page 11 « ». 100, • •...
- Page 12 30 . • •...
- Page 13 • • • • 140°, •...
- Page 14 15%. • •...
- Page 15 • • • • •...
- Page 16 • •...
- Page 18 : https://global.dreametech.com...
- Page 19 E1-E7 H1-H6...
- Page 20 . 4,5 HHR25A 21,6 V 27 V 700 mL 300 W 900 mL HCB3 220-240V~ 1,6 A 50/60 Hz 150 W –...
- Page 21 – – ’ – • • • • WEEE 2012/19/EU)
-
Page 22: Safety Information
Safety Information Important Safety Instructions For Household Use Only Please read this manual carefully before use and retain it for future reference. • When using an electrical appliance, basic precautions should always be followed, • including the following: READ ALL INSTRUCTIONS BEFORE USING (THIS APPLIANCE). Failure to follow the •... - Page 23 Safety Information • cigarettes, matches or hot ashes. Do not pull or carry adapter by cable, use cable as a handle, close door on cable, or • pull cable around sharp edges or corners. • appliance, and before connecting or disconnecting the tool with a moving brush. •...
-
Page 24: Battery And Charging
T 3.15A time/current characteristic detachable supply unit read operator's manual We, Dreame Trading (Tianjin) Co., Ltd., hereby, declares that this equipment is in compliance with the applicable Directives and European Norms, and amendments. address: https://global.dreametech.com For detailed e-manual, please go to https://global.dreametech.com/pages/user-manuals-and-faqs... -
Page 25: Product Overview
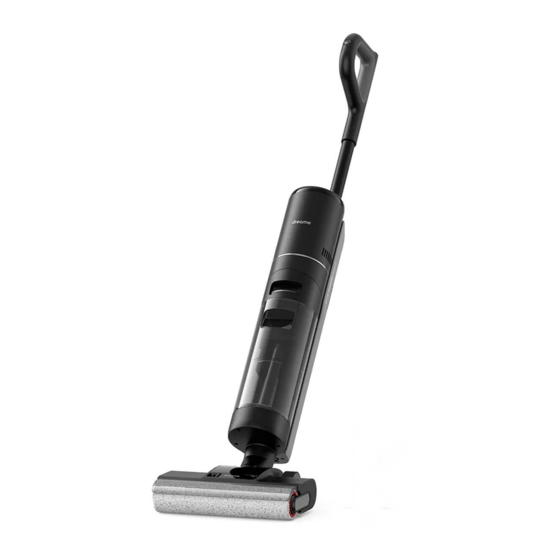
Product Overview Packing List Replacement Filter Handle Main Body Cleaning Brush Charging Base Spare Brush Roller... - Page 26 Product Overview Wet and Dry Vacuum Self-Cleaning Button Brush Roller Cover Clean Water Tank Release Button Mode Switch Brush Roller Voice Prompt Button Power Switch Brush Roller Handle the voice prompt or Brush Roller Release Display Screen adjust the volume. Button Press and hold for Used Water Tank...
-
Page 27: Charging Base
Product Overview Charging Base Charging Contacts Air-Drying Outlet Air-Drying Inlet Power Cord Display Screen Ultra Mode Error Messages Drying Mode Suction Mode Auto Mode Clean Water Tank Battery Status Indicator Dirt Level Indicator Used Water Tank full The color of the Blocked Tube Self-Cleaning indicator changes in... -
Page 28: Installation
Installation Storage Box Installation charging base as shown in the diagram. Assembly and Disassembly of Handle Insert the end of the handle vertically into the port on the top of the vacuum as indicated until you hear a click. Click Note: To disassemble, press the contacts in the hole on the back of the appliance with the appropriate tool and pull the handle upwards at the same time. - Page 29 Charging Place the appliance on the charging base. When the voice prompt "Charging Started" is displayed, the appliance activates the charging mode. When charging, the number on the display screen represents the current battery level as a percentage. When the number reaches 100, the battery is fully charged.
-
Page 30: How To Use
How to Use Working Modes The appliance will start in auto mode by default. You can switch to the suction mode or the Ultra Mode based on your needs. Auto Mode Ultra Mode Preparing Ultra Mode, please wait for 30 seconds. This mode is suitable for deep cleaning. -
Page 31: Start Cleaning
How to Use Start Cleaning Gently step on the brush cover and recline the appliance backwards. Press the power switch to start operating. Press the to switch among the auto mode - the ultra mode - the suction mode according to your needs. Note: •... - Page 32 How to Use One-Press Self-Cleaning Note: The self-cleaning function can be enabled only when the appliance is being charged and the battery level is more than 15%. Drying Mode Press and hold self-cleaning button for 3 seconds to activate drying mode. The appliance will be charged once drying is completed.
-
Page 33: Care And Maintenance
Care & Maintenance Tips: • • Replace parts if needed. The parts must be replaced by those available from the manufacturer or its service agent. • and store the vacuum in a cool, low-humidity environment away from direct sunlight. To avoid over-discharge of the battery, charge the vacuum at least once every 3 months. -
Page 34: Cleaning The Brush Assembly
Care & Maintenance Cleaning the Tube and the Dirt Sensor Remove the Used Water Tank, gently wipe the tube and the dirt sensor with a wet cloth before use. Note: Do not rinse the tube or the dirt sensor. Dirt Sensor Cleaning the Brush Assembly 2. - Page 35 troubleshooting. If the problem persists, please contact customer service. Error Possible Cause Solution The appliance is out of battery or Fully charge its battery before its battery level is low The appliance is in the upright Recline the appliance position backwards Clear the blockage and wait The appliance does...
- Page 36 The air outlet and air inlet of the Check and clear the blockage strange noise while charging base may be blocked of air outlet and air inlet drying For additional services, please contact us via aftersales@dreame.tech Website: https://global.dreametech.com...
-
Page 37: Troubleshooting
Troubleshooting If the appliance is not working properly, the screen display will show an error message. Error Possible Cause Solution Icon Fill the Clean Water Tank Clean Water Tank The Used Water Tank is Empty the Used Water Tank full Clean the brush roller with the provided Brush roller stuck cleaning brush... - Page 38 Wet and Dry Vacuum Charging Time (including drying) Model HHR25A Drying time 1 hour Rated Voltage 21.6 V Charging Voltage 27 V Used Water Tank 700 mL Capacity Rated Power 300 W Clean Water Tank 900 mL Capacity Charging Base Model HCB3 220-240 V~50/60 Hz...
-
Page 39: Weee Information
Battery Disposal and Removal The built-in lithium-ion battery contains substances that are hazardous to the environment. Before disposing of the battery, make sure the battery is removed by battery; Removal Guide CAUTION: WEEE Information All products bearing this symbol are waste electrical and electronic equipment household waste. - Page 40 • • • • • • • • • • • • • • • •...
- Page 41 • • • • • • • • • • • • • • •...
- Page 42 • • • • • • • • • • • • T 3,15A dreametech.com https://global.dreametech.com/pages/user-manuals-and-faqs...
- Page 47 • •...
- Page 48 • •...
- Page 49 • • • • •...
- Page 50 • •...
- Page 51 • • • • •...
- Page 52 • •...
- Page 54 https://global.dreametech.com...
- Page 55 E1-E7 H1-H6...
- Page 56 HHR25A 21,6 V 27 V 700 mL 300 W 900 mL HCB3 220-240V~ 1,6 A 50/60 Hz 150 W...
Need help?
Do you have a question about the H12 Pro and is the answer not in the manual?
Questions and answers