Table of Contents
Advertisement
Quick Links
Sabina™ II
Sit-to-stand lift
Instructions for Use
Sabina II EE
Slingbar 350
Comfort Slingbar
Sabina SeatStrap SlingBar
Sabina II SeatStrap SlingBar Prod. No. 2027007
Sabina II HeelSupport
Calf Strap
SlingBar 350
Comfort SlingBar
The Sabina sit-to-stand lift is especially designed for people
who have difficulty in standing up on their own from a
seated position.
Sabina sit-to-stand lift is intended for use with patients
who are able to actively participate in the raising motion.
When standing, they can be moved to a wheelchair or to a
toilet; this gives them standing practice in connection with
the transfer.
There are two different sling bar options for Sabina sit-to-
stand lift, as well as many different sit-to-stand vests.
The patient's overall mobility determines the choice of
sling bar and sit-to-stand vest.
In this document, the person being lifted is referred to as the patient, and the person helping is referred to as the caregiver.
IMPORTANT!
Lifting and transferring a patient always involves a certain level of risk. Read the instructions for use for both the patient
lift and lifting accessories before use. It is important to completely understand the contents of the instructions for use. The
equipment should only be used by trained personnel. Ensure that the lifting accessories are suitable for the lift used. Exer-
cise care and caution during use. As a caregiver, you are always responsible for the patient's safety. You must be aware of
the patient's ability to make it through the lifting situation. If something is unclear, contact the manufacturer or supplier.
7EN155106 Rev. 2
ENGLISH 2020
Prod. No. 2020003
Prod. No. 2027002
Prod. No. 2027003
Prod. No. 2027006
Prod. No. 2027011
Prod. No. 20290022
Product Description
The Sabina sit-to-stand lift equipped with the Comfort
SlingBar combined with the Liko ComfortVest provides
an gentle lifting action without putting pressure under
the arms. This combination is suitable for those who are
especially sensitive to pressure under the arms, such as
people who are paralyzed on one side.
Sabina sit-to-stand lift can also, to a limited extent, be used
for passive lifting of a patient sitting in a sling.
Advertisement
Table of Contents

Subscribe to Our Youtube Channel
Related Manuals for Hill-Rom Liko Sabina II


Summary of Contents for Hill-Rom Liko Sabina II
- Page 1 Sabina™ II Sit-to-stand lift Instructions for Use Sabina II EE Prod. No. 2020003 Slingbar 350 Prod. No. 2027002 Comfort Slingbar Prod. No. 2027003 Sabina SeatStrap SlingBar Prod. No. 2027006 Sabina II SeatStrap SlingBar Prod. No. 2027007 Sabina II HeelSupport Prod. No. 2027011 Calf Strap Prod.
-
Page 2: Table Of Contents
Table of Contents Symbol Description .......................... 3 Safety Instructions ........................... 4 Definitions ............................5 Technical Data ..........................5 Measurement ........................... 6 EMC Table ............................7 Assembly ............................10 Operation ............................12 Charging the Batteries ........................13 Maximum Load ..........................14 Recommended Lifting Accessories .................... -
Page 3: Symbol Description
Symbol Description These symbols can be found in this document and/or on the product. Symbol Description For indoor use only. The product has extra protection against electric shock (Insulation Class II). Protection level against electric shock Type B. Warning; this situation requires extra care and attention. Read instructions for use before use. -
Page 4: Safety Instructions
Sabina™ II EE sit-to-stand lift have been tested by accredited testing institutes. Under no circumstances must the lift be modified. Please contact Hill-Rom for more information. Use of the product adjecent to other equipment should be avoided because it could result in improper operation, if such use is neccessary, observe and verify that the other equipment is operating normally. -
Page 5: Definitions
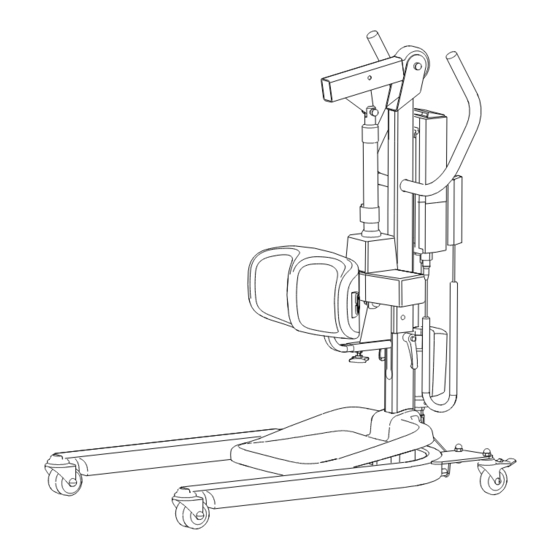
Definitions 1. Lift arm 16. Lift motor 2. Handles 17 Mechanical emergency lowering 3. Battery 18. Holder for quick reference guide with 4. Hand control colourcode for sling sizes (accessory) 5. Control box with emergency stop 19. Lift mast 6. Motor for base-width adjustment 20. -
Page 6: Measurement
Measurement A Ref. 1 A B3** Ref. 2 D2** Measurements (mm.) Sabina II A min* A max* D1 D2** F1 L max* L min* SlingBar 1050 1770 1060 870 590 690-1115 530-1005 915 210 900-1000 107 22 1725 Comfort 1050 1750 1060 870 555 690-1115 530-1005 900 210 900-1000 107 22... -
Page 7: Emc Table
EMC Table Guidance and manufacturer’s declaration – electromagnetic emissions The product is intended for use in the electromagnetic environment specified below. The customer or the user of the product should assure that it is used in such an environment. ”Essential performance according to the manufacturer: The product shall not move unintentionally while being submitted to disturbances.”... - Page 8 Guidance and manufacturer’s declaration – electromagnetic immunity The product is intended for use in the electromagnetic environment specified below. The customer or the user of the product should assure that it is used in such an environment. ”Essential performance according to the manufacturer: The product shall not move unintentionally while being submitted to disturbances.”...
- Page 9 Guidance and manufacturer’s declaration – electromagnetic immunity The product is intended for use in the electromagnetic environment specified below. The customer or the user of the product should assure that it is used in such an environment. ”Essential performance according to the manufacturer: The product shall not move unintentionally while being submitted to disturbances.”...
-
Page 10: Assembly
Assembly Before assembly, make sure you have the following parts: • Lift mast with lift arm, control box, lift motor • Foot rest and frame for the foot rest • Sling bar with safety latches and locking handles • Lower leg support •... - Page 11 8. A) Put the frame for the foot rest over the lift mast’s bracket 9. Install the lower leg support on the lift mast. Loosen to the base. Make sure the frame is securely in place. wheel A in order to adjust the distance to the patient’s B) Push the footrest into the frame.
-
Page 12: Operation
Operation Hand control Emergency stop Indicator lamp (A) - charge the battery of the lift! Activate: Press the red button on the control box. The lifting motion is operated with the push buttons on the hand Reset: Turn the button in the direction shown by control. -
Page 13: Charging The Batteries
Charging the Batteries Indications for charging the battery In the event of low battery voltage, a signal from the control box will sound. At the same time, an indicator on the hand control will illuminate. When this happens, the battery must be charged as soon as possible. However, there is sufficient power for a few more lifts. -
Page 14: Maximum Load
For the assembled lift unit, including accessories, the maximum load is always the lowest maximum load rating for any of the components. Check the markings on the lift and lifting accessories, contact your Hill-Rom representative if you have any questions. Recommended Lifting Accessories Using other lifting accessories than those recommended below may induce risk. - Page 15 SeatStrap SlingBar Prod. No. 2027007: can be used with Sabina™ II sit-to-stand lift. Prod. No. 2027006: can be used with earlier Sabina sit-to-stand lift models, but can also be used with Sabina II sit-to-stand lift. Width: 19 cm (7.5 inch.) Maximum load: 200 kg (440 lbs).
-
Page 16: Using Sabina™ Sit-To-Stand Lift To Assist Users Into A Standing Position
Using Sabina™ sit-to-stand lift to Assist Users into a Standing Position There are two different sling bar options available for Sabina sit-to-stand lift, as well as many different sit-to-stand vests. The patient’s overall mobility determines which sling bar and sit-to-stand vest to use. Carefully read the instruction for use for the lifting accessories used. - Page 17 Raising a person with active lifting using Sabina™ sit-to-stand lift with the Comfort SlingBar For this sling bar, we recommend Liko ComfortVest mod. 95. This combination is suitable for people who are especially sensitive to pressure under the arms, such as people who are paralyzed on one side. The ComfortVest is designed to lift behind the back and on the outside of the arms.
-
Page 18: Using Sabina Sit-To-Stand Lift In Passive Lifting Situations
For this sling bar, we recommend Liko UniversalSling mod. 000. See the respective instruction for use for the sling model for more information or contact Hill-Rom for further guidance. Passive lifting using Sabina sit-to-stand lift with SlingBar 350 1. Disassemble the lower leg support: Unscrew screw A. - Page 19 3. Advance the lift. Connect the sling’s suspension loops to 4. Raise the sling bar to the lowest height necessary to the sling bar’s hooks. The height setting of the lift mast perform the transfer. may have to be adjusted, see page 10. Make sure that the lifting motion is not so high Before the patient is lifted from the underlying that the patient gets too close to the lift mast!
-
Page 20: Simple Troubleshooting
4. Check the battery voltage. 5. Check that the battery’s contact plates are not defective or broken. 6. If the lift still does not work properly, please contact Hill-Rom. 1. Check that the emergency stop has not been engaged. The charger doesn’t work. -
Page 21: Recycling Instructions
Old batteries are to be deposited at the nearest recycling facility in accordance with local regulations or given to personnel authorized by Hill-Rom. Hillrom evaluates and provides guidance to its users on the safe handling and disposal of its devices to aid in the prevention of injury, including, but not limited to: cuts, punctures of the skin, abrasions, and any required cleaning and disinfection of the medical device after use and prior to its disposal. -
Page 22: Cleaning And Disinfection
The trainer should supervise the trainee until the trainee can clean and disinfect the lift as instructed. Hill-Rom recommends to clean and disinfect the lift between patient use and regularly during extended patient stays. Some fluids used in the hospital environment, such as iodophor and zinc oxide creams, can cause permanent stains. - Page 23 Cleaning and Disinfection Equipment: • Protective equipment (such as: gloves, eye protection, apron, face mask and shoe covers) as recommended by the facility protocol and manufacturers instructions • Disposable microfiber cloths recommended • Soft bristle brush • Warm water • To find Cleaning / Disinfectants compatible or not compatible for use on Liko®...
- Page 24 Step 2: Disinfection: 1. For the use of suitable disinfectants see "Application of commonly used Cleaning / Disinfectants on Liko products” in this document. 2. Follow the manufacturer's instructions. 3. Make sure all surfaces remain wet with the cleaner/disinfectant for the specified contact time. Rewet surfaces with a new wiping cloth as necessary and per the manufacturer's instructions.
- Page 25 www.hillrom.com 7EN155106 Rev. 2 • 2020...
-
Page 26: Inspection And Maintenance
Hill-Rom and using original Liko spare parts. Service Agreement Hill-Rom offers the opportunity to enter into service contracts for the maintenance and regular inspection of your Liko product. Expected Life Time The product has an expected life time of 10 years when correctly handled, serviced and periodically inspected in accordance with Liko’s instructions.
Need help?
Do you have a question about the Liko Sabina II and is the answer not in the manual?
Questions and answers