Table of Contents
Advertisement
Quick Links
Advertisement
Table of Contents

Related Manuals for Alaris Medical Systems Medley 8000 Series


Summary of Contents for Alaris Medical Systems Medley 8000 Series
-
Page 3: Table Of Contents
TABLE OF CONTENTS INTRODUCTION ABOUT THE SYSTEM ..................FEATURES AND DEFINITIONS . - Page 4 MAINTENANCE (Continued) STORAGE ..................... . BATTERY CARE AND MAINTENANCE .
- Page 5 GENERAL CONTACT INFORMATION Customer Advocacy For clinical and technical questions, feedback, and troubleshooting assistance. Phone, toll-free, within the United States and Canada: (800) 854-7128, Ext. 7812 E-Mail: CustomerFeedback@alarismed.com Technical Support For technical information related to maintenance procedures and service manual support. United States: Canada: Phone:...
- Page 6 T H I S PA G E I N T E N T I O N A L LY L E F T B L A N K...
-
Page 7: Introduction
INTRODUCTION About the System The Medley™ Medication Safety System is a modular infusion and monitoring system intended for use in today’s growing professional healthcare environment, for use in adult, pediatric and neonatal care. The Medley™ Medication Safety System consists of the Programming Module ( Series), the Guardrails ®... -
Page 8: Features And Definitions
Features and Definitions Refer to the “Alarms, Errors, Messages” chapter of this Directions for Use for the definitions of various alerts. Refer to the Directions for Use that applies to the attached Medley™ Module(s) for features and definitions specific to that module. Anesthesia Mode The Anesthesia Mode allows the anesthesiologist to access additional drugs, in each profile, that are appropriate to anesthesiology. - Page 9 Features and Definitions (Continued) Patient ID Entry An optional alphanumeric -character patient identifier can be entered and displayed. • When enabled, the entry defaults to the Startup screen. • When disabled, the entry is only accessible from the System Options screen. Pole Clamp The Medley™...
-
Page 10: Symbols
Symbols Alternating Current: Indicates that device should be attached to alternating current source, Hz only. Attention: Refer to accompanying documentation. Canadian and Certification Mark: Products bearing this mark have been tested and U.S. certified in accordance with applicable and Canadian electrical safety and performance U.S. -
Page 11: Getting Started
GETTING STARTED NOTE: Although the Medley™ Medication Safety System is built and tested to exacting specifications, it is not intended to replace the supervision by medical personnel. The user should become thoroughly familiar with the features and operation of the Medley™ System and exercise vigilance in its utilization. - Page 12 Warnings and Cautions (Continued) User Precautions (Continued) • The instrument case should only be opened by qualified WARNING service personnel using proper grounding techniques. Electrical shock hazard. Do not open case. Refer to qualified service personnel. Dropping/Jarring Should an instrument be dropped or severely jarred, it should be immediately taken out of use and inspected by qualified service personnel, to ensure its proper function prior to reuse.
- Page 13 Warnings and Cautions (Continued) User Precautions (Continued) Radio Frequency Interference WARNING Operating the system near equipment which radiates high- Use of accessories or cables other energy radio frequencies (electrosurgical/cauterizing than those specified may result in equipment, portable radios, cellular telephones, etc.) may degraded electromagnetic cause false alarm conditions.
-
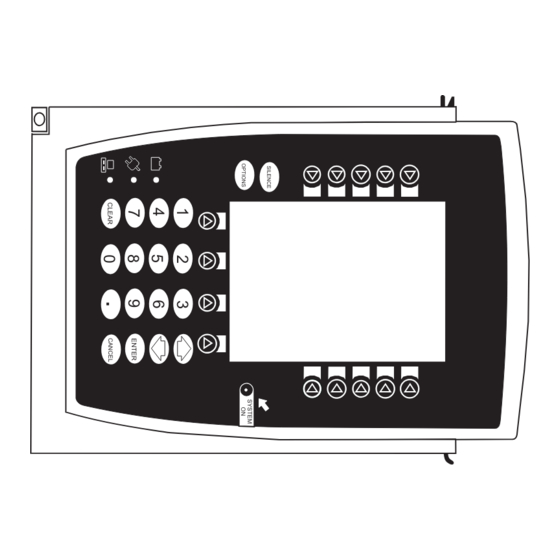
Page 14: Controls And Indicators
Controls and Indicators Front/Side View IUI Connector, Left IUI Connector, Right (not visible) Handle Main Display Soft Keys - When pressed, allows selection of options or infusion parameters appearing on Main Display adjacent to soft key. Silence Key - When pressed during an alarm, silences System On Key - audio for two minutes. - Page 15 Controls and Indicators (Continued) Rear View IUI Connector, Right IUI Connector, Left Handle AC Power Cord Safety Retainer Pole Clamp Knob Power Cord Strap Use this bolt to reorient Pole Clamp 90° for attachment to a bed rail instead of a pole. Primary Audio Speaker Connector Plug over RJ45 Communication Data Port...
-
Page 16: Installation
Installation Instruments are tested and calibrated before they are packaged for shipment. To ensure proper operation after shipment, it is recommended that an incoming inspection be performed before placing the instrument in use. To enable the Profiles feature, a hospital-defined best-practice data set must be uploaded to the Programming Module. -
Page 17: Attaching And Detaching Channels
Attaching and Detaching Channels Channels can be attached to either side of the Programming Module or to either side of another channel. The process to attach or detach is the same for either side, whether attaching/detaching to/from a Programming Module or another channel. -
Page 18: Adding Channel(S) While System Is Powered On
Attaching and Detaching Channels (Continued) Adding Channel(s) While System is Powered On Add channel as described in “Attaching Channel(s)”. IUI Connectors • System tests channel, causing all segments and Indicator lights of channel displays to illuminate briefly. • Appropriate channel identification display ( illuminates. -
Page 19: Adjusting Display Contrast
Displays (Continued) Main Display (Continued) Channel Selected Indicator Infusion Setup “Inactive” Soft Key RATE mL/h _250 Nonhighlighted indicates a VTBI nonselected soft key. “Active” Soft Key Highlighted indicates a selected soft key. >Press START Prompt Bar SECOND- PAUSE START Look here for user prompts. Adjusting Display Contrast Press key. -
Page 20: Start-Up
Start-Up Powering On System Connect Programming Module to an external power source. Press SYSTEM O O N System self test begins: • Diagnostics test causes all LED display segments and Status Indicator lights of attached channel(s) to illuminate briefly. • Power Indicator illuminates. •... -
Page 21: Responding To Maintenance Reminder
Start-Up (Continued) Responding to Maintenance Reminder If the Preventive Maintenance ( ) Reminder option is enabled MAINTENANCE REMINDER and the Programming Module or an attached module is due for Module(s) due for routine preventative maintenance: preventive maintenance, a message MAINTENANCE R R EMINDER Module A: YYYY-MM-DD appears at power up. - Page 22 Start-Up (Continued) Selecting New Patient and Profile Options (Continued) Patient ID Entry Feature Disabled Select required option. Midtown Hospital NEW P P ATIENT? NEW PATIENT ? To indicate programming is for a new patient and clear all “Yes” Clears Previous Patient Data stored patient parameters from memory, press Y Y e e s s soft key.
- Page 23 Start-Up (Continued) Selecting New Patient and Profile Options (Continued) Patient ID Entry Feature Enabled Select required option. Midtown Hospital NEW P P ATIENT? NEW PATIENT ? • To indicate programming is for a new patient and clear “Yes” Clears Previous Patient Data all stored patient parameters from memory: a.
-
Page 24: Entering Patient Id
Start-Up (Continued) Selecting New Patient and Profile Options (Continued) Patient ID Entry Feature Enabled (Continued) Midtown Hospital To select a profile, press corresponding left soft key. 1 of 2 Profiles View Adult ICU NOTES: View Adult General Care View Neonatal •... -
Page 25: Modifying Patient Id
Start-Up (Continued) Entering Patient ID (Continued) To enter patient identifier, use numeric data entry keys Patient ID Entry and/or alpha speed keys. NOTES: • An alphanumeric identifier, of up to 16 characters, can be entered. _ _ _ _ _ _ _ _ _ _ _ _ _ _ _ _ •... - Page 26 Start-Up (Continued) Modifying Patient ID (Continued) To clear entire entry, press key. CLEAR Patient ID Entry To back up a single character at a time, press key. CANCEL 123456789CD >Enter Patient ID and Press CONFIRM PAGE EXIT CONFIRM DOWN To enter modified patient identifier, use numeric data entry Patient ID Entry keys and/or alpha speed keys.
-
Page 27: Adjusting Audio Volume
Adjusting Audio Volume Press A A u u d d i i o o A A d d j j u u s s t t soft key. Midtown Hospital Adult ICU VTBI = 250.0 mL VOLUME AUDIO INFUSED ADJUST To change volume to desired level, press either L L o o u u d d e e r r or Audio Volume Adjust S S o o f f t t e e r r soft key. -
Page 28: Reviewing System Configuration
Setting Up Time of Day (Continued) Enter current Time of Day. System Options Time of Day Press C C o o n n f f i i r r m m soft key. Current time: Change 14:30 Time NOTE: The format is a 24-hour clock (military time). CONFIRM Reviewing System Configuration Press... -
Page 29: Reviewing Serial Number
Reviewing Serial Number Press key. OPTIONS Press P P a a g g e e D D o o w w n n soft key. System Options 1 of 3 Display Contrast Patient ID Time of Day Power Down All Channels Anesthesia Mode >Select an Option or EXIT... -
Page 30: Reviewing Software Version
Reviewing Software Version Press key. OPTIONS Press soft key. PAGE D D OWN System Options 1 of 3 Display Contrast Patient ID Time of Day Power Down All Channels Anesthesia Mode >Select an Option or EXIT PAGE EXIT DOWN Press S S o o f f t t w w a a r r e e V V e e r r s s i i o o n n s s soft key. System Options 2 of 3 Battery Runtime System Configuration... -
Page 31: Viewing And Clearing Guardrails Event Counter
Viewing and Clearing Guardrails ® Event Counter Press key. OPTIONS System Options 2 of 3 Battery Runtime Press soft key. PAGE D D OWN System Configuration Serial Numbers Press G G u u a a r r d d r r a a i i l l s s E E v v e e n n t t C C o o u u n n t t e e r r soft key. Software Versions To clear event counter information, press key and... -
Page 32: Powering Off Channel
Powering Off (Continued) Powering Off Channel Press and hold key until a beep is heard CHANNEL O O FF (approximately seconds) and then release to initiate power down. Powering Down NOTE: To interrupt the power down sequence, quickly press any one of the numeric keys on the Programming Module. -
Page 33: Computer Link
Computer Link The optional Computer Link feature allows a hospital computer CAUTION to interact with the instrument. The computer cannot start or Only systems that have been tested stop the instrument, set the rate, or make any change in status. and certified in compliance to If the feature is off, the computer cannot communicate with the standard... - Page 34 T H I S PA G E I N T E N T I O N A L LY L E F T B L A N K GETTING STARTED...
-
Page 35: Alarms, Errors, Messages
ALARMS, ERRORS, MESSAGES To enhance safety and ease of operation, the Medley™ System provides a full range of audio and visual alarms, errors, and messages. Definitions Advisory A sequence of audio and/or visual signals indicating the operating status of the Medley™ Medication Safety System. The audio may be silenced for approximately two minutes by pressing the key. -
Page 36: Audio Characteristics
Audio Characteristics The Programming Module and Main Display provide various types of alert information. The characteristics of the accompanying audio sounds are as follows: Type Sound Notes Advisory One short beep every two seconds Variable volume; can be silenced for two minutes. -
Page 37: Alarms
Alarms Alarm Meaning Response Battery Discharged Operation of all channels stopped Connect AC power cord to power due to insufficient battery charge. source; alarm will be silenced. Press key on Pump Module to RESTART continue operation of paused channels. Channel Disconnected Channel(s) disconnected while in To silence alarm and clear message operation or have a communication... -
Page 38: Errors
Errors Error Meaning Response Channel Error Error detected. Operation stops on To silence alarm and continue affected channel. operation of unaffected channels, press soft key . Replace CONFIRM channel with an operational instrument, as required. Service by qualified personnel is required. Defective battery detected. -
Page 39: Messages
Messages Message Meaning Response Battery Run Time = X.X hours AC power cord is disconnected from None. Connect AC power cord to power source. Approximate power source as soon as possible. remaining battery run time under current power consumption rate is displayed. - Page 40 T H I S PA G E I N T E N T I O N A L LY L E F T B L A N K ALARMS, ERRORS, MESSAGES...
-
Page 41: Maintenance
MAINTENANCE The Medley™ System Technical Service Manual is available from Medical Systems. It includes ALARIS routine service schedules, interconnect diagrams, component parts lists and descriptions, test procedures, and other technical information, to assist qualified service personnel in repair and maintenance of the instrument’s repairable components. -
Page 42: System Configurable Settings
Specifications (Continued) NOTES: 1. Power Cords; North America: To ensure correct polarity and grounding reliability, use power cords that incorporate a NEMA 5-15P (125V) or NEMA 6-15P (250V) plug only. 2. Power Cords; International: Use only cords that comply with IEC 60245, or IEC 60227, designation #53 and local electrical codes and/or regulations. -
Page 43: Storage
Storage Plug the Programming Module into an outlet during storage, to ensure a fully charged battery when needed. indicator light) will be on whenever the Programming Module is plugged in. Battery Care and Maintenance Battery Type and Charging The Medley™ Programming Module is equipped with a volt, mAh nickel metal hydride battery. -
Page 44: Battery Care
Battery Care and Maintenance (Continued) Battery Care The battery capacity should be checked at least once every six months. Refer to the Medley™ System Technical Service Manual for test and replacement procedures. If the Programming Module is to be stored at temperatures in excess of °... -
Page 45: Cleaning
Cleaning DO NOT spray cleaning fluids directly onto the instrument or WARNING immerse the instrument in fluids. Turn the instrument off and unplug the power cord from the power DO NOT use solutions containing phosphoric acid (Foamy source before cleaning. Do not spray *), aromatic solvents (naphtha, paint thinner, Q&A fluids directly onto the rear case of... -
Page 46: Inspection Requirements
Inspection Requirements To ensure the system remains in good operating condition, both regular and periodic inspections are required. R R e e g g u u l l a a r r i i n n s s p p e e c c t t i i o o n n s s consist of a visual inspection for damage WARNING and cleanliness, and performing the procedure described in the Failure to perform these inspections... -
Page 47: Service Information
Service Information WARNING NOTE: If the instrument shows evidence of damage in transit, notify the carrier’s agent immediately. Do not return damaged Instruments returned from the service equipment to the factory before the carrier’s agent has authorized depot to your facility may be set to repairs. -
Page 48: Warranty
Systems any other liability in connection with the sale or use of Medical Systems ® Products. ALARIS ALARIS MEDICAL SYSTEMS DISCLAIMS ALL OTHER WARRANTIES, EXPRESS OR IMPLIED, INCLUDING ANY WARRANTY OF MERCHANTABILITY OR OF FITNESS FOR A PARTICULAR PURPOSE OR APPLICATION. See packing inserts for international warranty, if applicable. MAINTENANCE MAINTENANCE... - Page 50 , Guardrails ® , and Medley™ are trademarks and registered trademarks of ALARIS Medical Systems, Inc. All other trademarks belong to their respective owners. US Pat. Nos. 5,601,445; 5,713,856; 5,781,442; 5,800,387; 5,836,910; 5,941,846; AU Patent Nos. 693,662; 703,178; 703,203; 719,254; 728,366;...
Need help?
Do you have a question about the Medley 8000 Series and is the answer not in the manual?
Questions and answers