Table of Contents
Advertisement
Quick Links
Advertisement
Table of Contents

Related Manuals for Alaris Medical Systems Signature Edition GOLD


Summary of Contents for Alaris Medical Systems Signature Edition GOLD
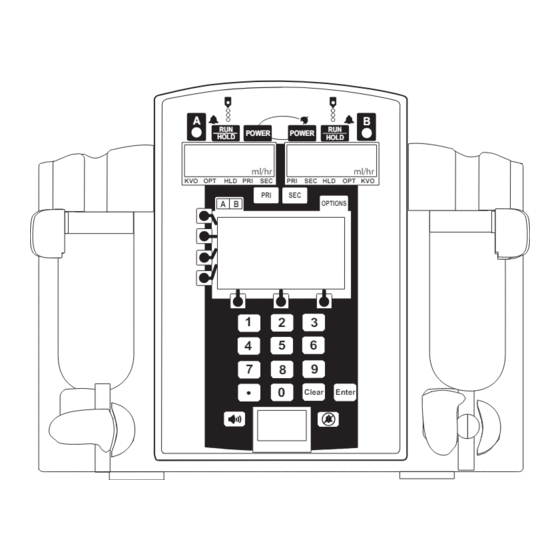
- Page 1 Signature Edition ® GOLD INFUSION PUMP Models 7130/7131 and 7230/7231 (Guardrails ® Safety Software Compatible) POWER POWER HOLD HOLD ml/hr ml/hr KVO OPT HLD PRI SEC HLD OPT KVO OPTIONS • Clear Enter DIRECTIONS FOR USE...
- Page 2 NOTE to Guardrails ® Safety Software Users: ® This instrument is compatible with the Guardrails Safety Software for Signature Edition ® GOLD Infusion Pumps. If the Profiles Feature is not enabled (Off), this Directions for Use applies. If the Profiles Feature is enabled (On) with the Guardrails ®...
-
Page 3: Table Of Contents
TABLE OF CONTENTS INTRODUCTION ABOUT THE INSTRUMENT ..................NEW USER INTERFACE FEATURES . - Page 4 ADVANCED OPERATIONS (Continued) DRUG SPECIFIC DOSE RATE CALCULATOR (DRC) ............Facts About DRC .
- Page 5 MAINTENANCE (Continued) CHECK-IN AND CONFIGURATION (Continued) Ground Resistance Test ................. . . Instrument Configuration .
- Page 6 GENERAL CONTACT INFORMATION Customer Advocacy For clinical and technical questions, feedback, and troubleshooting assistance. Phone, toll-free, within the United States and Canada: (800) 854-7128, Ext. 7812 E-Mail: CustomerFeedback@alarismed.com Technical Support - North America For technical information related to maintenance procedures and service manual support. United States: Canada: Phone:...
-
Page 7: Introduction
INTRODUCTION About the Instrument The Signature Edition ® Infusion Pump includes GOLD Model and Model Infusion Pumps with 7130 7131 7230 7231 Resistance Monitoring Mode, Adjustable Pressure Capability, and AccuSlide ® Flow Regulator administration sets. • The single channel (Model ) provides a full range 7130 7131... -
Page 8: New User Interface Features
New User Interface Features The user interface differences between instruments having Version software and those having Version (North 2.78 4.06 America) or Version (Europe), are as follows: 4.08 • N N e e w w P P a a t t i i e e n n t t ? ? prompt during start-up. Unless all power is lost, previous infusion parameters are retained in memory until the instrument is powered on and N N e e w w P P a a t t i i e e n n t t ? ? Y Y e e s s is selected (six-hour memory rule no longer... -
Page 9: Controls And Indicators
Controls and Indicators Model 7130/7131 POWER Key: Turns instrument on and off. Power Indicator: Green = Plugged in and charging. Flashing Amber = Battery power. Infusing Indicator: Indicates instrument is infusing. Alarm Indicator: Indicates instrument is in alarm and has stopped infusing. RUN•HOLD Key: Starts and stops infusion. - Page 10 Controls and Indicators (Continued) Model 7230/7231 Channel Select Keys/Indicators: Select channel A or B. Light to indicate which channel is selected. Alarm Indicators: Indicate a channel is in alarm and has stopped infusing. Infusing Indicators: Indicate a channel is infusing. RUN•HOLD Keys: Start and stop infusion on selected channel.
-
Page 11: Displays
Displays Main LCD Display The Main Display is backlit for easy viewing. The backlight CAUTION dims when operating on battery power as an energy-saving Appearance of lines and/or dots that feature. Pressing any key automatically turns the backlight up remain on constantly when the again. -
Page 12: Rate Display(S)
Displays (Continued) Rate Display(s) rate display is easily viewed from a distance. Rate Display(s) Indicates current infusion rate(s) in mL/h. Flashes to indicate hold or alarm condition, and when in mode. ml/hr Model Status Bar 7130 7131 Indicates which mode the instrument is in: Optional Modes, Primary, Hold, Secondary, or Model Status Bars... -
Page 13: Around The Instruments
Around the Instruments Panel Lock Key Handle RS-232 Connector Cover Flow Sensor Receptacle(s) RS-232 Connector Pole Clamp Pole Clamp Knob (illustration may not reflect knob in use on the instrument) Pole Clamp Rotation lever Battery Door Potential Equalization Connector ( 7131 / 7231 ) Power Cord POWER HOLD... -
Page 14: Symbols And Terms
Symbols and Terms Alarm indicator. Attention: Refer to accompanying documentation. Audio volume. Approximate battery time remaining under current infusing conditions. Battery gauge does not represent battery time remaining when instrument is turned off. Conformité Européenne [CE - Marking] notified body “0086”: British Standards Institution. Configurable Option. - Page 15 Symbols and Terms (Continued) Panel lock. Green = instrument plugged into power and battery being charged. Flashing amber = instrument running on battery power and battery being depleted. RS 232 connector. RS-232 : Federal ( ) law restricts this device to sale by or on the order of a physician. CAUTION U.S.A.
- Page 16 Symbols and Terms (Continued) centimeter day (d) gram (g) hour infusion in “hold” mode inch kilogram “keep vein open” infusion rate mode pound microgram (µg) microliter (µL) milliequivalent milligram minute milliliter milliunit nanogram (ng) “options” mode “primary” infusion mode revolution (r) “secondary”...
-
Page 17: Basic System Operation
BASIC SYSTEM OPERATION NOTE: Although the Signature Edition ® Pump is built and tested to exacting specifications, it is not intended to replace the supervision of IV infusions by medical personnel. The user should become thoroughly familiar with the features and operation of the system and exercise vigilance in its utilization. - Page 18 Warnings and Cautions (Continued) CAUTION Prior to use, Medical Systems recommends that users ALARIS become familiar with the instrument, the administration sets and any accessories that may be used. WARNING This instrument is designed to stop fluid flow under alarm conditions.
- Page 19 Warnings and Cautions (Continued) Parallel Infusions There are no contraindications regarding the use of the Signature Edition ® Pump with any other positive displacement infusion device when ported together into a common site location. User Precautions To ensure proper performance of the instrument and to reduce potential injury to the operator, observe the following precautions.
- Page 20 Warnings and Cautions (Continued) User Precautions (Continued) Administration Sets (Continued) • Flush port(s) per facility protocol. • Discard administration set per facility protocol. SmartSite ® Needle-Free System: • SmartSite ® Needle-Free Valve Port is contraindicated for blunt cannula systems. • Swab top of SmartSite ®...
- Page 21 Warnings and Cautions (Continued) User Precautions (Continued) Dropping/Jarring Should an instrument be dropped or severely jarred, it should be immediately taken out of service and inspected by qualified service personnel to ensure its proper function prior to reuse. Operating Environment DANGER Explosion risk if used in the presence Not for use in the presence of flammable anesthetics.
-
Page 22: Preparing An Infusion
Preparing an Infusion Preparing Primary Solution Container Prepare the primary solution container in accordance with the manufacturer’s directions for use. Preparing Primary Administration Set Use only an Medical Systems ® Series administration ALARIS set. • Slide AccuSlide ® Flow Regulator thumb clamp down until Thumb Clamp an audible “click”... -
Page 23: Loading Primary Administration Set
Preparing an Infusion (Continued) Loading Primary Administration Set Slide AccuSlide ® Flow Regulator thumb clamp down until Thumb Clamp an audible “click” verifies it is in fully closed position. “Click” AccuSlide ® Flow Regulator Using both hands, press top and bottom of AccuSlide ®... -
Page 24: Start-Up
Start-Up WARNING To turn channel on, press POWER Each time the instrument is turned on • Instrument performs a self test. verify and/or set the monitoring • All indicators and displays momentarily light. mode, resistance alert and/or pressure alarm limit. If the •... -
Page 25: Primary Infusion
Primary Infusion Follow “Start-Up” steps. OPTIONS • Primary setup page appears. Rate= mL/h VTBI= 0.0 mL 0.0 mL • Primary infusion rate is highlighted. PRIMARY If current primary infusion rate is appropriate, press ENTER To enter a new infusion rate, use numeric keypad. Press ENTER •... -
Page 26: Making Changes During Primary Infusion
Primary Infusion (Continued) Making Changes During Primary Infusion Select the desired channel ( ), as necessary. The channel does OPTIONS not need to be on hold to change the settings for Rate or VTBI, Rate= 125.0 mL/h or to clear the VTBI= 900.0 mL 100.0 mL PRIMARY... -
Page 27: Resuming An Interrupted Primary Infusion
Primary Infusion (Continued) Resuming an Interrupted Primary Infusion Follow “Start-Up” steps and select - n n o o . NEW P P ATIENT? OPTIONS Rate= 125.0 mL/h NOTE: If resuming an infusion on a dual channel instrument VTBI= 850.0 mL with an infusion currently running, N N E E W W P P A A T T I I E E N N T T ? ? screen does 150.0 mL Primary... -
Page 28: Secondary Infusion
KVO Mode (Continued) Resuming Primary Operation from KVO (Continued) To accept new value, press ENTER OPTIONS Rate= 125.0 mL/h VTBI=1000.0 mL To resume primary infusion, press channel’s HOLD 1000.0 mL PRIMARY Secondary Infusion This mode is designed to support automatic secondary infusions WARNING (“piggybacking”) in the same instrument channel. - Page 29 Secondary Infusion (Continued) Follow “Start-Up” steps. OPTIONS • Primary setup page appears. Rate= 125.0 mL/h VTBI= 950.0 mL 50.0 mL NOTE: If programming a secondary from a running primary, PRIMARY place the channel on hold and then proceed. Verify primary settings are appropriate. Press CAUTION •...
-
Page 30: Making Changes During Secondary Infusion
Secondary Infusion (Continued) Making Changes During Secondary Infusion Select the desired channel, as necessary. The channel does not need to be on hold to change the settings for Rate or VTBI Press soft key next to parameter to be edited. Changing Secondary Infusion Rate •... -
Page 31: Resuming An Interrupted Secondary Infusion
Secondary Infusion (Continued) Viewing or Changing Primary Settings During Secondary Infusion (Continued) Changing Primary VTBI NOTE: If the flow sensor option is in use, VTBI can be turned by selecting VTBI , pressing and then OPTIONS CLEAR ENTER Rate= 100.0 mL/h Pri Rate=125.0 mL/h The primary VTBI can be deleted from the primary mode setup VTBI=950.0... -
Page 32: Changing Primary Solution Container
Changing Primary Solution Container Place channel on hold. Remove empty solution container. Spike new container. • Ensure drip chamber is filled to full. Press soft key. VTBI To enter a new , use numeric keypad. Press VTBI ENTER To restart infusion, press channel’s HOLD Unloading Set Place channel on hold. -
Page 33: Powering Off
Unloading Set (Continued) Whenever instrument is not in use, close latch(es). Turn off power, as necessary. Powering Off Press and hold channel’s until display turns off. POWER Air-in-Line and Accumulated Air-in-Line The Air-in-Line Detection System provides clinicians the ability to detect inappropriate amounts of air in the IV line. -
Page 34: Single Or Accumulated Air Bubble Detection (No Reset Feature)
Air-in-Line and Accumulated Air-in-Line (Continued) Single or Accumulated Air Bubble Detection (NO Reset Feature) To place channel on hold, press h h o o l l d d soft key. OPTIONS AIR IN LINE hold OPTIONS ACCUMULATED AIR IN LINE hold Remove air per hospital protocol. -
Page 35: Alarms, Alerts And Prompts
Alarms, Alerts and Prompts There are three types of displayed messages. The messages are listed alphabetically on the following pages, with a probable POWER HOLD cause and suggested remedy next to each one. Use this section in conjunction with the appropriate clinical practice or hospital ml/hr procedure. - Page 36 Alarms, Alerts and Prompts (Continued) MESSAGE PROBABLE CAUSE REMEDY ACCUMULATED AIR IN LINE Air detector has detected Press h h o o l l d d soft key. Open latch multiple small bubbles. to remove set. Clear air per Alarm hospital protocol.
- Page 37 Alarms, Alerts and Prompts (Continued) MESSAGE PROBABLE CAUSE REMEDY AIR IN LINE Air detector has detected an air Press h h o o l l d d soft key. Open latch bubble larger than configured to remove set. Clear air per Alarm threshold tolerance.
- Page 38 Alarms, Alerts and Prompts (Continued) MESSAGE PROBABLE CAUSE REMEDY CHANNEL MALFUNCTION Channel malfunction. Turn channel off and then on. If problem persists, do not use Alarm channel. Contact qualified Dual channel instrument only. service personnel. Channel Not On Channel must be turned on to Channel’s HOLD view or change settings.
- Page 39 Alarms, Alerts and Prompts (Continued) MESSAGE PROBABLE CAUSE REMEDY Dose Rate Running Channel must be on hold to was pressed while change modes. running in Dose Rate program. Prompt Entry Invalid An invalid value was entered Press key to clear CLEAR during programming.
- Page 40 Alarms, Alerts and Prompts (Continued) MESSAGE PROBABLE CAUSE REMEDY LATCH OPEN Latch was opened during an Check for proper set installation. infusion. Close latch. Press r r u u n n soft key. Alarm LATCH OPEN Latch is open (prior to starting an Close latch fully to left.
- Page 41 Alarms, Alerts and Prompts (Continued) MESSAGE PROBABLE CAUSE REMEDY New Baseline Set A new Manual Pressure Baseline Baseline will remain set until a has successfully been set. new manual baseline is set, Prompt instrument is turned off or latch Manual Pressure Baseline has been opened.
- Page 42 Alarms, Alerts and Prompts (Continued) MESSAGE PROBABLE CAUSE REMEDY OCCLUSION UPSTREAM Flow has been obstructed Check administration set for between fluid container and probable cause (kinked tubing, Alarm instrument. closed clamp, etc.). Press r r u u n n soft key to restart infusion. (See “Detection of Upstream Occlusion”...
- Page 43 Alarms, Alerts and Prompts (Continued) MESSAGE PROBABLE CAUSE REMEDY Pressure Unstable Cannot Set Excessive variation in pressure Reduce or temporarily remove Baseline due to motion, flow from other sources of variation while instruments or blood pressure performing manual baseline Prompt prevents accurate setting of setting operation.
- Page 44 Alarms, Alerts and Prompts (Continued) MESSAGE PROBABLE CAUSE REMEDY Return To Loading Dose? Channel was turned off during a Press y y e e s s soft key to return to Loading Dose program. Loading Dose program or press Prompt - n n o o was selected n n o o soft key to return to primary PATIENT?
- Page 45 Alarms, Alerts and Prompts (Continued) MESSAGE PROBABLE CAUSE REMEDY SET OUT Set has been removed during an Reinstall set. Press r r u u n n soft key. infusion. Alarm Set Pressure Baseline Set Pressure Baseline has been Press o o k k soft key to set Pressure selected in options mode.
- Page 46 T H I S PA G E I N T E N T I O N A L LY L E F T B L A N K BASIC SYSTEM OPERATION...
-
Page 47: Advanced Operations
ADVANCED OPERATIONS NOTE: All features and options are shown enabled in this section. The optional features illustrated may not have been enabled on the instrument. Dynamic Monitoring ® System The Dynamic Monitoring ® System provides the clinician the ability to monitor downstream pressure or resistance, allowing rapid detection of full and partial occlusions. -
Page 48: Dynamic Monitoring ® System
Dynamic Monitoring ® System (Continued) Monitoring Options - General (Continued) • Adjustable Pressure: designed to monitor line/site OPTIONS pressure and provide user adjustable pressure alarm limits. Rate= 125.0 mL/h Used for Precision Flow mode or for high resistance systems; VTBI=1000.0 mL 0.0 mL such as, infusion through transducers, into dialysis systems Primary... - Page 49 Dynamic Monitoring ® System (Continued) Monitoring Options - General (Continued) Selecting Monitoring Option (Continued) Press o o k k soft key. Display automatically returns to normal WARNING operating screen. Each time the instrument is turned on, verify and/or set the monitoring NOTE: While the channel is on, the selected option, mode, resistance alert and/or resistance alert and pressure alarm thresholds will remain in...
-
Page 50: Monitoring Options - Resistance Mode
Dynamic Monitoring ® System (Continued) Monitoring Options - Resistance Mode Detection of Downstream Occlusions In the Resistance or High Resistance monitoring mode, a OPTIONS condition occurs when the measured RESISTANCE A A LERT Rate= 125.0 mL/h resistance reaches the alert limit. VTBI=1000.0 mL 0.0 mL Primary... -
Page 51: Resistance Alert
Dynamic Monitoring ® System (Continued) Monitoring Options - Resistance Mode (Continued) Auto Restart Plus Feature The Auto Restart Plus feature provides the ability to OPTIONS automatically continue an infusion if downstream resistance or Rate= 125.0 mL/h pressure measurements indicate that an occlusion condition has VTBI=1000.0 mL 0.0 mL -second C C h h e e c c k k i i n n g g L L i i n n e e period (excluding High... -
Page 52: Resistance Trend Graphs
Dynamic Monitoring ® System (Continued) Resistance Alert (Continued) Setting Alert Marker OPTIONS Rate= 125.0 mL/h To numerically display present alert level marker, press either VTBI=1000.0 mL 0.0 mL soft key. Vertical line on resistance bar graph visually Primary indicates alert level. Alert = 70% •... - Page 53 Dynamic Monitoring ® System (Continued) Resistance Trend Graphs (Continued) Viewing Resistance Mode Trend Graphs (Continued) Press R R e e s s i i s s t t a a n n c c e e T T r r e e n n d d soft key. OPTIONS Resistance Trend •...
-
Page 54: Monitoring Options - Pressure Mode
Dynamic Monitoring ® System (Continued) Resistance Trend Graphs (Continued) Clearing Resistance Trend Graphs (Continued) • All data is cleared from graphs. OPTIONS -12h RESISTANCE return clear time Returning to Normal Operating Screen Press r r e e t t u u r r n n soft key. OPTIONS •... - Page 55 Dynamic Monitoring ® System (Continued) Monitoring Options - Pressure (Continued) Detection of Downstream Occlusions (Continued) When a Downstream Occlusion is detected, one of the following occurs: OPTIONS • If Auto Restart Plus feature is on, instrument notifies clinician Rate= 125.0 mL/h with a C C h h e e c c k k i i n n g g L L i i n n e e message and audible tone.
-
Page 56: Adjustable Pressure Alarm
Dynamic Monitoring ® System (Continued) Adjustable Pressure Alarm In the Adjustable Pressure monitoring mode, the pressure alarm limit may be varied from mmHg to the maximum configured pressure limit, in mmHg increments. Qualified service personnel can turn the adjustment feature on or off, set a default alarm level and set a maximum pressure limit. -
Page 57: Pressure Baseline
Dynamic Monitoring ® System (Continued) Adjustable Pressure Alarm (Continued) Pressure Monitoring Using Automatic Baseline Calibration (Continued) • When loading a set connected to a small diameter catheter, wait at least five seconds after loading set before activating . This allows pressure generated by loading process to HOLD dissipate and sensor to stabilize. - Page 58 Dynamic Monitoring ® System (Continued) Pressure Baseline (Continued) Manually Setting Pressure Baseline While Operating in Adjustable Pressure Mode (Continued) To place channel on hold, press channel’s key. (All HOLD infusions connected to the channel being base-lined must be on hold.) Press OPTIONS OPTIONS...
-
Page 59: Pressure Trend Graphs
Dynamic Monitoring ® System (Continued) Pressure Baseline (Continued) Manually Setting Pressure Baseline While Operating in Adjustable Pressure Mode (Continued) Press o o k k soft key. OPTIONS Verify pressure readout is zero (0) mmHg. Pressure Baseline NOTE: True baseline pressure will be zero or within a few return mmHg of zero. - Page 60 Dynamic Monitoring ® System (Continued) Pressure Trend Graphs (Continued) Viewing Pressure Mode Trend Graphs NOTE: For dual channel instruments, select the desired channel, as necessary. The trend graph is not available while the split screen is displayed. Press OPTIONS OPTIONS Rate= 125.0 mL/h •...
- Page 61 Dynamic Monitoring ® System (Continued) Pressure Trend Graphs (Continued) Clearing Pressure Trend Graphs To clear graphed data, press c c l l e e a a r r soft key. OPTIONS -12h PRESSURE return clear time Press o o k k soft key. OPTIONS All trend data will be cleared...
-
Page 62: Detection Of Upstream Occlusions
Dynamic Monitoring ® System (Continued) Detection of Upstream Occlusions If the flow pathway between the fluid container and the AccuSlide ® Flow Regulator is obstructed due to kinked tubing, a closed clamp or an improperly installed set, then an OCCLUSION condition exists. -
Page 63: Advanced Operations (Continued)
Drug Specific Dose Rate Calculator (DRC) (Continued) Facts About DRC • The patient weight, drug concentration and diluent volume WARNING cannot be changed while infusing. Changes to any of these Ensure the correct entry of all drug items while on hold will recalculate the volumetric rate to calculation infusion parameters. - Page 64 Drug Specific Dose Rate Calculator (DRC) (Continued) Entering a New Program (Continued) Press soft key corresponding to first letter of desired drug. OPTIONS Select Drug A - F • A list of drug names is displayed. Select Drug G - M Select Drug N - S Select Drug T - Z menu...
- Page 65 Drug Specific Dose Rate Calculator (DRC) (Continued) Entering a New Program (Continued) Programming When a Drug Name is Listed (Continued) To scroll through units available, press and release soft OPTIONS key. When correct unit is displayed, press Dose in mcg/kg/min ENTER Conc in mg/mL Weight in kg...
- Page 66 Drug Specific Dose Rate Calculator (DRC) (Continued) Entering a New Program (Continued) Programming When a Drug Name is Not Listed (Continued) If dose unit is appropriate, press ENTER OPTIONS Dose in mcg/kg/min Conc in mg/mL Weight in kg To scroll through units available, press and release soft key.
- Page 67 Drug Specific Dose Rate Calculator (DRC) (Continued) Entering a New Program (Continued) Programming When a Drug Name is Not Listed (Continued) To approve all displayed information and advance to first OPTIONS setup page, press o o k k soft key. Dose in mcg/kg/min Conc in mg/mL •...
- Page 68 Drug Specific Dose Rate Calculator (DRC) (Continued) Entering a New Program (Continued) Calculating Volumetric Rate (Continued) To enter weight and/or height, use numeric keypad. Press OPTIONS ENTER Rate=13.1 mL/h Dose= 5 mcg/kg/min • Instrument automatically calculates and displays Conc=800 mg/500 mL volumetric infusion rate in mL/h.
- Page 69 Drug Specific Dose Rate Calculator (DRC) (Continued) Entering a New Program (Continued) Calculating Volumetric Rate (Continued) To clear , press (zero key). Press CLEAR ENTER OPTIONS Dopamine To approve all displayed information and advance to main VTBI= 250.0 mL 0.0 mL hold page, press o o k k soft key.
- Page 70 Drug Specific Dose Rate Calculator (DRC) (Continued) Entering a New Program (Continued) Calculating Dose Rate (Continued) To enter diluent volume, use numeric keypad. Press ENTER OPTIONS Rate=13.1 mL/h • If applicable, patient weight and/or height is highlighted. Dose=---- mcg/kg/min Conc=800 mg/500 mL Wt=---- menu To enter weight and/or height, use numeric keypad.
-
Page 71: Making Changes During Drc Program
Drug Specific Dose Rate Calculator (DRC) (Continued) Entering a New Program (Continued) Calculating Dose Rate (Continued) To enter , use numeric keypad. Press VTBI ENTER OPTIONS Dopamine NOTE: If the flow sensor option is being used, Dose Rate VTBI VTBI= 250.0 mL 10.0 can be turned off by selecting VTBI , then pressing... - Page 72 Drug Specific Dose Rate Calculator (DRC) (Continued) Making Changes During DRC Program (Continued) Viewing More Information on Dose Rate Setup Press soft key. OPTIONS Rate=13.1 mL/h • Additional Dose Rate setup information is displayed for a Dose= 5 mcg/kg/min short interval. VTBI=248.0 VI= 2.0 Dopamine 10% Resistance...
- Page 73 Drug Specific Dose Rate Calculator (DRC) (Continued) Making Changes During DRC Program (Continued) Changing VTBI (Continued) To enter new value, use numeric keypad. VI temporarily disappears. Press ENTER NOTE: If the flow sensor option is being used, Dose Rate can be turned off by selecting VTBI and then pressing VTBI CLEAR Dose Rate VTBI can be deleted from VTBI / VI screen and main...
- Page 74 Drug Specific Dose Rate Calculator (DRC) (Continued) Making Changes During DRC Program (Continued) Changing Weight or Height (Continued) To highlight weight value, press W W t t soft key once. To OPTIONS highlight H H t t , , press W W t t soft key twice or press W W t t soft key Rate=13.1 mL/h Dose= 5 mcg/kg/min and then...
- Page 75 Drug Specific Dose Rate Calculator (DRC) (Continued) Making Changes During DRC Program (Continued) Changing Concentration (Continued) To select concentration value, press C C o o n n c c soft key once. To OPTIONS highlight diluent value, press C C o o n n c c soft key twice, or press Rate=13.1 mL/h Dose= 5 mcg/kg/min C C o o n n c c soft key and then...
-
Page 76: Resuming An Interrupted Drc Program
Drug Specific Dose Rate Calculator (DRC) (Continued) Resuming an Interrupted DRC Program The channel will retain its place in the program if the instrument is turned off. Follow “Start-Up Sequence” steps and select NEW P P ATIENT? OPTIONS n n o o . Return To NOTE: If resuming an infusion on a dual channel instrument Dose Rate? -
Page 77: Quitting Drc Program
Drug Specific Dose Rate Calculator (DRC) (Continued) Quitting DRC Program The channel must be on hold. Press m m e e n n u u soft key. OPTIONS Rate=13.1 mL/h Dose= 5 mcg/kg/min VTBI=248.0 VI= 2.0 Dopamine menu setup To return to primary setup page, press Q Q u u i i t t P P r r o o g g r r a a m m soft OPTIONS key. -
Page 78: Entering A New Program
Multi-Step Program (Continued) Entering a New Program Select the desired channel, as necessary. The channel must be on hold in the primary mode, secondary mode, or a Loading Dose program. Press OPTIONS OPTIONS Multi-Step • Options page appears. Multi-Dose Loading Dose View Curr. - Page 79 Multi-Step Program (Continued) Entering a New Program (Continued) Programming by Rate and Volume (Continued) To enter rate, use numeric keypad. Press OPTIONS ENTER STEP 1 • is highlighted. VTBI Rate= 25.0 mL/h VTBI= ----- Time= -- h -- min menu To enter , use numeric keypad.
- Page 80 Multi-Step Program (Continued) Entering a New Program (Continued) Programming by Rate and Volume (Continued) To approve page, press o o k k soft key. STEP T T OTALS OPTIONS STEP TOTALS (3) • Main hold page is displayed. VTBI= 130.0 mL Time= 1 h 42 min 0.0 mL menu...
- Page 81 Multi-Step Program (Continued) Entering a New Program (Continued) Programming by Volume and Time (Continued) To enter hours, use numeric keypad. Press OPTIONS ENTER STEP 1 • Time (minutes) is highlighted. Rate= ----- mL/h VTBI= 5.0 mL Time= 0 h menu To enter minutes ( ), if desired, use numeric keypad.
-
Page 82: Making Changes During Multi-Step Program
Multi-Step Program (Continued) Entering a New Program (Continued) Programming by Volume and Time (Continued) 10. To approve page, press o o k k soft key. STEP T T OTALS OPTIONS STEP TOTALS (3) • Main hold page is displayed. VTBI= 130.0 mL Time= 1 h 42 min 0.0 mL menu... - Page 83 Multi-Step Program (Continued) Making Changes During Multi-Step Program (Continued) Viewing Totals Remaining in Multi-Step Program Press soft key. OPTIONS Rate= 50.0 mL/h VTBI= 25.0 mL 5.0 mL STEP 2 of 3 10% Resistance • Time and remaining in Multi-Step program are displayed VTBI OPTIONS for a short interval.
- Page 84 Multi-Step Program (Continued) Making Changes During Multi-Step Program (Continued) Viewing or Editing Multi-Step Program (Continued) To select a step for editing, press a soft key. OPTIONS RATE VTBI TIME • Step setup page is displayed. 25.0 0h12m 50.0 25.0 0h30m 3 100.0 100.0 1h 0m menu...
-
Page 85: Resuming An Interrupted Multi-Step Program
Multi-Step Program (Continued) Resuming an Interrupted Multi-Step Program The channel retains its place in the program if the instrument is turned off. The program can be restarted from STEP 1 resumed where it left off. Follow “Start-Up Sequence” steps and select NEW P P ATIENT? n n o o . -
Page 86: Quitting Multi-Step Program
Multi-Step Program (Continued) Resuming an Interrupted Multi-Step Program (Continued) To continue or restart program, press or r r u u n n soft key. OPTIONS HOLD Rate= 25.0 mL/h VTBI= 4.0 mL 1.0 mL STEP 1 of 3 menu setup Quitting Multi-Step Program The channel must be on hold. -
Page 87: Entering A New Program
Multi-Dose Program (Continued) Entering a New Program Select the desired channel, as necessary. The channel must be on hold in the primary mode, secondary mode, or a Loading Dose program. Press OPTIONS OPTIONS Rate= 25.0 mL/h • Options page appears. VTBI= 4.0 mL 0.0 mL... - Page 88 Multi-Dose Program (Continued) Entering a New Program (Continued) To enter infusion rate, use numeric keypad. Press ENTER OPTIONS Rate=250.0 mL/h • /Dose (volume to be infused per dose) is highlighted. VTBI VTBI/Dose=----- No. Doses= Frequency= -- h menu To enter /Dose, use numeric keypad.
- Page 89 Multi-Dose Program (Continued) Entering a New Program (Continued) 11. To advance to time until first dose page, press o o k k soft key. OPTIONS DOSE COMPLETE NOTE: All doses must be programmed to start within ALERT OPTION hours. • To start first dose immediately, proceed to “Starting First menu Dose Immediately After Programming”...
-
Page 90: Making Changes During Multi-Dose Program
Multi-Dose Program (Continued) Entering a New Program (Continued) Delaying Start of First Dose (Continued) To advance to timer hold page, press s s t t a a r r t t t t i i m m e e r r soft key. OPTIONS 12 min Until First Dose... -
Page 91: Resuming An Interrupted Multi-Dose Program
Multi-Dose Program (Continued) Making Changes During Multi-Dose Program (Continued) Changing Time Interval Until Next Dose Press s s t t o o p p t t i i m m e e r r soft key. OPTIONS 12 min Until Dose 2 of 4 stop timer To select a value for editing, press a soft key. - Page 92 Multi-Dose Program (Continued) Resuming an Interrupted Multi-Dose Program (Continued) To access setup parameters, press R R e e v v i i e e w w / / R R e e s s u u m m e e soft key. OPTIONS •...
-
Page 93: Quitting Multi-Dose Program
Multi-Dose Program (Continued) Quitting Multi-Dose Program The channel must be on hold or the last dose complete. Press m m e e n n u u soft key. OPTIONS Rate=250.0 mL/h VTBI=100.0 mL VI= 0.0 mL DOSE 1 of 4 menu To return to primary setup page, press Q Q u u i i t t P P r r o o g g r r a a m m soft OPTIONS... - Page 94 Loading-Dose (Continued) Entering a New Program (Continued) To view additional selections, press p p a a g g e e soft key. OPTIONS Resistance Trend Monitoring Options Dose Rate Calculator Set Pressure Baseline return page Press L L o o a a d d i i n n g g D D o o s s e e soft key. OPTIONS Multi-Step •...
-
Page 95: Making Changes During Loading Dose Program
Loading-Dose (Continued) Making Changes During Loading Dose Program Select the desired channel, as necessary. The channel does not need to be on hold to change settings for Loading Dose Rate or VTBI Changing Loading Dose Press soft key next to parameter to be edited. Infusion Rate •... - Page 96 Loading-Dose (Continued) Viewing or Changing Primary Settings During Loading Dose Infusion (Continued) Press soft key for P P r r i i R R a a t t e e , P P r r i i or T T o o t t a a l l Changing Primary Rate During VTBI Loading Dose Infusion...
-
Page 97: Resuming An Interrupted Loading Dose Program
Loading-Dose (Continued) Resuming an Interrupted Loading Dose Program Follow “Start-Up Sequence” steps and select NEW P P ATIENT? OPTIONS n n o o . Return To NOTE: If resuming an infusion on a dual channel instrument Loading Dose? with an infusion currently running, N N E E W W P P A A T T I I E E N N T T ? ? screen does not appear. - Page 98 T H I S PA G E I N T E N T I O N A L LY L E F T B L A N K ADVANCED OPERATIONS...
-
Page 99: Additional Features
ADDITIONAL FEATURES NOTE: All features and options are shown enabled in this section. The optional features illustrated may not have been enabled on the instrument. Battery Management System The Battery Management System incorporates features which enhance battery maintenance in order to maximize the life of the battery, reduce associated costs and increase instrument availability. -
Page 100: Battery Recharge
Battery Management System (Continued) Battery Recharge The battery recharges whenever the instrument is plugged into outlet. Qualified service personnel can replace the battery when charging capacity gets too low. NOTE: All batteries gradually lose their capacity to hold a charge over time and use. -
Page 101: Panel Lock
Nurse Call (7130/7230 Only) (Continued) If an Alarm Occurs (Continued) Reset nurse call system, as required. NOTE: Disconnecting the nurse call cable from the wall or turning off the instrument activates the nurse call system. Disconnecting the nurse call cable from the instrument will not activate the nurse call system. -
Page 102: Pole Clamp
Pole Clamp NOTE: The illustrated pole clamp knob may not reflect the knob in use on the instrument. The uniquely designed pole clamp adapts to a wide variety of surfaces (such as, poles, bed rails) to provide greater versatility and to simplify transports. It features: •... -
Page 103: Flow Sensor
Flow Sensor The optional Flow Sensor notifies users of empty containers and/or upstream occlusions. A handle cap accessory is available for storing the flow sensor when not in use. NOTE: If a flow sensor is not connected to the instrument, ensure protective plugs are installed at the connector site to prevent entry of foreign material. -
Page 104: Rs-232 Computer Link
Flow Sensor (Continued) Attach flow sensor to instrument handle when not in use. NOTES: CAUTION Do not use solvents or cleaning • The flow sensor should be routinely cleaned with warm water while actuating the slider, then dried thoroughly. agents. Damage to plastic parts of the flow sensor could occur. -
Page 105: Connecting To A Computer
RS-232 Computer Link (Continued) Connecting to a Computer Press OPTIONS OPTIONS Resistance Trend • Options page appears. Monitoring Options Dose Rate Calculator Set Pressure Baseline To view additional selections, press p p a a g g e e soft key. return page Press C C o o m m p p u u t t e e r r L L i i n n k k soft key. - Page 106 RS-232 Computer Link (Continued) Disconnecting from a Computer Press OPTIONS OPTIONS Resistance Trend • Options page appears. Monitoring Options Dose Rate Calculator To view additional selections, press p p a a g g e e soft key. Set Pressure Baseline return page Press C C o o m m p p u u t t e e r r L L i i n n k k soft key.
-
Page 107: Maintenance
MAINTENANCE Specifications Medical Systems ® Administration Sets: Use only ALARIS 72 Series administration sets. Alarms: Accumulated Air In Line Key Stuck Air In Line Latch Open Battery Depleted No Upstream Flow Detected Channel Malfunction Occlusion Downstream Computer Link Failure Occlusion Upstream Flow Sensor Unplugged Primary Flow Detected During Secondary Hold Time Exceeded... - Page 108 Specifications (Continued) Downstream Occlusion: NOTE: Time to Occlusion and Bolus Volume data tested to standards defined in , Section 51.101 b). AAMI ID26:1998 Time to Alarm Monitoring Options Time to Detect Downstream Occlusion Pressure Resistance and (minutes) High Resistance 100% 100% Threshold Settings mmHg...
- Page 109 Specifications (Continued) Ground Current Leakage: Electrical leakage current, enclosure: <100 microamperes Electrical leakage current, patient: <10 microamperes KVO Flow Range: 0.1 to 20.0 mL/h in 0.1 mL/h increments Mode of Operation: Continuous Power Requirements: 100-240 V~, 50/60 HZ (40 watts), 3-wire grounded system Class 1 with Internal Power Source Rate Accuracy: For rates greater than 1 mL/h, up to 999.9 mL/h: ±5%, 95% of the time with 95%...
-
Page 110: Configurable Options
Configurable Options The following features can be customized by qualified service personnel in the Configuration and Diagnostics Modes. Feature Options Default Air in Line: Air-in-Line Accumulator On/Off Air-in Line Alarm Threshold 50, 100, 200, or 500 mcL 100 mcL Air-in-Line Reset On/Off Audio: Transition Tone... - Page 111 Configurable Options (Continued) Feature Options Default Pressure Sensor* Self Check Interval 1-52 wks 12 weeks Profiles Rate, Maximum 0.1 - 999.9 mL/h 999.9 mL/h Regional Settings Region: N. America, European North America English ** Language: English VTBI On/Off (Flow Sensor use) These features are configured in the Diagnostics Mode.
-
Page 112: Unpacking
Unpacking Remove instrument from its carton. Important: Plug instrument into an outlet a minimum hours prior to use. • Maximum battery capacity, as well as gauge accuracy, is reached after several charge/discharge/recharge cycles, in the refresh process. Medical Systems ALARIS recommends that the battery be fully charged/ discharged/recharged, using the refresh cycle, before placing the instrument in use. - Page 113 Check-In and Configuration (Continued) Rate Accuracy Qualification Test (Continued) NOTES: Rate accuracy of the Signature Edition ® Pump should be tested using a Model 80VCS Calibration Set. The system is designed to produce overall accuracy of ±5% for rates greater than 1 mL/h and up to 999.9 mL/h, and ±6.5% for rates equal to or less than 1 mL/h, 95% of the time with 95% confidence.
- Page 114 Check-In and Configuration (Continued) Rate Accuracy Qualification Test (Continued) Fill solution container with clean tap water. Close AccuSlide ® Flow Regulator clamp on Calibration Set 80VCS and then insert spike into solution container. Open AccuSlide ® Flow Regulator clamp and prime set. Pay particular attention to ensure all air is expelled from set.
- Page 115 Check-In and Configuration (Continued) Rate Accuracy Qualification Test (Continued) 16. Adjust fluid level in burette until meniscus is level with zero mark on burette. NOTE: The instrument may need to be run to prime the line to the zero level of the burette (step 13 ). 17.
-
Page 116: Set Sensor Check / Pressure Calibration Verification
NOTE: If the reading is out of range, refer to the “Pressure Calibration” section of Service Bulletin 490 or 495 (or most current version) or contact ALARIS Medical Systems ® Technical Support for assistance. - Page 117 Check-In and Configuration (Continued) Functional Test (Continued) Install primed administration set with latch open. Verify instrument displays A A i i r r I I n n L L i i n n e e and L L a a t t c c h h O O p p e e n n messages.
-
Page 118: Flow Stop Test
Check-In and Configuration (Continued) Flow Stop Test With an administration set primed and loaded in instrument, turn off power. With all tubing clamps open and fluid container two or more feet about instrument, verify no fluid flows through set. Open latch and remove set. Verify no fluid flows through set. -
Page 119: Cleaning
Cleaning Unplug power cord from outlet before cleaning. CAUTION DO NOT SPRAY onto or immerse the Verify connector is covered. Do not spray fluid RS-232 instrument in fluids. Cleaning directly into any connector. solutions should be applied to the instrument with a soft cloth. Use a soft cloth dampened with warm water and a mild, nonabrasive cleaning solution. -
Page 120: Air-In-Line Assembly
Cleaning (Continued) Air-in-Line Assembly It may be necessary from time to time to clean the Air-in-Line CAUTION Detector so that optimal contact is maintained between the Do not use solvents or chemical detection system and the tubing. This allows the ultrasound cleaners. -
Page 121: Inspection Requirements
Inspection Requirements To ensure the instrument remains in good operating condition, WARNING both regular and periodic inspections are required. Failure to perform these inspections may result in improper instrument operation. Instruments are tested and calibrated before they are packaged for shipment. To ensure proper operation after shipment, it is recommended that an incoming inspection be performed by your... -
Page 122: Service Information
Service Information NOTE: If the instrument shows evidence of damage in transit, notify the carrier’s agent immediately. Do not return damaged equipment to the factory before the carrier’s agent has authorized repairs. If the instrument fails to respond as described in this document and the cause cannot be determined, do not use the instrument. -
Page 123: Warranty
Systems any other liability in connection with the sale or use of Medical Systems ® products. ALARIS ALARIS MEDICAL SYSTEMS DISCLAIMS ALL OTHER WARRANTIES, EXPRESS OR IMPLIED, INCLUDING ANY WARRANTY OF MERCHANTABILITY OR OF FITNESS FOR A PARTICULAR PURPOSE OR APPLICATION. See packing inserts for international warranty, if applicable. MAINTENANCE... - Page 124 T H I S PA G E I N T E N T I O N A L LY L E F T B L A N K MAINTENANCE...
-
Page 125: Appendix
APPENDIX Trumpet and Start-Up Curves DESCRIPTION AND EXPLANATION OF TRUMPET AND FLOW CHARACTERISTICS UNDER VARYING START-UP CURVES DELIVERY CONDITIONS In this instrument, as with all infusion systems, the Effects of Pressure Variations action of the pumping mechanism and variations in Under conditions of +100 mmHg pressure, the individual administration sets cause short-term Signature Edition... - Page 126 Trumpet and Start-Up Curves (Continued) Pressure Mode Pressure Mode Start-up at 1 mL/h (initial) -0.2 Time (min) Pressure Mode Trumpet Curve at 1 mL/h (initial) 12.2 21.2 -6.2 -12.1 Observation Interval (min) Pressure Mode Trumpet Curve at 0.1 mL/h (48 hr) 98.0 51.0 23.8...
- Page 127 Trumpet and Start-Up Curves (Continued) Pressure Mode (Continued) Pressure Mode Start-up at 25 mL/h (initial) Pressure Mode Start-up at 999.9 mL/h (initial) 2000 1800 1600 1400 1200 1000 -200 Time (min) Time (min) Pressure Mode Trumpet Curve at 25 mL/h (initial) Pressure Mode Trumpet Curve at 999.9 mL/h (initial) -1.2 -0.9...
- Page 128 Trumpet and Start-Up Curves (Continued) Resistance Mode Resistance Mode Start-up at 0.1 mL/h (initial) Resistance Mode Start-up at 1 mL/h (initial) 0.20 0.18 0.16 0.14 0.12 0.10 0.08 0.06 0.04 0.02 0.00 -0.02 -0.2 Time (min) Time (min) Resistance Mode Trumpet Curve at 0.1 mL/h (initial) Resistance Mode Trumpet Curve at 1 mL/h (initial) 13.3 153.4...
- Page 129 Trumpet and Start-Up Curves (Continued) Resistance Mode (Continued) Resistance Mode Start-up at 999.9 mL/h (initial) Resistance Mode Start-up at 25 mL/h (initial) 2000 1800 1600 1400 1200 1000 -200 Time (min) Time (min) Resistance Mode Trumpet Curve at 25 mL/h (initial) Resistance Mode Trumpet Curve at 999.9 mL/h (initial) 15.6 -0.7...
- Page 130 Trumpet and Start-Up Curves (Continued) High Resistance Mode High Resistance Mode Start-up at 999.9 mL/h (initial) 2000 1800 1600 1400 1200 1000 -200 Time (min) High Resistance Mode Trumpet Curve at 999.9 mL/h (initial) -0.1 -0.5 -0.3 -0.7 -1.1 -1.4 -0.9 -1.3 -2.3...
- Page 132 951,428; GB Patent Nos.: 121,931; 248,632; 387,724; 431,310; 612,004; 2,045,812; 2,045,813; 2,045,814; Hong Kong Nos.: HK1006005; HK1006006; HK1006041; JP Patent Nos.: 1,003,444 1,003,445 1,006,528 1,743,342 1,924,062 2,553,557 2,802,171 3,025,018 3,025,019 3,064,014 ; SE Sv. pat. nr.: 387,724. Other Patents Pending. 147859-103 Copyright© 2003 ALARIS Medical Systems, Inc. All rights reserved.
Need help?
Do you have a question about the Signature Edition GOLD and is the answer not in the manual?
Questions and answers