
Subscribe to Our Youtube Channel
Related Manuals for Fluidmaster PerforMAX 400AH


Summary of Contents for Fluidmaster PerforMAX 400AH
- Page 1 QUICK Install Guide PerforMAX ® 400AH FILL VALVE *See back page for important legal information. INSTALL WITH CONFIDENCE...
-
Page 2: Getting Started
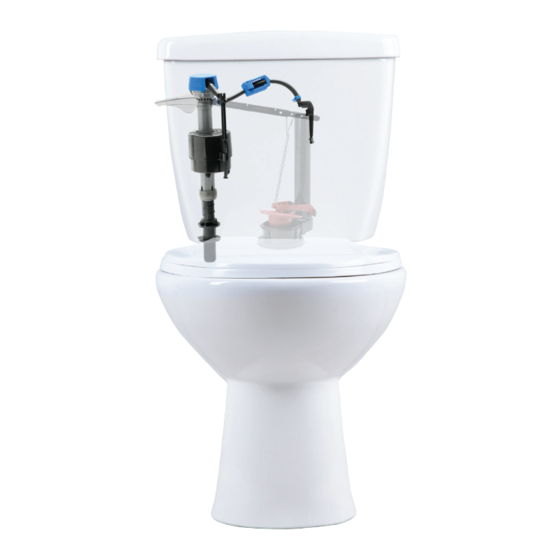
GETTING STARTED PARTS OVERVIEW Refill Tube Clamp Tank Water Level Adjustment Screw TOOLS NEEDED Bowl Water Level Adjustment Roller Clamp Refill Tube Towel Pliers Bucket Sponge Refill Tube Clamp Refill Clip Shank Washer Locknut Tank Water Level Bowl Water Level Adjustment Screw Adjustment Roller Clamp... - Page 3 STEP 1: PREPARE TANK STEP 2: REMOVE OLD FILL VALVE A: TURN OFF WATER A: REMOVE CONNECTOR Remove water supply connector from bottom of fill valve by twisting connector nut to the left (clockwise). LEFT TURN CLOCKWISE B: REMOVE OLD LOCKNUT B: DRAIN WATER Below tank, twist locknut Flush toilet to drain most of the water from the tank.
- Page 4 STEP 3: ADJUST HEIGHT OF NEW FILL VALVE A: TWIST FILL VALVE TO ADJUST HEIGHT FOR STANDARD FLUSH VALVES Top of fill valve cap should measure roughly 3" Fill Valve Cap above top of overflow pipe. TOP OF FILL VALVE CAP 3"...
- Page 5 STEP 4: INSTALL NEW FILL VALVE INSTALL LOCKNUT INSTALL SHANK WASHER Screw locknut to the Pull up to top of shank. right (counterclockwise) * Place shank washer onto fill valve shank onto threaded shank of RIGHT (below tank). fill valve. WIDE SIDE UP. Shank Washer ATTACH REFILL TUBE TO REFILL CLIP Threaded Shank...
-
Page 6: Step 5: Finishing Steps
STEP 5: FINISHING STEPS FOR STANDARD FLUSH VALVES A: ATTACH WATER Top of SUPPLY CONNECTOR Overflow Tube TO FILL VALVE Twist to the right 1/2" (counterclockwise) RIGHT Water Level Overflow Pipe TOP DOWN VIEW B: TURN ON WATER Check for leaks. (See Troubleshooting for leak solutions) TURN... - Page 7 STEP 6: FINE-TUNE TANK WATER LEVEL A: FLUSH THE TOILET TO CHECK FOR STANDARD FLUSH VALVES THE TANK WATER LEVEL Tank Water Level After the water stops filling the tank, Adjustment Screw Top of the water level should be roughly ½ 1/2"...
- Page 8 STEP 7: FINE-TUNE BOWL WATER LEVEL A: FILL BOWL WITH A If the water level matches the line in TOO HIGH the bowl and the fill valve is STILL GALLON OF WATER FILLING, then the bowl water level is Wait 1 minute until the bowl TOO HIGH, proceed to Step 7D.
- Page 9 A: FLUSH THE TOILET If you’re satisfied with the flush, YOU’RE DONE! YOU DID IT! We knew you could! Share your success story with friends and family! #FixedMyToilet #Fluidmaster Still not working exactly right? See the next page for Troubleshooting.
-
Page 10: Troubleshooting
• WON’T TURN OFF REPLACE FILL VALVE SEAL • WON’T REFILL TANK Remove cap (see page 18). REMOVE CAP AND CHECK FOR DEBRIS Replace seal with a genuine Fluidmaster 242 Seal. Turn off water supply. TURN Replace valve cap. COUNTER- B: Flush toilet. - Page 11 For installation assistance, contact our recommended (see page 12). 1/2" technical services department. Email, chat or call our toll-free number. Overflow Pipe www.fluidmaster.com/support 1-800-631-2011 C: Roller clamp may need to be adjusted Hours Available: (see page 14). Monday – Friday...
- Page 12 LIMITED SEVEN-YEAR EXPRESS WARRANTY Subject to the “Exclusions” set forth below, Fluidmaster Inc. promises to the consumer to repair, or at the option of Fluidmaster Inc. to replace any part of this plumbing product which proves to be defective in workmanship or materials under normal use for seven years from the date of purchase.
Need help?
Do you have a question about the PerforMAX 400AH and is the answer not in the manual?
Questions and answers