
Related Manuals for Fluidmaster PerforMAX 400H


Summary of Contents for Fluidmaster PerforMAX 400H
- Page 1 QUICK Install Guide 400H PerforMAX FILL VALVE ® VIDEO HOW-TO VIDEO VISIT: FLUIDMASTER.COM 400H PRODUCT PAGE *See back page for important legal information. SPANISH - Page 16 INSTALL WITH CONFIDENCE...
-
Page 2: Getting Started
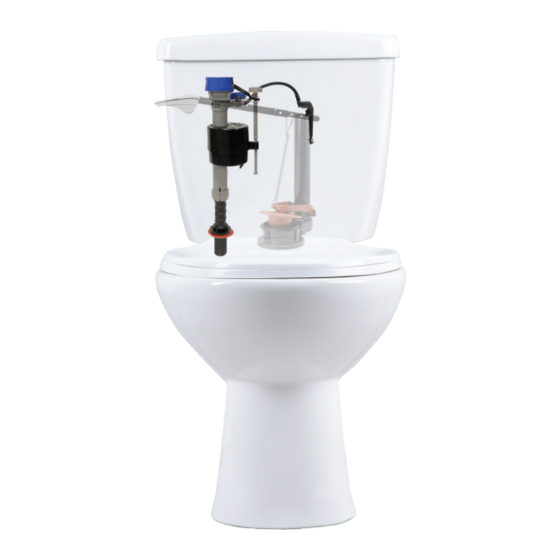
GETTING STARTED STEP 1: PREPARE TANK A: TURN OFF WATER TOOLS NEEDED PARTS OVERVIEW Bowl Water Level Dial Bucket Sponge Tank Water Level Adjustment Screw Towel Scissors TURN (Optional) Refill Tube CLOCKWISE B: DRAIN WATER Flush toilet to drain most of the water from the tank. FLUSH Refill Clip TOP DOWN VIEW... - Page 3 STEP 2: REMOVE OLD FILL VALVE STEP 3: ADJUST HEIGHT OF NEW FILL VALVE A: REMOVE CONNECTOR A: TWIST FILL VALVE TO ADJUST HEIGHT Remove water supply Top of fill valve cap should measure roughly 3" connector from bottom above top of overflow pipe when installed. of fill valve by twisting connector nut to the left LEFT...
-
Page 4: Step 5: Finishing Steps
DO NOT OVER TIGHTEN. INSERT FILL VALVE TURN ON WATER Check for leaks. Position refill tube to face flush valve making sure fill valve parts do not (Go to www.Fluidmaster.com/support interfere with lever arm. for leak solutions.) TURN COUNTER- Fill Valve... - Page 5 STEP 6: FINE-TUNE TANK WATER LEVEL STEP 7: FINE-TUNE BOWL WATER LEVEL A: FLUSH THE TOILET NOTE: The PerforMAX Fill Valve is pre-set to fill the proper bowl water level in most toilets straight out of the box. TO CHECK THE TANK WATER LEVEL After the water stops filling the 1/2"...
- Page 6 Share your success story WATER LEVEL with friends and family! Repeat Steps 7D and 7E until water level in bowl matches the line when the fill valve shuts off. #FixedMyToilet #Fluidmaster Still not working exactly right? See the next page for Troubleshooting.
-
Page 7: Troubleshooting
With left hand twist cap and lever arm Always use genuine Fluidmaster parts when installing or repairing. Fluidmaster will not be counterclockwise to unlock cap. Let responsible or liable for use of non-Fluidmaster parts during installation or repair. - Page 8 TROUBLESHOOTING FOR CANISTER FLUSH VALVES The Fluidmaster refill clip is not required for installation. If you’ve already installed the refill clip onto the refill tube, simply pull it or cut it off. FOR MANSFIELD ® Push refill tube into refill hole at the top of the flush valve cap.
-
Page 9: Guía De Instalación Rápida
VIDEO DE PASO 2: REMUEVA LA VÁLVULA DE LLENADO ANTIGUA Balde, Esponja, Toalla, Tijeras (opcional) CÓMO HACERLO VISITE: FLUIDMASTER.COM (PÁGINA 4) EMPEZANDO: RESUMEN DE PIEZAS PAGINA DE ESPECIFICACIONES REMUEVA EL CONECTOR. Remueva el conector del suministro de agua de la DEL PRODUCTO 400H parte inferior de la válvula de llenado girando la tuerca del conector hacia la... - Page 10 ABRA EL AGUA. Revise por fugas. Si el nivel del agua coincide con la línea en la taza del sanitario y la válvula de (Visite a www.Fluidmaster.com/support para soluciones de fugas). llenado TODAVÍA SIGUE LLENANDO, entonces el nivel del agua en la taza es NIVEL DEL AGUA.
-
Page 11: Solución De Problemas
Siempre utilice piezas de genuino Fluidmaster cuando instale o repare. Fluidmaster no se hará suba el flotador con su mano derecha. responsable por el uso de piezas que no sean Fluidmaster durante la instalación o reparación. Con la mano izquierda, gire la tapa y el brazo de la palanca al sentido EL NIVEL DEL AGUA EN LA TAZA DEL SANITARIO ESTÁ... -
Page 12: Notes / Notas
NOTES / NOTAS: Para asistencia para la instalación, comuníquese ¿PREGUNTAS con nuestro departamento de servicio técnico. ADICIONALES? EMAIL, CHAT LLAME a nuestro número gratuito. www.fluidmaster.com/support 1-800-631-2011 Horario Disponible: Lunes – Viernes 5:30 AM - 5:00 PM Hora Estándar del Pacífico... - Page 13 SIN ANULAR la GARANTÍA DE FLUIDMASTER, ya que este sistema no daña los componentes. NO apriete demasiado las tuercas o el tanque, ya que la taza se puede agrietar. Siempre use piezas de calidad Fluidmaster al instalar o reparar. Fluidmaster no se hace responsable por el uso de piezas durante la que no sean de Fluidmaster durante la instalación o reparación.
Need help?
Do you have a question about the PerforMAX 400H and is the answer not in the manual?
Questions and answers