Advertisement
Available languages
Available languages
Advertisement
Table of Contents

Related Manuals for Fluidmaster PerforMAX K-400H-043


Summary of Contents for Fluidmaster PerforMAX K-400H-043
- Page 1 QUICK Install Guide K-400H-043 PerforMAX FILL VALVE ® + 2" & 3" SUPER FLAPPER SCAN FOR HOW-TO VIDEO VIDEO www.fluidmaster.com *See back page for important product warnings and warranty information. ESPAÑOL - Página 26 INSTALL WITH CONFIDENCE...
-
Page 2: Getting Started
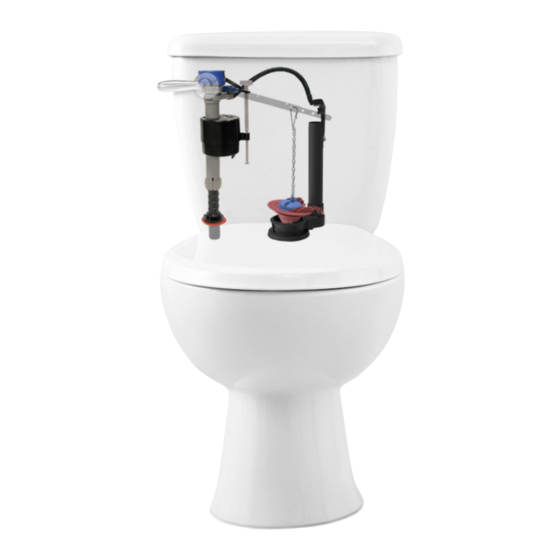
GETTING STARTED TOOLS NEEDED PARTS OVERVIEW FILL VALVE Bowl Water Level Dial Bucket Sponge Tank Water Level Adjustment Screw Towel Scissors (Optional) Refill Tube Refill Clip UNIVERSAL 2" & 3" SUPER FLAPPER Shank Washer Locknut... - Page 3 STEP 1: PREPARE TANK A: TURN OFF WATER B: DRAIN WATER Flush toilet to drain most of the water from the tank. FLUSH C: USE SPONGE OR TOWEL TO SOAK UP EXCESS WATER IN TANK Sponge Towel...
- Page 4 STEP 2: REMOVE OLD FILL VALVE A: REMOVE CONNECTOR Remove water supply connector from bottom of fill valve by twisting connector nut to the left. NOTE: Inspect water supply connector. Replace it if it is worn, or you don’t know how old it Towel is, to prevent flooding and (Optional)
- Page 5 STEP 3: REMOVE OLD FLAPPER A: DISCONNECT FLAPPER CHAIN Flexible Frame Flappers B: REMOVE FLAPPER FROM FLUSH VALVE SEAT Simply unhook or lift flapper Unhook arms off the flush valve mounting posts, depending on the type of flapper. Solid Frame Flappers...
- Page 6 STEP 4: INSTALL NEW SUPER FLAPPER A: MEASURE OLD FLAPPER Remove the old flapper. Measure the old flapper with the Easy Sizing Guide inside the packaging: • 2" flappers will better fit measuring guide. • 3" flappers will better fit BLUE measuring guide.
- Page 7 FLAPPER EASY SIZING GUIDE Once the size is determined, please proceed to follow the instructions for your specific flapper size (Page 9 OR 10).
- Page 8 FLAPPER EASY SIZING GUIDE...
- Page 9 STEP 4: INSTALL NEW SUPER FLAPPER 2" IF YOUR FLAPPER IS BLUE Seal Stretch the to remove it. BLUE Bulb. Remove the Remove the BLUE Arms by lifting up on tabs. INSTALL NEW FLAPPER Place flapper on top of flush valve seat and snap the RED Arms onto...
- Page 10 STEP 4: INSTALL NEW SUPER FLAPPER 3" IF YOUR FLAPPER IS RED Seal Stretch the to remove it. BLUE Arms Clip the to install.
- Page 11 C: ATTACH FLAPPER CHAIN TO LEVER Pinch clasp of clip and attach the clip to the tank lever directly above the flapper. Leave roughly ½" inch of slack in chain (small “j” shape). To adjust chain length, remove clip and reposition lower on the chain for shorter length.
- Page 12 STEP 5: ADJUST HEIGHT OF NEW FILL VALVE A: TWIST FILL VALVE TO ADJUST HEIGHT Top of fill valve cap should measure roughly 3" above top of overflow pipe when installed. NOTE: Increasing height allows more water to fill in the tank. HOLD TWIST LEFT...
- Page 13 STEP 6: INSTALL NEW FILL VALVE PUSH REFILL TUBE ONTO REFILL PORT FIRST ATTACH REFILL CLIP TO OTHER Refill Clip Refill Tube END OF REFILL TUBE INSERT FILL VALVE Position refill tube to face flush valve making sure fill valve parts do not interfere with lever arm. Fill Valve Refill Tube Overflow...
-
Page 14: Step 7: Finishing Steps
STEP 7: FINISHING STEPS A: ATTACH WATER SUPPLY CONNECTOR TO FILL VALVE Twist to the right *Hand-tighten only. DO NOT OVERTIGHTEN. TURN ON WATER Check for leaks. C: WATER LEVEL After the tank stops filling, water level should fill the tank to roughly ½... - Page 15 STEP 8: FINE-TUNE TANK WATER LEVEL A: FLUSH THE TOILET TO CHECK THE TANK WATER LEVEL After the water stops filling the 1/2" tank, the water level should be roughly ½ inch below the top of overflow pipe to ensure a Overflow Pipe proper flush.
- Page 16 STEP 9: FINE TUNE FLUSH A: TEST FLUSH Drop 3 squares of toilet paper in bowl then flush. B: ADJUST FOR MOST EFFICIENT FLUSH Continue to adjust dial down one setting and flush until toilet is unable to flush paper properly. Note: Flapper dial is pre-set to maximum setting.
- Page 17 STEP 10: FINE-TUNE BOWL WATER LEVEL FILL BOWL WITH A GALLON OF WATER Wait 1 minute until the bowl water level recedes down and stops. MARK THE WATER LEVEL IN THE BOWL With a pencil, draw a line at the top of the water level in bowl.
- Page 18 A: FLUSH THE TOILET If you’re satisfied with the flush, YOU’RE DONE! YOU DID IT! We knew you could! Share your success story with friends and family! #FixedMyToilet #Fluidmaster Still not working exactly right? See the next page for Troubleshooting.
-
Page 19: Troubleshooting
• Press down on top cap while rotating top & arm clockwise to locked position. SCAN FOR TROUBLESHOOTING HOW-TO VIDEO www.fluidmaster.com Always use genuine Fluidmaster parts when installing or repairing. Fluidmaster will not be responsible or liable for use of non-Fluidmaster parts during installation or repair. - Page 20 • Press down on top cap while rotating top & arm clockwise to locked position. Always use genuine Fluidmaster parts when installing or repairing. Fluidmaster will not be responsible or liable for use of non-Fluidmaster parts during installation or repair.
- Page 21 TROUBLESHOOTING IF YOUR FLUSH IS WEAK OR FLUSHING MULTIPLE TIMES WEAK OR NOT FLUSHING If your chain is not properly lifting the flapper, move the clip 3 or 4 links down the chain to reduce the chain slack. (Refer to “TIP” on chain on Page 11.) FLAPPER IS CLOSING TOO FAST Turn...
- Page 22 TROUBLESHOOTING TOILET KEEPS RUNNING IF YOUR FLAPPER’S SIZE IS 2" BLUE Seal Confirm is removed (See Step B1 under 2" on Page 9). BLUE Bulb Confirm is removed (See Step B2 under 2" on Page 9). BLUE Arms Confirm are removed. Ensure flapper is attached using Arms.
- Page 23 TROUBLESHOOTING REASSEMBLY OF FLAPPER PUTTING ARMS BACK ON Attach the RED Arms by aligning RED Pegs with the holes on the frame of the flapper (Ensure position of the arms match the image shown). Press down until you feel it snap into place.
- Page 24 TROUBLESHOOTING REASSEMBLY OF FLAPPER PUTTING SEALS BACK ON BLUE Seal Attach by stretching it until it’s inside of the groove closest to the top of the flapper. Make sure the seal is fully inserted in the groove. RED Seal Attach by stretching it until it’s inside of the second groove from the top of the flapper.
- Page 25 NOTES...
-
Page 26: Guía De Instalación Rápida
Agua de la Taza Tornillo de Ajuste de Nivel de Agua del Tanque Toalla Tijeras (Opcional) Manguera De Relleno ESCANEAR PARA EL VIDEO DE COMO HACERLO www.fluidmaster.com Clip De Relleno 523A-009 Tapón Universal 2" y 3" SUPER FLAPPER Junta De Vástago Contratuerca... - Page 27 GUÍA DE INSTALACIÓN RÁPIDA PASO 1: PREPARE EL TANQUE (PÁGINA 3) CIERRE EL AGUA. DRENE EL AGUA. Descarga el inodoro para drenar la mayor parte del agua del tanque. USE LA ESPONJA O LA TOALLA PARA REMOVER EL EXCESO DE AGUA EN EL TANQUE.
- Page 28 GUÍA DE INSTALACIÓN RÁPIDA 2" SI SU TAPÓN ES DE (PÁGINA 9) Estire la junta AZUL para retirarla Retire la perilla AZUL soportes AZULES Retire los levantando las pestañas INSTALAR EL NUEVO SÚPER TAPÓN. Coloque el tapón en la parte superior soportes ROJOS del asiento de la válvula de descarga y encaje los en el poste...
- Page 29 GUÍA DE INSTALACIÓN RÁPIDA PASO 5: AJUSTE LA ALTURA DE LA VÁLVULA DE LLENADO NUEVA (PÁGINA 12) GIRE LA VÁLVULA DE LLENADO PARA AJUSTAR LA ALTURA La parte superior de la tapa de la válvula de llenado debe medir aproximadamente 7,62 cm (3") más que la parte superior del tubo de desagüe cuando instalada.
- Page 30 GUÍA DE INSTALACIÓN RÁPIDA PASO 7: PASOS PARA FINALIZAR (PÁGINA 14) CONECTE EL CONECTOR DE SUMINISTRO DEL AGUA A LA VÁLVULA DE LLENADO. Gire hacia la derecha. Solo apriete a mano. NO APRIETE DEMASIADO. ABRA EL AGUA. Revise si hay fugas. NIVEL DEL AGUA.
- Page 31 GUÍA DE INSTALACIÓN RÁPIDA PASO 8: AFINE EL NIVEL DEL AGUA EN EL TANQUE (PÁGINA 15) DESCARGUE EL INODORO PARA REVISAR EL NIVEL DEL AGUA EN EL TANQUE. Una vez que el tanque termine de llenar, el nivel del agua debe ser aproximada- mente 1,27cm (1/2") más abajo de la parte superior del tubo de desagüe para asegurar una descarga adecuada.
- Page 32 (PÁGINA 18) DESCARGUE EL SANITARIO. Si está satisfecho con el descargue, ¡TERMINÓ! ¡LO LOGRÓ! ¡Sabíamos que podía! ¡Comparta su historia de éxito! #FixedMyToilet #Fluidmaster Para asistencia para la instalación, comuníquese ¿PREGUNTAS con nuestro departamento de servicio técnico. ADICIONALES? EMAIL, CHAT LLAME a nuestro número gratuito.
-
Page 33: Solución De Problemas
• Presione hacia abajo sobre la tapa mientras gira la tapa y el brazo en el sentido de las manecillas del reloj hasta que se asegure. Siempre utilice piezas Fluidmaster genuinas cuando instale o repare. Fluidmaster no se hará responsable por el uso de piezas que no sean Fluidmaster durante la instalación o reparación. - Page 34 EL NIVEL DEL AGUA EN LA TAZA DEL SANITARIO ESTÁ DEMASIADO BAJO (PÁGINA 20) EL AGUA DE LA MANGUERA DE RELLENO TIENE QUE FLUIR A TRAVÉS DEL TUBO DE DESAGÜE Asegúrese que la manguera de relleno esté supliendo agua dentro del tubo de desagüe.
- Page 35 SI EL TAMAÑO DEL TAPÓN ES 3 PULGADAS Confirme que se haya retirado la junta roja. Asegúrese de que el tapón esté sujeto con los soportes azules. En caso contrario, consulte la instrucción B en “VOLVER A COLOCAR LOS SOPORTES” enseguida. REENSAMBLAJE DEL TAPÓN (PÁGINA 23) VOLVER A COLOCAR LOS SOPORTES...
- Page 36 ’n Sparkle® de Fluidmaster para aquellos usuarios que desean utilizar limpiadores de tazas dentro del tanque SIN ANULAR la GARANTÍA DE FLUIDMASTER, ya que este sistema no daña los componentes. NO apriete demasiado las tuercas o el tanque, ya que la taza se puede agrietar.
Need help?
Do you have a question about the PerforMAX K-400H-043 and is the answer not in the manual?
Questions and answers