Advertisement
Available languages
Available languages
Quick Links
PART#4-753, Rev. 3, 02/09
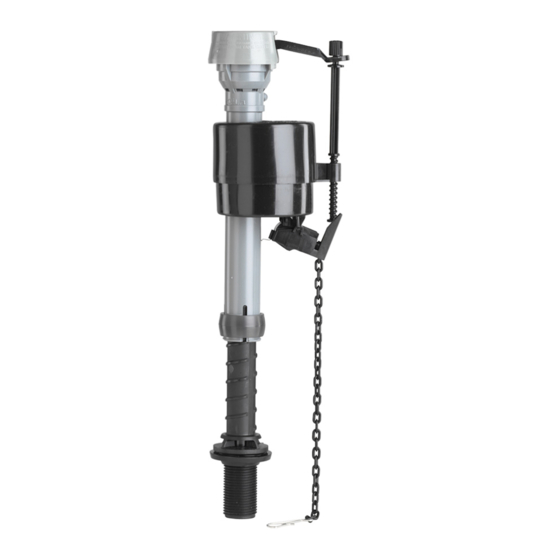
FLUIDMASTER
400LS FILL
®
VALVE WITH LEAK SENTRY
®
TECHNOLOGY INSTALLATION
INSTRUCTIONS
TOOLS NEEDED
DO NOT USE
OR
+
IMPORTANT: A flapper with a plastic or metal chain is
recommended for the Leak Sentry
®
to maintain its settings.
Flappers with nylon or vinyl straps will stretch and cause
Leak Sentry
®
to work improperly.
(Replace with a flapper like the Fluidmaster 501 or 502.)
2.
continued...
MEASURE
HEIGHT ONLY; DO
NOT INSTALL
1"
"CL"
MARK
Place shank
washer onto
threaded
shank of fill
SHANK
WASHER
valve. Flat
side up. Then
place fill valve
in tank.
DO NOT
MOVE
LOCK RING
THREADED
SHANK
3.
continued...
Roller & Hose Clamp
For your convenience, the roller clamp
and hose clamps are pre-assembled to the
refill hose. Attach one end of hose to refill
clip and slide clip to right side of overflow
pipe. Attach other end of hose to nipple on
fill valve with a slight arching (see picture
to the left). Cut tube if necessary. Squeeze
tabs of hose clamp and move clamp to
end of hose, over the fill valve nipple, then
release tabs. Do not shove refill tube down
overflow pipe. This will cause water loss.
5.
Testing Leak Sentry
®
Simulate a leak by
slightly lifting flapper
chain to allow 3 or 4
inches of water to slowly
drain from tank. Fill
valve should not turn
on, but remain locked
and stay off.
If test fails go to
Troubleshooting section.
Make sure chain is free,
not tangled or caught.
those choosing to use in-tank bowl cleaners and WILL NOT VOID the FLUIDMASTER WARRANTY because
it will not damage the components.
Because drop-in cleaners used in the tank can result in damaged
tank parts (see WARNING above), Fluidmaster recommends the
If using the
LEAK SENTRY
use of Flush 'n Sparkle
Flush 'n Sparkle
®
DEVICE
8100, 8200 or 8300). It cleans the bowl without harming tank
cleaning system
parts by isolating the cleaner from the tank water, releasing it
the tank should
only to the bowl where it is needed. Cartridges supply more than
1,000 flushes and are a snap to replace.
look like this
when setup
is complete.
400LS WATER-SAVING FEATURES
Prevents wasteful refills in leaky tanks.
The Leak Sentry
If there is a tank leak, the float cup will not drop to refill the tank until the tank lever is
pushed. On the first flush attempt, the valve will simply refill the empty tank; only then
will you receive a complete flush. This will continue to occur until the tank leak is fixed.
The Adjustable Refill allows you to adjust the amount of water going into the bowl,
eliminating water waste due to the bowl being overfilled.
Place valve in tank; do
Removing
not install. The Critical
Level mark – identified
the Valve Cap
on valve – should be
1 inch above the top of
Assembly
the overflow pipe. This
is a plumbing code.
Remove fill valve from
Before installing the
tank to adjust height.
valve, remove the valve
cap assembly. Push float
up with right hand (see
Adjust height of fill valve
picture). Twist cap and
by turning lower shank
lever counterclockwise
in or out of the valve
1/8
of a turn to unlock.
th
body. Do not move lock
Let cap assembly hang
ring. It holds the valve
on float cup.
body and shank together
under pressure. Do not
interchange body with
old shank, as leaking
can occur.
Flushing Out the Debris: Hold
Place cap assembly on top of
Press down on top cap rotat-
a cup over the uncapped valve
gray valve body by aligning
ing top & arm clockwise to
to prevent splashing. Turn water
cap arm and adjustment rod
locked position.
supply full on and off a few
next to refill hose.
times. Leave water supply off.
Check for leaks. Tighten nuts
just enough to stop leaking.
6.
Water-Saving Feature: Roller Clamp
Check bowl water level by flushing toilet. If bowl appears to be full but continues to
fill, the valve may be overfilling the bowl causing excess water to siphon down the
trapway. Adjust amount of water going down into the bowl as follows: Fill the bowl
with a gallon of water. Wait 3 minutes until the bowl water level recedes down and
stops. With a pencil, draw a line at the top of the water level in bowl. Now flush the
toilet. If the valve is still filling and the water is up to the line in the bowl, then the
amount of water going into the bowl is too high and needs to be adjusted. Adjust
the refill by turning the roller clamp with thumb to the next lower number. Flush
the toilet; adjust until water level in bowl is at the pencil mark when the fill valve
shuts off. If valve shuts off and bowl is not full, adjust by turning the roller clamp
to a higher number. Repeat until water in bowl is up to line. "O" on roller clamp
equals no refill to bowl.
START HERE
WARNING
DO NOT USE IN-TANK DROP-IN TOILET BOWL CLEANERS CONTAINING
BLEACH OR CHLORINE. Use of such products will: (1) RESULT IN DAMAGE to tank
1.
components and MAY CAUSE FLOODING and PROPERTY DAMAGE and (2) VOID
Remove Fill Valve from Tank
FLUIDMASTER WARRANTY. DO NOT overtighten nuts or tank/bowl may crack.
Fluidmaster Flush 'n Sparkle
Toilet Bowl Cleaning System is recommended for
®
®
Toilet Bowl Cleaning System (Models
device alerts you to a tank leak, typically caused by a faulty flapper.
®
Turn off water supply.
(Clockwise)
3.
Installing Fill Valve
DO NOT use plumber's putty to seal these fittings.
METAL/COPPER
FLARED TUBING
Place fill valve
in tank. Align
fill valve nipple
to face right &
parallel with
back wall of
tank. Press
down on shank
while tightening
Use Fluidmaster coupling nut and
locknut. Hand-
cone washer to replace existing parts.
Water supply tube must extend 1/2 inch
tighten only.
inside threaded shank of valve.
PLASTIC SUPPLY LINE or METAL SPIRAL TUBING.
Use chart to determine the appropriate assembly parts required to properly reconnect the water supply. Do not use plumber's putty to seal these
fittings (Teflon tape optional).
4.
Water-Saving Feature: Hooking Up the Leak Sentry
FLAPPER CHAIN HOOK-UP
Lift tank lever all the way up inside tank.
Hold tank lever there. Pull flapper chain
tight so the flapper is lifted as high as it
can go and attach chain to hole in lever
directly above flapper. Make sure flapper
Turn on water supply.
chain is straight.
IMPORTANT: Submerge the
float cup under the water for
Make sure flapper is closed on seat. If
30 seconds. Adjust water level
not, you may need to lengthen the flapper
by turning water level
chain by a link or two to allow flapper to
adjustment screw. To raise–
close and seal tank.
turn clockwise; to lower –
counterclockwise.
Hose Clamps
Flush out tank and sponge
Remove fill valve from tank.
dry. Remove water supply
coupling nut and locknut
from under tank.
These parts must be used as illustrated to insure watertight connections.
METAL FLANGED
METAL SPIRAL
TUBING
TUBING
LOCK-
LOCK-
LOCK-
NUT
NUT
NUT
SPIRAL
FLAT
CONE
CONE
WASHER
WASHER
WASHER
COUPLING
COUPLING
COUPLING
NUT
NUT
NUT
WATER
WATER
WATER
SHUTOFF
SHUTOFF
SHUTOFF
Use existing coupling nut and
Use existing spiral
existing flat washer.
cone washer.
CAUTION: DO NOT use CONE WASHER with
CAUTION: Overtightening LOCKNUT or COUPLING
NUT could result in breakage and potential flooding.
LEAK SENTRY
CHAIN HOOK-UP
®
Lift tank lever all the way up inside tank and
hold it there. Pull Leak Sentry
lifts the float cup all the way up the fill valve
shaft. Then connect chain & clip with no
slack in chain to the tank lever.
NOTE: Do not cross Leak Sentry
flapper chain. If lever has only one hole, then
attach to same hole.
TROUBLESHOOTING
FLUSHING OUT DEBRIS
FILL VALVE WILL NOT TURN OFF.
WATER LEVEL IN BOWL IS TOO LOW.
IMPORTANT: Sand and rust move through
• Move roller clamp to higher number.
water pipes. Always clear debris from
Remove cap assembly
water lines. Repeat steps "Removing the
LEAK SENTRY
Valve Cap Assembly" & "Flushing Out the
• Make sure valve is set at 5 o'clock in tank.
Debris".
• Make sure water drops below float cup
during flush. Raise the valve higher in
FILL VALVE WILL NOT TURN ON.
tank and reset water level.
• If float cup does not drop when flushing
Flush out valve
• Device chain should be loose except
the tank: Tighten Leak Sentry
®
chain
when lever is pushed to flush tank. See
by one link and then try flushing again.
"Hooking Up the Leak Sentry
Tighten by one link at a time until valve
• Untangle Leak Sentry
turns on at flush. See "Hooking Up the
adjustment or device area.
Leak Sentry
®
Chain".
Replace cap assembly
2.
Prepare Valve
for Installation
ASSEMBLY PARTS
Roller & Hose
Clamp
Push the cone washer out with
your thumb or with scissors
cut the four connections
SHANK/
LOCKNUT
COUPLING
REFILL CLIP
between the shank & cone
CONE
NUT
OR ANGLE
WASHER
ADAPTER
washers. Set cone washer aside.
VINYL/BRAIDED
PLASTIC OR METAL
CONNECTOR
COMPRESSION
BALL TUBING
LOCK-
NUT
COUPLING
NUT
WATER
SHUTOFF
Do not use Fluidmaster's
With correct washers in
Captive cone washer already
coupling nut and the cone
place tighten coupling
included. No additional
washer on plastic or metal
washers required.
tubing as shown.
nut. Hand-tighten only.
CAUTION: Do not use
Fluidmaster cone
washer with plastic
supply line or metal
spiral tubing.
Chain
®
®
chain until it
®
chain and
WILL NOT LOCK FLOAT CUP.
®
Do not shove refill tube down overflow pipe.
CAUTION:
This will cause loss of water from tank.
30800 Rancho Viejo Road
San Juan Capistrano, CA 92675
www. uidmaster.com
800-631-2011
®
Chain".
WARRANTY
®
chain from screw
This Fluidmaster
product has a limited
®
warranty for a period of 5 years. For complete
warranty details, please visit our website at
www.fluidmaster.com
Advertisement

Related Manuals for Fluidmaster 400LS


Summary of Contents for Fluidmaster 400LS
- Page 1 Toilet Bowl Cleaning System is recommended for ® INSTRUCTIONS those choosing to use in-tank bowl cleaners and WILL NOT VOID the FLUIDMASTER WARRANTY because it will not damage the components. ASSEMBLY PARTS Because drop-in cleaners used in the tank can result in damaged...
- Page 2 ® de Fluidmaster para aquellos usuarios que TECNOLOGÍA LEAK SENTRY ® desean utilizar limpiadores de tazas dentro del tanque SIN ANULAR la GARANTÍA DE FLUIDMASTER, ya que este sistema no daña los componentes. PIEZAS DEL ENSAMBLADO HERRAMIENTAS Dado que los limpiadores sumergibles usados dentro del tanque pueden...
Need help?
Do you have a question about the 400LS and is the answer not in the manual?
Questions and answers