Table of Contents
Advertisement
Quick Links
Advertisement
Table of Contents

Related Manuals for Siemens HB214AB 0 Series


Summary of Contents for Siemens HB214AB 0 Series
- Page 1 Built-in oven HB214AB.0 en Instruction manual...
-
Page 3: Table Of Contents
Cleaning the cooking compartment and accessories 11 replacement parts and services can be found at www.siemens-home.bsh-group.com and in the online Operating the appliance ....11 shop www.siemens-home.bsh-group.com/eshops... -
Page 4: Intended Use
Intended use 8Intended use (Important safety information R ead these instructions carefully. Only then I n t e n d e d u s e will you be able to operate your appliance G eneral information safely and correctly. Retain the instruction I m p o r t a n t s a f e t y i n f o r m a t i o n manual and installation instructions for future Warning –... -
Page 5: Halogen Lamp
Causes of damage Water in a hot cooking compartment may replacing the bulb, unplug the appliance from Risk of scalding! ■ create hot steam. Never pour water into the the mains or switch off the circuit breaker in hot cooking compartment. the fuse box. -
Page 6: Environmental Protection
Environmental protection Carrying the appliance: do not carry or hold the Open the appliance door as infrequently as possible ■ ■ appliance by the door handle. The door handle when the appliance is in use. cannot support the weight of the appliance and could break. -
Page 7: Getting To Know Your Appliance
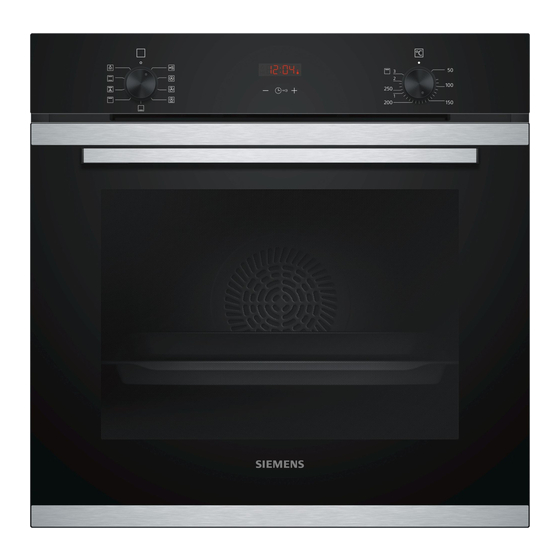
Getting to know your appliance Depending on the appliance model, individual Note: *Getting to know your details and colours may differ. appliance Control panel I n this chapter, we will explain the indicators and You can set your appliance's various functions on the G e t t i n g t o k n o w y o u r a p p l i a n c e controls. -
Page 8: Types Of Heating And Functions
Getting to know your appliance Types of heating and functions Use the function selector to set the types of heating and To make sure you always use the right type of heating other functions. to cook your food, we have explained the differences and applications below. -
Page 9: Cooking Compartment
Accessories Due to thermal inertia, the temperature displayed Note: _Accessories may be slightly different to the actual temperature inside the oven. Y our appliance is accompanied by a range of A c c e s s o r i e s accessories. -
Page 10: Optional Accessories
Accessories Optional accessories Locking function The accessories can be pulled out approximately You can buy optional accessories from the after-sales halfway until they lock in place. The locking function service, from specialist retailers or online. *You will find prevents the accessories from tilting when they are a comprehensive range of products for your appliance pulled out. -
Page 11: Before Using For The First Time
Before using for the first time Keep the kitchen ventilated while the appliance is Glass roasting dish heating. For stews and bakes. Apply the settings indicated below. You can find out Glass tray how to set the heating function and the temperature in For large roasts, moist cakes and bakes. -
Page 12: Rapid Heating
Time-setting options Use the temperature selector to set the temperature OTime-setting options or grill setting. Y our appliance has different time-setting options. T i m e - s e t t i n g o p t i o n s Time-setting option Use Cooking time Once the set cooking time has elapsed, the... -
Page 13: Setting The End Time
Time-setting options Use the button to set the cooking time. Touch the button again. The end time will be highlighted on the display. The appliance will start heating after a few seconds. The remaining time will count down on the display. Use the button to delay the end time. -
Page 14: Setting The Time
Childproof lock 5 minutes if you touch the button and 10 minutes if AChildproof lock you touch the button. Touch the button until the timer symbol Y our appliance is equipped with a childproof lock so C h i l d p r o o f l o c k highlighted. -
Page 15: Keeping The Appliance Clean
Cleaning heating elements. Always allow the appliance to cool Glass cover for Hot soapy water: down. Keep children at a safe distance. the interior light- Clean with a dish cloth and then dry with a soft cloth. Area Cleaning If the cooking compartment is heavily soiled, use oven cleaner. -
Page 16: Rails
Rails Then insert the rail into the front socket , until the „ pRails rail also rests against the cooking compartment wall here, and press it downwards … (figure " W ith good care and cleaning, your appliance will retain R a i l s its appearance and remain fully functional for a long time to come. - Page 17 Appliance door Lift out the outer panel (fig. ) and set it down Slide each inner panel back in and make sure that it carefully on a flat surface. is sitting correctly at the bottom in the retainer Lift out the inner panel (fig. ) and set it down (fig.
-
Page 18: Trouble Shooting
Trouble shooting Put the cover back in place and press on it until you Warning – Risk of electric shock! hear it click into place (fig. & Incorrect repairs are dangerous. Repairs may only be Open the appliance door again fully. carried out and damaged power cables replaced by Close the two locking levers on the left and right one of our trained after-sales technicians. -
Page 19: Customer Service
Customer service Remove the tea towel and switch on the circuit JTested for you in our breaker. cooking studio H ere, you can find a selection of dishes and the ideal 4Customer service T e s t e d f o r y o u i n o u r c o o k i n g s t u d i o settings for them. -
Page 20: Cakes And Pastries
Tested for you in our cooking studio phases using residual heat. This means that it remains Ensure that you always use suitable accessories and more succulent and browns less. Depending on the that they are placed in the oven the right way around. method of preparation and the type of food, it is ~ "Accessories"... - Page 21 Tested for you in our cooking studio Cakes in tins Dish Accessories/cookware Shelf posi- Heating Tempera- Cooking tion function ture in °C time in mins Sponge cake, simple Ring tin/loaf tin 140-150 75-90 Basic sponge cake, 2 levels Ring tin/loaf tin 140-150 70-85 Sponge cake, delicate...
- Page 22 Tested for you in our cooking studio Dish Accessories/cookware Shelf posi- Heating Tempera- Cooking tion function ture in °C time in mins Choux pastry Baking tray 190-210 35-50 Choux pastry, 2 levels Universal pan + baking tray 190-210 35-45 * Preheat ** Preheat for 5 mins;...
- Page 23 Tested for you in our cooking studio Dish Accessories/cookware Shelf posi- Type of Tempera- Cooking tion heating ture in °C time in mins Pizza, frozen, thin base, x 1 Wire rack 190-210 15-20 Pizza, frozen, thin base, x 2 Universal pan + wire rack 190-210 20-25 Pizza, frozen, deep-pan, x 1...
-
Page 24: Bakes And Gratins
Tested for you in our cooking studio Bakes and gratins Always use the indicated shelf positions. Your appliance offers you a range of heating types for You can prepare dishes on one level using a baking tin/ preparing bakes. You can find the ideal settings for dish or the universal pan. - Page 25 Tested for you in our cooking studio meat thermometer in the corresponding chapter. There, When roasting, add a little liquid if the meat is lean. A you can find notes on inserting the meat thermometer, covering of approx. cm depth should be applied to the possible heating types and additional information.
- Page 26 Tested for you in our cooking studio Dish Accessories/cookware Shelf posi- Type of Tempera- Cooking tion heating ture in °C time in mins Turkey breast, boned, 1 kg Cookware, covered 240-260 80-100 Turkey thigh, bone in, 1 kg Cookware, uncovered 180-200 80-100 Meat...
-
Page 27: Vegetables And Side Dishes
Tested for you in our cooking studio The crackling is too thin. Increase the temperature or switch on the grill briefly at the end of the roasting time. The roast looks good but the juices Next time, use a smaller roasting dish and add more liquid if necessary. are burnt. -
Page 28: Drying
Tested for you in our cooking studio Drying Use the following shelf positions for drying: 1 wire rack: Position 3 ■ You can achieve outstanding drying results with hot 2 wire racks: Positions 3 + 1 ■ air.With this type of preserving, flavours are concentrated as a result of the dehydration. -
Page 29: Prove Dough
Tested for you in our cooking studio bubbling as they should. The bubbling process starts after approx. 30-60 minutes. Meal Accessory/cookware Shelf posi- Heating Step Tempera- Cooking time in mins tion function ture in °C Vegetables, e.g. carrots 1-litre preserving jars 160-170 Before it starts bubbling: 30- Once it starts bubbling: 30-... -
Page 30: Keeping Warm
Tested for you in our cooking studio times.As the food defrosts, break up any clumps and To allow the temperature to equalise, leave the remove items which have already defrosted from the defrosted food to rest for another 10 to 30 minutes in cooking compartment. - Page 31 Tested for you in our cooking studio Dish Accessories/cookware Shelf posi- Heating Tempera- Cooking tion function ture in °C time in Fatless sponge cake 26 cm springform cake tin 160-170 30-35 Fatless sponge cake, 2 levels 2 x 26 cm springform cake tins 150-160** 35-50 Double-crusted apple pie...
- Page 32 *9001406002* 9001406002 980627...
Need help?
Do you have a question about the HB214AB 0 Series and is the answer not in the manual?
Questions and answers