Table of Contents
Advertisement
Quick Links
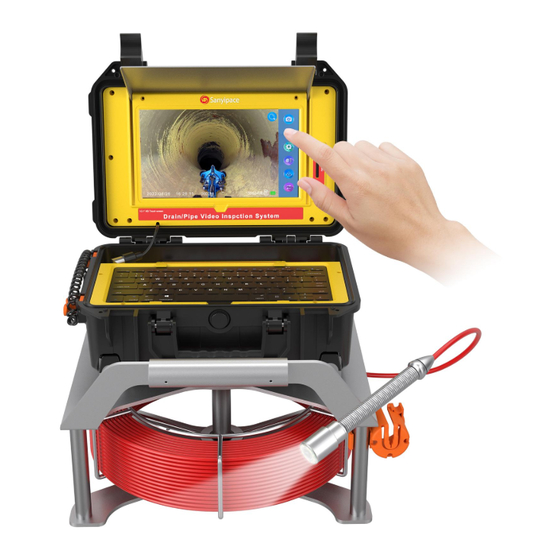
Touch Screen Sewer Camera System
User Manual
Model No:S610ASMKTCP
NOTE: All accessories are under the keyboard!
-------------------------------------------------------------------------------------------------------------------------------------------
Please contact us at first time if you got issues with the product
Amazon After-sale: support@sanyipace.com
Website After-sale: service@sanyipace.com
Advertisement
Table of Contents

Related Manuals for Sanyipace S610ASMKTCP


Summary of Contents for Sanyipace S610ASMKTCP
- Page 1 Touch Screen Sewer Camera System User Manual Model No:S610ASMKTCP NOTE: All accessories are under the keyboard! ------------------------------------------------------------------------------------------------------------------------------------------- Please contact us at first time if you got issues with the product Amazon After-sale: support@sanyipace.com Website After-sale: service@sanyipace.com...
- Page 2 ● Scan this QR code to get the electronic version of the instruction in English. ● Scannen Sie diesen QR -Code, um die elektronische Version der Anweisung auf Deutsch abzurufen. ● Scannez ce code QR pour obtenir la version électronique de l'instruction en Français.
-
Page 3: Table Of Contents
Catalog 1. Notice ....................1 2. Scope of Product Use ...............1 3. Product Specification ................ 1 4. IPS Monitor Operation ..............2 5. Control Box ..................6 6. Camera with Self-leveling Function & 512Hz Transmitter ....7 7. Cable Coil ..................9 8. -
Page 4: Notice
1. Notice a. Please read the manual carefully before using the product. b. Handle the device with care when operating, do not drop or push hard. c. Do not dismantle the machine without permission. d. Please turn off the monitor and disconnect the device after use. e. -
Page 5: Ips Monitor Operation
---Monitor Screen--- Size: 10.1-inch Camera/monitor picture: IPS color Function: Video recording, audio recording, headphone port, capture photos, 5X digital zoom, battery level display, distance counter, 512Hz transmitter, self-leveling, keyboard input (support English), etc. Monitor input voltage: DC 12V SD card: package includes 16GB card, support max 128GB Display resolution: 1080P Menu Language: Chinese/English/Russian/German optional Screen port: power input/video... - Page 6 Tap to zoom in 0-5 times, tap the 6th time to return to normal (0). Tap to capture a photo, tap one at a time. Tap to start recording (video with audio), tap again to stop recording. Tap to adjust 5 levels of LED lights. Tap to clear distance calculation back to 0.
- Page 7 Tap the 10 gears to adjust the screen contrast, and tap the screen at will to exit. Tap the 10 gears to adjust the screen color saturation, and tap the screen at will to exit. Tap to imperial/metric switching. Tap to Invert the image. 01 Mode: Horizontal direction;...
- Page 8 Tap to restore factory settings. The version of the current system. Tap to language switching, currently supports Chinese, English, German, Russian switching. Adjusting the circumference according to the coil length and diameter makes calculating the distance more accurate. 165ft/50m 7mm diameter coil circumference defaults to 1.0, please do not adjust it.
-
Page 9: Control Box
5. Control Box Note: The earphone port is compatible with any brand of 3.5mm audio earphones, and you can play videos with sounds after plugging in the earphone. -
Page 10: Camera With Self-Leveling Function & 512Hz Transmitter
6. Camera with Self-leveling Function & 512Hz Transmitter Camera probe size details: The camera probe has a built-in 512Hz transmitter, which transmits a 512Hz frequency signal through a built-in chip, compatible with any 512Hz pipe locator. - Page 11 Transmit Frequency: 512Hz Output Waveform: sine wave Transmit Distance: about 16.4ft/5m Self-leveling can be defined as the ability of any instrument to level itself regardless of the angle of inclination. The camera probe is equipped with a self-levelling gravity bearing inside which automatically level the direction of the lens no matter how the camera probe rotates, providing users with upright pictures all the time.
-
Page 12: Cable Coil
7. Cable Coil New stable and strong coil structure with steel bearing inside, can easily release or coil the cable with less time and force. How to release the cable: Take out the cable from the holder, then rotate the cable coil clockwise to release. -
Page 13: Device Installation
The steps of charging are as follows: a. Take out the DC adapter from the storage box under the keyboard. b. Connect the DC adapter port to the charging port (on the control panel). c. Plug the DC adapter into a 100-240V AC power source, the indicator light is in red during charging. -
Page 14: Wireless Keyboard
10. Wireless Keyboard For the indicator light on the keyboard: doesn't light up -- the keyboard is off or connected flashing quickly -- during pairing flashing slowly -- pairing failed How to make the wireless keyboard work? 1.Push down the 2 yellow buckles to release the lock of the keyboard, and then lift the keyboard from the center depression. -
Page 15: Disassemble Box
2.Install the battery from the accessory at the keyboard. 3.Turn on the switch and press the "CONNECT" button to pair, wait for some seconds and it works 4. If the pairing fails, please unplug and re-plug the Bluetooth receiver beside the on/off button, and repeat the above steps to pair it again. 11. -
Page 16: Structure & Accessories
12. Structure & Accessories Where are the accessories? Note: All accessories are placed in the storage box under the keyboard, please open the keyboard and take it out. - Page 17 ①Control box*1 ②16GB SD Card*1 ③Metal Bracket*1 ④Fiberglass Cable*1 ⑥1.5in*3.55in/38mm*90mm Pipe ⑤Camera*1 Pulley*1 ⑦1.14in*1.58in/29mm*40mm Protective Cover*1 ⑧DC Adapter*1 ⑨Screwdriver*1 ⑩Keyboard*1 ⑪Battery*2 ⑫Instruction*1...
-
Page 18: Trouble & Troubleshooting
13. Trouble & Troubleshooting Trouble Troubleshooting a. Check whether each interface is connected correctly; No power b. Check whether the battery is out of power, check the power display. a. Is the DC adapter plug-in correctly; b. Check if the indicator light of the DC adapter is on. Can’t be charged a. - Page 19 24 hours a day. If you encounter any problems during use, please feel free to contact us. ----Contact Us---- Purchase Sanyipace products, and enjoy fast delivery and guarantee. Please go to our official store as below: Website: https://www.sanyipace.com https://www.sanyipace.de Amazon Store: US: https://www.amazon.com/sanyipace...
Need help?
Do you have a question about the S610ASMKTCP and is the answer not in the manual?
Questions and answers