Table of Contents
Advertisement
Available languages
Available languages
Quick Links
Advertisement
Chapters
Table of Contents

Subscribe to Our Youtube Channel
Related Manuals for Viscount Legend SOUL 261


Summary of Contents for Viscount Legend SOUL 261
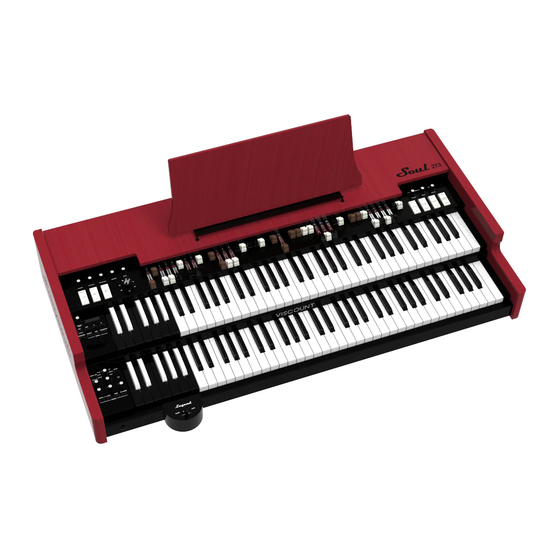
- Page 1 User Manual - EN Manuale Utente - IT Edition: 1.4...
-
Page 3: Table Of Contents
Table of contents TABLE OF CONTENTS IMPORTANT NOTES ................................2 Product Care ..................................2 Notes about this manual ............................... 2 INTRODUCTION ..................................3 Main features ..................................3 FRONT PANEL ..................................4 Upper panel ..................................4 Side panels ................................... 6 REAR PANEL ..................................10 MAKING CONNECTIONS .............................. -
Page 4: Important Notes
Important notes IMPORTANT NOTES Product Care • Do not apply excessive force to the instrument's structures and controls (knobs, buttons, keyboard etc...). • Whenever possible, do not place the instrument close to units that generate strong interference, such as radio - TV sets, monitors, etc ... •... -
Page 5: Introduction
/ amplify in a different way than the rest of the keyboard. On the Legend Soul 261 model, selection of Sets and two Pre-sets per manual is possible via buttons on the left panel. -
Page 6: Front Panel
Quickly select two general volume levels without using the [VOLUME] knob (point 1). In NORMAL mode (in Legend Soul 261 the led is switched off) the volume is set through the [VOLUME] knob. In SOFT mode the volume is lowered by 12 dB. - Page 7 [PERCUSSION VOLUME SOFT/NORMAL] (Legend Soul 273) or [SOFT/NORMAL] (Legend Soul 261) control. Selects one of the two percussion levels. In NORMAL mode (Led off in Legend Soul 261) the volume of the percussion is set with the [PERCUSSION VOLUME] knob (see point 15). In SOFT (led on in Legend Soul 261) the volume is attenuated.
-
Page 8: Side Panels
(Legend Soul 261) control. Selects the percussion harmonic. SECOND (Led off in Legend Soul 261) selects the second harmonic (equivalent to a 4 'register), THIRD (Led on in Legend Soul 261) selects the third harmonic (equivalent to a 2 2/3’ register). - Page 9 It is also possible to select a different sound for the pedal board (see point 43). For more information, see Organ models (page 20). Preset of the upper manual Black Octave (Legend Soul 273) or PRESETS buttons (Legend Soul 261). Controls for selecting the upper manual Presets. The Led indicates which Preset is currently selected.
- Page 10 Program main page indicate that the function is activated. In the Legend Soul 261 the function can be activated by holding down the PEDALS [MODEL] button for a few moments (point 28) and is indicated by the LED on the button itself lighting up.
- Page 11 Front panel deactivated (Layer mode, Led off) both the Pedals drawbars and those of the Lower manual are played at the same time. In both models, however, the function can also be activated via the display menu using the To Lower Mode parameter (page 38) and it is also possible to set the note that acts as the Split point between the Pedals to Lower and the Lower section using the Split Note parameter (page 38).
-
Page 12: Rear Panel
Rear panel REAR PANEL Audio input connectors [ANALOG IN] mini jack. Standard mini jack audio input, stereo, 1/8”. Use to connect to external devices such as smartphones, tablets or computers. The signal on this input is then sent to the headphones output and to the AUDIO OUT [MAIN L/MONO] and [MAIN R] outputs. - Page 13 When using foot controller pedals, the user must select the correct pedal type (see FC1 Type and EXP Type parameters, page 42). Using the expression pedal of the optional Viscount pedalboard set FC1 Type or EXP Type as RTS. Using an optional Viscount expression pedal, set FC1 Type or EXP Type as TRS.
- Page 14 Rear panel MIDI connectors MIDI [PEDALS KEYB ONLY] connector: connect here the optional Viscount pedalboard or any other MIDI pedalboard. This pedalboard will play the instrument's pedalboard drawbars. MIDI [OUT] connector. This connector sends the MIDI data generated by Legend Soul. Connect it to the MIDI input connector of the receiving device.
-
Page 15: Making Connections
Making connections MAKING CONNECTIONS Connecting to audio devices Legend Soul is not equipped with internal loudspeakers. In order to produce sound, it must be connected to external audio devices, such as amplifiers, loudspeakers or headphones connected to the jack (located under the keyboard to the left). - Page 16 Making connections Connecting to a mixer When recording or performing live, it might AUDIO OUT [AUX 1] AUDIO OUT AUDIO OUT [MAIN L/MONO] and [AUX 2] jacks [PEDALS] and [MAIN R] jacks be necessary to connect the instruments to an audio mixer, which then sends the signal to amplifiers or amplified speakers.
-
Page 17: Connecting To Midi Devices
NOTES The Viscount MIDI pedal board must be connected to the instrument using only the cable supplied with the pedal board, failing which a 5-wire MIDI cable is required. Using a normal 3-wire cables, the pedal board is not powered. -
Page 18: Using A Computer
Making connections Controlling Legend Soul with an external keyboard It is possible to control the Legend Soul with an external keyboard which, if capable of transmitting MIDI data on several channels, can separately control the three sections of the organ as each one receives on a specific MIDI channel. -
Page 19: Using A Portable Audio Player
Making connections Use the Legend Soul as a sound generator driven by a sequencer In order to use the Legend Soul as a sound generator with a sequencer, with the possibility of controlling each section of the organ separately on a dedicated MIDI channel, it is sufficient to configure the tracks to transmit data on the MIDI channel assigned to each section of the organ. - Page 20 To assign a function to a pedal, read Pedal Setup Section, page 42. Using the expression pedal of the optional Viscount pedalboard set FC1 Type or EXP Type as RTS. Using an optional Viscount expression pedal, set FC1 Type or EXP Type as TRS.
-
Page 21: Switching On And Basic Functions
Switching on and basic functions SWITCHING ON AND BASIC FUNCTIONS To switch on the instrument, please follow these simple rules Make sure that the [POWER] switch on the rear panel is set to 0. Make sure that all connected speakers or amplifiers (if any) are switched off. Connect the included power cable to the instrument. -
Page 22: Organ Models
To select an organ model, press the [T.WHEELS], [PIPE], [TRANSISTOR] buttons (on Legend Soul 273) or cycle the [MODEL] button (on Legend Soul 261): T.WHEELS (Legend Soul 273) or TW (Legend Soul 261): electromechanical organ PIPE: pipe organ TRANSISTOR (Legend Soul 273) or TR (Legend Soul 261):... -
Page 23: What Are Drawbars And How To Use Them
PEDALS [MODEL] button) by activating the Pedals Lock function. To do this, press the PEDALS [LOCK] button (Legend Soul 273) or press and hold the PEDALS [MODEL] button (Legend Soul 261) for a while. The activated function is confirmed by the switching on of the red LED... - Page 24 To use the drawbars of Set A, press the key A# of the Black Octave for each manual (Legend Soul 273) or the button [DRAWBARS SET A] (Legend Soul 261). To use the drawbars of Set B, press the key B of the Black Octave (Legend Soul 273) or the [DRAWBARS SET B] button (Legend Soul 261).
- Page 25 Switching on and basic functions Romantic UPPER Drawbars LOWER Drawbars PEDALS Drawbars DRAWBAR SOUND 1 1/3' PIPE 1 1/3' 16’ 8’ 16’ 8’ 16’ INTONATION 2/3' 2/3' CORRESPONDING NOTE Symph UPPER Drawbars LOWER Drawbars PEDALS Drawbars DRAWBAR SOUND 1 1/3' 1 1/3' PIPE 16’...
-
Page 26: What Are Presets And How To Use Them
Legend Soul has a Black Octave for each manual and includes 9 Presets, that can be recalled through the keys from C# to A. In the Legend Soul 261 there are 2 Presets per manual, which can be recalled with the PRESETS [1] and [2] buttons located next to the pertinent manual. -
Page 27: Percussion
In NORMAL mode (led off in Legend Soul 261) volume is set through the PERCUSSION [VOLUME] knob. In SOFT mode (led on in Legend Soul 261) the volume is decreased. The knob mentioned above can also be used to finely adjust the maximum volume of the percussion (see point 15, page 5). -
Page 28: Adding Internal Noises
261) you can modulate the upper manual sound. To add the effect to the lower manual and the pedalboard, use the [VIBRATO GREAT ON/OFF] tab (Legend Soul 273) or [VIBRATO/CHORUS LOWER] (Legend Soul 261). The six-position knob [VIBRATO AND CHORUS] can be used to select one of the three Vibrato effects (V1-V2- V3) or the three Chorus effects (C1-C2-C3), which differ in the depth of modulation of the signal. -
Page 29: Reverb
Through the lever control located on the Half Moon panel (Legend Soul 273) or on the side panel of the lower manual (Legend Soul 261) it is possible to select the speed (FAST or SLOW) of the rotation or to stop it completely (BRAKE). -
Page 30: Effects
Switching on and basic functions that continue to be modulated. These two settings can be activated through the Brake Mode and Memphis Style parameters available in the display menu (page 35). In addition to the rotary speaker simulation there are also several simulations of tube or transistor amplifiers commonly used with electric pianos, electric guitars or electric basses. -
Page 31: Program Main Page
Program main page PROGRAM MAIN PAGE After switching on the instrument the display shows the Program main page, with which it is possible to select the Programs and view their main information. In this page, the display is divided into 5 areas, with the following fields: Location of the Program. -
Page 32: Saving A Program
Program main page Saving a Program After modifying a Program, all changes will be lost as soon as you select another Program or switch off the instrument. To prevent that and make these changes permanent, Programs must be saved. To save a Program, you must assign it a name and select a location, if you don’t want to overwrite the current Program. -
Page 33: Edit Menu
Edit menu EDIT MENU By pressing the [EDIT] button in the Program main page it is possible to access all the configuration parameters of the Legend Soul. The main page of EDIT menu includes the following fields: Name of the menu. It means that you are on the main page of the EDIT menu. -
Page 34: Up/Lo/Pd Destination Section
Edit menu UP/LO/PD DESTINATION section The UP/LO/PD DESTINATION section allows you to set for each manual and for the Pedals section (whether it is played with the pedal itself or with the Lower manual using the Pedals to Lower function enabled, page 38) to which block of the audio chain to send the signal of the section and of the Left Hand section of the Lower manual (see also LowerLeftHand parameter, page 37). -
Page 35: Effect Section
Edit menu EFFECT section The EFFECT section of the EDIT menu contains the selection and adjustment parameters of the EFFECT multi-effect section. To access this section in the EDIT menu (page 31) place the cursor on the EFFECT field and press the data entry dial or hold down the effect category selection knob for a short while (point 35, page 7). - Page 36 Edit menu Phaser and Flanger (Pha/Fla) Phaser is an is effect that modulates the phase of the signal and sums it to the original signal thus adding spatiality to the sound. Flanger is a modulating effect that makes the sound cyclical and metallic. Parameter name Description Switch...
-
Page 37: Rotary / Amp Section
Edit menu Delay This effect repeats the signal to create rhythmic or ambience effects. Parameter name Description Switch Activate / deactivate effect. [FX ON] Settings: OFF, ON Preset Delay effect preset. Settings: preset list Dry/Wet Balance between the original input signal (Dry/Wet=0.0) and the effected signal (Dry/Wet=10.0). [AMOUNT] Settings: between 0.0 and 10.0 Time / bpm... -
Page 38: Reverb Section
The PRESETS section allows memorization of the drawbar presets that can be recalled with the Black Octave keys (in the Legend Soul 273) or the DRAWBARS SET buttons (in the Legend Soul 261) (see point X on page X). To access this section in the EDIT menu (page 31) place the cursor on the PRESETS field and press the data entry dial. -
Page 39: Percussion Section
Double mode activation is also displayed on the Program main page by the wording "DH"”. In Double mode the position of the [PERCUSSION HARMONIC SELECTOR] tab (Legend Soul 273) or the pressure of the [SECOND/THIRD] button (Legend Soul 261) are not detected. -
Page 40: Pedalboard Section
Edit menu Amount of the “Key Compression” effect typical of electromechanical organs where when multiple TW Key Compr. key contacts are connected to the same tonewheel, the volume does not grow proportionally and the total volume is less than the sum of the volumes of all the notes. You can use this effect to achieve a softer, less aggressive sound and a dynamic feel similar to that of an electromechanical organ. - Page 41 Edit menu To Lower Vel. Velocity value beyond which the sound of the Pedals section is generated with the Pedals to Lower function. Using this parameter, you can get a thicker bass effect by simply playing harder. Settings: • Off: the sound of the Pedals section is always generated, regardless of the Lower manual keys velocity.
-
Page 42: General Settings Menu
General Settings menu GENERAL SETTINGS MENU The GENERAL SETTINGS menu collects most of the settings that affect the entire instrument, and except for the parameters listed in What is a Program on page 29, are not affected by the selection of Programs. All settings made in GENERAL SETTINGS are immediately stored until a new modification or recall of a Factory Reset. -
Page 43: Equalizer Section
General Settings menu EQUALIZER section The EQUALIZER section contains all the Master equalizer settings (see points 40, 41 and 42, page 8). To access this section in the GENERAL SETTINGS menu (page 40) place the cursor on the EQUALIZER field and press the data entry dial. -
Page 44: Tw Hum Section
General Settings menu TW HUM section As known, in the real tonewheel organ there is a complex background noise at the output, due to the fact that even without playing, a small part of the signal generated by the tonewheels passes through the complex wiring;... - Page 45 General Settings menu • Hold Upper: Sustain effect for the Upper manual only. • Hold Lower: Sustain effect for the Lower manual only. • Hold Up+Low: Sustain effect for both Upper and Lower manuals. • Rot/Amp Byp: switch on/bypass of Rotary/Amp effect. •...
-
Page 46: Midi Section
General Settings menu FC1 Function Function assigned to the foot controller connected to the PEDAL [FOOT CONTROLLER 1] connector. Settings: • OFF: no function assigned. • Reverb Lvl: level of the Reverb effect. • Gain Lvl: input gain of the Rotary / Amp effect. •... -
Page 47: Program Recall Section
General Settings menu Tx/Rx Real Time Enable sending and receiving MIDI Real Time messages. Settings: OFF, ON Black Octave Black Octave operating mode. (Legend Soul Settings: OFF, ON • Presets: Presets selection. only) • MidiNote Upp: Black Octave keys of the Upper manual transmit MIDI notes. •... -
Page 48: Utility Menu
Utility menu UTILITY MENU The UTILITY menu provides some useful parameters that affect the whole instrument. To access the menu, select the UTILITY field in the EDIT menu. Menu name. Shows that you currently are in the UTILITY menu. Page number. Shows the current page number and the total of pages on the menu (for example “1/11”... -
Page 49: Save All / Save Program / Save Presets Functions
Utility menu SAVE ALL / SAVE PROGRAM / SAVE PRESETS functions The Save All, Save Program and Save Presets functions allow you to store on a USB flash drive inserted in the USB [TO DEVICE] connector: Save All: all instrument data Save Program: a single Program Save Presets: all drawbars Presets (of Tonewheels, Pipe and Transistor models) The data is stored as a file:... -
Page 50: Load All / Load Program / Load Presets Functions
Utility menu LOAD ALL / LOAD PROGRAM / LOAD PRESETS functions The Load All, Load Program and Load Presets functions allow you to load from a USB flash drive inserted into the USB [TO DEVICE] connector: Load All: all instrument data saved via the Save All function Load Program: single Programs saved via the Save Program function Load Presets: all drawbar preset via the Save Presets function To load all instrument data or all drawbar presets, follow this procedure:... -
Page 51: Release / Update Function
Utility menu RELEASE / UPDATE function The Release/Update function can be used to check the operating system version currently running on the instrument. Each time an update file is released it will be made available on the website: http://www.viscountinstruments.com. Update files are named Soul-XXX.LGU, where XXX stands for the update version. -
Page 52: Appendix
(page 49). If you still see the same message again after the update, or if it changes to [Contact service], you need to contact the technical support by writing an email to service@viscount.it indicating the error message and the number that appears on screen. -
Page 53: Panic Function
Appendix USB charger active You are trying to update the system despite the fact that the USB [TO DEVICE] port is currently set so as to power/charge an external device (page 46). USB charger OVERCURRENT [Extract device] The external device you are trying to charge through the USB [TO DEVICE] port requires too much power. To avoid malfunctions, the port is deactivated for 10 seconds. - Page 54 Appendix Check that the signal of the manual or pedalboard in which you are playing is sent to an audio output connected to the amplification / diffusion system (see Destination parameter, page 32) The sound is distorted. Lower the volume. A distortion effect was applied by effects of the EFFECT section or by the [ROTARY / AMP GAIN] knob.
- Page 55 Disposal of old Electrical & Electronic Equipment (Applìcable throughout the European Union and other European countries with separate collection programs) Dir. 2002/95/CE, 2002/96/CE e 2003/108/CE This syrnbol, found on your product or on its packaging, indicates that this product should not be treated as household waste when you wish to dispose of it.
- Page 57 Sommario SOMMARIO NOTE IMPORTANTI ................................2 Cura del prodotto .................................. 2 Note riguardanti il manuale ..............................2 INTRODUZIONE ..................................3 Caratteristiche principali ................................ 3 PANNELLO FRONTALE ................................ 4 Pannello superiore ................................4 Pannelli laterali ..................................6 PANNELLO POSTERIORE ..............................10 COLLEGAMENTI CON LO STRUMENTO .........................
-
Page 58: Note Importanti
Note importanti NOTE IMPORTANTI Cura del prodotto • Non applicate eccessiva forza alle strutture ed ai comandi dello strumento (manopole, pulsanti, tastiera ecc…). • Non collocare, quando possibile, lo strumento in prossimità di unità che producano forti interferenze come apparecchi radio – TV, monitor, ecc... •... -
Page 59: Introduzione
Sul modello Legend Soul 261 è possibile la selezione dei Set e di due Preset per manuale tramite pulsanti sul pannello sinistro. -
Page 60: Pannello Frontale
Tramite questo selettore è possibile selezionare rapidamente due livelli di volume generale senza agire sulla manopola [VOLUME] (vedi punto 1). In NORMAL (nel Legend Soul 261 corrisponde al Led spento) il volume è quello impostato con la manopola di cui sopra, in SOFT viene abbassato di 12 dB. - Page 61 - nel Legend Soul 273 il tasto A# della Black Octave del manuale superiore (punto 30). - nel Legend Soul 261 il pulsante [A] nel pannello laterale del manuale superiore (punto 30). Set B dei drawbars del manuale superiore (Upper).
-
Page 62: Pannelli Laterali
Pannello frontale Selezione di due livelli della percussione. In NORMAL (Led spento nel Legend Soul 261) il volume della percussione è quello impostato con la manopola PERCUSSION [VOLUME] (vedi punto 15). In SOFT (Led acceso nel Legend Soul 261) il volume viene attenuato. - Page 63 Comandi per la selezione dei Preset del manuale superiore. Il led acceso indica quale Preset è attualmente selezionato. Set A o B nella Black Octave (Legend Soul 273) o pulsanti DRAWBARS SET (Legend Soul 261) del manuale superiore. Comandi per la selezione dei Set A o B dei drawbars del manuale superiore. Il led acceso indica quale Set è...
- Page 64 Pannello frontale Controlli degli effetti Pulsante [ROTARY/AMP BYPASS]. Premere questo pulsante per disattivare l’effetto Rotary o Amp. Il Led rosso acceso indica che l’effetto è disattivato. Per maggiori informazioni sugli effetti Rotary e Amp consultare Rotary / Amp (pag. 28). Manopola [EFFECT].
- Page 65 Program stanno ad indicare che la funzione è attivata. Nel Legend Soul 261 la funzione è attivabile tenendo premuto per qualche istante il pulsante PEDALS [MODEL] (punto 28) e viene indicata dall’accensione del Led del pulsante stesso.
-
Page 66: Pannello Posteriore
Pannello posteriore PANNELLO POSTERIORE Connettori degli ingressi audio Mini jack [ANALOG IN]. Ingresso audio mini jack stereo standard da 1/8” per il collegamento di dispositivi esterni come smartphone, tablet o computer. Il segnale presente in questo ingresso viene ridistribuito all’uscita cuffie e alle uscite AUDIO OUT [MAIN L/MONO] e [MAIN R] e non viene regolato dalla manopola [MASTER VOLUME] del pannello frontale. - Page 67 Per i pedali foot controller è necessario impostare il tipo di pedale utilizzato (vedi parametri FC1 Type e EXP Type a pagina 44). Utilizzando il pedale d’espressione della pedaliera opzionale Viscount impostare FC1 Type o EXP Type come RTS. Utilizzando un pedale d’espressione opzionale Viscount impostare FC1 Type o EXP Type come TRS.
- Page 68 Connettori MIDI Connettore MIDI [PEDALS KEYB ONLY]: connettore per il collegamento della pedaliera opzionale Viscount o qualsiasi altra pedaliera MIDI tramite la quale suonare i drawbars di pedaliera. Connettore MIDI [OUT]. Connettore utilizzato per la trasmissione dei dati MIDI generati dal Legend Soul. Collegare questo connettore all’ingresso MIDI del dispositivo ricevente.
-
Page 69: Collegamenti Con Lo Strumento
Collegamenti con lo strumento COLLEGAMENTI CON LO STRUMENTO Collegamento con dispositivi audio Il Legend Soul non è equipaggiato con altoparlanti interni. Per ascoltare il suono riprodotto, quindi, è necessario collegare lo strumento ad altri dispositivi audio, come amplificatori e diffusori o utilizzare un set di cuffie collegate al jack posto sulla sinistra sotto la tastiera. - Page 70 Collegamenti con lo strumento Collegamento con un mixer Nel caso di una registrazione o di una AUDIO OUT [AUX 1] AUDIO OUT AUDIO OUT [MAIN L/MONO] and [AUX 2] jacks [PEDALS] and [MAIN R] jacks performance vivo può essere necessario collegare gli strumenti musicali ad un mixer, le cui uscite vengono dirette agli amplificatori o a diffusori amplificati.
-
Page 71: Collegamento Con Dispositivi Midi
NOTE La pedaliera MIDI Viscount va collegata allo strumento utilizzando esclusivamente il cavo fornito con la pedaliera, in mancanza del quale è necessario un cavo MIDI a 5 fili. Utilizzando i normali cavi a 3 fili la pedaliera non viene alimentata. -
Page 72: Utilizzo Con Un Computer
Collegamenti con lo strumento Controllo del Legend Soul tramite una tastiera esterna E’ possibile controllare il Legend Soul con una tastiera esterna che, se in grado di trasmettere dati MIDI su più canali, può controllare in maniera separata le tre sezioni dell’organo in quanto ognuna riceve su uno specifico canale MIDI. -
Page 73: Utilizzo Con Un Lettore Audio Portatile
Collegamenti con lo strumento Utilizzare il Legend Soul come generatore sonoro con un sequencer Per poter utilizzare il Legend Soul come generatore sonoro con un sequencer, con la possibilità di controllare separatamente ciascuna sezione dell’organo su un canale MIDI dedicato, è sufficiente configurare le tracce per trasmettere i dati sul canale MIDI assegnato ad ogni sezione dell’organo. - Page 74 Per assegnare le funzioni ai pedali consultare la Sezione Pedal Setup a pagina 44. Utilizzando il pedale d’espressione della pedaliera opzionale Viscount impostare FC1 Type o EXP Type come RTS. Utilizzando un pedale d’espressione opzionale Viscount impostare FC1 Type o EXP Type come TRS.
-
Page 75: Accensione Ed Operazioni Di Base
Accensione ed operazioni di base ACCENSIONE ED OPERAZIONI DI BASE Per l’accensione dello strumento attenersi a queste semplici regole: Accertarsi che l’interruttore [POWER] posto nel pannello posteriore sia in posizione 0. Accertarsi che eventuali amplificatori o altoparlanti amplificati collegati siano spenti. Collegare il cavo di alimentazione in dotazione con lo strumento. -
Page 76: I Modelli D'organo
Per selezionare un modello d’organo premere i pulsanti [T.WHEELS], [PIPE], [TRANSISTOR] (nel Legend Soul 273) o ciclicamente il pulsante [MODEL] (nel Legend Soul 261): T.WHEELS (Legend Soul 273) o TW (Legend Soul 261): organo elettromeccanico PIPE: organo a canne TRANSISTOR (Legend Soul 273) o TR (Legend Soul 261): organo... -
Page 77: Cosa Sono E Come Si Utilizzano I Drawbars
Per fare ciò premere il pulsante PEDALS [LOCK] (nel Legend Soul 273) o tenere premuto per qualche istante il pulsante PEDALS [MODEL] (nel Legend Soul 261). La funzione attivata viene confermata dall’accensione del Led rosso del pulsante e dal simbolo nella nella videata principale Program del display, a fianco del nome del suono di pedaliera (campo Ped). - Page 78 Per utilizzare i drawbars del Set A è necessario, per ogni manuale, premere il tasto A# della Black Octave (nel Legend Soul 273) od il pulsante [DRAWBARS SET A] (nel Legend Soul 261). Per utilizzare i drawbars del Set B, premere il tasto B della Black Octave (nel Legend Soul 273) od il pulsante [DRAWBARS SET B] (nel Legend Soul 261).
- Page 79 Accensione ed operazioni di base Modello Pipe Un organo a canne produce il suono immettendo aria pressurizzata in canne di metallo o legno chiamate voci o registri. Esistono molti tipi di registri che producono suoni differenti per quanto concerne altezza, timbro e volume.
- Page 80 Accensione ed operazioni di base Modello Transistor Con il diffondersi dei circuiti a transistor vennero introdotti nel mercato degli strumenti musicali organi portatili che appunto utilizzavano i transistor al posto delle ruote tonali o delle canne per la generazione del suono. Il sistema di circuiti e quindi la timbrica che ne derivava variava da produttore a produttore e da modello a modello, ma principalmente due sono stati i modelli che si affermarono negli anni ’70 che nel Legend Soul vengono chiamati Vx e Farf.
-
Page 81: Cosa Sono E Come Si Utilizzano I Presets
Il Legend Soul 273 dispone della Black Octave per ogni manuale e contiene 9 Preset, richiamabili con i tasti compresi dal C# al A. Nel Legend Soul 261 sono presenti 2 Preset per manuale, richiamabili con i pulsanti PRESETS [1] e [2] presenti a fianco del manuale di pertinenza. -
Page 82: Aggiungere I Rumori Interni
In SLOW (Led spento nel Legend Soul 261) il tempo è quello impostato con la manopola PERCUSSION [DECAY]. In FAST (Led acceso nel Legend Soul 261) il tempo è minore. E’ infatti presente anche la manopola sopra descritta per la regolazione fine del tempo massimo di decadimento della percussione (vedi punto 16 a pag. 5). -
Page 83: Vibrato And Chorus
Tramite la bascula [VIBRATO GREAT ON/OFF] (nel Legend Soul 273) o il pulsante [VIBRATO/CHORUS LOWER] (nel Legend Soul 261) è possibile aggiungere l’effetto al manuale inferiore ed alla pedaliera. Tramite la manopola a sei posizioni [VIBRATO AND CHORUS] è possibile selezionare uno tra i tre effetti di Vibrato (V1-V2-V3) od i tre di Chorus (C1-C2-C3), differenti per profondità... -
Page 84: Rotary / Amp
Tramite il controllo a leva posizionato nel pannello Half Moon (nel Legend Soul 273) o nel pannello laterale del manuale inferiore (nel Legend Soul 261) è possibile selezionare le velocità alta (posizione FAST) o bassa (SLOW) o fermare la rotazione (BRAKE) degli altoparlanti. Le velocità dell’effetto Rotary sono altresì gestibili con un pedale a singolo o doppio switch collegato al connettore jack [ROTARY SPEAKER] presente nel pannello posteriore. -
Page 85: Effetti
Accensione ed operazioni di base Con la manopola [ROTARY/AMP GAIN] è possibile regolare il guadagno del segnale in ingresso all’effetto Rotary/Amp simulando la distorsione di un segnale quando l’amplificatore collegato allo strumento viene portato in saturazione. Questo controllo infatti riproduce fedelmente le sonorità e le caratteristiche della distorsione analogica, tanto maggiore quanto più... -
Page 86: Videata Principale Program
Videata principale Program VIDEATA PRINCIPALE PROGRAM Dopo aver acceso il display visualizza la videata principale dei Program, con la quale è possibile selezionare i Program e visualizzarne le informazioni principali. In questa videata il display risulta diviso in 5 aree in cui sono presenti i seguenti campi: Locazione del Program. -
Page 87: Memorizzazione Di Un Program
Videata principale Program Memorizzazione di un Program Per rendere definitive le modifiche apportate ad un Program, così da non perderle selezionandone un altro o spegnendo lo strumento, è necessario memorizzare il Program. La procedura di memorizzazione prevede l’assegnazione del nome del Program ed il salvataggio nella locazione desiderata, così da non sovrascrivere quella corrente se non desiderato. -
Page 88: Menu Edit
Menu Edit MENU EDIT Premendo il pulsante [EDIT] nella videata principale Program è possibile accedere a tutti i parametri di configurazione del Legend Soul. La pagina principale del menu EDIT è composta dai seguenti campi: Nome del menu. Indica che ci si trova nella pagina principale del menu EDIT. Numero della pagina. -
Page 89: Sezione Up/Lo/Pd Destination
Menu Edit Sezione UP/LO/PD DESTINATION La sezione UP/LO/PD DESTINATION permette di impostare quale sia il blocco della catena audio a cui inviare il segnale di ogni manuale, della sezione Pedals (sia che venga suonata con la pedaliera oppure sul manuale Lower con la funzione Pedals to Lower abilitata, vedi pag. 39) e della sezione Left Hand del manuale Lower (vedi anche parametro LowerLeftHand a pag. -
Page 90: Sezione Effect
Menu Edit Sezione EFFECT La sezione EFFECT del menu EDIT raccoglie i parametri di selezione e regolazione della sezione multi-effetti EFFECT. Per accedere a questa sezione, nel menu EDIT (pag. 32) posizionare il cursore sul campo EFFECT e premere il dial data entry, oppure tenere premuta per qualche istante la manopola di selezione della categoria di effetto (punto 35 a pag. - Page 91 Menu Edit Drive Quantità di distorsione del segnale. [AMOUNT] Impostazioni: da 0.0 a 10.0 Tone Timbrica della distorsione. [RATE] Impostazioni: da 0.0 a 10.0 Phaser e Flanger (Pha/Fla) Il Phaser aggiunge al segnale originale una copia a cui viene modulata la fase aggiungendo così spazialità al suono. Il Flanger è...
-
Page 92: Sezione Rotary / Amp
Menu Edit LFO Depth Profondità di modulazione. [AMOUNT] Impostazioni: da 0.0 a 10.0 LFO Speed Frequenza di modulazione. [RATE], [TAP] Impostazioni: da 0.0 a 10.0 Delay Effetto che genera ripetizioni del segnale per creare effetti ambientali o ritmici. Nome parametro Descrizione Attivazione / disattivazione dell’effetto. -
Page 93: Sezione Reverb
La sezione PRESETS permette la memorizzazione dei Preset dei drawbar richiamabili con i tasti della Black Octave (nel Legend Soul 273) o i pulsanti DRAWBARS SET (nel Legend Soul 261) (vedi punti 29 e 31 a pag. ). Per accedere a questa sezione, nel menu EDIT (pag. 32) posizionare il cursore sul campo PRESETS e premere il dial data entry. -
Page 94: Sezione Percussion
L’attivazione della modalità Double viene anche visualizzata nella pagina principale Program dalla dicitura “DH”. In modalità Double la posizione della bascula [PERCUSSION HARMONIC SELECTOR] (Legend Soul 273) o la pressione del pulsante [SECOND/THIRD] (Legend Soul 261) non vengono rilevate. 2nd 3rd Balance Bilanciamento di volume tra la percussione di seconda e di terza armonica. -
Page 95: Sezione Pedalboard
Menu Edit TW Key Compr. Quantità dell'effetto "Key Compression" tipico degli organi elettromeccanici nei quali quando più contatti vengono collegati alla stessa ruota fonica, il suo volume non cresce proporzionalmente e il volume totale è inferiore alla somma dei volumi di tutte le note. È possibile utilizzare questo effetto per ottenere un suono più... - Page 96 Menu Edit To Lower Vel. Valore di dinamica solo sopra il quale viene generato il suono della sezione Pedals con la funzione Pedals to Lower. Utilizzando questo parametro è possibile ottenere un effetto di maggiore corposità dei bassi solo suonando con più vigore. Impostazioni: •...
-
Page 97: Menu General Settings
Menu General Settings MENU GENERAL SETTINGS Il menu GENERAL SETTINGS raccoglie la maggior parte delle impostazioni che interessano l’intero strumento, e tranne i parametri elencati in Cosa e’ un Program a pag. 30, non vengono modificate dalla selezione dei Program. Tutte le impostazioni fatte in GENERAL SETTINGS vengono immediatamente memorizzate sino ad una nuova modifica o al richiamo di un Factory Reset. -
Page 98: Sezione Equalizer
Menu General Settings Sezione EQUALIZER La sezione EQUALIZER raccoglie i parametri di impostazione dell’equalizzatore Master dello strumento (vedi punti 40, 41 e 42 a pag. 8). Per accedere a questa sezione, nel menu GENERAL SETTINGS (pag. 41) posizionare il cursore sul campo EQUALIZER e premere il dial data entry. -
Page 99: Sezione Tw Hum
Menu General Settings (pag. 41) posizionare il cursore sul campo PREAMP AO-28 e premere il dial data entry. Nome parametro Descrizione Tone Control Regolazione del Tone Control del preamplificatore AO-28. Impostazioni: da 0.0 a 10.0 Sezione TW HUM Come noto, negli originali organi elettromeccanici è presente un complesso rumore di fondo dovuto al fatto che, anche senza suonare, una piccola parte del segnale generato dalle ruote tonali passa attraverso il complesso cablaggio elettrico. -
Page 100: Sezione Pedal Setup
Menu General Settings Sezione PEDAL SETUP La sezione PEDAL SETUP contiene i parametri di impostazione dei pedali collegati ai connettori PEDAL presenti nel pannello posteriore. Per accedere a questa sezione, nel menu GENERAL SETTINGS (pag. 41) posizionare il cursore sul campo PEDAL SETUP e premere il dial data entry. -
Page 101: Sezione Midi
Menu General Settings EXP Minimun Livello del segnale audio quando il foot controller collegato al connettore PEDAL [EXP] è in posizione minima. Impostazioni: • Mute: segnale completamente azzerato. • Normal: segnale attenuato. EXP Range Posizione e range di valori assunti dal foot controller collegato al connettore PEDAL [EXP]. Tramite questa videata è... -
Page 102: Sezione Program Recall
Menu General Settings Tx/Rx Program Abilitazione della trasmissione e ricezione dei messaggi MIDI di Program Change (associati al cambio dei Program). Impostazioni: OFF, ON Tx/Rx CC Abilitazione della trasmissione e ricezione dei messaggi MIDI di Control Change (associati alla variazione dei controlli). Impostazioni: OFF, ON Tx/Rx Real Time Abilitazione della trasmissione e ricezione dei messaggi MIDI di Real Time. -
Page 103: Menu Utility
Menu Utility MENU UTILITY Il menu UTILITY raccoglie alcune funzioni di utilità che interessano l’intero strumento. Per accende a questo menu selezionare il campo UTILITY nel menu EDIT. Nome del menu. Indica che ci si trova nel menu UTILITY. Numero della pagina. Indica la pagina corrente visualizzata e il numero totale delle pagine del menu. -
Page 104: Funzioni Save All / Save Program / Save Presets
Menu Utility Funzioni SAVE ALL / SAVE PROGRAM / SAVE PRESETS Le funzioni Save All, Save Program e Save Presets permettono di memorizzare in un’unità flash USB inserita nel connettore USB [TO DEVICE]: Save All: tutti i dati dello strumento Save Program: singoli Program Save Presets: tutti i Preset dei drawbars (dei modelli Tonewheels, Pipe e Transistor) I dati vengono memorizzati come file:... -
Page 105: Funzioni Load All / Load Program / Load Presets
Menu Utility Funzioni LOAD ALL / LOAD PROGRAM / LOAD PRESETS Le funzioni Load All, Load Program e Load Presets permette di ricaricare da un'unità flash USB inserita nel connettore USB [TO DEVICE]: Load All: tutti i dati dello strumento salvati tramite la funzione Save All Load Program: singoli Program salvati tramite la funzione Save Program Load Presets: tutti i Preset dei drawbars tramite la la funzione Save Presets Per eseguire un caricamento di tutti i dati dello strumento o di tutti i Preset dei drawbars, seguire questa procedura:... -
Page 106: Funzione Release / Update
Menu Utility Funzione RELEASE / UPDATE La funzione Release/Update permette di conoscere la versione del sistema operativo attualmente installata sullo strumento e di effettuarne l’aggiornamento. Ogni qualvolta verrà rilasciato un file di aggiornamento (nome del file Soul-XXX.LGU dove XXX indica la versione che verrà installata), questo sarà reso disponibile sul sito web http://www.viscountinstruments.com. -
Page 107: Appendice
USB inserita in quanto lo strumento tenterà un nuovo aggiornamento. Se al termine dello stesso viene di nuovo visualizzato il messaggio di errore, contattare il servizio di assistenza tecnica all’indirizzo service@viscount.it indicando il messaggio di errore ed il numero visualizzato. Update file not detected! – Led [PIPE] e [TRANSISTOR] lampeggianti Nell’unità... -
Page 108: Funzione Panic
Appendice USB charger active Si sta tentando di effettuare l’aggiornamento del sistema operativo ma la porta USB [TO DEVICE] è impostata per l’alimentazione / caricabatteria di un dispositivo esterno (pag. 47). USB charger OVERCURRENT [Extract device] Il dispositivo esterno che si sta tentando di caricare tramite la porta USB [TO DEVICE] sta assorbendo troppa corrente. - Page 109 Appendice Controllare che nel Set di drawbars del manuale o pedaliera in cui si sta suonando ci sia almeno un drawbar estratto. Controllare che nel manuale in cui si sta suonando non sia attiva la modalità Cancel (vedi pag. 25). Controllare che il segnale del manuale o pedaliera in cui si sta suonando è...
- Page 110 Smaltimento dei rifiuti elettrici ed elettronici (applicabile nell’Unione Europea e negli altri paesi europei con servizio di raccolta differenziata) Ai sensi dell’art. 13 del Decreto legislativo 25 luglio 2005, n. 151 “Attuazione delle Direttive 2002/95/CE, 2002/96/CE e 2003/108/CE” II simbolo presente sul prodotto o sulla sua confezione indica che il prodotto non verrà trattato come rifiuto domestico.
- Page 111 MIDI Informations MIDI INFORMATIONS What is MIDI The MIDI (Musical Instrument Digital Interface) allows instruments of different makes and types to communicate with each other by means of this clearly specified protocol of codes. This makes it possible to create systems of MIDI instruments which offer much better versatility and control than can be achieved with separate instruments.
-
Page 112: Midi Informations
MIDI Informations CONTROL CHANGE These are control messages (often associated to trimmers or pedals) used to add expression to the performance, allowing you to set (and control in real time if necessary) voice parameters such as volume (CC n.7) or expression pedal (CC n.11), etc. This message contains the following information: Control Change: a controller has been adjusted Controller Number: which controller has been adjusted... - Page 113 CC 22 Organ / Pedals Model On Upper channel On Upper channel 0-9 (Legend Soul 273) 0-9 (Legend Soul 273) 0-1 (Legend Soul 261) 0-1 (Legend Soul 261) CC 25 Drawbars Preset 10-11 (Set A-B) 10-11 (Set A-B) On section channel On section channel ≤63 Pre, ≥64 Post.
- Page 114 MIDI IMPLEMENTATION CHART Viscount Legend Soul 273 - 261 Version: 1.0 Drawbars Organ Date: 10 Jan. 2023 FUNCTION… TRANSMITTED RECEIVED REMARKS BASIC Default 1, 2, 3 1, 2, 3 * * MIDI IN / USB TO HOST ports 1÷16 *...
- Page 116 Viscount International S.p.A. Via Borgo, 68 / 70 – 47836 Mondaino (RN), ITALY Tel: +39-0541-981700 Fax: +39-0541-981052 Website: www.viscountinstruments.com...
Need help?
Do you have a question about the Legend SOUL 261 and is the answer not in the manual?
Questions and answers