Table of Contents
Advertisement
Quick Links
Advertisement
Table of Contents

Related Manuals for jost KKS-U


Summary of Contents for jost KKS-U
- Page 1 KKS-U Installation and operating instructions...
- Page 2 MUB 007 004 M01 (REV--) 05-2023...
-
Page 3: Table Of Contents
3.4 Safety instructions for maintenance......8 4 Intended use..............10 4.1 General information..........10 4.2 System requirements and properties for operating the JOST KKS............. 11 4.3 Target group and existing knowledge...... 13 4.4 Content and purpose of this documentation... 13 4.5 Application limits............14 4.6 Principle.............. -
Page 4: Explanation Of Symbols
Explanation of symbols WARNING! Means that death, serious physical injury or significant material damage can occur if the relevant safety instruc- tions are not followed. ATTENTION! Means that minor physical injury or material damage can occur if the relevant safety instructions are not fol- lowed. -
Page 5: General Information
Do not use the product until you are certain that the tractor unit and semi-trailer on which the JOST KKS is fitted comply with road traffic regulations in your country. Please refer to the installation and operating manuals of the fol-... -
Page 6: Safety Instructions
The relevant safety regulations in your country (e.g. Health & cuit! Safety at Work) apply to working with fifth wheel couplings, tractor units, semi-trailers and the JOST KKS. The safety instructions in the tractor unit and semi-trailer operating manuals continue to apply IMPORTANT! and must be followed. -
Page 7: Safety Instructions For Operation
“Fifth wheel coupling guard. closed” (green) is shown on the display. The JOST KKS is Lay electric cables and pneumatic hoses in such a only an assistance function that helps you with the cou- way that they do not kink or chafe. -
Page 8: Safety Instructions For Maintenance
Use the JOST KKS only if it is in perfect technical landing gears. condition. When coupling and uncoupling, make sure no one is in the danger zone, e.g. - Page 9 Some components of the KKS system have their own installation and operating manuals, because the sys- tem is partially based on existing JOST products. It is therefore essential to refer to maintenance and repair instructions in other installation and operating manuals.
-
Page 10: Intended Use
Intended use General information IMPORTANT! The JOST KKS is designed to help the driver couple and uncouple The JOST JSK 42 fifth wheel coupling used for this prod- semi-trailers. uct is produced in accordance with Regulation ECE R55 As with conventional connections between a semi-trailer and trac-... -
Page 11: System Requirements And Properties For Operating The Jost Kks
Only semi-trailers that satisfy the following points are suitable JOST KKS for use with the JOST KKS: The following tractor units are suitable for use with the JOST KKS: The tractor unit must have pneumatic suspension at least on the rear axle. - Page 12 ISO 1726. installing the KKS system. ADVICE! IMPORTANT! If your chassis is different, please contact the JOST tech- If you are uncertain whether the semi-trailer is suitable nical customer support team. for the retrofit, please consult our technical customer support team.
-
Page 13: Target Group And Existing Knowledge
Intended use Target group and existing knowledge Content and purpose of this documentation This documentation is intended for the installation, operating and This documentation contains the relevant information for installa- maintenance personnel of the KKS system. tion, operation, maintenance and disposal of the KKS system. It is Installation, operating and maintenance personnel must be intended to enable safe work on and with the KKS system. -
Page 14: Application Limits
IMPORTANT! A semi-trailer equipped with KKS is compatible with the follow- Please ask regarding the suitability of fifth wheel cou- ing JOST fifth wheel couplings with a minimum height of 162 mm plings from other manufacturers. including mounting plate: JSK 34 H... -
Page 15: Principle
Intended use Principle The KKS system is a state-of-the-art product that conforms to the applicable health and safety regulations. WARNING! Nevertheless, the following risks can arise if it is mis- used or used incorrectly: Serious or fatal injury to the user or third parties. Damage to the KKS system and other material assets of the owner. -
Page 16: List Of Components
Semi-trailer system components ADVICE! 5.1.1 Modul E-Drive landing gears You can find information on installation, operation, maintenance and repair in the JOST Modul E-Drive land- ing gears installation and operating manual or repair manual at www.jost-world.com. 5.1.2 Swivel wedge with kingpin... -
Page 17: Cable Store With Cables
List of components the central axis of the KKS kingpin when the vehicle corners. Dur- 1 Cable store 4 Spring for the swivel wedge ing coupling, the kingpin is held by the locking system of the fifth return 2 Crossmember (semi-trailer) 5 Swivel bracket wheel coupling and the swivel wedge slides into the coupling jaw 3 Wiring harness 6 Swivel wedge... -
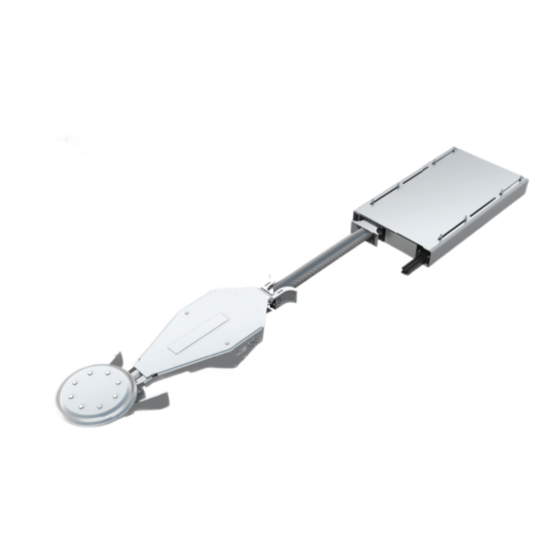
Page 18: Exploded View
List of components 5.1.4 Exploded view Figure 8: KKS system, semi-trailer, CAD model 1 Locking ring 5 Crossmember, semi-trailer 2 Slip ring 6 Cable store 3 Kingpin 7 Electric cables, pneumatic hoses 4 Trailer plate 8 Swivel wedge MUB 007 004 M01 (REV--) 05-2023... -
Page 19: Installation
7-pin socket using an ISO 7638-1 connector. The JOST Modul-E-Drive landing gears must be installed on Produce the connection to the 15-pin socket using the semi-trailer as described in the installation and operating an ISO 12098 connector. The manufacturer will not manual. - Page 20 Installation KKS/041 KKS/042 Figure 10: Valve unit holder, Figure 11: Valve unit holder, marking the holder location screwed onto semi-trailer Select a suitable location on the semi-trailer for fitting the holder (1). It may be secured to any of the semi-trailer’s longi- KKS/040 tudinal members.
- Page 21 Installation KKS/043 KKS-044 Figure 12 Valve unit holder, Figure 13: Valve unit holder, screw-in connector inserted, screw-in connector inserted, view 1 view 2 Insert the screw-in connector (7) in the holder (1), making KKS/045 sure that the shorter threads are on the same side, as shown Figure 14: Valve unit holder, fitting the seals in Figure 12.
- Page 22 Installation Figure 15: Valve unit holder, installing the line filters Figure 16: Valve unit holder, installing the 2-way valve Fit the line filters (5) to the connection side of the holder (1), Connect the 2-way valves (6) to the unused connection side which is facing the front in the direction of travel and there- of the screw-in connectors (7).
- Page 23 Installation ADVICE! See Figure 9 for an overview of components. Figure 17: Valve unit holder, installing the connection pieces Screw the vehicle-specific connection pieces (11) into the open connections of the line filters (5) and 2-way valves (6), as shown in Figure 17. Figure 18: Valve unit holder, coloured marking IMPORTANT! WARNING!
-
Page 24: Installing The Cable Store
Installation Guides the central wiring harness when cornering. ATTENTION! Protects the central wiring harness from damage. Make colour markings on the valve unit or label it, so that the valve circuits will be connected to the correct ATTENTION! compressed air circuit during installation. This will pre- Correct and careful installation of the cable store greatly vent potential incorrect installation. - Page 25 Installation To do this, proceed as follows: ADVICE! Position the cover plate of the cable store on the crossmem- If H is smaller than 50 mm, the cable store has a ber structure of the semi-trailer at the required distance. gooseneck contour in accordance with ISO 1726.
-
Page 26: Installing The Swivel Wedge
Installation Position the side panels on both sides of the cover plate, as Installing the swivel wedge shown in Figure 21. Fasten the side panels to the cover plate using three cable ties per side. Figure 23: Swivel wedge The swivel wedge consists of the components shown in Figure 23. The principle functions of the swivel wedge are as follows: Figure 22: Cable store Producing the electrical and pneumatic connections between... - Page 27 The swivel wedge may only be installed using the spe- position in the direction of travel. cial setting master from JOST, as shown in Figure 24. You Lift the swivel wedge until the kingpin of the swivel wedge is can purchase the tool from JOST using order number in contact with the edge of the weld-in plate.
- Page 28 ADVICE! For tightening torques and all the necessary information on the kingpin, see the installation and operating man- ual at www.jost-world.com. MUB 007 004 M01 (REV--) 05-2023...
- Page 29 Position the swivel bracket as shown in Figure 29. Push the wiring harness and swivel bracket into the cable store. ADVICE! The JOST setting master is no longer needed for the fol- ATTENTION! lowing installation steps. During installation, the spring is compressed. We rec- ommend having two persons perform installation.
- Page 30 Installation Figure 30: Installing the swivel bracket Figure 31: Swivel bracket, secured Insert the swivel bracket in the cable store, as shown in Figure Using Figure 31, check that you have installed the swivel bracket correctly. Fasten the swivel bracket to the cable store using the sup- plied screws M6x15 (4x).
- Page 31 Installation Figure 33: Installing the cable store base plate Figure 32: Spring preload Check the spring preload travel between the swivel wedge Insert the base plate in the cable store, as shown in Figure 33. and the cable store, as shown in Figure 32. Push the base plate into the cable store until the base plate If the measured spring preload travel deviates, readjustment meets the side panels.
- Page 32 Installation Figure 34: Swivel wedge, installed Figure 35: Swivel wedge frame in straight-ahead position ATTENTION! Make sure that no persons or objects are in the pivot range of the swivel wedge while it is pivoting. The swivel wedge returns to its original position automatically. IMPORTANT! Pivot the swivel wedge 20°...
- Page 33 Installation Adjust the swivel wedge support as follows: 1. Move the swivel wedge frame into its straight-ahead position (0° ± 5°), as shown in Figure 35. The swivel wedge frame must remain in the straight-ahead position during adjustment. 2. Check that the adjusting nut (A) and lock nut (B) are loose. If necessary, slacken them by half a turn so that they can rotate freely on the threaded pin.
- Page 34 Installation ATTENTION! The cable clamp assignment may differ from Figure 37 due to the existing design. Before laying electric cables and pneumatic hoses, check which line/cable you are dealing with. Pneumatic hoses have coloured markings at the ends (yellow = brake, red = supply). The electric cables can be identified by their cross-sectional area and the number of wires.
- Page 35 Installation Figure 39: 15-pin connector Figure 38: Routing and connecting the 7-pin and 15-pin electric cables Connect the supplied 15-pin connector to electric cable A and route the cable in a loop, so that it can be plugged into the socket or the parking socket.
- Page 36 Installation KKS/101 Figure 41: Valve unit, connecting KKS air hoses Figure 42: Valve unit, fully connected Connect the cables that you routed from the KKS cable store A Supply valve unit (red) 3 KKS supply hose to the correct line filter. B Brake valve unit (yellow) 4 Coupling head or Duo-Matic brake hose...
-
Page 37: Connecting The Modul E-Drive Landing Gears
Install Modul E-Drive landing gears as described in the prod- uct-specific installation and operating manual. ADVICE! You can find the Modul E-Drive landing gears installation and operating manual at www.jost-world.com. KKS/104 KKS/103 The Modul E-Drive landing gears are already equipped with... - Page 38 Installation Undo the housing screws (10 x T20) from the motor (see Fig- ure 46). depending on the version KKS2 KKS2 KKS/109 KKS/110 Figure 50: Modul E-Drive, rout- Figure 51: Modul E-Drive, rout- ing the KKS adapter cable on ing the KKS adapter cable to the housing the semi-trailer chassis KKS/107...
-
Page 39: Warning Stickers
Installation Warning stickers Attach the following warning stickers to the KKS semi-trailer so that they can easily be seen: Affix this sticker prominently on the front of the semi-trailer in the vicinity of spiral hose connections. KKS/111 KKS/112 Figure 52: KKS adapter cable, Figure 53: KKS adapter cable, routing the cable in the semi- connection with KKS system... -
Page 40: Before Starting Up
Affix these stickers prominently in the vicinity of the landing Before starting up gears. WARNING! The JOST KKS may only be started up if a system check of the semi-trailer has been per- formed as described in the section “Checking the KKS system on the semi-trailer”;... -
Page 41: Checking The Kks System On The Semi-Trailer
6.6.1 Checking the KKS system on the semi-trailer ADVICE! The following points must be checked: You can find further information in the JOST Modul E- The kingpin, cable store and guard plate are securely Drive landing gears installation and operating manual at mounted and tightened to the correct torque. - Page 42 You can find information on using the KKS system in leakage from the KKS connection can be heard when the the KKS installation and operating manual at www.jost- compressed air system is at maximum pressure (> 10 bar); world.com.
- Page 43 Installation all system components move freely through the entire articu- lated range of the tractor-trailer combination. Figure 56: Articulated range of tractor-trailer combination 2. Carry out the uncoupling process, checking that: the landing gears on the semi-trailer are retracted electrically via the KKS remote control;...
-
Page 44: Operation, Maintenance And Troubleshooting
Important licensing documents! bleshooting sections in the KKS installation and operat- Advisory opinion from TÜV Nord. ing manual. This is available at www.jost-world.com. Please scan the QR code and obtain the document from the licensing agency during the vehicle test. - Page 48 Member of JOST World JOST, Germany, Tel. +49 6102 295-0, tkd-technik@jost-world.com, www.jost-world.com MUB 007 004 M01 (REV--) 05-2023 • 1.5 1212027...
Need help?
Do you have a question about the KKS-U and is the answer not in the manual?
Questions and answers