Table of Contents
Advertisement
Quick Links
Advertisement
Table of Contents

Related Manuals for ITT GOULDS PUMPS 3311


Summary of Contents for ITT GOULDS PUMPS 3311
- Page 1 Installation, Operations, and Maintenance Instructions 3311...
-
Page 3: Table Of Contents
Table of Contents Table of Contents 1 Introduction and Safety ............................ 3 1.1 Important Safety Notice..........................3 1.2 Safety Warnings ............................3 1.3 Safety ................................ 4 1.4 General precautions ..........................5 1.5 Parts ................................8 2 Safety Instructions ............................9 2.1 Safety instructions ............................. - Page 4 Table of Contents 7.2 Safety measures ............................. 28 7.3 Electrical connection ..........................28 7.4 Checks before first start-up ........................28 7.5 Starting procedure........................... 29 7.6 Particular information ..........................29 7.7 Stopping procedure ..........................29 8 Maintenance, Disassembly, Assembly ......................31 8.1 Prerequisites ............................
-
Page 5: Introduction And Safety
ITT Goulds pumps will provide safe, trouble-free service when properly installed, maintained, and operat- Safe installation, operation, and maintenance of ITT Goulds Pumps equipment are an essential end user responsibility. This Pump Safety Manual identifies specific safety risks that must be considered at all times during product life. -
Page 6: Safety
Trapped liquid can rapidly expand and result in a violent explosion and injury. ITT Goulds Pumps will not accept responsibility for physical injury, damage, or delays caused by a failure to observe the instructions for installation, operation, and maintenance contained in this Pump Safety Manual or the current IOM available at http://www.gouldspumps.com/literature. -
Page 7: General Precautions
Personal injuries will result if procedures outlined in this manual are not followed. ITT Goulds Pumps will not accept responsibility for physical injury, damage or delays caused by a failure to observe the instructions in this manual and the IOM provided with your equip- ment. - Page 8 1.4 General precautions Shaft alignment procedures must be followed to prevent catastrophic failure of drive components or unintended contact of rotating parts. Follow coupling manufacturer's coupling installation and operation procedures. WARNING Before beginning any alignment procedure, make sure driver power is locked out.
- Page 9 1.4 General precautions WARNING The pump may handle hazardous and/or toxic fluids. Observe proper decon- tamination procedures. Proper personal protective equipment should be worn. Precautions must be taken to prevent physical injury. Pumpage must be han- dled and disposed of in conformance with applicable environmental regula- tions.
-
Page 10: Parts
1.5 Parts The use of genuine Goulds parts will provide the safest and most reliable operation of your pump. ITT Goulds Pumps ISO certifica- tion and quality control procedures ensure the parts are manufac- tured to the highest quality and safety levels. -
Page 11: Safety Instructions
2 Safety Instructions 2 Safety Instructions 2.1 Safety instructions This manual gives basic instructions which must be observed during installation, operation and mainte- nance of the pump. It is therefore imperative that this manual be read by the installer and the responsible personnel or oper- ators prior to installation and commissioning. -
Page 12: Safety At Work
2.4 Safety at work 2.4 Safety at work When operating the pump, the safety instructions contained in this manual, the relevant national accident prevention regulations and any other service and safety instructions issued by the plant operator must be observed. 2.5 Safety instructions relevant to operation •... -
Page 13: Application
3 Application 3 Application 3.1 Limitation of use Operation of the pump must be limited to the application and operating conditions stated by the purchas- er and confirmed on the manufacturer's data sheet. The pump is covered by warranty under Gould’s Pumps’... -
Page 14: Applications
3.5 Applications Depending on its design, the pump is either driven from the discharge side or the suction side, by a cus- tomary electric motor or turbine. The direction of rotation is counter-clockwise for discharge side drive, and clockwise for suction side drive, when viewed from drive end. 3.5 Applications •... -
Page 15: System Layout
4 System Layout 4 System Layout 4.1 Pipework General In short discharge lines, the nominal diameter should be such that the piping resistance is only a small proportion of the discharge head. For long pipelines, the most cost-effective solution should be deter- mined on a case-by-case basis. - Page 16 4.1 Pipework • Flange seals must not extend into the interior of the pipework. • Clean the pipework prior to pump installation. • Support the pipelines so as to prevent distortion of pump components. • Avoid rough cross-section transitions and sharp bends. •...
- Page 17 4.1 Pipework • In order to prevent clogging, it is recommended that the customer provide a sedimenta- tion tank or a larger flushable fine strainer upstream from the pump. Design: Conical strainer with perforated plate support body with external fine screen, mesh size 0.5 mm, of corro- sion-resistant material.
- Page 18 4.1 Pipework Eccentric reducer (suction operation) or concentric reducer (feed operation) Shut-off valve Suction line Bend Foot valve Feed line Non-return valve Control valve Figure 4: Pump installation A shut-off valve should be installed in the feed line; it is to be closed for maintenance work. It should be installed such that air pockets cannot form in the spindle cap, i.e.
- Page 19 4.1 Pipework a. Equalizer line b. Additional line Shut-off valve Shut-off valve (vacuum tight) Figure 5: Vacuum operation Discharge line For flow control, install a shut-off valve as close to the pump nozzle as possible. It is recommended that a non-return valve be installed between pump nozzle and shut-off valve, thus protecting the pump against reverse rotation and also the pump and the foot valve against water hammer that may occur in the event of sudden shut-down.
- Page 20 4.1 Pipework • A non-return valve should be installed in the minimum flow nozzle or the minimum flow line. • For repair or overhaul work on the pump or the bypass non-return valve, a shut-off valve must be installed in the minimum flow line (c). a.
-
Page 21: Electrical Connections
4.2 Electrical connections Drain line, leakage water line The pump has connections for leakage water and drain lines. Pressure monitoring In order to monitor the pressures upstream and downstream from the pump, the installation of measuring points in the pipeline is recommended. 4.2 Electrical connections The electrical connection for the driving motor must be in compliance with the relevant rules and require- ments. -
Page 22: Unpacking, Handling, Storage
5 Unpacking, Handling, Storage 5 Unpacking, Handling, Storage 5.1 Safety measures WARNING: • Do not lift heavy equipment overhead of personnel. • A safe distance must be kept when lifting and moving the equipment. • Use only approved and suitable lifting equipment. •... -
Page 23: Preservation
5.5 Preservation Figure 7: Lifting the pump Figure 8: Lifting the pump/motor/baseplate assembly 5.5 Preservation Usually, only iron pumps are preserved. Removal of preservation To remove the preservative coating, the pump should be filled and drained several times using appropri- ate agents, e.g. - Page 24 5.5 Preservation Re-preservation If the pump has been supplied preserved and is to be stored, a new preservative coating should be ap- plied after six months. For suitable preservatives, contact Goulds Pumps. 3311 Installation, Operations, and Maintenance Instructions...
-
Page 25: Pump Installation
6 Pump Installation 6 Pump Installation 6.1 Prerequisites Prior to the installation of the pump, the storage and handling instructions in 5 Unpacking, Handling, Storage on page 20, must have been complied with. 6.2 Safety measures WARNING: • The pipework must be properly installed. Fluid leakage during operation may cause health hazards or environmental damage. -
Page 26: Motor
6.4 Motor Prior to installation checks should be made with regard to: • possible damage to the pump or the pump set that may have occurred in transit • ease of running (check that the shaft is free to rotate by hand) •... - Page 27 6.5 Alignment of the set Shims Additional shim, if foundation bolt distance ≥ 800 mm Figure 9: Position of the shims After aligning the set the axial clearance between the two coupling halves measured at one point of the coupling must be the same over the complete circumference of the coupling, the permissible tolerance being ±...
- Page 28 6.5 Alignment of the set Stud bolt Adjusting nut Washer Safety screw Figure 11: Coupling alignment Guide pins (6) on the suction and discharge casing feet prevent lateral movement of the pump. The drive side guide pin is held in place by a guide casing which is bolted to the baseplate (8). The opposite guide pin can move in a guide casing.
-
Page 29: Grouting The Baseplate
6.6 Grouting the baseplate CAUTION: • Avoid distortions when finally tightening the bolts. • The nuts of the foot fastening must be loosened so far that the washers can be moved by light hammer blows. 6.6 Grouting the baseplate Prior to grouting the baseplate, carry out the following preparatory work: Check the dimensions with regard to height and alignment of flanges. -
Page 30: Starting & Stopping Procedures
7 Starting & Stopping Procedures 7 Starting & Stopping Procedures 7.1 Prerequisites The pump or the pump set must have been installed in accordance with the instructions of 6 Pump In- stallation on page 7.2 Safety measures WARNING: • If there is no shaft seal, interrupt all further work and install a shaft seal. Priming the pump with the liquid handled in the absence of a shaft seal may present a human-health or en- vironmental hazard. -
Page 31: Starting Procedure
7.5 Starting procedure • Is the shut-off valve in the suction or feed line fully open? • Is the motor ready? • Is the direction of rotation of the motor correct? (Check by momentarily switching on the motor.) • Is the coupling correctly aligned (refer to 6 Pump Installation on page 23). - Page 32 7.7 Stopping procedure CAUTION: If there is danger of freezing, the pump should be drained down. WARNING: • Please note that there will always be some residual liquid even if the pump is emptied in vertical position. • Ensure that the pump does not contain any hazardous substances when it is dismantled to be returned to the manufacturer's factory.
-
Page 33: Maintenance, Disassembly, Assembly
8 Maintenance, Disassembly, Assembly 8 Maintenance, Disassembly, Assembly 8.1 Prerequisites The pump or the pump set must have been taken out of operation in accordance with the instructions of 7 Starting & Stopping Procedures on page 8.2 Safety measures WARNING: •... - Page 34 8.3 Maintenance and inspection If the bearings are new, change first oil after about 200 operating hours. Afterwards, change the oil in accordance with the following table: light service normal and severe service Light contamination, light contamination, T < 50 °C T >...
-
Page 35: Disassembly
8.4 Disassembly Packed stuffing box With a packed stuffing box, there is always a leakage in the form of drops. In the case of heavy leakage, the packing and the shaft wearing sleeve should be checked (for scores). Driving motor Maintenance of the driving motor should be in compliance with the manufacturer's instructions. -
Page 36: Discharge Side Drive
8.8 Discharge side drive 8.8 Discharge side drive 8.9 Dismantling of the bearings a) Sleeve bearing, lubricated by the liquid handled (non-drive side) Figure 13: Axial suction nozzle • Remove bearing cover 160.1 • Remove circlip 932.1 • Pull out bearing bush 545.1/545.2 with O-rings 412.1 •... - Page 37 8.9 Dismantling of the bearings Figure 14: Radial suction nozzle • Remove bearing cover 160.1 with O-ring 412.11 • Remove circlip 932.1 • Pull out bearing bush 545.1/545.2 with O-rings 412.1 • Remove bearing sleeve 529.1 CAUTION: Anti-rotation grooved pin 561.1 must remain in the shaft. b) Anti-friction bearing, •...
- Page 38 8.9 Dismantling of the bearings • If installed - remove cooling and/or circulation line • Remove key 940.5 • Release bolts 914.5 • Remove bearing cover 360.1 with labyrinth ring 423.2 and limiting ring 380 • Release grub screw 904.2 •...
-
Page 39: Dismantling Of Shaft Seal
8.10 Dismantling of shaft seal 8.10 Dismantling of shaft seal a) Stuffing box packing Dismantle bearings in accordance with 7.4.3.1.1 b) or c) • Release nuts 920.2 • Slide back the stuffing box gland 452 • Remove packing rings 461 •... -
Page 40: Dismantling Of Balancing Device
8.11 Dismantling of balancing device 8.11 Dismantling of balancing device Dismantle bearings in accordance with 7.4.3.1.1 b) or c) Dismantle shaft seal in accordance with 7.4.3.1.2 a) or b) • Pull balance disc 601 from shaft 210 • Remove key 940.3 •... -
Page 41: Suction Side Drive
8.13 Suction side drive • Dismantle delivery casing 107 • Remove, from stage to stage, impeller 230, key 940.1, stage casing 108.1 with diffuser 171.1, in that order 8.13 Suction side drive 8.14 Dismantling the oil-lubricated anti-friction bearing - drive side •... -
Page 42: Dismantling Of Oil-Lubricated Anti-Friction Bearing- Non-Drive Side
8.16 Dismantling of oil-lubricated anti-friction bearing- non-drive side Dismantle bearings in accordance with 7.4.3.2.1 • Release nuts 920.2 • Slide back the stuffing box gland 452 • Remove packing rings 461 • Release bolts 914.1 • Remove sealing casing 441 •... - Page 43 8.16 Dismantling of oil-lubricated anti-friction bearing- non-drive side • If installed - remove cooling and/or circulation line • Release bolts 914.5 • Remove bearing cover 360.2 with limiting ring 380 • Release grub screw 904.2 • Remove circlip 932.2 • Support shaft 210 on the drive side with key 940.5, and release shaft nut 921 •...
-
Page 44: Dismantling Of Shaft Seal - Non-Drive Side
8.17 Dismantling of shaft seal - non-drive side • Compress spring 950 by moving bearing carrier 382 • Remove circlip 932.3 • Remove bearing 321 • Release bolts 914.4 • Remove bearing housing 350.2 with bearing carrier 382 and spring 950 •... -
Page 45: Dismantling Of The Balancing Device
8.18 Dismantling of the balancing device Dismantle bearings in accordance with 7.4.3.2.3 a) or b) • Release nuts 920.2 • Remove seal cover 471 • Remove balancing line • Release bolts 914.1 • Withdraw sealing casing 441, mechanical seal 433 and shaft sleeve 523 8.18 Dismantling of the balancing device Dismantle bearings in accordance with 7.4.3.2.3 a) or b) Dismantle shaft seal in accordance with 7.4.3.2.4 a) or b) -
Page 46: Dismantling Of Hydraulic Unit
8.19 Dismantling of hydraulic unit • Dismantle balance disc seat 602 • Pull balance drum 603 from shaft 210 8.19 Dismantling of hydraulic unit Dismantle bearings in accordance with 7.4.3.2.3 a) or b) Dismantle shaft seal in accordance with 7.4.3.2.4 a) or b) Dismantle balancing device in accordance with 7.4.3.2.5 •... -
Page 47: Assembly
8.21 Assembly Carry out a concentricity check. 8.21 Assembly CAUTION: The assembly work must be based on good engineering practice. • Use no force. • Heavy parts must be supported during assembly. • Before assembly, apply a layer of an appropriate erection substance on the fitting points. Observe instructions with regard to cleanliness and safety. -
Page 48: Bearings
8.24 Bearings CAUTION: The packing rings must not be inserted until after the pump, including the bearings, has been completely installed. • Only pre-compressed packing rings are permissible. • Thoroughly clean the packing area and the stuffing box gland. • The first packing ring should now be laterally bent open and pushed on the shaft wearing sleeve. - Page 49 8.24 Bearings CAUTION: Check axial position of the rotor. Dimension X must be the same as before disassembly. Suction side drive Install suction side anti-friction bearing in the reverse manner to disassembling. 3311 Installation, Operations, and Maintenance Instructions...
- Page 50 8.24 Bearings Install discharge side anti-friction bearing, without or with lift-off device in the reverse manner to dis- assembling. CAUTION: Check axial position of the rotor. Dimension X must be the same as before disassembly. 3311 Installation, Operations, and Maintenance Instructions...
-
Page 51: Locating Troubles
9 Locating Troubles 9 Locating Troubles 9.1 Troubles and possible causes Trouble Cause Remedial action Insufficient liquid Wrong direction of rotation. Re-connect the motor. delivered Discharge pressure too high. Check the system for contaminants, re-adjust the duty point. Suction lift too high or insufficient NPSHA. Check liquid levels, open suction side shut-off valves, clean suction side filter / dirt trap. - Page 52 9.1 Troubles and possible causes Flow rate too low / too high. Ensure minimum flow / throttle discharge side shut-off valve. Unsteady run- Suction lift too high or insufficient NPSHA. Check liquid levels, ning of pump, open suction side shut-off valves, excessive noise clean suction side filter / dirt trap.
-
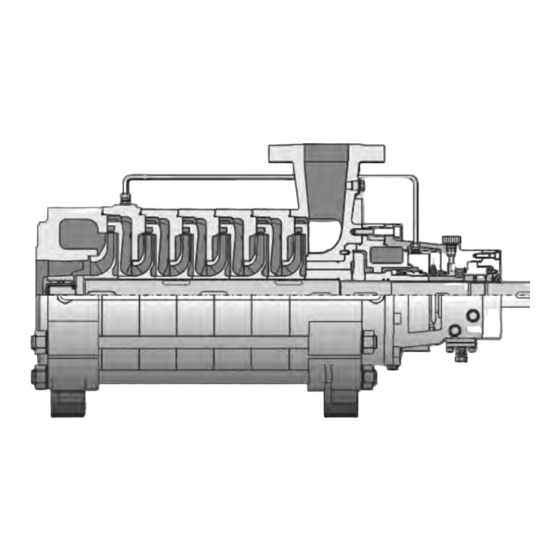
Page 53: Sectional Drawing / Parts List
10 Sectional Drawing / Parts List 10 Sectional Drawing / Parts List 10.1 Sectional Drawing – Size: 2x3-7 Discharge side drive - with axial inlet, without lift-off device 10.2 Sectional Drawing – Size: 2.5x4-8 & 4x5-11 Discharge side drive - with axial inlet, without lift-off device 3311 Installation, Operations, and Maintenance Instructions... - Page 54 10.2 Sectional Drawing – Size: 2.5x4-8 & 4x5-11 3311 Installation, Operations, and Maintenance Instructions...
-
Page 55: Sectional Drawing - Size: 2X3-7
10.3 Sectional Drawing – Size: 2x3-7 10.3 Sectional Drawing – Size: 2x3-7 Discharge side drive - with axial inlet, with lift-off device 3311 Installation, Operations, and Maintenance Instructions... -
Page 56: Sectional Drawing - Size: 2.5X4-8 & 4X5-11
10.4 Sectional Drawing – Size: 2.5x4-8 & 4x5-11 10.4 Sectional Drawing – Size: 2.5x4-8 & 4x5-11 Discharge side drive - with axial inlet, with lift-off device 3311 Installation, Operations, and Maintenance Instructions... -
Page 57: Sectional Drawing - Size: 2X3-7
10.5 Sectional Drawing – Size: 2x3-7 10.5 Sectional Drawing – Size: 2x3-7 Discharge side drive - with radial inlet, without lift-off device 3311 Installation, Operations, and Maintenance Instructions... -
Page 58: Sectional Drawing - Size: 2.5X4-8 & 4X5-11
10.6 Sectional Drawing – Size: 2.5x4-8 & 4x5-11 10.6 Sectional Drawing – Size: 2.5x4-8 & 4x5-11 Discharge side drive - with radial inlet, without lift-off device 3311 Installation, Operations, and Maintenance Instructions... -
Page 59: Sectional Drawing - Size: 2X3-7
10.7 Sectional Drawing – Size: 2x3-7 10.7 Sectional Drawing – Size: 2x3-7 Discharge side drive - with radial inlet, with lift-off device 3311 Installation, Operations, and Maintenance Instructions... -
Page 60: Sectional Drawing - Size: 2.5X4-8 & 4X5-11
10.8 Sectional Drawing – Size: 2.5x4-8 & 4x5-11 10.8 Sectional Drawing – Size: 2.5x4-8 & 4x5-11 Discharge side drive - with radial inlet, with lift-off device 3311 Installation, Operations, and Maintenance Instructions... -
Page 61: Sectional Drawing - Size: 2X3-7
10.9 Sectional Drawing – Size: 2x3-7 10.9 Sectional Drawing – Size: 2x3-7 Suction side drive - without lift-off device 3311 Installation, Operations, and Maintenance Instructions... -
Page 62: Sectional Drawing - Size: 2.5X4-8 & 4X5-11
10.10 Sectional Drawing – Size: 2.5x4-8 & 4x5-11 10.10 Sectional Drawing – Size: 2.5x4-8 & 4x5-11 Suction side drive - without lift-off device 3311 Installation, Operations, and Maintenance Instructions... -
Page 63: Sectional Drawing - Size: 2X3-7
10.11 Sectional Drawing – Size: 2x3-7 10.11 Sectional Drawing – Size: 2x3-7 Suction side drive - with lift-off device 3311 Installation, Operations, and Maintenance Instructions... -
Page 64: Sectional Drawing - Size: 2.5X4-8 & 4X5-11
10.12 Sectional Drawing – Size: 2.5x4-8 & 4x5-11 10.12 Sectional Drawing – Size: 2.5x4-8 & 4x5-11 Suction side drive - with lift-off device 3311 Installation, Operations, and Maintenance Instructions... -
Page 65: Parts List
10.13 Parts list 10.13 Parts list Gould’s Item # Part number DIN Denomination 100S Suction casing 100D Delivery casing 100G 108/108.1 Stage casing 100T 108.2 Stage casing with extraction 109C 160.1 Bearing cover 119C 160.2 Oil room cover 171.1 Diffuser 150L 171.2 Diffuser last stage... - Page 66 10.13 Parts list 356S Tie bolt Vent plug 341 / 370 / 371 / 372 914.1/.2.../.6 Hexagon socket head cap screw 355 / 357F 920.1/.2 Shaft nut Safety device 932.1/.2/.3 Circlip 178 / 400 / 401 940.1/.2/.3/.4/.5 Compress spring HOW TO ORDER When ordering parts call 1-800-446-8537 or your local Goulds Representative...
- Page 67 Visit our website for the latest version of this document and more information: www.gouldspumps.com ITT - Goulds Pumps Vertical Products Operation 3951 Capitol Avenue City of Industry, CA 90601-1734 Form IOM.3311.en-us.2023-11 ©2023 ITT Corporation The original instruction is in English. All non-English instructions are translations of the original instruction.
Need help?
Do you have a question about the GOULDS PUMPS 3311 and is the answer not in the manual?
Questions and answers