Hercules DJCONTROL INPULSE T7 Manual
Hide thumbs
Also See for DJCONTROL INPULSE T7:
- Quick start manual (6 pages) ,
- Instruction manual (2 pages)
Table of Contents
Advertisement
Quick Links
Advertisement
Table of Contents

Subscribe to Our Youtube Channel
Related Manuals for Hercules DJCONTROL INPULSE T7


Summary of Contents for Hercules DJCONTROL INPULSE T7
- Page 1 User Manual...
-
Page 2: Table Of Contents
TABLE OF CONTENTS BOX CONTENTS .......... 6 TECHNICAL SPECIFICATIONS ....8 FEATURES ..........11 Overview ............11 Decks .............. 12 Mixing ............. 30 Connectors ............. 41 INSTALLATION ........... 44 Connections ........... 44 Downloading the software ......47 DJUCED ..........47 Serato DJ Lite .......... - Page 3 Mode 5 ............60 Mode 6 ............62 Mode 7 ............64 Mode 8 ............66 Scratching ............68 Filters .............. 69 MULTICHANNEL SOUND CARD ....70 Master output for speakers (output 1-2) ..71 Headphones output (output 3-4) ....72 Microphone input ..........
- Page 4 Serato DJ Lite can be used without any time limit. If you install Serato DJ Pro instead of Serato DJ Lite, Serato DJ Pro will work with your DJControl Inpulse T7 for the duration of a trial period. At the end of this trial period, if you want to continue using Serato DJ Pro, you must purchase a Serato DJ Pro license.
- Page 5 A wide variety of video tutorials are available to help you learn to mix with the Hercules DJControl Inpulse T7 controller: − Hercules DJ Academy (in English): o In DJUCED , by clicking the icon. o On the DJUCED website.
-
Page 6: Box Contents
Box contents − Hercules DJControl Inpulse T7 − Two vinyl records (7 inches / 17.8 cm) − Two felt slipmats − Braided USB cable − Removable power cable − Power adapter − Instruction manual − Warranty flyer... - Page 7 You can remove the protective films covering the VU meters Hercules DJControl Inpulse T7 controller. You can also leave the protective films in place, as they do not affect the use of the VU meters.
-
Page 8: Technical Specifications
Technical specifications System requirements: − DJUCED https://www.djuced.com/downloaddjuced/ (in English) Serato DJ Lite: https://serato.com/dj/lite/downloads?systemreq uirements#system-requirements (in English) Audio outputs: o Resolution = 24-bit o Sample rate = 44.1 kHz Master outputs for speakers (output 1-2) via: − Two RCA connectors: o Maximum output power = 7 dBU @ 1 kΩ... - Page 9 Power supply − Only use the power supply indicated in the user manual. − Only use the power supply with the network voltage and frequency indicated on the power supply’s rating plate.
- Page 10 Information regarding the power supply Published Value Unit information Manufacturer’s GUILLEMOT name or CORPORATION S.A. trademark 414 196 758 R.C.S. Business Vannes number 2 Rue du Chêne Héleuc Address 56910 Carentoir France Model identifier A481-1852590D Input voltage 100 - 240 Input AC 50 - 60 frequency...
-
Page 11: Features
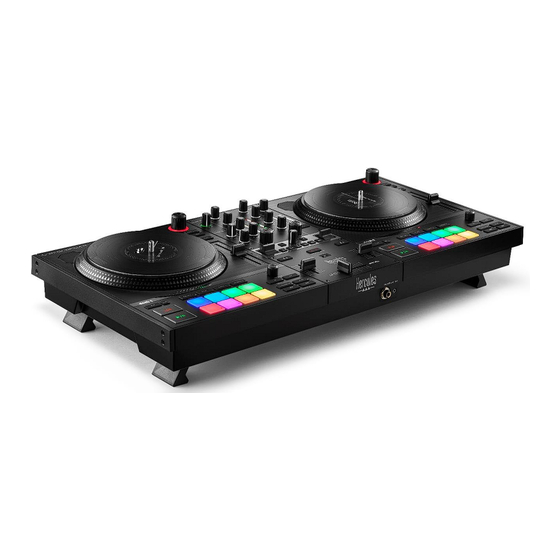
Features Overview 1. Motorized platter 2. Transport buttons (Play, Cue, Sync, Shift) 3. Loop controls (Loop) 4. Track selection controls (Browser, Load, Assist./Prep.) 5. Tempo fader (Pitch fader) 6. Pads and modes 7. Playback modes 8. Monitoring, volumes (Master, Headphones and Microphone) and Beatmatch Guide 9. -
Page 12: Decks
Decks 1. Motorized platter Felt slipmat: placed between the motorized platter and the vinyl record. It protects the vinyl record from rubbing against the platter, and reduces vibrations when playing the record. You must always be sure to place the felt slipmat on the motorized platter before installing the vinyl record. - Page 13 Vinyl record: lets you scratch, speed up or slow down playback, and move within the track. The line on the vinyl record’s label is a point of reference (i.e. a marker) for mixing and scratching. The action carried out depends on two criteria: −...
- Page 14 Actions of the vinyl records with Serato DJ Lite and Serato DJ Pro: Play/Pause Motorized platter SHIFT button Play Scratching Play Top/Ring Press and hold Move quickly within the track Play Ring Speed up or slow down playback Pause Top/Ring Move slowly within the track Pause Top/Ring...
- Page 15 Actions of the vinyl records with DJUCED Motorized Play/Pause SHIFT button platter Play Scratching Play Top/Ring Press and hold Move quickly within the track Play Ring Speed up or slow down playback Pause Ring Move slowly within the track...
- Page 16 Motorized platter: drives the vinyl record that controls the playback of the track and the track’s speed according to the tempo set with the tempo fader. When the Beatmatch Guide function is enabled, the BEAT ALIGN visual guides indicate the direction in which you need to turn the ring (i.e.
- Page 17 2. Transport buttons SHIFT: combined control. For example: − SHIFT + RANGE (KEYLOCK): locks the track’s musical key. − SHIFT + IN: in DJUCED , divides the size of the ® active loop by two. SYNC: enables or disables automatic synchronization of the BPM (beats per minute) values of two tracks.
- Page 18 CUE: inserts a Cue point in the track to identify a specific instant, or moves the deck playhead to the Cue point’s position. − Track paused: inserts a Cue point at the spot where the track is stopped. − Track playing: stops playback of the track and moves the deck playhead to the Cue point.
- Page 19 3. Loop controls AUTOLOOP encoder: − Press the encoder: enables or disables playback of the loop. − Turn the encoder: adjusts the length of the loop. IN/OUT: enables a loop by choosing the in point (IN) and the out point (OUT). When the loop is active (i.e.
- Page 20 4. Track selection controls BROWSER encoder*: lets you browse through your music library and the list of tracks by turning the encoder to the left (up) or to the right (down). Press the encoder to select folders and load the selected track on the destination deck.
- Page 21 ASSIST./PREP.*: − In DJUCED , displays the panel suggesting the best upcoming tracks for your mix. To move through the list of suggested tracks, turn the BROWSER encoder. To select a track, press the BROWSER encoder. The track already loaded on this deck must be paused.
- Page 22 5. Tempo fader Tempo fader: sets the track’s playback speed by adjusting the number of BPM. − Move up: slows down the track. − Move down: speeds up the track. − Tempo fader in the middle: the track’s original speed. The white LED is lit up. When the Beatmatch Guide function is enabled, the TEMPO visual guides indicate whether you need to move the tempo fader up or down, in order to slow down...
- Page 23 In Serato DJ Lite and Serato DJ Pro, when SYNC mode is enabled, pressing SHIFT and moving the tempo fader at the same time lets you move the tempo fader’s values while maintaining the amplitude. For example, with a tempo scale of ±8%, or 16% amplitude, you can move the tempo fader’s values to cover from 0% (maximum) to -16% (minimum), which still results in 16% amplitude, with -8% in the center.
- Page 24 RANGE*: lets you change the tempo scale of the tempo faders. − In DJUCED : ± 6 %, ± 8 %, ± 10 %, ± 12 %, ± 16 %, ± 20 %, ± 25 %, ± 33 %, ± 50 %. −...
- Page 25 6. Pads and modes Mode buttons: lets you enable up to eight modes. To enable a main mode, press HOT CUE 1, LOOP 2, STEMS 3 or SAMPLER 4. To enable a secondary mode (MODE 5, MODE 6, MODE 7 and MODE 8), simultaneously press SHIFT and HOT CUE 1, LOOP 2, STEMS 3 or SAMPLER 4.
- Page 26 7. Playback modes INSTRUMENTAL: lets you play just the Melody, Bass and Drums parts of a track. This is a shortcut for Stems mode. − To play just the Melody, Bass and Drums parts of a track, press the INSTRUMENTAL button. The button lights up.
- Page 27 SHIFT + INSTRUMENTAL: enables Slip mode. In Slip mode, the deck playhead continues to advance in the background when you apply an effect or a loop, place a Cue point, or when you use the motorized platters. When you stop applying an effect, playback resumes from the point where the track would be if it had kept playing.
- Page 28 VOCAL: lets you play just the Vocals part of a track. This is a shortcut for Stems mode. − To play just the Vocals part of a track, press the VOCAL button. The button lights up. − To resume playing all parts of a track (Vocals, Melody, Bass and Drums), press the VOCAL button again.
- Page 29 (pitch bend -) / (pitch bend +): lets you manually align the beat grid of the track being played on this deck with the beat grid of the other deck. − Press and hold to momentarily slow down the deck. −...
-
Page 30: Mixing
Mixing 8. Monitoring, volume and Beatmatch Guide MIC volume: adjusts the volume of the microphone. MIC illuminated ring: indicates the level of the audio signal (VU meter). − Off: there is no audio signal. − Green: the audio signal is being played. −... - Page 31 HEADPHONES volume: : adjusts the signal being played on your − headphones, mixing the Cue output (monitoring of decks 1 and 2) and the Mix output (Master output). o To only listen to the monitoring, press the Monitoring buttons for decks 1 and 2. The buttons light up.
- Page 32 Monitoring: selects the sound source played on your headphones. (located below the MASTER VU meter): plays − the sound of the mix being played out loud for the audience. * (located on both sides of the BEATMATCH − GUIDE button): plays the sound of deck 1 or deck 2 when the Cue/Mix button is set to Cue.
- Page 33 BEATMATCH GUIDE: enables or disables the light guides to adjust the tempo and align the beat grids of the two tracks. There are four red arrows per deck. DJUCED defines one of the decks as the master ® synchronization (Master Sync) deck, and the other as the slave deck.
- Page 34 − TEMPO visual guides: if one of the two red arrows located to the right of a tempo fader is lit up, this means that the tempo (i.e. number of beats per minute) of the track being played on this deck is different than the tempo of the other deck.
- Page 35 − BEAT ALIGN visual guides: if one of the two red arrows located below a motorized platter is lit up, this means that the beats of the track being played on this deck are not aligned with the beats of the other deck.
- Page 36 9. Mixing section GAIN knob*: adjusts the gain (i.e. the volume level before the volume fader). 3-band equalizer (EQ)*: controls the intensity of the EQ. A knob is associated with each band: HIGH, MID and LOW. FILTER knob*: adjusts the frequency of the dual filter (high-pass and low-pass).
- Page 37 Mixer VU meter: displays the level of the audio signal of decks 1 and 2. Volume fader*: adjusts the deck’s volume. Crossfader: lets you make a transition between two tracks by increasing the volume of one of the decks, while decreasing the volume of the other deck. −...
- Page 38 Curve switch: lets you modify the crossfader curve. (mix): progressive mixing of the two decks. − (scratch): very fast mixing of the two decks. − (disabled): crossfader disabled, to mix using the − volume faders only. In Serato DJ Lite and Serato DJ Pro, you can modify the crossfader settings.
- Page 39 Effects To display the effects rack: − In DJUCED : click − In Serato DJ Lite: click Effects buttons *: lets you select an effect from the effects rack. The button lights up. To enable an effect, use the performance lever. To modify the effects associated with buttons select a new effect in the effects rack.
- Page 40 on the right apply to the right-hand deck (Deck 2). In Serato DJ Pro, the two groups of three effects buttons apply to the two virtual decks. Performance lever*: lets you enable an effect loaded on buttons . There are three different positions: −...
-
Page 41: Connectors
Connectors Master output for speakers (output 1-2) Balanced microphone input USB-B 2.0 port POWER button Connector for power adapter Headphones output (output 3-4) Master output for speakers (output 1-2): lets you connect active speakers. Formats: 2 x unbalanced RCA (Cinch) and 2 x balanced XLR. - Page 42 POWER button: lets you power on and power off the DJControl Inpulse T7 controller. Connector for power adapter: lets you connect the power cable and plug the DJControl Inpulse T7 controller into an electrical outlet using the adapter. Headphones output (output 3-4): lets you connect headphones in order to monitor tracks.
- Page 43 Extend the four retractable feet to elevate the DJControl Inpulse T7 controller and run the cables underneath it. − Retract the feet before transporting the DJControl Inpulse T7 controller. − Retract the feet when you are not using the DJControl Inpulse T7 controller.
-
Page 44: Installation
Inpulse T7 controller. 2. Connect the power cable to the power adapter, and plug it into an electrical outlet. 3. Connect the USB cable to the DJControl Inpulse T7 controller and to the computer. 4. Press the POWER button on the DJControl Inpulse T7 controller. - Page 45 Power supply − Only use the power supply indicated in the user manual. − Only use the power supply with the network voltage and frequency indicated on the power supply’s rating plate.
- Page 46 − It is possible to simultaneously use both output formats (XLR and RCA) — for example, by connecting an output pair to the PA system, and a second output pair to monitoring speakers. − An LED illumination sequence, called Vegas Mode, starts up each time you connect the DJControl Inpulse T7 controller to your computer.
-
Page 47: Downloading The Software
® Windows requires that you install the drivers in ® order to use DJControl Inpulse T7 in ASIO mode, which reduces the latency compared to WASAPI mode and is generally more stable. The drivers also let you test your DJControl... - Page 48 Select the Audio tab to choose the sound card, and assign the outputs for headphones and speakers. The standard setup for Windows ® is as follows: − Audio device: DJControl Inpulse T7 ASIO (ASIO) − Output: o Master: Outputs 1&2 o Headphones: Outputs 3&4...
- Page 49 The standard setup for macOS is as follows: ® − Audio device: DJControl Inpulse T7 − Output: o Master: Outputs 1&2 o Headphones: Outputs 3&4...
-
Page 50: Serato Dj Lite
® Windows requires that you install the drivers in ® order to use DJControl Inpulse T7 in ASIO mode, which reduces the latency compared to WASAPI mode and is generally more stable. The drivers also let you test your DJControl... - Page 51 Hercules DJControl Inpulse T7 includes a license for Serato DJ Lite, not a license for Serato DJ Pro. Serato DJ Lite can be used without any time limit. If you install Serato DJ Pro instead of Serato DJ Lite, Serato DJ Pro will work with your DJControl Inpulse T7 for the duration of a trial period.
-
Page 52: Livening Up Your Mix
Livening up your mix There are different ways to liven up your mix. Modes and pads The pads In DJUCED , pads 1 to 8 carry out the actions corresponding to the mode currently enabled. In Serato DJ Lite, pads 1 to 4 carry out the actions corresponding to the mode currently enabled. - Page 53 The modes enabled on the pads vary according to the software being used: Modes DJUCED Serato DJ Lite Serato DJ Pro** Hot Cue Hot Cue Hot Cue Loop Roll Auto Loop Auto Loop Stems Stems Stems Sampler Sampler Sampler TonePlay –...
-
Page 54: Hot Cue Mode
Hot Cue mode A Hot Cue point is a marker (like a bookmark) that you can place in a track to easily locate this moment in the track again, and instantly return to it afterwards. In DJUCED , eight Hot Cue points can be set per track. ... -
Page 55: Loop Mode
In DJUCED , this mode corresponds to Loop Roll mode. The deck playhead continues to advance in the background when you apply a loop. When you disable the loop, playback resumes from the point where the track would be if it had kept playing. In Serato DJ Lite and Serato DJ Pro, this mode corresponds to Auto Loop mode. - Page 56 Loop length: Deck 1 / Deck 2 Serato DJ Lite DJUCED Pad 1 1/16 of a beat 1 beat Pad 2 ⅛ of a beat 2 beats Pad 3 ¼ of a beat 4 beats Pad 4 ½ of a beat 8 beats Pad 5 1 beat...
-
Page 57: Stems Mode
Stems mode Stems mode lets you separate a track into four different parts (vocals and instruments), called “stems”. 1. To access Stems mode, press STEMS 3. The STEMS 3 button’s light stays lit up. 2. Pads 1 to 4 are each associated with a stem. To stop playing a stem, press the corresponding pad. - Page 58 When you enable stems in a track for the first time, the separation is not always immediate. This may take a few moments, while the DJ software analyzes the track and generates the different parts (vocals, melody, bass, drums). You should remember to leave enough time between the moment when you are separating the stems and the moment when you are playing them.
-
Page 59: Sampler Mode
Sampler mode A sample is a short sound played over the track that is currently playing: it can be played either once (jingle) or in repetition (loop). In DJUCED , pads 1 to 8 let you play the eight samples ... -
Page 60: Mode 5
Mode 5 Serato DJ Lite does not feature mode 5 (TonePlay). Serato DJ Pro, in conjunction with the Pitch 'n Time plugin, offers a Pitch Play mode which works using the same principle as TonePlay mode. In DJUCED , mode 5 corresponds to TonePlay mode. ... - Page 61 Modifying the tone: Deck 1 / Deck 2 Tone Pad 1 Original tone Pad 2 Pad 3 Pad 4 Pad 5 Pad 6 Pad 7 Pad 8...
-
Page 62: Mode 6
Mode 6 Serato DJ Lite does not feature mode 6. In DJUCED , mode 6 corresponds to PadFX mode. This mode lets you control the effects in the effects rack using the pads. An effect is sometimes a filter or a combination of filters applied to a track to modify its sound (echo, reverb…). - Page 63 Possible actions: Deck 1 / Deck Effects Pad 1 Effect 1 of the rack Pad 2 Effect 2 of the rack Pad 3 Effect 3 of the rack Pad 4 Displays/hides the effects rack Pad 5 Changes effect 1 in the rack Pad 6 Changes effect 2 in the rack Pad 7...
-
Page 64: Mode 7
Mode 7 In DJUCED , mode 7 corresponds to Slicer Loop mode. In Serato DJ Lite and Serato DJ Pro, mode 7 corresponds to Manual Loop mode. In DJUCED , mode 7 corresponds to Slicer Loop mode. This mode lets you slice the active loop into eight sections. - Page 65 In Serato DJ Lite and Serato DJ Pro, mode 7 corresponds to Manual Loop mode. This mode lets you manually enable a loop. 1. To access mode 7 (Manual Loop), simultaneously press SHIFT and STEMS 3. The STEMS 3 button flashes.
-
Page 66: Mode 8
Mode 8 In DJUCED , mode 8 corresponds to BeatJump mode. In Serato DJ Lite and Serato DJ Pro, mode 8 corresponds to Scratch Banks mode. In DJUCED , mode 8 corresponds to BeatJump mode. This mode lets you make a precise jump in the track. 1. - Page 67 In Serato DJ Lite and Serato DJ Pro, mode 8 corresponds to Scratch Banks mode. This mode lets you instantly load a scratch sample onto the deck to scratch on the motorized platter in place of the track that’s currently playing, and then quickly return to the track that’s currently playing.
-
Page 68: Scratching
Scratching Scratching consists of producing a sound effect from a track, by turning the motorized platter. Place your index finger on top of the motorized platter and make small, quick movements to the right and to the left. You can repeat this scratch multiple times to create a rhythm. -
Page 69: Filters
Filters Adjustment of the track’s filter lets you attenuate certain frequencies. − Attenuate the high frequencies (known as a low- pass filter or high-cut filter): turn the filter knob (FILTER) to the left. − Attenuate the low frequencies (known as a high- pass filter or low-cut filter): turn the filter knob (FILTER) to the right. -
Page 70: Multichannel Sound Card
Multichannel sound card The DJControl Inpulse T7 controller includes a built-in multichannel sound card, allowing you to play your mix on speakers for the audience (Master output for speakers), monitor the next track that you’re preparing on your headphones (headphones output), and use a microphone and/or a device equipped with a line-level output as an audio source. -
Page 71: Master Output For Speakers (Output 1-2)
Master output for speakers (output 1-2) Your active speakers must be connected to one of the two Master outputs for speakers located at the back of your DJ controller. It is possible to simultaneously use both output formats — for example, by connecting an output pair to the PA system, and a second output pair to monitoring speakers. -
Page 72: Headphones Output (Output 3-4)
Headphones output (output 3-4) Your headphones must be connected to one of the two headphones outputs located at the front of your DJ controller. By default, each time your DJ controller is connected, the headphones output is assigned to output 3-4 so that it can work with all DJing software available on the market —... - Page 73 We do not recommend that you connect two pairs of headphones at the same time (i.e. one to the 1/8” / 3.5 mm mini-jack output connector, and one to the ¼” / 6.35 mm jack output connector). If both pairs of headphones do not have the same impedance, they will have different output volumes.
-
Page 74: Microphone Input
Microphone input Your microphone must be connected to the Microphone input located at the back of your DJ controller. The microphone input is balanced. connect balanced unbalanced microphone. The advantage of using a balanced microphone is that you will enjoy better sound, with less breathing effects and other noises. -
Page 75: Compatibility
PC or Mac, as it complies with the USB Audio and USB MIDI standards. ASIO and Windows® control panel To use the DJControl Inpulse T7 controller with Serato DJ Lite, you must install the ASIO drivers. The ASIO drivers are available here: https://support.hercules.com/product/djcontrolinpul set7/. - Page 76 − Start up your software (e.g.: DJUCED ® ) and select the DJControl Inpulse T7 ASIO (ASIO) driver: Once the software begins using the ASIO driver, the ASIO settings can no longer be modified in the control panel. This is perfectly normal, and indicates that the...
- Page 77 − Reduce the buffer size to reduce latency. − Increase the buffer size if you notice glitches or artifacts in the audio. You will need to repeat this procedure until you find the optimal buffer size for your system. The drivers are available here: https://support.hercules.com/product/djcontrolinpul set7/...
-
Page 78: Firmware Update
The drivers are available here: https://support.hercules.com/product/djcontrolinpul set7/ The control panel also allows you to access this information and display the driver versions installed on your computer in the ABOUT tab. Have this information ready if you need to contact Hercules’ technical support. -
Page 79: Testing The Dj Controller In The Control
Testing the DJ controller in the control panel In the ABOUT section of the DJControl Inpulse T7 control panel, you can test your DJ controller’s sound, MIDI controls and lighting, along with the motorized platters. To access the control panel, go to the following directory: C:\Program Files\DJHERCULESMIX\Audio\DJ Console Series\cpl2\. - Page 80 MIDI controls test To test whether the DJControl Inpulse T7 controller’s MIDI controls are working (without using DJ software to do so), try using the buttons or other controls that you want to test out. If the DIN connector icon turns green, this means that the MIDI command is being received and the button or other control is working properly.
- Page 81 LEDs. The icon turns green during the test, and the controller’s LEDs light up. You can also light up all of the DJControl Inpulse T7 controller’s LEDs by simultaneously pressing the IN and OUT buttons on both decks.
- Page 82 4. Motorized platters test To test whether the DJControl Inpulse T7 controller’s motorized platters are working (without using DJ software to do so), click the icon for platter 1 or 2. The icons for the corresponding platter and the DIN connector turn green during the test, and the motorized platter moves (i.e.
-
Page 83: Demo Mode
Demo mode This mode is available when you connect your DJ controller to a power supply and a USB power supply without a computer, and is used in-store, in particular. In this case, the DJ controller is not operational but is in demo mode: a demo sequence lighting up the controller’s different lights keeps repeating itself. -
Page 84: Faqs
FAQs No sound is coming out of my headphones. Make sure that you have connected your headphones at the front of the DJ controller, as your DJ controller is equipped with a multichannel sound card preconfigured to work with DJUCED ®... - Page 85 The sound on my headphones is distorted. Make sure that your headphones feature a TRS connector (standard headphones) and not a TRRS connector (headphones + microphone). Ring Ring Ring Sleeve Sleeve TRRS connectors are not compatible with the DJControl Inpulse T7 controller.
- Page 86 Serato DJ Lite. In order to test (without using DJ software) whether the audio interface of the DJControl Inpulse T7 controller is producing sound, you can display the DJ controller’s control panel. Click the ABOUT tab, and then click the speaker icon.
- Page 87 No sound is coming out of my laptop computer speakers. Your DJ controller is equipped with a preconfigured multichannel sound card. If you want to use the speakers built into your laptop computer: − In DJUCED ® , access the settings and tick the SEND MASTER TO COMPUTER SPEAKERS option.
- Page 88 If you want to use the speakers built into your laptop computer: − In DJUCED , access the settings and tick the ® SEND MASTER TO COMPUTER SPEAKERS option. You must connect your headphones to the DJControl Inpulse T7 controller.
- Page 89 DJControl Inpulse T7 controller. In order to test (without using DJ software) whether the audio interface of the DJControl Inpulse T7 controller is producing sound, you can display the DJ controller’s control panel. Click the ABOUT tab, and then click the speaker icon.
- Page 90 DJControl Inpulse T7. If your speakers’ connectors differ from the connectors on the DJControl Inpulse T7 controller, you can use a dual RCA to 1/8” / 3.5 mm mini-jack adapter (not included) to connect multimedia speakers, a dual XLR to ¼”...
- Page 91 How can I connect the DJControl Inpulse T7 controller to a USB-C port, or a Thunderbolt 3 port? You can connect the DJControl Inpulse T7 controller to a USB-C port or a Thunderbolt 3 port in three different ways: − By...
- Page 92 TECHNICAL SUPPORT https://support.hercules.com...
- Page 93 Trademarks Intel ® and Intel Core™ are trademarks or registered trademarks of Intel Corporation. Microsoft ® Windows ® 10/11 is a registered trademark or trademark of Microsoft Corporation in the U.S. and/or in other countries. ® and macOS® are trademarks of Apple Inc., registered in the U.S. and other countries.
- Page 94 Copyright No part of this manual may be reproduced, summarized, transmitted, transcribed, stored in a retrieval system, or translated into any language or computer language, in any form or by any means, electronic, mechanical, magnetic, manual, via photocopying, recording, or other, without the express written consent of Guillemot Corporation S.A.
- Page 95 DJUCED® and Serato DJ Lite End User License Agreement Please read the License Agreement displayed during installation of DJUCED® and Serato DJ Lite carefully.
Need help?
Do you have a question about the DJCONTROL INPULSE T7 and is the answer not in the manual?
Questions and answers