Hercules DJControl Instinct P8 User Manual
Hide thumbs
Also See for DJControl Instinct P8:
- Quick start quide (2 pages) ,
- Quick start manual (2 pages)
Table of Contents
Advertisement
Quick Links
Advertisement
Table of Contents

Subscribe to Our Youtube Channel
Related Manuals for Hercules DJControl Instinct P8


Summary of Contents for Hercules DJControl Instinct P8
- Page 1 User manual...
- Page 2 1. Overview...
-
Page 3: Box Contents
2. Box contents Hercules DJControl Instinct P8 USB cable (type A male/type B male), length: 4.9 feet / 1.5 meters Quick start guide... -
Page 4: Product Specifications
3. Product specifications 3.1. Mechanical specifications Dimensions: 10.4 x 7.4 x 1.9” / 26.5 x 18.7 x 4.8 cm Weight: 2.2 lb / 1 kg 3.2. Technical specifications 1. USB MIDI controller, featuring: DECK 8 transport buttons: SHIFT / PLAY / CUE / SYNC 2 matrices of 4 pads each with multicolored backlighting and 1 associated mode button (LOOP, EFFECT, SAMPLE, HOTCUE) 2 rotary encoders with integrated switch to control loops (LOOP) and... - Page 5 2. Built-in multi-channel audio interface Speaker output (= output 1-2) with RCA connector o Maximum power = 5 dBU into 1 kΩ o THD+N @1 kHz ~ -83 dB o Resolution = 16-bit o Sample rate = 48 kHz Headphones output (= output 3-4) with 1/8” (3.5 mm) connector o Maximum power = 5 dBU into 32 Ω...
-
Page 6: Installation
4. Installation 4.1. Connection to a computer (USB) Note: A LED illumination sequence, called Vegas Mode, starts up each time you connect the device to your computer. This sequence starts again after five minutes of inactivity on the controller, i.e. when the user has not interacted with the product. - Page 7 4.2. Downloading DJUCED™ 40° Go to: https://support.hercules.com/djcontrolinstinctP8 Download and install DJUCED™ 40°. 4.3. Starting up DJUCED™ 40° A window appears, indicating that your product has been successfully detected and is ready to use.
- Page 8 4.4. Tutorials to get started in DJUCED™ 40° Follow the tutorials to help you get started in DJUCED™ 40° available here: https://www.youtube.com/user/Djucedsoftware/playlists...
-
Page 9: Description Of Features
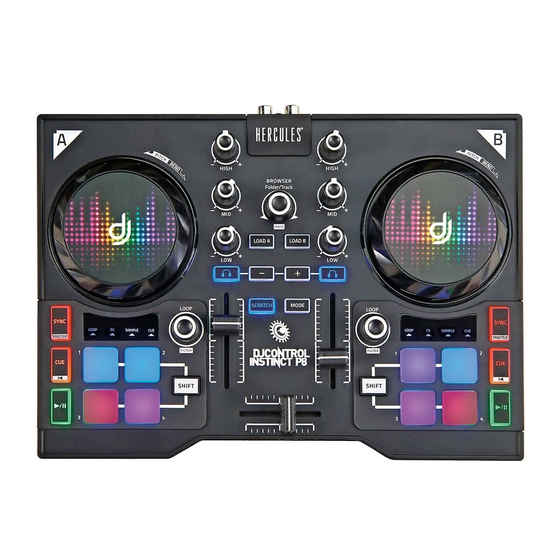
5. Description of features 5.1. Product description Transport buttons: SYNC, CUE, play/pause Performance pads Transport button: SHIFT Adjust loops/filter/effects amount Browse within the library, load tracks, adjust master volume 3-band equalization Mixer: headphones volume, monitoring, volume faders, crossfader, SCRATCH, MODE Deck: Scratch, Pitch bend, Pitch Reset Speakers output (1-2) 10. - Page 10 5.2. Multi-channel sound card The product includes a built-in multi-channel sound card, allowing you to play your mix on speakers for the audience (speaker output) and monitor the next track that you’re preparing on your headphones (headphones output). 1. Speakers output (= output 1-2) Your speakers should be connected to the speakers output located at the back of your product.
- Page 11 Mac, as it complies with the USB Audio and USB MIDI standards. 2. ASIO ASIO drivers are available from the product page on the Hercules website, if required by a software application or if you wish to benefit from lower latency on your PC.
- Page 12 The drivers are available here: https://support.hercules.com The control panel also allows you to access this information and display the driver versions installed on your computer in the ABOUT tab. Have this information ready if you need to contact Hercules’ technical support.
-
Page 13: Demo Mode
6. Demo Mode This mode is available when you connect your product to a USB power supply. In this case, the product is not operational but is in demonstration mode and the start-up Vegas Mode sequence keeps repeating itself. - Page 14 7. FAQ 7.1. No sound is coming out of my headphones. Make sure that you have connected your headphones to the right-hand side of the product, as your product is equipped with a multi-channel sound card preconfigured to work with DJUCED™ 40°. By default, the 2 monitoring buttons are enabled when the software is first launched.
- Page 15 only one sound card for the speakers and headphones outputs. If your built-in sound card only has one output (1-2) as in the example below, you will not be able to use your headphones for monitoring. In that case, connect your headphones and speakers directly to the product.
- Page 16 8. Trademarks Intel® and Pentium® are registered trademarks of Intel Corporation. Microsoft® Windows® 7, 8 and 10 are registered trademarks or trademarks of Microsoft Corporation in the United States and/or in other countries. Mac and Mac OS are trademarks of Apple Inc., registered in the U.S. and other countries.
- Page 17 9. Copyright No part of this manual may be reproduced, summarized, transmitted, transcribed, stored in a retrieval system, or translated into any language or computer language, in any form or by any means, electronic, mechanical, magnetic, manual, via photocopying, recording, or other, without the express written consent of Guillemot Corporation S.A.
- Page 18 10. DJUCED™ 40° End User License Agreement Please read the License Agreement displayed during installation of DJUCED™ 40° carefully.
- Page 19 APPENDIX: FUNCTIONS OVERVIEW EQUALIZER (EQ) The ROTARY KNOB controls the EQ intensity in DJUCED™ 40°. One knob is associated with each band: HIGH / MID / LOW. These knobs work the same way on decks A and B. Use SHIFT + EQ knobs to control decks C and D. Easily browse UP/DOWN through your music library by turning the encoder to the LEFT/RIGHT.
- Page 20 PLAY/PAUSE BUTTON PLAY/PAUSE the track on decks A and B (press SHIFT to control decks C and CUE BUTTON - If a track is NOT being played, insert a Cue point at the current PLAYHEAD position. - If a track IS being played, the playhead goes to the last Cue point used and stops playback of the track.
- Page 21 In LOOP mode (MODE + PAD 1) In CUE mode (MODE + PAD 4) ADD or DELETE up to 4 HOTCUES on the fly. Makes a temporary loop of 1/2/4 or 8 beats, depending on the pad. ADD a HotCue at the current playhead position by In conjunction with the SHIFT button: pressing a pad.
- Page 22 JOG WHEEL The jog wheels are pressure-detecting, and can react to the lightest touches of your fingers. With the jog wheels, you can: - move within tracks (when playback is stopped). - control the pitch bend of a track (during playback). - scratch (when Vinyl (Scratch) mode is enabled), by touching the upper part of the jog wheel and turning the jog wheel to the right and to the left.
Need help?
Do you have a question about the DJControl Instinct P8 and is the answer not in the manual?
Questions and answers