KitchenAid KSM55; KSM60; KSM70; 7KSM60; 7KSM70 - 5.5 Quart Bowl-Lift Stand Mixer Manual
- Owner's manual (40 pages)
Advertisement
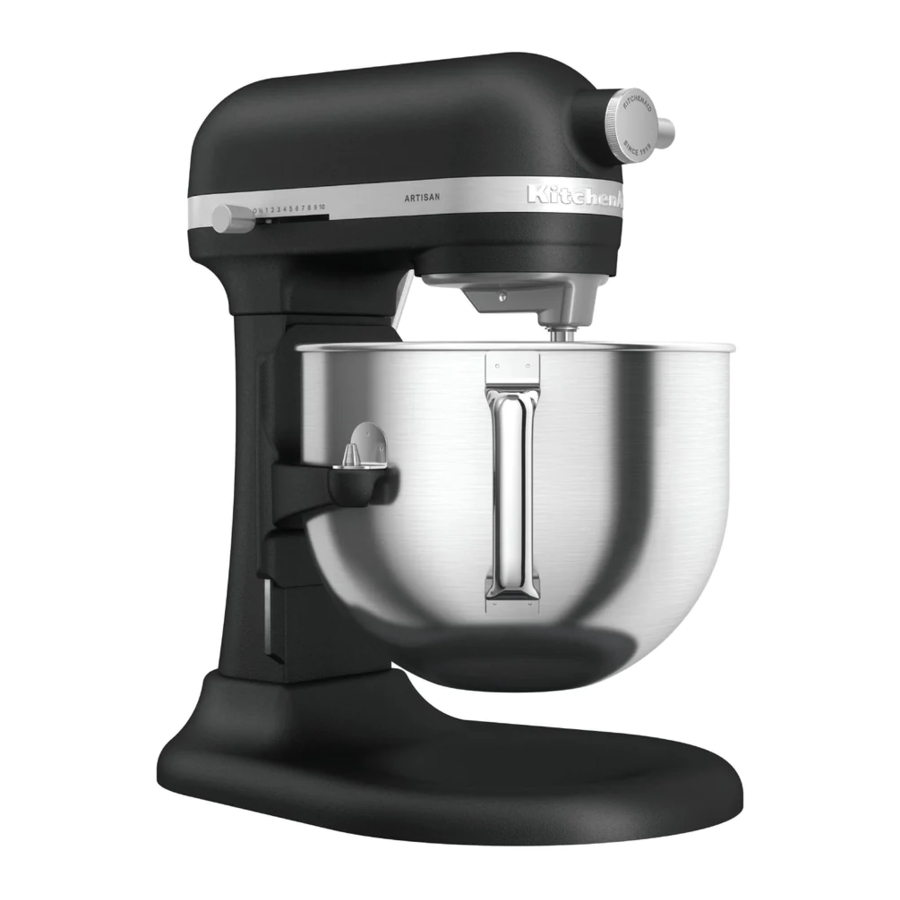
OVERVIEW

- Motor Head
- Attachment Hub
- Attachment Knob
- Hub Cover
- Beater Shaft
- Speed Control Lever
- Bowl-Lift Lever
- Beater Height Adjustment Screw
- Bowl Support
- Locating Pins
- Bowl*
- Bowl Handle*
- Double Flex Edge Beater**
- Flat Beater
- Spiral Dough Hook
- Wire Whip**
- 11-Wire Stainless Steel Elliptical Whip**
- Pouring Shield**
- Spring Latch and Bowl Pin (Not Shown)
- Pastry Beater**
- Flex Edge Beater**
- Scraper** ***
*Bowl type may vary. Bowls are also available for purchase as separate accessories.
**Included with select models. Picture/Style may vary from product depending on model.
***Can also be used to scrape your Bowl.
ACCESSORY/SPEED GUIDE
| ACCESSORY | USE FOR | DESCRIPTION | SPEED |
| Flat Beater | Mixing and folding ingredients | Folding delicate ingredients, egg whites, cream, etc. Mixing cakes, frostings, cookies, etc. | 1∕2 speed for folding Speeds 1-6 for mixing |
| Flex Edge Beater*, Double Flex Edge Beater* | Mixing and creaming ingredients | Creaming butter and sugar, mixing cakes, frostings, cookies, etc. | Speeds 1-6 |
| Spiral Dough Hook | Kneading | Breads, rolls, pizza dough, etc. | Speed 2 |
| Wire Whip/11-Wire Elliptical Whip* | Whipping | Eggs, Egg whites, cream, etc. | Speeds 4-10 |
| Pastry Beater* | Cutting butter into flour, mashing fruits/vegetables, shredding meats | Pie dough and other pastries; mashed potatoes/fruits/vegetables, shredded chicken | Pastries (Cutting butter into flour): Speed 1-3, Mashing fruits/Vegetables: Up to Speed 2 Mashing potatoes, Shredding Meat: Speed 2 |
NOTE: Use Speed 2 to mix or knead yeast doughs. Use of higher speed creates high potential for Stand Mixer failure. The PowerKnead™ Spiral Dough Hook efficiently kneads most yeast dough within 4 minutes. The use of a lower speed might slow down the unit and not thoroughly knead the dough.
*Available as an accessory purchase with selected models only.
PRODUCT ASSEMBLY
- Turn the Stand Mixer to "0" (OFF) and then Unplug.
To attach the Bowl: Fit the Bowl Supports over Locating Pins and press down on back of the Bowl until Bowl Pin snaps into Spring Latch.

- To Remove Bowl: Place Bowl-Lift Lever in the down position. Grasp Bowl Handle and lift straight up and off Locating Pins.

- To attach the Accessory: Slip the accessory onto the shaft. Turn to hook it over the Pin on the shaft.

- To Remove the Accessory: Turn Stand Mixer to "0" (OFF) then unplug. Press accessory upward and turn to the left. Pull down the accessory from Beater Shaft.

![]()
If the Bowl is not securely snapped into place, it will be unstable and wobble during use. - To raise the Bowl: Rotate the Bowl-Lift Lever to the straight up position. The Bowl must always be in the raised position when mixing.

- Test the Beater to Bowl Clearance: Turn Stand Mixer ON and test each speed, making sure the beater does not touch the Bowl during operation. If the Beater is too far away from the bottom or is hitting the Bowl, proceed to next step to make adjustments.

- (OPTIONAL) To adjust Beater to Bowl Clearance: Lower the Bowl to the down position. Turn the screw slightly counterclockwise (left) to raise the beater, or clockwise (right) to lower it. Adjust the beater so that it just clears the surface of the Bowl. Check again the clearance of the beater to the Bowl.

![]()
When properly adjusted, the Flat Beater will not strike on the bottom or sides of the Bowl. If the Flat Beater or the Wire Whip is so close that it strikes the bottom of the Bowl, coating may wear off the beater or wires on the whip may wear.


USING THE POURING SHIELD*
PRODUCT USAGE
- Turn the Stand Mixer to "0" (OFF) and then Unplug.
- Attach Bowl and Flat Beater, Dough Hook, or Wire Whip to the mixer. Attach Bowl and raise into locked position.
- Place the shield onto the Bowl so that the Motor Head covers the U-shaped gap in the shield. This will position the pouring chute just to the right of the Attachment Hub as you face the Mixer. Press lightly so that the tabs snap the shield onto the Bowl.
- Pour ingredients into the Bowl through the Pouring Chute.
DISASSEMBLING THE PRODUCT
- Turn the Stand Mixer to "0" (OFF) and then Unplug.
- Lift the front of the Pouring Shield* clear of the rim of the Bowl. Pull away from the Stand Mixer. Lower the Bowl and scrape.
*Available with select models only and available as an accessory purchase.
PRODUCT USAGE
  Electrical Shock Hazard |
| Plug into a grounded 3 prong outlet. Do not remove ground prong. Do not use an adapter. Do not use an extension cord. Failure to follow these instructions can result in death, fire, or electrical shock. |
- Plug the Stand Mixer into a grounded 3 prong outlet. Start with lower speed to avoid splashing and increase it gradually. Refer to the "Speed Control Guide".
![]()
Injury Hazard
Unplug mixer before touching beaters.
Failure to do so can result in broken bones, cuts, or bruises. - Do not scrape the Bowl while operating. Scraping the Bowl once or twice during mixing is usually sufficient.
OPTIONAL ATTACHMENTS
KitchenAid offers a wide range of optional attachments such as the Spiralizer, Pasta Cutters, or Food Grinder that may be attached to the Stand Mixer attachment power hub.
- Turn the Stand Mixer to "0" (OFF) and then unplug. Unscrew Attachment Hub Cover. Insert attachment into Attachment Hub, making certain that attachment power shaft fits into the square Attachment Hub socket.

- Tighten the Attachment Knob by turning it clockwise until the attachment is secured to the Stand Mixer.


NOTE: See the "Use and Care Guide" of each specific attachment for more details.
CARE AND CLEANING

Do not immerse the Stand Mixer body in water or other liquids. Allow the appliance to cool completely before putting on or taking off parts, and before cleaning the appliance.
- Turn the Stand Mixer to "0" (OFF) and then Unplug.
- Wipe the Stand Mixer Body with a soft, damp cloth.
- The Bowl is full dishwasher-safe.
The following parts are dishwasher-safe, top rack only: Flat Beater, Flex Edge Beater*, Double Flex Edge Beater*, Spiral Dough Hook, 11 Wire Elliptical Whip*, Pastry Beater*, Scraper* ** and Pouring Shield*. - The following part should be hand-washed only, using warm, soapy water and drying thoroughly: Wire Whip only.
*Available with select models only and available as an accessory purchase.
**Can also be used to scrape your Bowl.
TROUBLESHOOTING GUIDE
| Electrical Shock Hazard  | ||||
| Plug into a grounded 3 prong outlet. Do not remove ground prong. Do not use an adapter. Do not use an extension cord. Failure to follow these instructions can result in death, fire, or electrical shock. | ||||
| PROBLEM | SOLUTION | |||
| If Stand Mixer warms up during use: | Under heavy loads with extended mixing time periods, you may not be able to comfortably touch the top of the Stand Mixer. This is normal. | |||
| If Stand Mixer emits a pungent odor during initial use: | This is normal. This is common with electric motors. | |||
| If the Flat Beater hits the Bowl: | Stop the Stand Mixer. See the "Product Assembly" section and adjust the Beater to Bowl Clearance. | |||
| The Speed Control Lever does not move smoothly or easily: | To move the Speed Control Lever with ease, lift slightly up as you move it across the settings in either direction. | |||
| If your Stand Mixer should fail to operate, please check the following: | Is the Stand Mixer plugged in? | |||
| Is the fuse in the circuit to the Stand Mixer in working order? If you have a circuit breaker box, be sure the circuit is closed. | ||||
| Turn off the Stand Mixer for 10-15 seconds, then turn it back on. If the Stand Mixer still does not start, allow it to cool for 30 minutes before turning it back on. | ||||
| If product shuts off after extensive use: | Motor has automatic sensor that will keep motor from overheating by shutting it off. If this occurs, turn speed switch to off and let Stand Mixer rest for 30 minutes before restarting. | |||
| If mixer is slowing down or appearing to struggle: | Are you using the appropriate beater and speed? See "Accessory/Speed Guide" for more information. Using 1/2 Speed or Speed 1 for bread doughs and heavy loads might slow down the unit. Breads should knead with the dough hook at Speed 2. If you have slowdown with heavy loads at 1/2 Speed, increase to Speed 1 or 2. | |||
| If the problem cannot be corrected: | See the "Warranty and Service" section. Do not return the Stand Mixer to the retailer; retailers do not provide service. | |||
For customers in the US, please visit kitchenaid.com/pinch-of-help for additional product help.
ARRANGING FOR SERVICE AFTER THE WARRANTY EXPIRES, OR ORDERING ACCESSORIES AND REPLACEMENT PARTS
In the United States and Puerto Rico:
For service information, or to order accessories or replacement parts, call toll-free at 1-800-541-6390 or write to:
Customer eXperience Center,
KitchenAid Small Appliances,
P.O. Box 218, St. Joseph, MI 49085-0218
Outside the United States and Puerto Rico:
Consult your local KitchenAid dealer or the store where you purchased the Stand Mixer for information on how to obtain service.
For service information in Canada:
Call toll-free 1-800-807-6777.
For service information in Mexico:
Call toll-free 01-800-0022-767.
PRODUCT SAFETY
Your safety and the safety of others are very important.
We have provided many important safety messages in this manual and on your appliance. Always read and obey all safety messages.
 This is the safety alert symbol.
This symbol alerts you to potential hazards that can kill or hurt you and others.
All safety messages will follow the safety alert symbol and either the word "DANGER" or "WARNING." These words mean:

You can be killed or seriously injured if you don't immediately follow instructions.
You can be killed or seriously injured if you don't follow instructions.
All safety messages will tell you what the potential hazard is, tell you how to reduce the chance of injury, and tell you what can happen if the instructions are not followed.
IMPORTANT SAFEGUARDS
When using electrical appliances, basic safety precautions should always be followed, including the following:
- Read all instructions.
- To protect against the risk of electrical shock do not put Stand Mixer in water or other liquid.
- This appliance is not intended for use by persons (including children) with reduced physical, sensory, or mental capabilities, or lack of experience and knowledge unless they are closely supervised and instructed concerning the use of the appliance by a person responsible for their safety. Close supervision is necessary when any appliance is used by or near children. Children should be supervised to ensure that they do not play with the appliance.
- Turn the appliance to "0" (OFF), then unplug from the outlet when not in use, before assembling or disassembling parts and before cleaning. To unplug, grasp the plug and pull from the outlet. Never pull from the power cord.
- Avoid contacting moving parts. Keep hands, hair, clothing, as well as spatulas and other utensils, away from beater during operation to reduce the risk of injury to persons, or damage to the mixer.
- Do not operate any appliance with a damaged cord or plug, or after the appliance malfunctions, or is dropped or damaged in any manner. Return appliance to the nearest Authorized Service Facility for examination, repair, or electrical or mechanical adjustment.
- The use of accessories or attachments not recommended or sold by the manufacturer may cause fire, electric shock or injury.
- Do not use the Stand Mixer outdoors.
- Do not let the cord hang over the edge of table or counter.
- Allow the appliance to cool completely before putting on or taking off parts, and before cleaning the appliance.
- Remove the Flat Beater, Wire Whip, Pastry Beater, Flex Edge Beater, Double Flex Edge Beater or Spiral Dough Hook from the Stand Mixer before washing.
Important Security Measures required for compliance with regulations in Mexico:
- If the power cord is damaged, it must be replaced by the manufacturer or its service agent or by qualified personnel to avoid any risk.
- The appliance is not intended for use by persons (including children) who suffer from reduced physical, sensory or mental capabilities or who lack the necessary experience or knowledge unless such persons are supervised or trained by a person authorized to operate the appliance.
- Children must be supervised to ensure that they do not use the appliance as a toy.
- To protect against the risk of electric shock, do not immerse the cord, plug/socket, or appliance in water or other liquids.
- Do not use the device for any other use other than that for which it was designed. Improper use of the appliance may lead to possible personal injury.
- This appliance is intended for use in the home and for similar applications, such as the following:
- By kitchen staff in retail areas, offices and other work environments;
- Country houses;
- By clients in hotels, motels or other residential-type settings;
- Bedroom or dining room settings.
- Do not use the appliance for any other use other than that for which it was designed. It could lead to possible injury.
SAVE THESE INSTRUCTIONS
This product is designed for household use only.
ELECTRICAL REQUIREMENTS
 Electrical Shock Hazard |
| Plug into a grounded 3 prong outlet. Do not remove ground prong. Do not use an adapter. Do not use an extension cord. Failure to follow these instructions can result in death, fire, or electrical shock. |
Voltage: 120 V~
Frequency: 60 Hz
NOTE: The power rating for your Stand Mixer is printed on the serial plate.
Do not use an extension cord. If the power supply cord is too short, have a qualified electrician or service person install an outlet near the appliance.
The maximum rating is based on the attachment that draws the greatest load (power). Other recommended attachments may draw significantly less power.

Documents / Resources
References
Download manual
Here you can download full pdf version of manual, it may contain additional safety instructions, warranty information, FCC rules, etc.
Download KitchenAid KSM55; KSM60; KSM70; 7KSM60; 7KSM70 - 5.5 Quart Bowl-Lift Stand Mixer Manual
Advertisement


Need help?
Do you have a question about the KSM55 and is the answer not in the manual?
Questions and answers