Advertisement
Table of Contents
Contents
UltraPro 41092 - 24-Hour Mechanical in-Wall Timer Manual
OPERATION
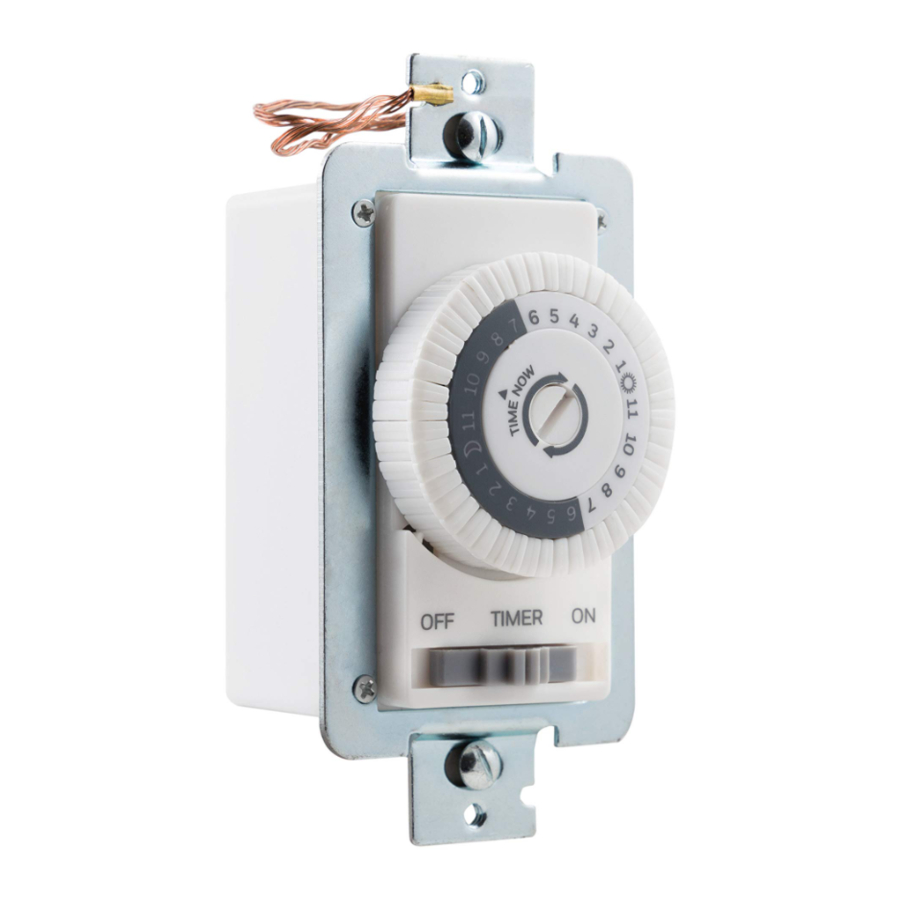
The timer has three settings, OFF, TIMER and ON (See Figure 1).

OFF - Turns connected load off.
TIMER - Connected load turns on and off based on timer's settings.
ON - Turns connected load on.
TIMER SETUP
- The segments around the outer edge of the timer's dial represent 30 minute periods. Be sure all segments are pulled up before programming (See Figure 2).

- Place the slide switch in the TIMER position (See Figure 3).

- Rotate the timer's dial clockwise until the pointer on the face of the dial points to the current time (See Figure 4).

Nighttime hours (from 6:30PM to 6:30AM) are highlighted with a gray background. - Select a time period (or periods) you want the appliance turned on, then push down ALL the segments that fall on or within that period. For example, to have the timer turn an appliance on at 1AM and off at 5AM, push down the segments representing 1AM and 5AM, and ALL the segments in between (See Figure 5).

You may need to turn the dial clockwise to access the desired segments. The setting(s) above the current time setting cannot be moved.


INSTALLATION
Note: If you are unsure or unclear about this installation or if the wires in your box do not match the manual (not all switch boxes have neutral wires), contact a qualified, licensed electrician.
- Using a dime, gently turn the center screw counterclockwise. Remove the center screw, center and timer dial. (See Figure 6).

- Turn OFF the main power at the circuit breaker or fuse box.
- Remove the existing switch.
- Connect the timer to the wall box wires with included wire nuts as shown in Figure 7.

- Connect the line/hot wire to the hot wire (black).
- Connect the load wire to the load wire (red).
- Connect the ground wire to the copper/bare ground wire.
- Connect the neutral wire to the neutral wire (white). The neutral wire is often found in the back of the wire box connected with a wire nut. There may be several neutral wires bound together. Add the timer neutral wire to the other neutral wires and secure with a wire nut. Tuck the wires into the wall box, leaving room for the timer.
- Use the supplied screws to mount the timer to the wall box, being careful not to crush any wires.
- Reinstall your wallplate. Reinstall timer dial and center.
- Turn the main power on at the circuit breaker.
- If the timer does not turn on, disconnect the power at the circuit breaker or fuse box. Swap the line and load wires on the timer. Remount the timer and


SPECIFICATIONS
125VAC
15A General/Resistive
1250W Tungsten
1/2HP Motor
500VA Electronic Ballast/LED

RISK OF ELECTRICAL SHOCK
- SHUT OFF POWER AT FUSE BOX OR CIRCUIT BREAKER BEFORE INSTALLATION
- DO NOT USE IN WET LOCATIONS
- USE INDOORS ONLY

RISK OF FIRE
- DO NOT USE TO CONTROL APPLIANCES THAT CONTAIN HEATING ELEMENTS (COOKING APPLIANCES, HEATERS, IRONS, ETC.)
- DO NOT EXCEED ELECTRICAL RATINGS
- DO NOT USE TO CONTROL RECEPTACLES
- USE COPPER WIRE ONLY WITH THIS DEVICE
![]()
HIGH VOLTAGE - DISCONNECT POWER BEFORE SERVICING.


Documents / ResourcesDownload manual
Here you can download full pdf version of manual, it may contain additional safety instructions, warranty information, FCC rules, etc.
Download UltraPro 41092 - 24-Hour Mechanical in-Wall Timer Manual
Advertisement


Need help?
Do you have a question about the 41092 and is the answer not in the manual?
Questions and answers