
Related Manuals for Levoit LVAC-200


Summary of Contents for Levoit LVAC-200
- Page 1 U SER MANUAL LVAC-200 Cordless Stick Vacuum Questions or Concerns? Please contact us Mon–Fri, 9:00 am–5:00 pm PST/PDT at support@levoit.com or at 1-888-726-8520.
-
Page 2: Table Of Contents
Table of Contents Specifications Package Contents Model LSV-V201-WUS Specifications Safety Instructions Battery Input 22.2V 2200mAh Getting to Know Your Vacuum Li-ion battery Controls Charging Input 100–240V ~ Using Your Vacuum 50/60Hz 0.5A Care & Maintenance Charging Time 4–5 hours Cleaning Storage Dimensions 9.8 x 7.7 x 43.3 in /... -
Page 3: Safety Instructions
IMPORTANT SAFETY INSTRUCTIONS When using this vacuum, basic precautions should always be followed, including the following: READ ALL INSTRUCTIONS BEFORE USING THIS APPLIANCE WARNING – To reduce the risk of fire, electric shock, or injury: • • CAUTION: Risk of injury. Roller brush may start Keep hair, loose clothing, fingers, and all body unexpectedly. - Page 4 • SAFETY INSTRUCTIONS (CONT.) Only use the battery pack specifically designed for this vacuum. Use of any other battery packs may create a risk of injury and fire. To request a new Battery & Charger LSV-V201B-WUS battery pack, contact Customer Support (see page 19).
-
Page 5: Getting To Know Your Vacuum
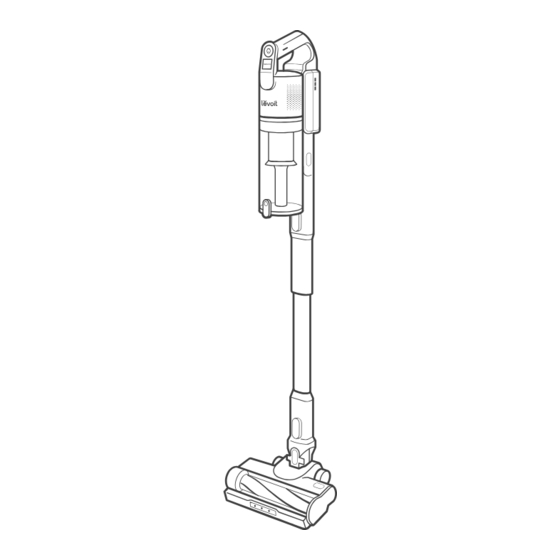
G E T T I N G TO K N O W YO U R VAC U U M On/Off Button 2-in-1 Pet Tool Eco/Turbo Mode Button Short Stick Vacuum Body Long Stick Pre-Motor Filters Vacuum Head Release Button Battery Indicator Lights Vacuum Head Battery LED Lights... -
Page 6: Controls
C O N T R O L S U S I N G YO U R VAC U U M On/Off Button Build the vacuum stick by aligning the • Turns on/off the vacuum. dots on the long stick and short stick, then push together until they lock in place. - Page 7 Nozzle Attachments Optionally, leave the stick attached to the vacuum body and press the Vacuum Head Release Button to Your vacuum comes with nozzle attachments remove the vacuum head. Then, attach to help you tackle almost any cleanup job. the nozzle attachment to the end of the stick.
-
Page 8: Care & Maintenance
C A R E & M A I N T E N A N C E Battery Installation Charging the Vacuum Turn the vacuum off. Press the Battery Your vacuum uses a 2,200mAh Li-ion battery. Release Button and remove the battery. When using the vacuum head on a full charge, the battery lasts approximately 40 minutes To reinstall, slide the battery into the slot in... - Page 9 CARE & MAINTENANCE (CONT.) Hang the vacuum on the wall mount. [Figure 2.3] Insert the charger into the charging port on the battery. [Figure 2.3] Plug the charger into the outlet. The battery lights will blink while charging. [Figure 2.3] Note: Charging time is about 4–5 hours.
- Page 10 Lid Release Button. [Figure 2.5] Use caution, as the lid will open • Only charge the battery with the charger specified by Levoit. when the release button is pushed. • If you are not using the battery for an extended Note: Holding the dust bin inside a trash period, store it in a cool, dry place.
-
Page 11: Cleaning
C L E A N I N G Cleaning the Vacuum Body Turn the vacuum off. Wipe the outside of the vacuum down with a damp cloth. Allow the vacuum to completely dry before using. Note: Do not allow water to enter the internal parts or motor of the vacuum. - Page 12 Replacement Filters: Figure 3.3 • To maintain the performance of your vacuum, only use official Levoit filters. For more information, contact Customer Support (see page 19). Figure 3.4...
- Page 13 CLEANING (CONT.) Post-Motor Filter Cleaning the Roller Brush Press the Dust Bin Release Button to Periodically check the roller brush for hair or remove the dust bin. [Figure 3.5] debris. The roller brush will automatically shut off if it is blocked or jammed. Pull out the post-motor filter (high- efficiency paper) from the vacuum body.
-
Page 14: Storage
S TO R AG E When the vacuum is not in use, store it on a flat surface or on the wall mount: Screw the wall mount into the wall near a power outlet (see Charging the Vacuum, page 8). Hang the vacuum on the wall mount. -
Page 15: Troubleshooting
1 hour before turning it back on. Vacuum is not charging. The charger is not properly plugged in or you are using the wrong charger. Use the provided Levoit charger only (see Charging the Vacuum, page 8). Roller brush is not turn- Clean the roller brush and remove any debris blocking the brush (see ing (LED lights flash). - Page 16 F C C S D O C S U P P L I E R ’ S D E C L A R AT I O N O F C O N F O R M I T Y Arovast Corporation hereby declares that this equipment is in compliance with FCC requirements. The declaration of conformity may be consulted in the support section of our website, accessible from www.levoit.com CAN ICES-003 (B) / NMB-003 (B)
-
Page 17: Warranty Information
(i) refund the purchase price if the purchase Claiming Your Limited Warranty Service in 5 Simple Steps: was made directly from the online Levoit store, (ii) repair any defects in material or workmanship, (iii) replace the product Make sure your product is within the specified limited with another product of equal or greater value, or (iv) provide warranty period. - Page 18 Disclaimer of Limited Warranties OTHER RIGHTS YOU MAY HAVE TO THE FULLEST EXTENT PROVIDED BY APPLICABLE SOME JURISDICTIONS DO NOT ALLOW FOR: (1) LAW, EXCEPT AS WARRANTED IN THIS LIMITED PRODUCT EXCLUSION OF IMPLIED WARRANTIES; (2) LIMITATION WARRANTY POLICY, AROVAST CORPORATION PROVIDES ON THE DURATION OF IMPLIED WARRANTIES;...
-
Page 19: Customer Support
Customer Support Team. Support Hours Arovast Corporation 1202 N. Miller St., Suite A Anaheim, CA 92806 Mon–Fri, 9:00 am–5:00 pm PST/PDT *Please have your order invoice and order ID Email: support@levoit.com ready before contacting Customer Support. Toll-Free: 1-888-726-8520... - Page 20 DL061223AL-M1_0623LSV-V201-WUS...
Need help?
Do you have a question about the LVAC-200 and is the answer not in the manual?
Questions and answers