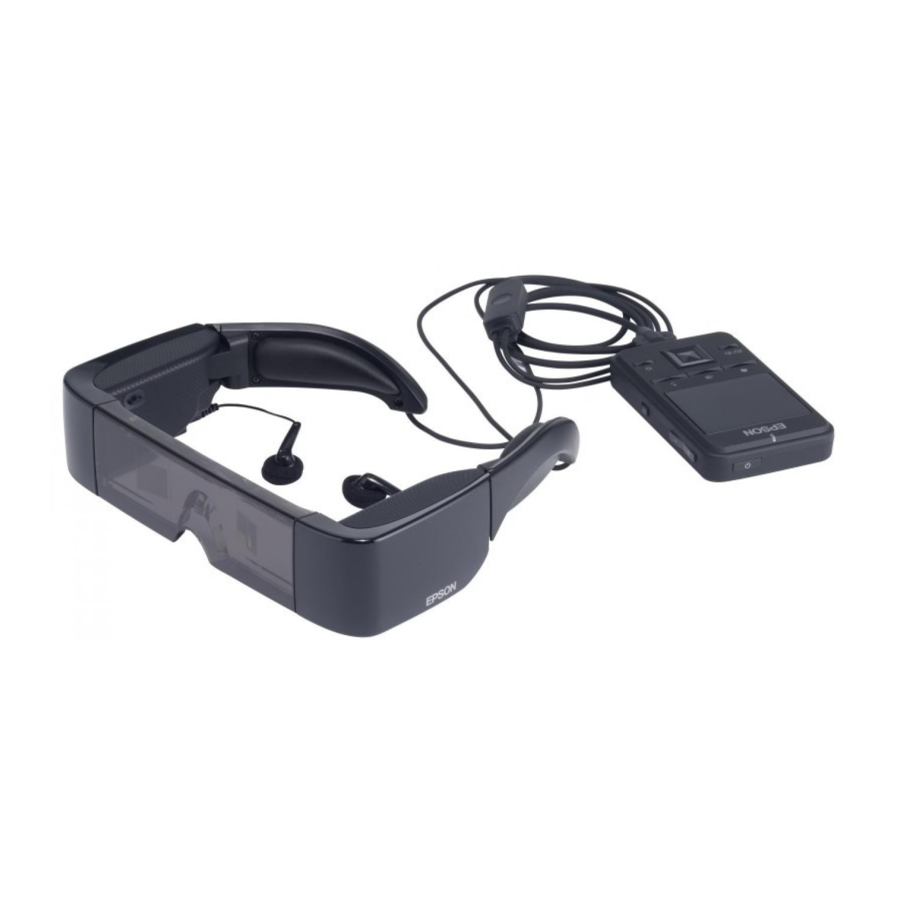
Epson Moverio BT-100, V11H423020 - Smart Glasses for Hands-Free Visual Manual
- Quick start manual (2 pages) ,
- User manual (142 pages)
Advertisement
Getting Ready
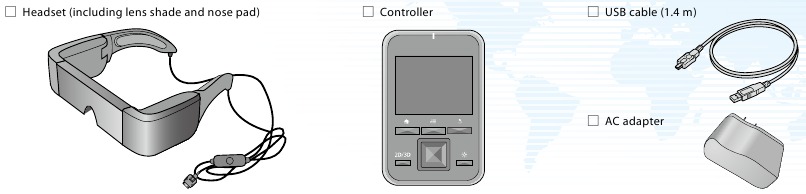
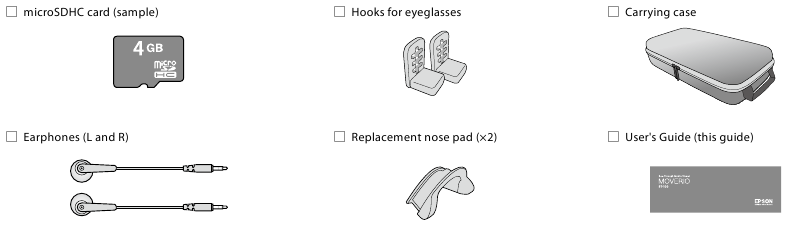
Checking the Package Contents
Check that all items are included.
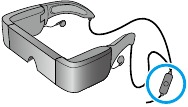
Charging
- Connect the controller and AC adapter.
Connect the controller and the AC adapter with the USB cable. Plug in the AC adapter.


Standard charge
- Initial charging takes approximately 5 hours.
- The LED indicator turns orange while charging.
- The LED indicator turns green when charging is complete.
- When charging is complete, remove the AC adapter.

- The battery is not fully charged at the time of purchase. Charge the battery before using this product.
- Battery life is approximately 6 hours. Battery life may vary depending on the usage conditions and the operating environment.
- The amount of battery remaining is displayed at the top of the Home screen.
 | The battery is full |
 | The battery is running low |
 | The battery needs to be charged |
- The LED indicates the following status.
| Green | Operating / Charging complete |
| Flashing green | Starting up / Shutting down |
| Orange | Charging |
| Flashing red | The battery is running low |
| Flashing red five times | Insufficient battery to start up |
| Blue | Sleep mode |
Turning on
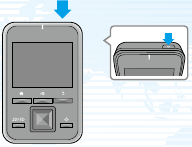
- Connect the headset and the controller.
Insert the headset's connection cable into the controller's headset connection port until it clicks.

- Turn it on.
Press the [![]() ] power button on the top of the controller for at least two seconds.
] power button on the top of the controller for at least two seconds.
The LED indicator turns green indicating the power is on.
![]()

Turning Off
- Press the [
![]() ] power button for at least two seconds. The [Device options] menu is displayed.
] power button for at least two seconds. The [Device options] menu is displayed. - Select [Power off ] - [OK].
Pressing the [  ] power button for less than two seconds turns sleep mode on or off.
Some electricity is consumed even when the power is off.
Wearing the Device
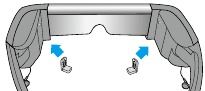
- Put on the headset and make adjustments so that you can see the whole screen.
Use both hands to open the arms, and then put on the headset. (The connection cable goes behind your ears.)


 Do not use too much force when opening the arms of the headset.

If you cannot view the top or bottom of the screen, remove the lens shade and replace the nose pad.

As shown in the illustration above, use the switches to widen the arms to fit your head.
(The switches allow you to adjust the width in three stages with the widest setting at the top and the narrowest at the bottom.)
Wearing the unit over glasses
- Remove the nose pad from the headset.
- Attach the glasses hooks to the left and right of the headset.
- While wearing your glasses, lower the headset from the top of your head to put it on. The headset is supported by the glasses hooks resting on the frame of your glasses.
If the screen height is not correct, try adjusting the position of the glasses hooks.

- Depending on the shape of your glasses, you may not be able to wear the headset.
- You cannot wear the headset over glasses wider than 147 mm.
- You can use the replacement nose pad instead of the glasses hooks when wearing the headset over glasses.
- Wear the earphones.
Connect the earphones supplied to the left and right of the headset.
![]()


If you have your own earphones, connect them to the controllers headphone port and unplug the earphones that came with the product.
Only connect earphones to this port. Do not connect any other devices.
- Remove the earphones from your ears when connecting or disconnecting the earphones. If you disconnect the earphones while listening to music or playing a movie, you may hear some noise, however this is not a malfunction.
- While wearing the headset, do not touch the screen display section. Fingerprints and so on cause the image quality to deteriorate. If the image display section becomes dirty, wipe it gently with a commercially available glass cleaner.
Viewing Tips
Watching the Screen
Your view of the screen size changes depending on the location of your point of view. If your point of view is in the distance, it will feel as if the screen size is in the distance and larger.

Viewing Environment
How an image is perceived may vary depending on the brightness of your surroundings.

It is difficult to see all of your surroundings while viewing with the product. Do not leave any fragile items in your immediate surroundings, and do not move around while wearing the headset.
- How an image is perceived varies depending on the individual.
- If there is a difference between the strength of your eyesight in your left and right eyes, you may not be able to view 3D contents correctly.
Basic Operations
Using the Controller

 BACK key
Displays the previous screen.
 MENU key
- Displays available menus for the current screen.
- Shows or hides the keyboard if held down during text input.
microSD card slot
Insert the microSD card.
HOME key
A short press returns you to the Home screen. Press and hold to display recently used applications.
2D/3D key
Changes between 2D and 3D mode.
Direction keys
- Moves the selection area up, down, left, or right.
- Scrolls the page.
 Power button
Press for at least two seconds to turn on.
When the power is on:
- Press and hold: Turns off the power; Turns on/off Airplane mode
- Short press: Turns on/off Sleep mode
Volume key
Displays the volume screen allowing you to adjust the volume.
Key lock switch
Move the switch to the bottom to prevent accidental operations.
Brightness key
Displays the brightness screen allowing you to adjust the brightness.
Enter key
Makes selections or confirms your choices.
Using the trackpad

When you touch the trackpad with your finger, a pointer is displayed on the screen.
Touching the trackpad for about one second enlarges the pointer, allowing you to drag.
- Clicking
Move the pointer to an icon or display item, and then tap the trackpad.
![]()
- Dragging
Touch the track pad for about one second to select the icon or display item, and then drag your finger on the trackpad to move it.
![]()


Mute button
Press the Mute button on the headset's connection cable to mute the image and audio.
Using the Home Screen
Unlocking
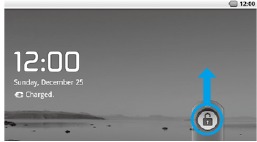
Drag the [  ] up.
] up.
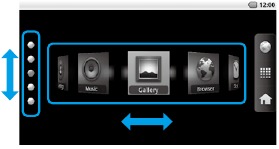
Home screen icons
![]()
- Time
- Status icon
- Browser
- Application list
- Change Home screen
- Shortcuts
- Change shortcut lists
Launching an application from a shortcut
Use the Direction keys to select a shortcut, and then press the Enter key.
| Status bar icons | |
 | Playing music |
 | Communicating via USB |
 | Connecting/using wireless LAN |
 | Scanning microSD card |
 [Low] [Low]  [Full] [Full] | Battery status |
 | Download complete |
 | Dolby Mobile On |
 | Alarm set |
 | Airplane mode |
 | Unmounting microSD card |
 | Charging |
Connecting to the Internet
You can access the Internet over a wireless LAN network.
- Enable wireless LAN, and then search for available networks.
- Launch [
![]() ] from the Home screen, and then select [Wireless & networks].
] from the Home screen, and then select [Wireless & networks].

- Select [Wi-Fi settings].

- Select [Wi-Fi].

- Launch [
- Connect to one of the displayed wireless LAN networks.
Select the network you want to connect to from [Wi-Fi networks].

 ] from the Home screen, and then select [Wireless & networks].


- If you select a security enabled network, you need to enter a password.
- You can add a network manually if the network you want to connect to is not found. For more details, see the digital user's guide.
Importing Data
Insert the microSD card into the controller
- Open the cover in the direction shown by the arrow.
![]()
- Slide the card into the slot until it clicks into place.
![]()


Removing the microSD card
- Launch [
![]() ] from the Home screen, and then select [SD card & device storage] - [Unmount SD card]. The SD card can now be removed.
] from the Home screen, and then select [SD card & device storage] - [Unmount SD card]. The SD card can now be removed. - Open the cover, press the microSD card once in the direction shown by the arrow, and then remove the card.
![]()

Copy data to the microSD card

Connect the controller to your computer with the USB cable supplied to copy the data.
Do not remove the microSD card or turn off the power while copying data or accessing a file. Otherwise, the data could be corrupted.
- You can store up to 4GB of data on the microSDHC card supplied.
- This product supports microSDHC cards up to 32 GB.
- It may take a while to read large microSDHC cards.
Safety Instructions
The following warning symbols are used in this guide to indicate possible dangerous operations or handling.
Make sure you understand these warnings before reading this guide.
Safety symbols
 | This symbol indicates information that, if ignored, could possibly result in serious personal injury or even death due to incorrect handling. |
| This symbol indicates information that, if ignored, could possibly result in personal injury or physical damage due to incorrect handling. |
General information symbols
| Indicates procedures which may result in damage or injury if sufficient care is not taken. |
| Indicates additional information and points which may be useful to know regarding a topic. |
Important Safety Instructions
Follow these safety instructions when setting up and using the see through mobile viewer:
- Read these instructions.
- Keep these instructions.
- Heed all warnings.
- Follow all instructions.
- Do not use this apparatus near water.
- Clean only with dry cloth.
- Use this product in accordance with the manufacturer's instructions.
- Do not use the product near any heat sources such as radiators, heat registers, stoves, or other apparatus (including amplifiers) that produce heat.
- Do not defeat the safety purpose of the polarized or grounding-type plug. A polarized plug has two blades with one wider than the other. A grounding type plug has two blades and a third grounding prong. The wide blade or the third grounding prong are provided for your safety. If the provided plug does not fit into your outlet, consult an electrician for replacement of the obsolete outlet.
- Protect the power cord from being walked on or pinched particularly at plugs, convenience receptacles, and the point where they exit from the apparatus.
- Only use attachments/accessories specified by the manufacturer.
- Unplug this apparatus during lightning storms or when unused for long periods of time.
- Refer all servicing to qualified service personnel. Servicing is required when the apparatus has been damaged in any way, such as the power-supply cord or plug is damaged, liquid has been spilled or objects have fallen into the apparatus, the apparatus has been exposed to rain or moisture, does not operate normally, or has been dropped.
- This product shall not be exposed to excessive heat such as sunshine, fire or the like.
Notes on Usage


Risk of fire, electric shock, or accident
Only use this product at the stated power-supply voltage.
Only use the USB cable and AC adapter supplied.
Do not use the supplied AC adapter with any other device.
Note the following points when handling the AC adapter.
- Do not plug the AC adapter into an outlet being used by many other devices.
- Do not plug in the AC adapter if there are any foreign objects such as dust stuck to it.
- Plug in the AC adapter securely.
- Do not hold the AC adapter with wet hands.
- Do not unplug the AC adapter by pulling on its cable.
Note the following points when handling the power cable (the microUSB cable supplied).
- Do not use the cable if it is damaged.
- Do not modify the cable.
- Do not place heavy objects on the cable.
- Do not bend, twist, or pull the power cable excessively.
- Do not place the wire near an electrical heater.
Do not use the product in locations where it may get wet or be subject to humidity such as in the rain or in a bath or shower. Do not place containers containing water, chemicals, or other liquids near this product.
Do not place this product in locations subject to smoke, steam, high humidity, or dust such as kitchen counters or near humidifiers.
Do not touch the AC adapter during a thunderstorm.
Do not disassemble or remodel this product (including consumable items).
In the following situations, turn off this product immediately, unplug the AC adapter, and contact an authorized Epson dealer.
- If you see smoke, or notice any strange odors or noises.
- If any water or foreign objects get into the product.
- If the product was dropped or the case was damaged.
Risk of deformation due to fire or heat
Do not leave this product in locations subject to extremely high temperatures such as cars with the windows closed, in direct sunlight, or in front of air-conditioning or heater outlets.

Risk of fire or burns
Do not cover this product or the AC adapter with a cloth or similar material during use.
Risk of malfunction or electric shock
Do not clean this product with a wet cloth or solvents such as alcohol, benzene, or thinner.
Risk of hearing impairment
Do not start using this product at a high volume.

Permanent hearing loss may occur if earphones or headphones are used at high volume for prolonged periods of time.
Risk of injury or poisoning
Do not disassemble or remodel this product.
Do not wear this product when driving, cooking, or performing any other dangerous tasks.
Risk of interference with other electronic devices
Check that there is no medical equipment in the area before use as this product may cause electromagnetic interference on medical equipment or cause the equipment to malfunction.
When taking this product into areas in which the use of electromagnetic waves is prohibited, such as on aircraft or in hospitals, turn off this product or disable the wireless LAN function.
Note the following points when using the wireless LAN in medical institutions.
- Do not bring this product into operating rooms, Intensive Care Units (ICUs), or Cardiac Care Units (CCUs).
- When on wards, turn off this product or stop the electromagnetic waves.
- Even when not on wards, turn off this product or stop the electromagnetic waves if there is any electronic medical equipment in the area.
- Follow any rules stipulated by medical institutions that prohibit the use of devices emitting electromagnetic waves, or that prohibit entry to certain areas with such devices.
If you have an implanted pacemaker or implanted defibrillator, make sure you keep a distance of at least 22 cm between this product and the implanted device when using the wireless LAN. Before use, make sure that there is no one with a pacemaker near you, and if you are in a crowded location such as a train, turn off this product or stop the electromagnetic waves.
Do not use this product near automatically controlled devices such as automatic doors or fire alarms because it may cause electromagnetic interference which could cause an accident to occur or the devices to malfunction.
In locations where usage is restricted, such as on aircraft or in hospitals, follow the on-site rules (such as airplane announcements).
Risk of fire, electric shock, or accident
For safety reasons, when you have finished using this product, make sure you turn it off.
When performing maintenance, make sure you unplug the AC adapter and disconnect all wires.
Do not touch the hot sections of the AC adapter for a while after use.
Do not use this product for extended periods of time if the controller is touching any part of your skin.
Risk of impaired vision
When wearing this product, do not look directly at the sun or at any bright lights.
Risk of damage or malfunctions
Do not place this product in locations subject to vibrations or impacts.
Do not use or store this product in locations subject to high or low temperatures. Also, avoid locations subject to sudden changes in temperature.
Do not place this product near high-voltage lines or magnetized items.
Risk of deterioration in image quality
Do not use or store this product in locations subject to smoke.
Risk of injury or feeling sick
Do not drop this product or treat it with unnecessary force.
When wearing this product, please be aware of the edges of the frame.
Do not place your finger between the moving parts of this product, such as the hinges.
Make sure you are wearing this product correctly.
Do not carry this product by its cable.
This product should only be used for viewing images.
If a problem or malfunction occurs, stop using this product immediately.
Stop using this product if your skin feels unusual when wearing this product.
Always take periodic breaks when viewing images using this product.
If you feel fatigued or uncomfortable when viewing with this product, stop viewing immediately.
Do not place any breakable or fragile objects in your immediate surroundings when using this product.
Only wear this product when viewing images. Do not move around while wearing this product.
Do not use this product if you are sensitive to light, or feel sick.
Children (especially under elementary school age) should not use this product as their eyesight is still developing.
Risk of injury or poisoning
Contact an authorized Epson dealer when replacing batteries.
Dispose of this product in accordance with your local laws and regulations.
Trademarks

Manufactured under license from Dolby Laboratories.
Dolby and the double-D symbol are trademarks of Dolby Laboratories.
iWnnIME © OMRON SOFTWARE Co., Ltd. 2011 All Rights Reserved.
Contains Adobe Flash Player by Adobe Systems Incorporated.
Adobe Flash Player Copyright © 1996-2011, Adobe Systems incorporated. Adobe, Flash and the Flash logo are either registered trademarks or trademarks of Adobe Systems Incorporated in the United States and/or other countries.

microSDHC Logo is a trademark of SD-3C, LLC.
Customer Service
Internet Support http://www.epson.com/
Notes Regarding Wireless LAN
Do not use the Wireless LAN function in France unless you are indoors.
If you purchase this product outside of North America, please note that this product emits wireless LAN electromagnetic waves on channels 1 to 13. Therefore, do not use the wireless LAN function in North America where wireless LAN channels are limited to 1 to 11 by the Wireless Telegraphy Act.
Follow local laws and regulations when using in other regions.
Adobe Flash Player Restrictions
- Copying or distributing the software is strictly prohibited.
- Modifying or creating derivative works based on the software is strictly prohibited.
- Reverse engineering, decompiling, disassembling, or otherwise attempting to discover the source code of the software is strictly prohibited.
- We cannot accept liability claims due to indirect, special, incidental, exemplary, punitive, consequential, or other damages that may result from your use of this software.

Documents / Resources
References
Download manual
Here you can download full pdf version of manual, it may contain additional safety instructions, warranty information, FCC rules, etc.
Download Epson Moverio BT-100, V11H423020 - Smart Glasses for Hands-Free Visual Manual
Advertisement


Need help?
Do you have a question about the Moverio BT-100 and is the answer not in the manual?
Questions and answers