Epson Moverio BT-35E - Smart Glasses for Hands-Free Visual Manual
- User manual (41 pages)
Advertisement
- 1 User's Guide Organization
- 2 Symbols Used in this Guide
- 3 Notes on Usage
- 4 Included Items
- 5 Part Names and Functions
- 6 Connecting the Interface Unit and External Devices
- 7 Turning On/Displaying Images
- 8 Extended Features
- 9 Wearing the Headset
- 10 Using the Belt Clip/Cable Retainer
- 11 Replacing the Parts
- 12 Supported Equipment and Software
- 13 Updating the Firmware
- 14 Maintenance
- 15 Troubleshooting
- 16 Specifications
- 17 General Notes
- 18 List of Safety Symbols
- 19 Safety Instructions
- 20 Contact List
- 21 Documents / Resources
User's Guide Organization
| User's Guide | This guide provides information on safely using this product, basic operating methods, and troubleshooting. Make sure you read this guide before using the product. |
| Start Guide | Explains procedures for using this product for the first time. |
Symbols Used in this Guide
Safety symbols
 | This symbol indicates information that, if ignored, could possibly result in serious personal injury or even death due to incorrect handling. |
 | This symbol indicates information that, if ignored, could possibly result in personal injury or physical damage due to incorrect handling. |
General information symbols
 | Indicates procedures which may result in damage or injury if sufficient care is not taken. |
| [ ] | Indicates buttons and keys on the interface unit. |
 | Indicates additional information and points which may be useful to know regarding a topic. |
| ➡ | Indicates a reference to related topics. |
Notes on Usage
This product uses an Si-OLED display panel. Due to the characteristics of the Si-OLED, you may notice burn-in or decreasing luminance on the panel. This is not a malfunction.
To reduce the burn-in, do the following.
- Do not display the same image for a long time.
- Hide markers or text that always appear in the same position.
- Decrease the display brightness.
List of Safety Symbols (corresponding to IEC60950-1 A2)
The following table lists the meaning of the safety symbols labeled on the equipment.

Approved standards: IEC60417 No.5031
Meaning: Direct current
To indicate on the rating plate that the equipment is suitable for direct current only; to identify relevant terminals.
Headset usage precautions
Do not drop this headset or treat it with unnecessary force.
The temples can only be opened outwards. Do not apply force in other directions. If excessive force is applied to the temples, they may be damaged.

When transporting the device, make sure you use the box that the device came in and the dedicated carrying case so as not to apply excessive force to the temples.
Included Items

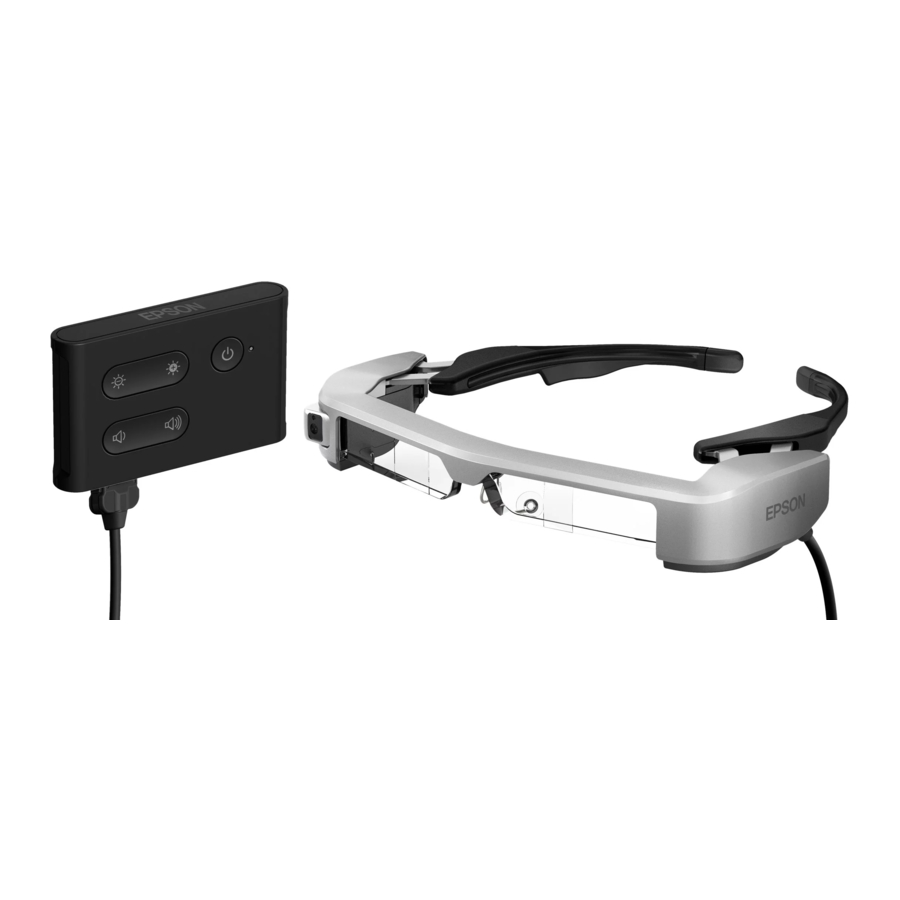
Part Names and Functions
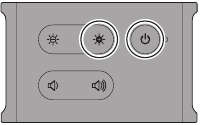
Interface Unit

[![]() ] (Standby) button
] (Standby) button
Set and release standby mode and AV mute, and show/hide images.
➡ "Standby Mode and AV Mute"
[ ] (Brightness adjustment) keys
Adjusts the brightness incrementally within a range of 0 to 20. Hold the keys down to increase or decrease the brightness.
[ ] (Volume) keys
Adjusts the volume incrementally within a range of 0 to 15. Hold the keys down to increase or decrease the volume.
Headset connector
Connects the headset.
➡ "Connecting by HDMI"
➡ "Connecting by USB Type-C"
LED indicator
Indicates the status of the product.
| Orange: On | Standby mode |
| Blue: Flashing | No video signal detected |
| Blue: On | Displaying images |
| Blue: Flashing slowly | AV mute enabled |
| Orange: Flashing | Error has occurred |
Micro-B port
This port is dedicated to supplying power.
(It cannot be used for data communication.)
HDMI port
Inputs video signals from video equipment or computers that support HDMI.
➡ "Connecting by HDMI"
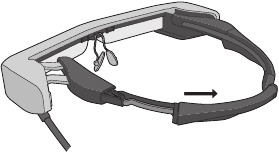
Headset

Temple grip
If the temple grip gets dirty or deteriorates, it can be replaced.
➡ "Replacing the Temple Grip"
Ambient light sensor
Senses the brightness of your surroundings and automatically adjusts the brightness of the screen.
Camera
Captures images and movies. Remove the protective film before use.
Interface unit connector
Inserts into the interface unit.
➡ "Connecting by HDMI"
➡ "Connecting by USB Type-C"
Temples
Open the temples to wear.
➡ "Wearing the Headset"
Nose pads
If the nose pads get dirty, it can be replaced.
➡ "Replacing the Nose Pads"
Safety shield (shaded shown)
ANSI Z87.1-compliant. Shaded shield helps minimize ambient light.
➡ "Attaching and Removing the Shield"
3.5 mm audio jack
You can connect commercially available earphones and microphones.
➡ "Wearing the Headset"
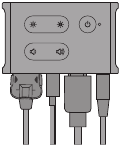
Connecting the Interface Unit and External Devices
Inputs and Outputs
The interface unit and external devices input/output the following data and power supply.
USB Type-C cables and HDMI cables are not supplied with this product. You need to obtain your own in advance.
| Port Name | Input/Output |
| USB-C |
|
| HDMI | Inputs video signals. |
| Micro-B | Only supplies power. (Connects the AC adapter with the dedicated micro-USB power supply cable.) |

Connecting by HDMI
Follow the steps below to display images from external devices connected by HDMI.

 When using the headset sensor or camera data, connect to the USB-C port. Video signals from the HDMI port have priority over video signals from the USB-C port.
➡ "When using the headset sensors or camera"
- Make sure you connect the headset before you connect the power supply.
- Do not connect or disconnect the headset while it is operating.
- Make sure you unplug the dedicated micro-USB power supply cable before unplugging the headset cable.
- HDMI cannot be connected using a conversion adapter.
- To prevent excessive wear on the connectors, do not disassemble the AC adapter once it has been assembled.
Connecting by USB Type-C
When connecting to an external device with USB Type-C, you can use data from the headset sensors and camera as well as view the images. Also, since it can be used as a power supply source, you can perform three operations simultaneously using one USB Type-C cable; input video signals, output sensor/camera data, and supply power.

- Make sure you connect the headset before you connect the power supply.
- Do not connect or disconnect the headset while it is operating.
- Make sure you unplug the USB Type-C cable before unplugging the headset cable.
- The connected equipment must support USB 2.0/3.0.
- Make sure you use a genuine USB-IF certified USB-C 3.1 cable.
- USB Type-C cannot be connected using a conversion adapter.
Notes on displaying images by USB Type-C
- This product supports DisplayPort Alternate mode (DP Alt mode) for USB Type-C.
➡ "Supported Equipment and Software" - To display images using USB Type-C, the connected device must support video output by USB Type-C.
- Depending on the device, displaying images may not be supported. See the manual supplied with the equipment you want to connect for more information.
Notes on supplying power by USB Type-C
- This product supports USB Type-C Current @ 1.5 A.
- Check that the connected equipment supports a power supply of 5 V/1.5 A or more by USB Type-C.
- If power cannot be supplied from the connected equipment, connect the AC adapter supplying power to the Micro-B port.
- Power supplied from the Micro-B port has priority over this product. If you change power supply during use, the product turns off temporarily.
If you are using the sensor/camera feature, make sure you reconfigure the connected device as necessary.
When using the headset sensors or camera
Data from the sensors and camera built into the headset are output from the USB-C port. Some devices do not support the use of data from sensors or cameras. See the following for more details.
➡ "Supported Equipment and Software"
Turning On/Displaying Images
When power is supplied from the Micro-B port or USB-C port, this product turns on. Also, when a video signal is being input, the video is displayed automatically.
When no video signal is being input, <No Signal> is shown on the display.
While viewing an image, you can hide the images and mute the audio by pressing the [ ![]() ] button (AV Mute).
] button (AV Mute).
Press the [ ![]() ] button again to release AV mute and resume the images and audio.
] button again to release AV mute and resume the images and audio.
To turn off the product, disconnect the power supply source.
See the following for information on using the buttons.
➡ "Interface Unit"
➡ "Extended Features"
- When playing a movie, the movie continues to playback even though images are hidden and audio is muted in standby mode or AV mute. To stop the movie, you need to stop it on the external device.
- This product is not chargeable. You need to connect equipment that can supply enough power.
➡ "Connecting by HDMI"
➡ "Connecting by USB Type-C"
Standby Mode and AV Mute
Although standby mode and AV mute will hide the images and mute the audio, there are a few differences.
Select the appropriate mode to suit your needs.
| Setting | Time to Display Images | Power Consumed | |
| Standby mode | Hold down the [ ] button ] button | Long (approx. 8 secs.) | Low power consumption |
| AV mute | Briefly press the [] button | Short | More than in standby mode |
This product automatically switches to standby mode (in Mode 1 only) after 20 minutes of inactivity or after 20 minutes if AV mute is enabled.
➡ "Extended Features"
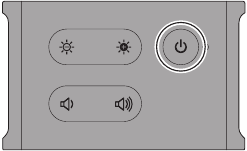
Extended Features
You can access extended features by holding down two buttons at the same time.
You can check the status of the extended features in the display or by using the LED indicators.
Switching between 2D and 3D display
This product uses the side-by-side 3D display format.
To switch between 2D and 3D mode, hold down the [ ] and the [
 ] keys at the same time.
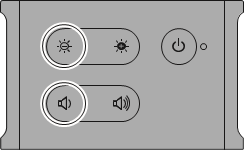
The following is shown on the display when switching modes.

Adjusting the screen brightness automatically
This product can automatically adjust the brightness of the screen according to the brightness of the environment in which it is being used.
To turn auto brightness adjustment on or off, hold down the [ ] and the [
 ] keys at the same time.
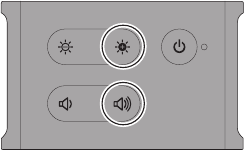
The following is shown on the display when switching modes.

Changing the mode setting
The following three modes are available. To switch the mode, hold down the [] and the [] button at the same time.
| Power saving feature*1 | [  ] button*2 ] button*2 | When switching mode | ||
| LED indicator*3 | Display | |||
| Mode 1 (Default setting) | Enabled | Operations available | Flashes white once |  |
| Mode 2 | Disabled | Operations available | Flashes white twice |  |
| Mode 3 | Disabled | Operations unavailable | Flashes white three times |  |
*1 This feature automatically switches to standby mode after 20 minutes of inactivity when no image is being input, or after 20 minutes when AV mute is enabled.
*2 The [ ![]() ] button shows/hides images. Hold down to switch to standby mode.
] button shows/hides images. Hold down to switch to standby mode.
➡ "Standby Mode and AV Mute"
*3 You can check the mode by the number of times the LED flashes white immediately after making settings.
In Mode 3, the [ ![]() ] button is disabled which helps to avoid operation mistakes when you want to show the display at all times.
] button is disabled which helps to avoid operation mistakes when you want to show the display at all times.
Wearing the Headset
- Use both hands to open the temples, and then put lead on the headset.
![]()
![warning]() Do not use too much force when opening the temples of the headset.
Do not use too much force when opening the temples of the headset. - Adjust the position of the headset so that you can see the image.
![]()


- How an image is perceived varies depending on the individual.
- You can connect earphones and microphones using the 3.5 mm audio jack.
Use earphones that conform to the CTIA standard.
You may hear some noise if the cables are disconnected or connected while content is being played.
![]()
You can clip the headset cable to your clothes.

Make sure the cable does not catch on anything in the surrounding area while wearing the product. Also, make sure the cable does not wind around your neck.
Wearing over Glasses
The headset can be worn over glasses. (The headset can only be worn over glasses that are approximately 5.8 inches [147 mm] wide.)
- Make sure that you do not damage the glasses and the lens of the headset when wearing.
- You may not be able to wear the headset over the glasses depending on the shape of your glasses.

![]() The nose pads fit over your glasses.
The nose pads fit over your glasses.
Using the Shaded Shield
If the surrounding ambient light is too bright to view the screen when wearing the headset, attach the shaded shield.
➡ "Attaching and Removing the Shield"
When the shaded shield is unnecessary, leave it flipped up.

You can adjust the brightness of the screen by using the [] keys.
➡ "Interface Unit"
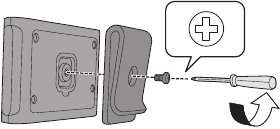
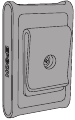
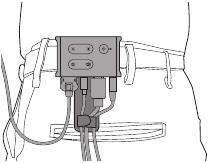
Using the Belt Clip/Cable Retainer
You can attach the interface unit to the belt by using a belt clip or cable retainer.
You can also secure extra cables to the cable retainer by using a commercially available band.
- Attach the belt clip to the interface unit using the screw supplied.
![]()
By changing the direction of the belt clip you can rotate the interface unit by 90 degrees.
![]()
![]() Loosen the screw to lift and rotate the clip. Attempting to rotate the clip without loosening the screw will damage the clip and interface unit.
Loosen the screw to lift and rotate the clip. Attempting to rotate the clip without loosening the screw will damage the clip and interface unit. - Connect the cables.
![]()
- Attach the clip to a belt and so on.

![]() Use the same procedure to attach the cable retainer to the belt. You can secure other cables using commercially available bands and so on so that they do not catch on anything in the surrounding area.
Use the same procedure to attach the cable retainer to the belt. You can secure other cables using commercially available bands and so on so that they do not catch on anything in the surrounding area.
![]()

- Keep the cables as close to your body as possible. Sagging cables may cause accidents or injuries if they become caught or trapped by surrounding objects.
- Do not pull the headset's cable. If the headset comes off, it may result in accident or injury.
- Since the belt clip/cable retainer are designed to grip the belt securely, they could scratch the surface of the belt during attachment or removal. Avoid attaching them to leather or shiny belts, or protect the belt by placing a thin cloth over the section they come in contact with.
Replacing the Parts
Attaching and Removing the Shield
This product includes clear and shaded safety shields. If it is too bright to view the screen when wearing the headset, attach the shaded shield.
- Attaching the shield
Hold the shield at an angle and press it against the protruding sections (two points) at the center of the headset.

- Removing the shield
To remove the shield, flip it up, and then push down and pull it towards you.

![warning]() If the shield is pushed or pulled with too much force, the shield and the lens could be damaged. Do not use too much force on the shield.
If the shield is pushed or pulled with too much force, the shield and the lens could be damaged. Do not use too much force on the shield.


Replacing the Temple Grip
- Press the part indicated by the circle (
![]() ) and remove the tip of the temple grip.
) and remove the tip of the temple grip.

- Slide off the remaining temple grip.
![]()
- Slide the replacement temple grip into the groove in the headset.

- While pressing the part indicated by the circle (
![]() ), attach the tip of the temple grip.
), attach the tip of the temple grip.


Replacing the Nose Pads
- Pull the nose pads towards you to remove them.
![]()
- Attach the replacement nose pads.
![]()


Supported Equipment and Software
External device
| HDMI® display | Supported equipment | Video output equipment with HDMI ports |
| Resolution (frame rate) | 1920 x 1080 (60 Hz/59.94 Hz), 1280 x 720 (60 Hz/59.94 Hz), 1280 x 720 (30Hz), 640 x 480 (60 Hz) | |
| DisplayPort display | Supported equipment | Computers and smart devices with USB Type-C ports that support DisplayPort Alternate Mode on USB Type-C*1 |
| Resolution (frame rate) | 1920 x 1080 (60 Hz/59.94 Hz), 1280 x 720 (60 Hz/59.94 Hz), 1280 x 720 (30Hz), 640 x 480 (60 Hz) |
*1 HDMI data transfer is not supported.
Images may not be displayed correctly at other resolutions.
Sensors and camera
| Supported equipment | Computers and smart devices with USB Type-C ports |
| Supported operating systems | Windows 10 and Android™ OS Ver. 7.0 or later |
When using the headset's sensors or camera, you need to install a sensor or camera-enabled application on the external device that you want to connect to.
The camera function for this product conforms to UVC1.1.
Software development kit
You need a dedicated SDK (Software Development Kit) to control the sensor, camera, and display from your application.
See the Developer's Guide (https://tech.moverio.epson.com/en/bt-35e/document.html) for more information.
Updating the Firmware
Download the firmware to your computer from the following download site, and then update it using the Epson BT-35E Update Tool.
See the firmware release notes for more information.
https://tech.moverio.epson.com/en/bt-35e/download.html
Maintenance
Cleaning the headset
- If you can see marks in the image or if the image is hazy, check that there is no dirt, dust, fingerprints, and so on, on the lenses.
If there is dust or dirt on the lenses, wipe them carefully with a soft cloth.
![warning]() When wiping the lenses, do not use lens cleaning liquids or organic solvents.
When wiping the lenses, do not use lens cleaning liquids or organic solvents. - If the camera is dirty, wipe it carefully with a soft cloth.
- If any parts other than the lens or camera are dirty, wipe them with a wet tissue.
Storing the headset
- When storing the headset, place it in the packaging that it came in or the dedicated carrying case.
- When placing the headset, make sure it is placed horizontally so that it does not touch against hard objects. If the headset is placed with the lens facing down and the lens touches hard objects, the lens could be damaged.
Cleaning the connector ports
- If the connectors on the interface unit are dirty or if there are foreign objects stuck to them, they may not work correctly. Wipe away any dirt with a dry cloth or cotton swab at least once every three months.
- Do not damage the connector ports with your finger or a hard object.
- Do not expose the connector ports to water. When cleaning the connector ports, use a dry cloth or a cotton swab.
Troubleshooting
If you think a malfunction has occurred, check the following.
No image is displayed
- Check of any cables are disconnected.
- If the LED indicator flashes orange for more than three seconds, an error has occurred.
➡ "Part Names and Functions"
Unplug the dedicated micro-USB power supply cable or the USB Type-C cable that is supplying the power, wait for a while, and then reconnect. - If images are not displayed by a USB Type-C connection, check that the connected equipment supports video output by USB Type-C. This product supports DisplayPort Alternate mode (DP ALT mode) for USB Type-C.
Images are fuzzy
- Reconnect the cables.
- Restart the connected equipment.
The display is not hidden when you press the [ ] button
The product may be set to Mode 3 in extended features. Hold down the [] key and the [] button at the same time to set Mode 1 or Mode 2.
➡ "Extended Features"
Cannot hear audio
- Check that the earphones are connected securely.
- Check that the volume is set correctly.
- Check that audio is being output from the output equipment.
- You may not be able to use it depending on the type of standard earphones you are using, such as earphones with a switch.
Cannot adjust the brightness of the screen
- If the product gets too hot, the image brightness may be decreased to protect the product.
You can check if the brightness has been limited by pressing the [![]() ] keys.
] keys. Normal operation Brightness limited ![]()
![]()
 ] keys.

Specifications
Product Specifications
| Model Number | BT-35E (H935A) | |
| Material | Si-OLED | |
| Panel size | 0.43" wide panel (16:9) | |
| Resolution | 1280x720 | |
| Angle of view | Approximately 23 degrees (diagonally) | |
| Virtual screen size | 40" support (virtual viewing distance 8.2 ft [2.5 m]) | |
| Color reproduction | 24 bit color (approximately 16,770,000 colors) | |
| Supported 3D | Side-by-side format | |
| Connector ports | Interface unit connector ports, 4 pin mini jack (earphones with microphone complying with the CTIA standard)*1, USB Type-C, HDMI, USB Micro-B (power supply only) | |
| Operating temperature | 41 to 95°F (5 to 35°C) humidity 20 to 80% (no condensation) | |
| Storage temperature | 14 to 140°F (-10 to 60°C) humidity 10 to 90% (no condensation) | |
| AC adapter | Model Number | PSAF10R-050Q |
| Manufacturer | PHIHONG TECHNOLOGY CO., LTD. | |
| Rated output voltage/current | 5 V/2 A | |
| Exterior dimensions (W x D x H) | Headset | 7.6 x 7.4 x 1.2 inches (193 x 189 x 30 mm) (without the shield) |
| Interface unit | 3.3 x 2.0 x 0.6 inches (85 x 52 x 15 mm) | |
| Mass | Headset | Approx. 4.2 ounces (119 g) (without shield and cables) |
| Interface unit | Approx. 1.6 ounces (45 g) | |
| Camera | 5 million pixels (Pan focus) | |
| Earphone output | Max. voltage 150 mV or less Voltage with broadband characteristics 75 mV or more | |
| Sensors | Geomagnetic sensor/accelerometer sensor/gyroscopic sensor/ambient light sensor | |
*1 Restrictions in operation may occur when using an adapter plug.
Video Input
| HDMI (Type A) | HDMI | Ver. 1.4 |
| Resolution (frame rate) | 1920 x 1080 (60 Hz/59.94 Hz), 1280 x 720 (60 Hz/59.94 Hz), 1280 x 720 (30Hz), 640 x 480 (60 Hz) | |
| EDID | Supported | |
| CEC | Not supported | |
| HDCP | Rev. 1.4 | |
| 3D formats | Not supported | |
| HDMI Data Transfer | Not supported | |
| USB Type-C | Video interface | DisplayPort Alternate Mode (DP Alt Mode) |
| Resolution (frame rate) | 1920 x 1080 (60 Hz/59.94 Hz), 1280 x 720 (60 Hz/59.94 Hz), 1280 x 720 (30Hz), 640 x 480 (60 Hz) | |
| EDID | Supported | |
| HDCP | Rev. 1.3 |
Power
| Interface | USB Type-C | USB Type-C Current @ 1.5 A |
| USB Micro-B | 5.0 V/1.5 A (DC input) | |
| Electricity consumption | Operating: Approx. 6.5 W Standby power consumption (Communication On): 2.0 W Standby power consumption (Communication Off): 0.3 W | |
General Notes
Manufacturer: SEIKO EPSON CORPORATION
Address: 3-5, Owa 3-chome, Suwa-shi, Nagano-ken 392-8502 Japan
Telephone: 81-266-52-3131
http://www.epson.com/
Importer: EPSON EUROPE B.V.
Address: Atlas Arena, Asia Building Hoogoorddreef 5, 1101 BA Amsterdam Zuidoost
The Netherlands
Telephone: 31-20-314-5000
http://www.epson.eu/
List of Safety Symbols
The following table lists the meaning of the safety symbols labeled on the equipment.


Safety Instructions
For your safety, read the attached documents carefully to use the product correctly. After you have read the documents, keep them in a safe place so that you can refer to them quickly at a later date.
Usage environment and condition precautions
Only use this product at the stated power-supply voltage.
Only use the AC adapter and dedicated micro-USB power supply cable supplied with the product. Using other power supply devices could result in heat, fire, explosion, malfunction, or liquid leakage.
Take the following precautions when handling the AC adapter. Failure to comply with these precautions could result in fire or electric shock.
- Do not plug the AC adapter into an outlet being used by many other devices.
- Do not insert the AC adapter into a dusty outlet.
- Insert the AC adapter firmly into the outlet.
- Do not hold the plug with wet hands.
- Do not cover or wrap the AC adapter in a cloth and so on.
- Do not use near a fire, stove, or electric heater.
Do not use the AC adapter, dedicated micro-USB power supply cable, or any USB Type-C cable if they are damaged. Failure to comply with these precautions could result in fire or electric shock.
For your safety, unplug the power supply cable when not using this product. The insulation may deteriorate, which may result in electric shock, fire, or malfunction.
Do not touch the plug during a thunderstorm. Failure to comply with these precautions could result in fire or electric shock.
Do not leave this product in locations subject to temperatures beyond the specified operating range, such as cars with the windows closed, in direct sunlight, or in front of air-conditioning or heater outlets. Also, avoid locations subject to sudden changes in temperature. Doing so may result in fire, breakdown, malfunction, or failure.
This product is not waterproof. Do not touch the AC adapter or the connectors and cables for each of the connector ports with wet hands. Failure to comply with these precautions could result in fire, burns, or electric shock.
Do not use the product in locations where it may get wet or is subject to high levels of humidity such as in a bath or shower. Failure to comply with these precautions could result in fire or electric shock.
Do not place this product in locations subject to smoke, steam, high humidity, or dust such as kitchen counters or near humidifiers. Doing so may result in fire, electric shock, or deterioration in image quality.
Do not cover this product with a cloth or similar material during use. Doing so may change the shape of the case through heat, or fire.
Do not touch the interface unit for too long while it is operating. Doing so may result in low temperature burns if it is in contact with your skin for too long, even if it is in a pocket or over clothing.
Do not expose the camera lens to direct sunlight for a long time. Doing so may result in fire or explosion due to condensed beams of light from the lens.
Product usage precautions

Do not start using this product at a high volume. Doing so may result in hearing impairment. Lower the volume before turning off the product, and gradually increase the volume after turning on the product. To prevent possible hearing damage, do not listen at high volume for prolonged periods of time.
Do not pull on the cable when inserting/removing it from the connector for the connector ports. Also, make sure you plug the connector straight into the connector port. If the connection is incomplete or incorrect, it could result in fire, burns, or electric shock.
Make sure you use genuine, certified products for cables connected to the USB-C port or the HDMI port. Failure to comply with these precautions could result in fire, burns, electric shock, or damage to the product due to incorrect wiring and so on when not using certified products.
Do not allow any conductive foreign objects to touch the external device connector or earphone microphone socket, and do not put any conductive foreign objects into the connection ports. Doing so may cause a short circuit and result in fire or electric shock.
Do not allow solvents such as alcohol, benzene, or thinner to touch the product. Also, do not clean this product with a wet cloth or solvents. Doing so may warp or crack the product housing and may result in electric shock, malfunction, or fire.
The product housing should only be opened by qualified service personnel. Also, do not disassemble or remodel the product (including consumable items). Many of the parts inside the product carry a high voltage and could cause fire, electric shock, accident, or poisoning.
Do not subject the lens of the product to strong shocks or knock it against hard objects. If the lens is damaged, it could splinter and cause serious injuries to the eyes and face.
Do not throw the product into a fire and do not heat the product. Do not place objects with open flames, such as candles, on this product. Doing so may result in heat, fire, or explosion.
Viewing image precautions
Do not wear this product while driving a car, riding a motor bike or bicycle, or performing any other dangerous tasks. Doing so may result in accident or injury.
Do not use this product in unstable locations such as stairs or at altitude. Also, do not use the product while walking in dangerous locations such as near machinery or equipment that might get caught on the cables, where there is a lot of traffic, or where it is dark. Doing so may result in accident or injury.
When walking while viewing images on the product, be aware of your surroundings. If you are too focused on the image, it could result in accidents, falling down, and colliding with other people.
When viewing in dark locations, it is difficult to see your surroundings due to the brightness of the image. Be aware of your surroundings.
When using this product in small locations, be aware of your surroundings.
When wearing this product, do not look directly at the sun or other light sources even if you are using the shaded shield. This could cause serious injury to your eyes or loss of eyesight.
Make sure the cable does not catch on anything in the surrounding area while wearing the product. Also, make sure the cable does not wind around your neck. Doing so may result in accident or injury.
Make sure the cable does not get damaged. Otherwise, it may result in fire or electric shock.
- Do not damage the cable.
- Do not place heavy objects on top of the cable.
- Do not bend, twist, or pull the cable with excessive force.
- Keep the power cable away from hot electrical appliances.
Product abnormality precautions
In the following situations, unplug the power supply cable, and contact the Epson service call center. Continuing to use under these conditions may result in fire or electric shock. Do not try to repair this product yourself.
- If you see smoke, or notice any strange odors or noises.
- If any water, beverages, or foreign objects get into the product.
- If the product was dropped or the case was damaged.
Usage environment and condition precautions
Do not place the product in locations subjected to vibrations or shocks.
While using the product to view images, play games, or listen to music, make sure you confirm the safety of your surroundings and do not leave any fragile items in your immediate vicinity. The images you are viewing may cause you to move your body involuntarily, resulting in damage to nearby items or personal injury.
Do not place this product near high-voltage lines or magnetized items. Doing so may result in breakdown, malfunction, or failure.
When performing maintenance, make sure you unplug the power supply cable and disconnect all wires. Otherwise, it may result in electric shock.
Product usage precautions
Stop using this product if the skin that touches the product (face and so on) feels itchy when wearing the product, or any unusual rashes occur, and consult your local dermatologist.
If you sweat while using the product, wipe the sweat from your face and the product. Continuing to use under these conditions may result in itching or a rash.
For your own safety, do not use a conversion adapter or extension cable when using the USB-C port or the HDMI port.
Hold the interface unit securely or place it on a stable surface and make sure the cables are not pulled with undue force.
Dispose of this product in accordance with your local laws and regulations.
Viewing image precautions
Always take periodic breaks when viewing images using this product. Long periods of viewing images may result in eye fatigue. If you feel fatigued or uncomfortable even after taking a break, stop viewing immediately.
Do not drop this product or treat it with unnecessary force. Also, if the product breaks due to an impact such as a fall, stop using the product. Continuing to use this product may result in injury due to glass fragments.
When wearing this product, be aware of the edges of the frame. Also, do not place your finger between the moving parts of this product. Doing so may result in injury.
Make sure you are wearing this product correctly. Incorrect usage could make you feel nauseous.
This product should only be used for the purposes stated in the manuals. Doing so may result in injury.
If a problem or malfunction occurs, stop using this product immediately. Continuing to use this product may result in injury or could make you feel nauseous.
Stop using this product if your skin feels unusual when wearing this product and consult your local dermatologist. Sometimes allergies may occur due to the coating or material of the product.
How a 3D image is perceived varies depending on the individual. Stop using the 3D function if you feel strange or cannot see in 3D. Continuing to view the 3D images could make you feel nauseous.
This product must not be used by children under the age of thirteen.
Do not use this product if you are sensitive to light, or feel nauseous. Doing so may aggravate your pre-existing conditions.
Do not use this product if you have prior eye conditions. Doing so may aggravate the symptoms such as strabismus, amblyopia, or anisometropia.
Contact List
This address list is current as of May 2018.
A more up-to-date contact address can be obtained from the corresponding website listed here. If you do not find what you need on any of these pages, please visit the main Epson home page at www.epson.com.
| EUROPE, MIDDLE EAST & AFRICA | |||
| ALBANIA ITD Sh.p.k. http://www.itd-al.com | AUSTRIA Epson Deutschland GmbH http://www.epson.at | BELGIUM Branch office Belgium http://www.epson.be | BOSNIA AND HERZEGOVINA NET d.o.o. Computer Engineering http://www.net.com.ba |
| BULGARIA Epson Service Center Bulgaria http://www.kolbis.com | CROATIA MR servis d.o.o. http://www.mrservis.hr | CYPRUS Mechatronic Ltd. http://www.mechatronic.com.cy | CZECH REPUBLIC Epson Europe B.V. Branch Office Czech Republic http://www.epson.cz |
| DENMARK Epson Denmark http://www.epson.dk | ESTONIA Epson Service Center Estonia http://www.epson.ee | FINLAND Epson Finland http://www.epson.fi | FRANCE & DOM-TOM TERRITORY Epson France S.A. http://www.epson.fr |
| GERMANY Epson Deutschland GmbH http://www.epson.de | GREECE Oktabit S.A. http://www.oktabit.gr | HUNGARY Epson Europe B.V. Branch Office Hungary http://www.epson.hu | IRELAND Epson (UK) Ltd. http://www.epson.ie |
| ISRAEL Epson Israel http://www.epson.co.il | ITALY Epson Italia s.p.a. http://www.epson.it | KAZAKHSTAN Epson Kazakhstan Rep. Office http://www.epson.kz | LATVIA Epson Service Center Latvia http://www.epson.lv |
| LITHUANIA Epson Service Center Lithuania http://www.epson.lt | LUXEMBURG Epson Europe B.V. Branch office Belgium http://www.epson.be | MACEDONIA Digit Computer Engineering http://www.digit.com.mk | NETHERLANDS Epson Europe B.V. Benelux sales office http://www.epson.nl |
| NORWAY Epson Norway http://www.epson.no | POLAND Epson Europe B.V. Branch Office Poland http://www.epson.pl | PORTUGAL Epson Ibérica S.A.U. Branch Office Portugal http://www.epson.pt | ROMANIA Epson Europe B.V. Branch Office Romania http://www.epson.ro |
| RUSSIA Epson CIS http://www.epson.ru | UKRAINE Epson Kiev Rep. Office http://www.epson.ua | SERBIA Atom partner http://www.atompartner.rs/wp/ EWE Comp http://www.ewe.rs | SLOVAKIA Epson Europe B.V. Branch Office Czech Republic http://www.epson.sk |
| SLOVENIA Birotehna d.o.o. http://www.birotehna.si | SPAIN Epson Ibérica, S.A.U. http://www.epson.es | SWEDEN Epson Sweden http://www.epson.se | SWITZERLAND Epson Deutschland GmbH Branch office Switzerland http://www.epson.ch |
| TURKEY Tecpro Bilgi Teknolojileri Tic. ve San. Ltd. Sti. http://www.tecpro.com.tr | UK Epson (UK) Ltd. http://www.epson.co.uk | AFRICA http://www.epson.co.za or http://www.epson.fr | SOUTH AFRICA Epson South Africa http://www.epson.co.za |
| MIDDLE EAST Epson (Middle East) http://www.epson.ae | |||
| NORTH, CENTRAL AMERICA & CARIBBEAN ISLANDS | |||
| CANADA Epson Canada, Ltd. http://www.epson.ca | COSTA RICA Epson Costa Rica, S.A. http://www.epson.co.cr | MEXICO Epson Mexico, S.A. de C.V. http://www.epson.com.mx | ECUADOR Epson Ecuador http://www.epson.com.ec |
| U. S. A. Epson America, Inc. http://www.epson.com | |||
| SOUTH AMERICA | |||
| ARGENTINA Epson Argentina S.R.L. http://www.epson.com.ar | BRAZIL Epson do Brasil http://www.epson.com.br | CHILE Epson Chile S.A. http://www.epson.cl | COLOMBIA Epson Colombia Ltd. http://www.epson.com.co |
| PERU Epson Peru S.A. http://www.epson.com.pe | VENEZUELA Epson Venezuela S.A. http://www.epson.com.ve | ||
| ASIA & OCEANIA | |||
| AUSTRALIA Epson Australia Pty. Ltd. http://www.epson.com.au | CHINA Epson (China) Co., Ltd. http://www.epson.com.cn | HONG KONG Epson Hong Kong Ltd. http://www.epson.com.hk | INDIA Epson India Pvt., Ltd. http://www.epson.co.in |
| INDONESIA PT. Epson Indonesia http://www.epson.co.id | JAPAN Seiko Epson Co. Toyoshina Plant http://www.epson.jp | KOREA Epson Korea Co., Ltd. http://www.epson.co.kr | MALAYSIA Epson Malaysia Sdn. Bhd. http://www.epson.com.my |
| NEW ZEALAND Epson New Zealand http://www.epson.co.nz | PHILIPPINES Epson Philippines Co. http://www.epson.com.ph | SINGAPORE Epson Singapore Pte. Ltd. http://www.epson.com.sg | TAIWAN Epson Taiwan Technology & Trading Ltd. http://www.epson.com.tw |
| THAILAND Epson (Thailand) Co.,Ltd. http://www.epson.co.th | |||
© 2018 Epson America, Inc., 9/18
Information on the Moverio Website
Provides technical information.
https://tech.moverio.epson.com/en/bt-35e/

Documents / Resources
References
Epson Global Portal
Country Selector | Epson Europe
![www.itd-al.com]() ITD – Offical Website
ITD – Offical WebsiteEpson Österreich | Willkommen bei Epson Österreich
Epson België | Welkom bij Epson België
![www.net.com.ba]() NET d.o.o.
NET d.o.o.![www.kolbis.com]() ..:: - ::..
..:: - ::..![www.mrservis.hr]() MR Servis
MR Servis![www.mechatronic.com.cy]() Welcome to Mechatronic...
Welcome to Mechatronic...Epson Česká republika | Vítejte v Epson Česká republika
Epson Danmark | Velkommen til Epson Danmark
Epson Eesti | Home
Epson Suomi | Tervetuloa Epson Suomi -sivuille
Epson France | Bienvenue sur Epson France
Epson Deutschland | Willkommen bei Epson Deutschland
![www.oktabit.gr]() Oktabit
OktabitEpson Magyarország | Üdvözöljük az Epson Magyarország honlapján
Epson Republic of Ireland | Welcome to Epson Republic of Ireland
ברוכים הבאים לאפסון ישראל | ברוכים הבאים לאפסון ישראל
Epson Italia | Benvenuti da Epson Italia

Download manual
Here you can download full pdf version of manual, it may contain additional safety instructions, warranty information, FCC rules, etc.
Download Epson Moverio BT-35E - Smart Glasses for Hands-Free Visual Manual
Advertisement


Need help?
Do you have a question about the Moverio BT-35E and is the answer not in the manual?
Questions and answers