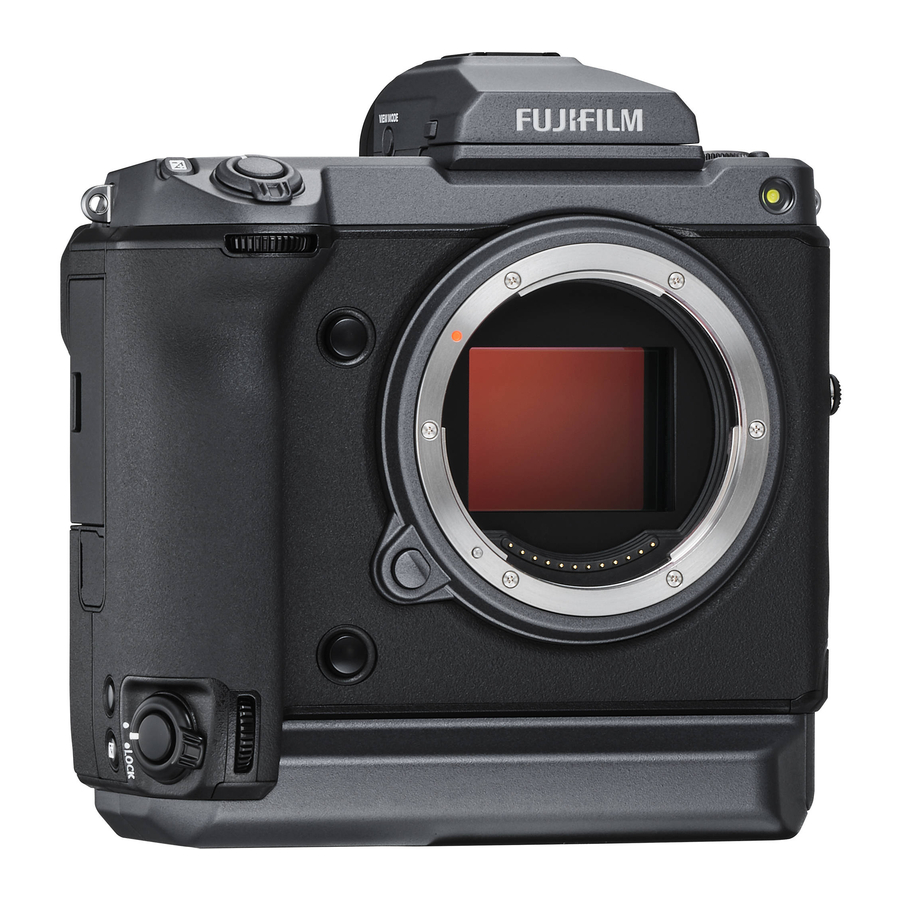
FujiFilm GFX 100 - Digital Camera Manual
- Owner's manual (352 pages) ,
- New features manual (14 pages) ,
- Owner's manual (376 pages)
Advertisement

Introduction
Features added or changed as a result of firmware updates may no longer match the descriptions in the documentation supplied with this product. Visit our website for information on the updates available for different products: https://fujifilm-x.com/support/download/firmware/
| No. | Description | GFX 100 | Ver. |
| 1 | The camera now off ers a "PIXEL SHIFT MULTI SHOT" option. | - | 3.00 |
| 2 | A COMPRESSED option has been added to  IMAGE QUALITY SETTING > RAW RECORDING > RECORDING TYPE in the shooting menu. IMAGE QUALITY SETTING > RAW RECORDING > RECORDING TYPE in the shooting menu. | 106 | 2.00 |
| 3 |  CLASSIC Neg. and CLASSIC Neg. and  ETERNA BLEACH BYPASS options have been added to ETERNA BLEACH BYPASS options have been added to  IMAGE QUALITY SETTING > FILM SIMULATION in the shooting menu. IMAGE QUALITY SETTING > FILM SIMULATION in the shooting menu. | 107 | 2.00 |
| 4 | Separate ROUGHNESS and SIZE options are now available for  IMAGE QUALITY SETTING > GRAIN EFFECT in the shooting menu. IMAGE QUALITY SETTING > GRAIN EFFECT in the shooting menu. | 108 | 2.00 |
| 5 | A COLOR CHROME FX BLUE item has been added to  IMAGE QUALITY SETTING in the shooting menu. IMAGE QUALITY SETTING in the shooting menu. | 109 | 2.00 |
| 6 | The  SHOOTING SETTING > FOCUS BKT item in the shooting menu now off ers a choice of MANUAL and AUTO focus bracketing options. SHOOTING SETTING > FOCUS BKT item in the shooting menu now off ers a choice of MANUAL and AUTO focus bracketing options. | 139 | 2.00 |
| 7 | The  MOVIE SETTING > F-Log/HLG RECORDING item in the shooting menu has been renamed F-Log/HLG/RAW RECORDING and now supports RAW output. MOVIE SETTING > F-Log/HLG RECORDING item in the shooting menu has been renamed F-Log/HLG/RAW RECORDING and now supports RAW output. | 158 | 2.00 |
| 8 | The procedure for rating pictures has changed. As a result, the content of the playback information displays has changed and a RATING item has been added to the playback menu. | 172, 173, 187 | 2.00 |
| 9 | Movie recording can now be controlled via a wider variety of external devices. As a result, the  CONNECTION SETTING > PC CONNECTION MODE item in the setup menu has been renamed CONNECTION MODE. CONNECTION SETTING > PC CONNECTION MODE item in the setup menu has been renamed CONNECTION MODE. | 244 | 2.00 |
PIXEL SHIFT MULTI SHOT
The camera takes a series of 16 shots, using in-body image stabilization to move the image sensor by half a pixel with each shot and recording each frame in RAW format. Using specialized computer software, the frames can then be combined to create a high-resolution RAW picture.
- Rotate the DRIVE mode dial to MULTI.
- Press the DRIVE button to view drive mode options.
- Select PIXEL SHIFT MULTI SHOT and choose a value for INTERVAL.
- We recommend setting INTERVAL to SHORTEST.
- If you intend to use the fl ash with every shot, choose a value for INTERVAL long enough to allow the fl ash to charge between shots.
- Press the shutter button to start shooting.
- The shots are recorded to the memory card in RAW format.
- To minimize vibration, use the self-timer or a remote release.
- Combine the shots on a computer.
- The shots can be combined using FUJIFILM Pixel Shift Combiner.
- To save high-resolution RAW pictures in other formats, use Capture One Express Fujifilm, Capture One Pro Fujifilm, or Capture One Pro, available from Capture One A/S. FUJIFILM X RAW STUDIO and RAW FILE CONVERTER EX powered by SILKYPIX cannot be used for this purpose.
![]() Visit the websites below to learn more about or download the following computer software:
Visit the websites below to learn more about or download the following computer software: - FUJIFILM Pixel Shift Combiner:
https://fujifilm-x.com/products/software/pixel-shift-combiner/ - Capture One Express Fujifilm:
https://www.captureone.com/products-plans/capture-one-express/fujifilm - Capture One Pro Fujifilm:
https://www.captureone.com/explore-features/fujifilm - Capture One Pro:
https://www.captureone.com/explore-features
- FUJIFILM Pixel Shift Combiner:
- Pixel-shift multi-shot photography can be performed via tethered shooting. For this purpose, use FUJIFILM Pixel Shift Combiner.
- The fl ash will synchronize with the shutter at shutter speeds of 1⁄5 s or slower (14-bit RAW) or ½.5 s or slower (16-bit RAW).
- The following limitations apply to the use of the pixel-shift multi-shot option:
- Pixel-shift multi-shot photography can only be performed using the elec-tronic shutter.
- Sensitivity is restricted to a maximum of ISO 1600. Choosing higher values or a setting of AUTO results in a sensitivity of ISO 1600, while lower values remain unchanged.
- The only option available for RAW RECORDING > RECORDING TYPE is LOSSLESS.
- Pictures taken with C (AF-C) selected for focus mode will be shot in focus mode S (AF-S). Pictures taken with A (AF-S) or M (manual) selected are shot in the chosen focus mode.
- If the subject or camera moves during shooting, the desired results may not be achieved when the shots are combined.
![]() SHOOTING SETTING > FLICKER REDUCTION is automatically set to OFF.
SHOOTING SETTING > FLICKER REDUCTION is automatically set to OFF.- The value selected for exposure compensation applies to all 16 shots.
Playback
Pictures taken using the pixel-shift multi-shot option are indicated by a pixel-shift multi-shot icon in full-frame playback.
RAW RECORDING
Choose whether to compress RAW images.
RECORDING TYPE
| Option | Description |
| UNCOMPRESSED | RAW images are not compressed. |
| LOSSLESS | RAW images are compressed using a reversible algorithm that reduces file size with no loss of image data. The images can be viewed in Capture One Express Fujifilm, RAW FILE CONVERTER EX powered by SILKYPIX, FUJIFILM X RAW STUDIO, or other software that supports "lossless" RAW compression. Quality is the same as UNCOMPRESSED  but the resulting files are anywhere from about 30 to 90 percent (14-bit RAW) or 45 to 100 percent (16-bit RAW) of their uncompressed size. but the resulting files are anywhere from about 30 to 90 percent (14-bit RAW) or 45 to 100 percent (16-bit RAW) of their uncompressed size. |
| COMPRESSED | RAW images are compressed using a "lossy", non-reversible algorithm. Quality is about the same as UNCOMPRESSED  but the resulting files are anywhere from about 25 to 35 percent (14-bit RAW) or 30 to 40 percent (16-bit RAW) of their uncompressed size. but the resulting files are anywhere from about 25 to 35 percent (14-bit RAW) or 30 to 40 percent (16-bit RAW) of their uncompressed size. |
OUTPUT DEPTH(bit)
| Option | Description |
| 16bit | RAW pictures are recorded at a bit depth of 16 bits. |
| 14bit | RAW pictures are recorded at a bit depth of 14 bits. |

FILM SIMULATION
Simulate the effects of different kinds of film, including black-and-white (with or without color filters). Choose a palette according to your subject and creative intent.
| Option | Description |
 PROVIA/STANDARD PROVIA/STANDARD | Standard color reproduction. Suited to a wide range of subjects, from portraits to landscapes. |
 Velvia/VIVID Velvia/VIVID | A high-contrast palette of saturated colors, suited to nature photos. |
 ASTIA/SOFT ASTIA/SOFT | Enhances the range of hues available for skin tones in portraits while preserving the bright blues of daylight skies. Recommended for outdoor portrait photography. |
 CLASSIC CHROME CLASSIC CHROME | Soft color and enhanced shadow contrast for a calm look. |
 PRO Neg. Hi PRO Neg. Hi | Offers slightly more contrast than  PRO Neg. Std.Recommended for outdoor portrait photography. PRO Neg. Std.Recommended for outdoor portrait photography. |
 PRO Neg. Std PRO Neg. Std | A soft-toned palette. The range of hues available for skin tones is enhanced, making this a good choice for studio portrait photography. |
 CLASSIC Neg. CLASSIC Neg. | Enhanced color with hard tonality to increase image depth. |
 ETERNA/CINEMA ETERNA/CINEMA | Film movies using a palette that features subdued colors and deep shadows. |
 ETERNA BLEACH BYPASS ETERNA BLEACH BYPASS | Unique color with low saturation and high contrast. Suitable for still and movie. |
 ACROS * ACROS * | Take black-and-white photos with rich gradation and outstanding sharpness. |
 MONOCHROME * MONOCHROME * | Take pictures in standard black and white. |
 SEPIA SEPIA | Take pictures in sepia. |
* Available with yellow (Ye), red (R), and green (G) filters, which deepen shades of gray corresponding to hues complementary to the selected color. The yellow (Ye) filter deepens purples and blues and the red (R) filter blues and greens. The green (G) filter deepens reds and browns, including skin tones, making it a good choice for portraits.
GRAIN EFFECT
Add a film grain effect.
ROUGHNESS
| Option | Description |
| STRONG | Choose for rougher grains. |
| WEAK | Choose for smoother grains. |
| OFF | Turn the effect off. |
SIZE
| Option | Description |
| LARGE | Choose for coarser grains. |
| SMALL | Choose for finer grains. |
COLOR CHROME FX BLUE
Increase the range of tones available for rendering blues.
| Option | Description |
| STRONG | Choose for a strong effect. |
| WEAK | Choose for a weak effect. |
| OFF | Turn the effect off. |
 COLOR CHROME FX BLUE options have also been added to.
![]() IMAGE QUALITY SETTING > EDIT/SAVE CUSTOM SETTING
IMAGE QUALITY SETTING > EDIT/SAVE CUSTOM SETTING![]() PLAY BACK MENU > RAW CONVERSION
PLAY BACK MENU > RAW CONVERSION -
![]() SCREEN SET-UP > REAR SUB MONITOR SETTING
SCREEN SET-UP > REAR SUB MONITOR SETTING -
![]() BUTTON/DIAL SETTING > EDIT/SAVE QUICK MENU
BUTTON/DIAL SETTING > EDIT/SAVE QUICK MENU -
![]() BUTTON/DIAL SETTING > FUNCTION (Fn) SETTING
BUTTON/DIAL SETTING > FUNCTION (Fn) SETTING
FOCUS BKT
Choose from AUTO and MANUAL focus bracketing modes.
- MANUAL: In MANUAL mode, you choose the following.
Option Description Description FRAMES Choose the number of shots. STEP Choose the amount focus changes with each shot. INTERVAL Choose the interval between shots.
Focus and FRAMES/STEP
The relation between focus and the options chosen for FRAMES and STEP is shown in the illustration.
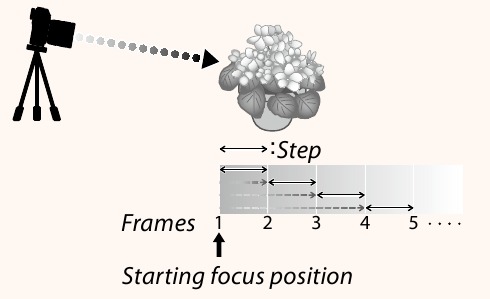
- Focus proceeds from the starting position toward infinity.
- Small STEP values translate to small changes in focus, larger values to larger changes.
- Regardless of the option chosen for FRAMES, shooting ends when focus reaches infinity.
- AUTO: In AUTO mode, the camera calculates FRAMES and STEP automatically.
- Select
![]() SHOOTING SETTING in the shooting menu, highlight FOCUS BKT, and press MENU/OK.
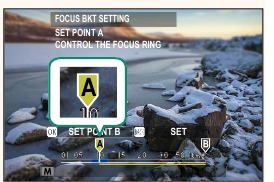
SHOOTING SETTING in the shooting menu, highlight FOCUS BKT, and press MENU/OK. - Select AUTO and choose an INTERVAL. The view through the lens will be displayed.
- Focus on the nearest end of the subject and press MENU/OK.
The selected focus distance appears as A on the focus distance indicator.
![]() The same focus range can be chosen by focusing on the farthest end of the subject first.
The same focus range can be chosen by focusing on the farthest end of the subject first.
![]()
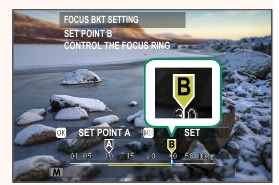
- Focus on the farthest end of the subject and press DISP/BACK. The selected focus distance (B) and focus range (A to B) appear on the focus distance indicator.
![]() Instead of pressing the DISP/BACK button, you can press MENU/OK and select A again.
Instead of pressing the DISP/BACK button, you can press MENU/OK and select A again.
![]()
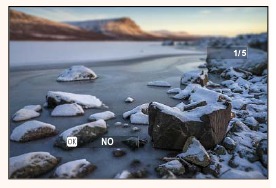
- Take photographs. The camera will calculate values for FRAMES and STEP automatically. The number of frames will appear in the display.
![]()
F-Log/HLG/RAW RECORDING
Choose the destination for F-Log, HLG (Hybrid Log-Gamma), or RAW movies shot while the camera is connected to an HDMI device.
| Option | Description |
 | The footage is processed using film simulation and both saved to the memory card and output to the HDMI device. |
 F-Log F-Log  F-Log F-Log | The footage is recorded to the memory card and output to the HDMI device in F-Log format. |
 F-Log F-Log | The footage is output to the HDMI device in F-Log format but saved to the memory card with film simulation applied. |
 F-Log F-Log  | The footage is recorded to the memory card in F-Log format but output to the HDMI device with film simulation applied. |
 HLG HLG  HLG HLG | The footage is recorded to the memory card and output to the HDMI device in HLG format. |
 RAW RAW | The footage is output to the HDMI device in RAW format but saved to the memory card with film simulation applied. |
 F-Log F-Log  RAW RAW | The footage is recorded to the memory card in F-Log format and output to the HDMI device in RAW format. |
 HLG HLG  RAW RAW | The footage is recorded to the memory card in HLG format and output to the HDMI device in RAW format. |

- F-Log offers a gentle gamma curve with a wide gamut suitable for further processing post-production. Sensitivity is restricted to values between ISO 800 and ISO 12800.
- The HLG (Hybrid Log-Gamma) recording format conforms to the international ITU-R BT2100 standard. When viewed on HLG-compatible displays, high-quality HLG footage faithfully captures high-contrast scenes and vivid colors. Sensitivity is restricted to values between ISO 1250 and ISO 12800. HLG recording is available when H.265(HEVC) is selected for
![]() MOVIE SETTING > H.265(HEVC)/H.264 in the shooting menu.
MOVIE SETTING > H.265(HEVC)/H.264 in the shooting menu. - Film simulation (
![]() ) footage is recorded using the option selected for
) footage is recorded using the option selected for ![]() MOVIE SETTING >
MOVIE SETTING > ![]() FILM SIMULATION in the shooting menu.
FILM SIMULATION in the shooting menu. - Footage shot with
![]()
![]()
![]() F-Log or
F-Log or ![]() F-Log
F-Log ![]()
![]() cannot be recorded to the memory card and output to the HDMI at different frame sizes (4K, Full HD). In addition, the following
cannot be recorded to the memory card and output to the HDMI at different frame sizes (4K, Full HD). In addition, the following ![]() MOVIE SETTING options are unavailable:
MOVIE SETTING options are unavailable: - MOVIE MODE frame rate options of 59.94P and 50P
![]() INTERFRAME NR
INTERFRAME NR- HDMI OUTPUT INFO DISPLAY
- RAW output cannot be recorded to the memory card.
- In-camera image enhancements are not applied to the RAW output.
- The crop (picture angle) and quality of footage output to external devices diff ers from that shown in the camera monitor. View the RAW footage on the external device.
- Footage output to external devices is generated from the original RAW data and its quality, which varies with device specifications, may not be equal to that achieved as the end result of post-production or the like.
- Focus zoom is not available when RAW is selected for HDMI output.
- RAW footage output via HDMI to incompatible devices will not display correctly but will instead will display as a mosaic.
- The minimum and maximum sensitivities for
![]() , F-Log, or HLG footage recorded to the memory card when RAW is selected for HDMI output are ISO 1250 and ISO 12800, respectively.
, F-Log, or HLG footage recorded to the memory card when RAW is selected for HDMI output are ISO 1250 and ISO 12800, respectively.
The Playback Display
This section lists the indicators that may be displayed during playback.

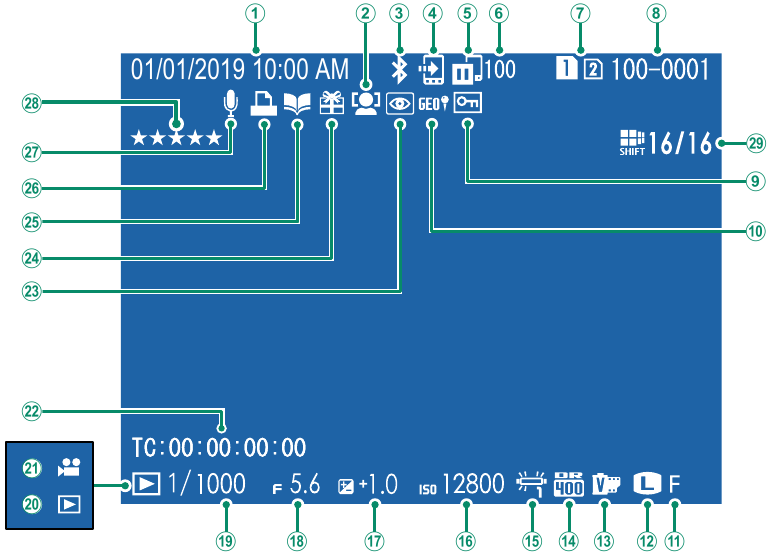
- Date and time
- Face detection indicator
- Bluetooth ON/OFF
- Image transfer order
- Image transfer status
- Number of frames selected for upload
- Card slot
- Frame number
- Protected image
- Location data
- Image quality
- Image size
- Film simulation
- Dynamic range
- White balance
- Sensitivity
- Exposure compensation
- Aperture
- Shutter speed
- Playback mode indicator
- Movie icon
- Time code
- Red-eye removal indicator
- Gift image
- Photobook assist indicator
- DPOF print indicator
- Voice memo
- Rating
- Pixel-shift multi-shot
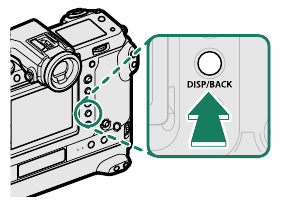
The DISP/BACK Button
The DISP/BACK button controls the display of indicators during playback.

Favorites: Rating Pictures
Pictures can be rated via the RATING item in the playback menu.
RATING
Rate pictures using stars.
- Select RATING in the playback menu.
- Rotate the front command dial to choose a picture and the rear command dial to choose a rating of from 0 to 5 stars ("
![]() ").
").

- The focus stick (focus lever) can be used in place of the front command dial to choose a picture.
- The rating dialog can also be displayed by pressing the AE-L button (vertical grip AE-L button) in single-frame, nine-frame, or hundred-frame playback.
- Use touch controls to zoom in or out.
CONNECTION MODE
Adjust settings for connection to external devices.
| Option | Description |
| USB CARD READER | Connecting the camera to a computer via USB automatically enables data transfer mode, allowing data to be copied to the computer. The camera functions normally when not connected. |
| USB TETHER SHOOTING AUTO | The camera can be controlled from computers, gimbals, drones, or other devices connected via USB. The camera automatically enters "tethered shooting" (i.e., remote-control) mode when the external device is turned on and returns to normal operation when the external device turned off or disconnected.
|
| USB TETHER SHOOTING FIXED | As for USB TETHER SHOOTING AUTO, except that the camera remains in "tethered shooting" (remote-control) mode when the external device is off or not connected, allowing the device to resume control when the connection is re-established after an accidental disconnection or other disruption. At default settings, pictures are not recorded to the memory card. |
| WIRELESS TETHER SHOOTING FIXED | Choose this option for wireless remote photography. Select a network using  CONNECTION SETTING > NETWORK SETTING. CONNECTION SETTING > NETWORK SETTING. |
| USB RAW CONV./ BACKUP RESTORE | Connecting the camera to a computer via USB automatically enables USB RAW conversion/backup restore mode. The camera functions normally when not connected.
|
 POWER MANAGEMENT > AUTO POWER OFF settings also apply during tethered shooting. To prevent the camera turning off automatically, select OFF for AUTO POWER OFF.

Visit the websites below to learn more about or download the following computer software:
- Capture One Express Fujifilm:
https://www.captureone.com/products-plans/capture-one-express/fujifilm - Capture One Pro Fujifilm:
https://www.captureone.com/explore-features/fujifilm - Adobe® Photoshop® Lightroom® + Tether Plugin:
https://fujifilm-x.com/global/products/software/adobe-photoshop-lightroom-tether-plugin/ - FUJIFILM X Acquire:
https://fujifilm-x.com/products/software/x-acquire/ - FUJIFILM X RAW STUDIO:
https://fujifilm-x.com/products/software/x-raw-studio/ - RAW FILE CONVERTER EX powered by SILKYPIX:
https://fujifilm-x.com/support/download/software/raw-file-converter-ex-powered-by-silkypix/ - FUJIFILM Pixel Shift Combiner:
https://fujifilm-x.com/products/software/pixel-shift-combiner/
7-3, AKASAKA 9-CHOME, MINATO-KU, TOKYO 107-0052, JAPAN
https://fujifilm-x.com

Documents / Resources
References
![fujifilm-x.com]() Firmware: Camera | FUJIFILM Digital Camera X Series & GFX – USA
Firmware: Camera | FUJIFILM Digital Camera X Series & GFX – USA![fujifilm-x.com]() FUJIFILM Pixel Shift Combiner | Software | FUJIFILM Digital Camera X Series & GFX – USA
FUJIFILM Pixel Shift Combiner | Software | FUJIFILM Digital Camera X Series & GFX – USAFree photo editing software for Fujifilm
Discover Capture One for Fujifilm
Discover Capture One features
![fujifilm-x.com]() Adobe Photoshop Lightroom Classic + Tether Plugin | Software | FUJIFILM X Series & GFX – Global
Adobe Photoshop Lightroom Classic + Tether Plugin | Software | FUJIFILM X Series & GFX – Global![fujifilm-x.com]() FUJIFILM X Acquire | Software | FUJIFILM Digital Camera X Series & GFX – USA
FUJIFILM X Acquire | Software | FUJIFILM Digital Camera X Series & GFX – USA![fujifilm-x.com]() FUJIFILM X RAW STUDIO | Software | FUJIFILM Digital Camera X Series & GFX – USA
FUJIFILM X RAW STUDIO | Software | FUJIFILM Digital Camera X Series & GFX – USA![fujifilm-x.com]() RAW FILE CONVERTER EX 3.0 powered by SILKYPIX | Software | FUJIFILM Digital Camera X Series & GFX – USA
RAW FILE CONVERTER EX 3.0 powered by SILKYPIX | Software | FUJIFILM Digital Camera X Series & GFX – USA![fujifilm-x.com]() FUJIFILM Digital Camera X Series & GFX – USA
FUJIFILM Digital Camera X Series & GFX – USA
Download manual
Here you can download full pdf version of manual, it may contain additional safety instructions, warranty information, FCC rules, etc.
Advertisement
 MOVIE SETTING > H.265(HEVC)/H.264 in the shooting menu.
 ) footage is recorded using the option selected for
  INTERFRAME NR
 ").
").


Need help?
Do you have a question about the GFX 100 and is the answer not in the manual?
Questions and answers