Advertisement
Parts Name
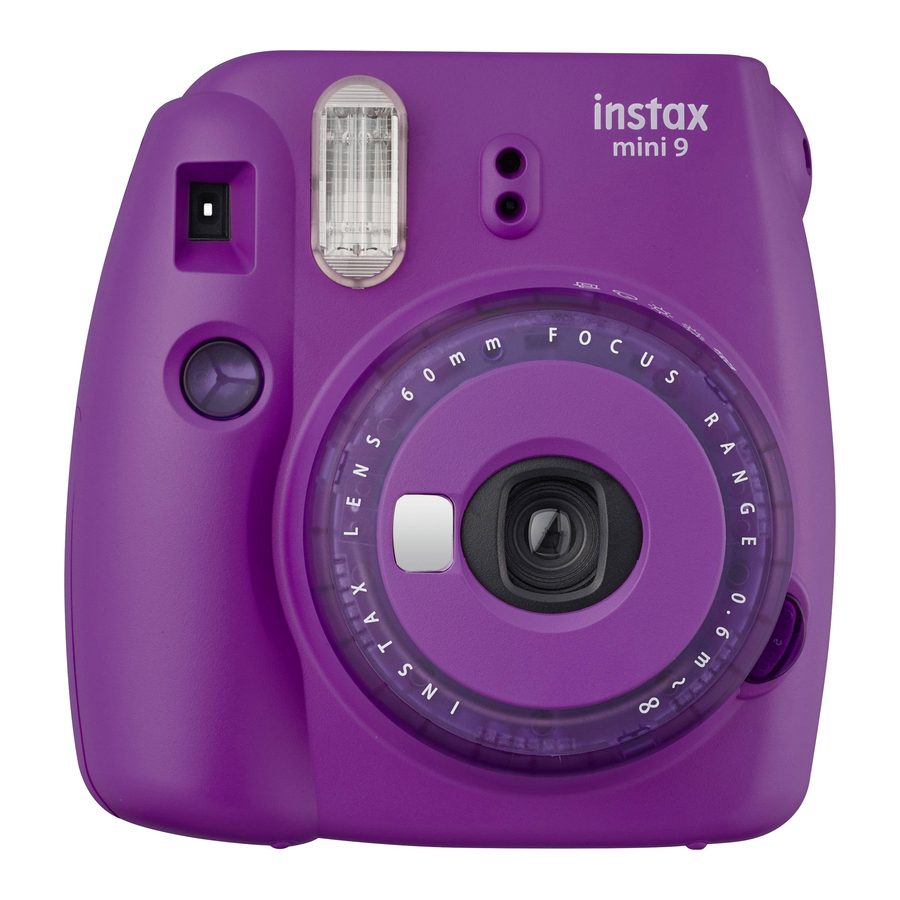
Front

- Film ejection slot
- Light sensor
- Flash lampface
- Viewfinder
- Shutter button
- Lens/Lens cover
- Self-portrait mirror
- Lens barrel
- Strap hook
- Brightness indicator
Rear

- Brightness adjustment dial
- Power button
- Flash charging lamp
- Back cover lock
- Film pack confirmation window
- Back cover
- Film counter
- Eyepiece
- Battery lid
- Tabs (Back)
Close-up lens

Inserting Batteries

|
- Push up the battery lid lock, then slide off the battery cover.
![]()
- Insert two AA batteries matching the
![]() and
and ![]() polarities.
polarities.
![]()
- Slide on the battery lid to close.
![]()

 and
and  polarities.

Loading the INSTAX mini Film Pack
|
- Press down the back cover lock to open the back cover.
![]()
- Hold both sides of the fi lm pack, align the yellow marks on the camera and the fi lm pack as indicated on the INSTAX mini fi lm pack instructions, then insert it straight.
![]()
- Close the back cover until the back cover lock clicks into place.
![]()
- Press the power button to turn the camera on. The fl ash charging lamp on the left of the eyepiece starts blinking. (Indicates the fl ash is charging.)
![]()
- When you press the shutter button, the fi lm cover (black) is ejected, and the fi lm counter display on the back changes from "S" to "10".
![]()
- After the fi lm cover has been ejected (the camera stops making a sound), grasp the edge of the fi lm, then take it out. Your camera is now ready to take a photo.
![]()


Taking Pictures [IMPORTANT]
- Press the power button to turn the camera on. The fl ash charging lamp on the left of the eyepiece starts blinking. (Indicates the fl ash is charging.) You cannot take a photo while the lamp is blinking.
![]()
- Turn the camera toward the subject, then turn the brightness adjustment dial to move to the position (
![]() ) where the lamp is lit.
) where the lamp is lit.

- Hold the camera, confi rm the desired composition of the fi nal image, then press the shutter button.
- Keep a distance from the subject of at least 0.6 m. The fl ash has an eff ective range of between 0.6 m and 2.7 m.
- The subject will be out of focus using the regular lens if the distance is less than 0.6 m. Use the close-up lens for short-distance photography. Using it enables you to photograph the subject between 35 cm and 50 cm.
- In short-distance photography (including photography using the provided close-up lens), the center of the subject in the viewfi nder will be on the upper right on the actual print.


 ) where the lamp is lit.

| on holding the camera
|
- Every time you take a photo, the number on the fi lm counter decreases from "10" to refl ect the number of remaining photos, and "0" is displayed when you have used up the fi lm pack.
![]()
- When the fi lm has been ejected (the camera stops making a sound), grasp the edge of the fi lm, then take it out.
![]()
- When you have fi nished taking a photo, push the lens barrel to turn the camera off.
![]()


Unloading the INSTAX mini fi lm pack
When "0" is displayed on the fi lm counter, unload the fi lm pack following the procedure below and as indicated on the INSTAX mini fi lm pack instructions.
- Press down the back cover lock to open the back cover.
![]()
- Grasp the rectangular holes on the fi lm pack, then pull it out straight.
![]()


Using the Close-Up Lens
You can photograph objects close-up, and can photograph yourself using the self-portrait mirror.
|
|
- Attach the left tab on the back to the left of the lens (
![]() ), then attach the right tab (
), then attach the right tab ( ![]() ) so that it clicks into place.
) so that it clicks into place.
![]()
- Hold the camera so that the "O" mark in the viewfi nder is on the upper right of the center of the subject (see the illustration above), then take a photo.
![]()
- Lift up the right side of the close-up lens supporting the left side (
![]() ), then detach it (
), then detach it (![]() ).
).
![]()
 ), then attach the right tab (
  ) so that it clicks into place.


Taking self-portraits
- Hold the camera securely keeping 35 cm to 50 cm between you and the edge of the lens.
- Confi rm the composition using the self-portrait mirror, then take a photo.


Taking a lighter (Hi-Key) picture [IMPORTANT]
This camera automatically determines an appropriate brightness for taking any given picture, and informs you by lighting the corresponding lamp. To take a lighter (Hi-key) picture, set the position of the brightness adjustment dial to the position of the mode darker than the mode for which the lamp on the dial lights.

| Position at which the lamp lights |  |  |  |  |
| Position to set the dial for a lighter (Hi- Key) picture |
Do not use the  (Hi-key) function outside; otherwise, the picture may be much lighter (whiter) than you intend.
SPECIFICATIONS
| Film | FUJIFILM INSTAX mini film |
| Picture Size | 62 mm × 46 mm |
| Lens | 2 components, 2 elements, f=60 mm, 1:12.7 |
| Viewfi nder | Real image finder 0.37× with target spot |
| Shooting range | 0.6 m and beyond |
| Shutter Speed | 1/60 sec. |
| Exposure Control | Manual switching system (LED indicator in exposure meter) |
| Film Feeding Out | Automatic |
| Film Developing Time | Approximately 90 seconds (Varies depending on the ambient temperature) |
| Flash | Constant firing flash (automatic light adjustment) Recycle time: 0.2 sec. to 6 sec. (when using new batteries) Effective flash range: 0.6 m – 2.7 m |
| Power Supply | Two AA-size 1.5V alkaline batteries Capacity: 100 shots (Approximately 10 INSTAX mini 10-pack film packs with new AA batteries) |
| Auto power off time | 5 min. |
| Others | Exposure counter (number of unexposed films), film pack confirmation window |
| Dimensions | 116 mm × 118.3 mm × 68.2 mm |
| Weight | 307 g (without batteries, strap and film pack) |
* Specifi cations are subject to change without notice.
TROUBLE SHOOTING
During operation
| Problems | Possible Causes | Solutions | |
| The shutter release won't trip. |
|
| |
| The lamp on the view fi nder blinks and the shutter release won't trip. |  Flash is charging. Flash is charging. | Wait until the lamp on the brightness adjustment dial is lit without blinking. | |
| The fi lm pack won't load into your camera, or won't load into your camera smoothly. |
|
| |
| All lamps on the brightness adjustment dial blink at the same time. |
|
| |
| The red lamp on the view fi nder lights up. | The battery power is low. | Replace the batteries with new ones. | |
| Printed pictures | |||
| The fi nished print looks over exposed. (White in color) |
|
| |
| The fi nished print looks under exposed. (Dark) |
|
| |
| The picture is out of focus. |
|
| |
| The subject in the viewfi nder has shifted in fi nished print. | The shooting range is too close to the subject. | Take pictures with a distance of at least 0.6 m between you and your subject. | |

 direction.
 direction.
Information for traceability in Europe
Manufacturer: FUJIFILM Corporation
Address, City: 7-3, Akasaka 9-Chome, Minato-ku, Tokyo
Country: JAPAN
Authorized representative in Europe: FUJIFILM EUROPE GMBH
Address, City: Dusseldorf Heesenstrasse 31, 40549
Country: Germany
Information for FUJIFILM in the United States
FUJIFILM North America Corp.
200 Summit Lake Drive
Valhalla, New York 10595, USA
Information for FUJIFILM in Canada
FUJIFILM Canada Inc.
600 Suffolk Court, Mississauga, Ontario L5R 4G4
IMPORTANT SAFETY NOTICE
This product has been designed with safety in mind, and to provide safe service when handled correctly and in accordance with the User's Guide and instructions. It is important that both the product and the INSTAX fi lm are handled properly and used only to take pictures as instructed in this User's Guide and in the INSTAX mini fi lm instructions. For your ease and safety, please follow what is written in this User's Guide. It is also a good idea to keep this User's Guide in a safe, easy to fi nd place where you can refer to it if needed.
 This symbol indicates danger, which could result in injury or death. Please follow these instructions. |
- Never attempt to take this product apart. There is a danger of an electric shock.
- If this product is dropped or damaged so that the inside is showing, do not touch it. There is danger of an electric shock.
- If the camera or the batteries inside become hot, begin to smoke, make a burning smell or show any sign of unusual condition, remove the batteries right away. Use gloves to keep from burning your hands. Not removing batteries could result in burns or fi re.
- Using a fl ash too close to a person's eyes may for the short term aff ect the eyesight. Take care when taking picture of infants and young children.
- If your camera gets wet or if something such as pieces of metal get inside, remove the batteries right away to avoid heat buildup or a fi re starting inside the camera.
- Do not use this camera in places where there is fl ammable gas or near open gasoline, benzene, paint thinner or other unstable substances which can give off dangerous vapors. Doing so could result in explosion or fi re.
- Store your camera out of the reach of infants and young children. Failure to do this could result in serious injury. (For example, the strap could become wrapped around a child's neck and cause choking.)
- Never take apart the batteries. Do not subject them to heat, throw them into an open fi re, or attempt to short-circuit them. Doing so could result in the batteries exploding or splitting open causing burns or fi re.
- Only use specifi ed batteries in this product. Use of incorrect type of batteries could cause explosion. Dispose of used batteries according to battery disposal instructions.
- Make sure batteries are stored in a safe, secure place and well out of the reach of any infants, young children or pets. Improper storage could result in a child swallowing a battery. (If a child swallows a battery, call a doctor or a hospital right away.)
- Do not look through the close-up lens at the sun or other strong light. Blindness or vision problems could result.
- Never get this product wet or handle it with wet hands. Doing so may result in an electric shock.
- Never take fl ash photographs of people riding bicycles, driving cars or riding a horse. The fl ash can distract the driver and frighten the animal, possibly causing an accident.
- Make sure that the battery C and D polarities are installed correctly in the camera. A damaged battery or electrolyte leakage may cause a fi re, injury, and contaminate the environment.
- Do not touch moving parts inside the camera. You may be injured.
- When using the camera, make sure that the battery cover is attached; otherwise, you may be injured.
- Do not leave the close-up lens in places exposed to strong sunlight. Personal injury or fi re could result if the lens should accidentally concentrate the sunbeams on an object or a person.
- Do not swing around the camera. You may be injured.
 | The "CE" mark certifi es that this product satisfi es the requirements of the EU (European Union) regarding safety, public health, environment and consumer protection. ("CE" is the abbreviation of Conformité Européenne.) |
COMMON SENSE CAMERA CARE
CAMERA CARE
- Your camera is a precision instrument. Do not get it wet or drop it. Also, do not expose to sand.
- Do not use a strap made for cellular phones or other similar electronic products. These straps are usually too weak to hold your camera securely. For safety, use only straps designed for your camera, and use only as specifi cally intended and instructed.
- If you are not using your camera for a long interval, unload the batteries and keep it where it will be safe from heat, dust, and moisture.
- Remove soil and dust from the lens, viewfi nder window, etc. with an air blower and by wiping lightly with a piece of soft cloth.5
- Do not use solvent such as thinner and alcohol to remove soil.
- Keep the fi lm chamber and camera interior clean to avoid damaging fi lms.
- In hot weather, do not leave your camera in a closed car or on the beach, and do not leave it in moist places.
- Moth repellent gas such as naphthalene adversely aff ects your camera and fi lms. Avoid keeping your camera or fi lms in a chest with mothballs.
- Your camera is computer-controlled. If you should experience an operational issue, remove the batteries and then reload them.
- Note that the temperature range within which your camera can be used is +5°C/+41°F to +40°C/+104°F.
INSTAX mini FILM AND PRINT CARE
See FUJIFILM INSTAX mini fi lm for fi lm use instructions. Follow all instructions for safe and proper use.
- Keep the fi lm in a cool and dry place. Do not leave the fi lm in a place where the temperature is extremely high (e.g., in a closed car).
- When you load a fi lm pack, use the fi lm as soon as possible.
- If the fi lm has been kept in a place where the temperature is extremely high or low, bring it to room temperature before start-ing to take pictures.
- Be sure to use the fi lm before the expiration or "Use Before" date.
- Avoid airport checked luggage inspection and other strong X-ray illumination. The eff ect of fogging, etc. may appear on un-used fi lm. We recommend that you carry the camera and/or the fi lm onto the aircraft as carry-on luggage. (Check with each airport for more information).
- Avoiding strong light, keep the developed prints in a cool and dry place.
- Do not puncture, tear, or cut INSTAX mini fi lm. If fi lm becomes damaged, do not use.
Cautions on handling the fi lm and prints
For details, refer to the instructions and warnings on FUJIFILM INSTAX mini fi lm.


Documents / ResourcesDownload manual
Here you can download full pdf version of manual, it may contain additional safety instructions, warranty information, FCC rules, etc.
Advertisement


Need help?
Do you have a question about the INSTAX mini 9 and is the answer not in the manual?
Questions and answers