
Related Manuals for Kaysun KID-05.1 S


Summary of Contents for Kaysun KID-05.1 S
- Page 1 USER MANUAL Remote Controller KID-05.1 S IMPORTANT NOTE: Thank you for purchasing our air conditioner. Please read this manual carefully before operating your new air conditioning unit. Make sure to save this manual for future reference.
-
Page 2: Table Of Contents
Table of Contents Remote Controller Specifications ............02 Handling the Remote Controller ............03 Buttons and Functions ..............04 Remote Screen Indicators ..............05 How to Use Basic Functions ............06 How to Use Advanced Functions ..........08... -
Page 3: Remote Controller Specifications
Remote Controller Specifications KID-05.1 S 3.0V( Dry batteries R03/LR03×2) -5°C~60°C(23°F~140°F) Quick Start Guide AUTO COOL HEAT FIT BATTERIES SELECT MODE SELECT TEMPERATURE SELECT FAN SPEED PRESS POWER BUTTON POINT REMOTE TOWARD UNIT NOT SURE WHAT A FUNCTION DOES? Refer to the How to Use Basic Functions and How to Use Advanced Functions sections of this manual for a detailed description of how to use your air conditioner. -
Page 4: Handling The Remote Controller
Handling the Remote Controller Inserting and Replacing Batteries NOTES FOR USING REMOTE CONTROL Your air conditioning unit may come with two batteries(some units). Put the batteries in the This equipment has been tested and found to remote control before use. comply with the limits for a Class B digital device, pursuant to part 15 of the FCC Rules. -
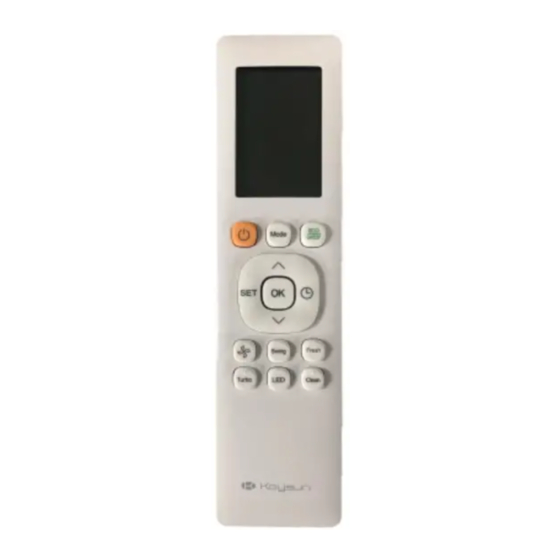
Page 5: Buttons And Functions
Buttons and Functions MODE ON/OFF Turns the unit on or off. Scrolls through operation modes as follows: AUTO COOL TEMP DRY HEA T FAN Increases temperate in NOTE: HEAT mode is not 1°C (1°F) increments. supported by the cooling only Max. -
Page 6: Remote Screen Indicators
Remote Screen Indicators Information are displayed when the remote controller is power up. Breeze Away display(some units) Active clean feature display Fresh feature display Sleep mode display Follow me feature display Wireless control feature display(some units) Transmission Indicator Low battery detection display(If flashes) Lights up when remote sends signal to indoor MODE display... -
Page 7: How To Use Basic Functions
How to Use Basic Functions ATTENTION Before operation, please ensure the unit is plugged in and power is available. AUTO Mode Select AUTO mode Set your desired temperature Turn on the air conditioner MODE NOTE: 1. In AUTO mode, the unit will automatically select the COOL, FAN, or HEAT function based on the set temperature. - Page 8 Setting the TIMER TIMER ON/OFF - Set the amount of time after which the unit will automatically turn on/off. TIMER ON setting Press TIMER button to initiate Press Temp. up or down button for Point remote to unit and wait 1sec, the ON time sequence.
-
Page 9: How To Use Advanced Functions
How to Use Advanced Functions Swing function Press Swing button Swing Swing The horizontal louver will swing up and down Keep pressing this button more than 2 seconds, automatically when pressing Swing button. the vertical louver swing function is activated. Press again to make it stop. - Page 10 Silence function Keep pressing Fan button for more than 2 seconds to activate/disable Silence function(some units). Due to low frequency operation of compressor, it may result in insufficient cooling and heating capacity. Press ON/OFF, Mode, Sleep, Turbo or Clean button while operating will cancel silence function.
- Page 11 SET function Press the SET button to enter the function setting, then press SET button or TEMP or TEMP button to select the desired function. The selected symbol will flash on the display area, press the OK button to confirm. To cancel the selected function, just perform the same procedures as above.
- Page 12 The design and specifications are subject to change without prior notice for product improvement. Consult with the sales agency or manufacturer for details. CR2756-RG10(D2S) 16117000A37345 2020.07.13...
Need help?
Do you have a question about the KID-05.1 S and is the answer not in the manual?
Questions and answers