Table of Contents
Advertisement
Operating Instructions
Timer Remote Controller
CZ-RTC4A
Model No.
°
A
ENGLISH
Before operating the unit, read these operating instructions thoroughly and keep them for future
reference.
Installation Instructions Separately Attached.
https://eu.datanavi.ac.smartcloud.panasonic.com/
documents/index.htm?model=CZ-RTC4A
ACXF55-38730
Advertisement
Table of Contents

Related Manuals for Panasonic CZ-RTC4A


Summary of Contents for Panasonic CZ-RTC4A
- Page 1 Operating Instructions Timer Remote Controller CZ-RTC4A Model No. https://eu.datanavi.ac.smartcloud.panasonic.com/ documents/index.htm?model=CZ-RTC4A ° ENGLISH Before operating the unit, read these operating instructions thoroughly and keep them for future reference. Installation Instructions Separately Attached. ACXF55-38730...
-
Page 2: Table Of Contents
CONTENTS Page Thank you for purchasing the ● Safety Precautions ......3 Panasonic timer remote controller. ● Part Names ...........4 ● Read the Operating Instructions • Control panel ........4 carefully for safe use. This • Screen display ........5 manual describes the Operating Instructions of the timer remote controller. -
Page 3: Safety Precautions
Safety Precautions WARNING CAUTION This symbol refers to a hazard or unsafe practice This symbol refers to a hazard or unsafe practice which can which can result in severe personal injury or death. result in personal injury or product or property damage. Matters to be observed Prohibited matters WARNING... -
Page 4: Part Names
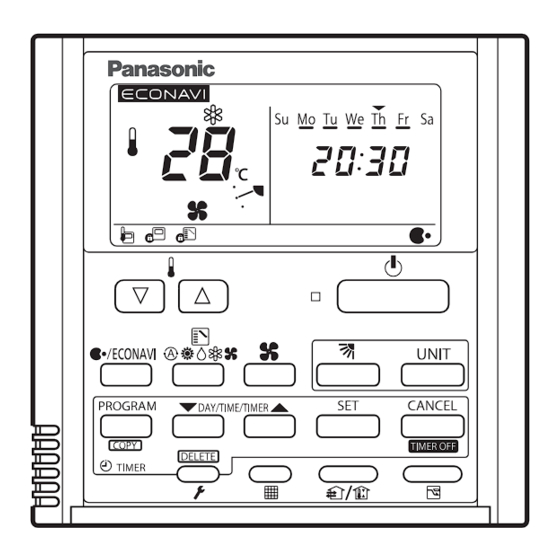
Part Names Control panel ° ° 1 Operation indicator Illuminates during operation. Blinks during alarm. 2 Start/Stop button Starts/Stops operation. 3 Fan speed Changing the fan speed. 4 Swing/Air direction Use this button to set the auto swing or air direction to a specifi c angle. 5 Unit select When more than one indoor unit is operated by one remote control unit, this button is used to select a unit when adjusting the air direction. -
Page 5: Screen Display
Part Names Screen display ° ° 16 15 11 10 Displayed if the selected feature was disabled during installation. Displayed when a mistake is made during timer setting. Appears when the timer program is being set. Indicates today’s day of the week. Displayed when the timer has been turned OFF. -
Page 6: Basic Operations
Basic Operations How to Operate Turn on the indoor unit before operation. See operating instructions of the indoor unit. Start/Stop operation / Operation mode 1. Press [Start/Stop] to start operation. 2. Press the mode select button to select the mode among AUTO , HEAT DRY , COOL and FAN... - Page 7 Basic Operations Note ● If the heating performance is insuffi cient in Low fan speed, change the fan speed to Medium or High ● The temperature range that can be set varies depending on the model. ● Temperature sensor detects temperature in the vicinity of the air inlet of the indoor unit.
-
Page 8: Setting The Present Time
Basic Operations Setting the Present Time Press and hold [SET] for more than 2 seconds to enter the present day and time setting mode. Once you enter the setting mode, “SETTING”, “▼”(day) and “time” fl ash. Set “▼” to today’s day of the week. Press [▲] to move “▼”... -
Page 9: Weekly Program Function
Weekly Program Function Checking the Weekly Timer • Set the weekly program assigning a given timer to each day of the week. Maximum of 6 programs a day and 42 programs a week can be set. Select the day and the TIMER number you want to program. Press [PROGRAM] to enter the program confi... -
Page 10: Changing The Program Timer
Weekly Program Function Changing the Program Timer To set the weekly program, follow the steps. Select the program you want to set in the program confi rmation mode, and press [SET]. This enters the setting mode of the program currently displayed. * In the program setting mode, [SETTING], “hour”, “minute”... - Page 11 Weekly Program Function Set the program pattern. (Program step 3) There are 4 program patterns. Pressing [▼/▲] repeats the following display patterns. Pattern 1 (Default display) Pattern 2 The indoor unit starts operation at the The indoor unit stops operation at the programmed time.
-
Page 12: Deleting The Program Timer
Weekly Program Function Deleting the Program Timer To delete the program timer setting, follow the steps below. Press [PROGRAM] to enter the program confi rmation mode. Press [▼/▲] to select the day of the program you want to delete. Press [SET] to fi x the day. Press [▼/▲] to select a TIMER No. -
Page 13: Invalidating The Program Timer
Weekly Program Function Invalidating the Program Timer If you want to stopping the program operation for more than 1 week, you can invalidate all the timer settings. Once the timer settings are invalidated, the program will not be operated until the invalidation is cancelled. -
Page 14: Duplicating The Program Timer
Weekly Program Function Duplicating the Program Timer You can duplicate the preset program by day. ■ Select the copy source. If [PROGRAM]([COPY]) is pressed in program checking mode , it enters the copy mode (Selecting the copy source ) of the program timer. -
Page 15: Before Asking Repair Work
Weekly Program Function Before Asking Repair Work Before asking repair work, please check the following. Trouble Possible Cause/Remedy “ERROR” is displayed If there is another TIMER No. which has the program of the same when the minute digits are time and same day, you cannot overlap the setting. entered. -
Page 16: Outing Function
Outing Function Outing function is a function that prevents the room temperature from increasing too much (or decreasing too much) when no one is in the room. An air conditioner works automatically if this function is set effective. General Performance of the Outing Function Outing function upper limit COOL / DRY The air conditioner starts operation when the... -
Page 17: Setting The Outing Function
Outing Function Setting the Outing Function Press and hold [Ventilation] for more than 2 seconds to display the upper limit temperature setting screen. [SETTING], and the upper limit temperature start fl ashing. (The default value of the upper limit temperature is 38 °C.) Press [ / ] to select the upper limit temperature, and press [SET] to fi... -
Page 18: Sleeping Function
Sleeping Function This function leads you to a comfortable sleep and changes the room temperature during your sleep. • You can set the off timer every one hour from 1 to 10 hours. ■ Display of remote control unit (during the time setting) Off time In case the present time is 23:00. - Page 19 Sleeping Function Ex. In case of 7 hours timer Press [Sleeping]. • Each time the button is pressed, the indication changes in the following order. (every one hour) (Press [CANCEL] to stop the time setting.) Press [SET]. • The sleeping operation starts. ■...
- Page 20 Sleeping Function ■ If [Sleeping] button does not work. Or, in the case of operation not being started even if [SET] is pressed. Check the following table. Display of the remote control unit Item Contents (Lighting/fl ashing indication) The Error indication fl ashes The clock is not set.
-
Page 21: Econavi Function
ECONAVI Function This function is available by attaching an optional ECONAVI sensor. The ECONAVI sensor detects human activity and conserves energy based on the activity level. Overview of the ECONAVI function • Cooling: Target temperature is the same as the set temperature. High activity •... -
Page 22: Nanoe X/Econavi Function
nanoe™X/ECONAVI Function ON/OFF setting of nanoe™X/ECONAVI function Using the remote controller, you can switch the nanoe™X/ECONAVI function ON/OFF. Press [nanoe™X/ECONAVI] 1 / 2 • Each time the button is pressed, the function changes in the following order. nanoe™X ON ECONAVI ON °... -
Page 23: Troubleshooting
Troubleshooting If operation does not start by pressing [Start/Stop] button ... Check the following before asking for repair. ● After recovery from blackout, press [Start/Stop] again. Blackout? If operation does not start, turn off the circuit breaker and consult the dealer of purchase about the symptom and Model No. - Page 24 Troubleshooting The remote ● Faulty sensor or incorrect installation. Turn OFF the ECONAVI function with the controller screen remote controller and contact the retailer or displays a fl ashing point of purchase with the Model No. and “ ”. problem. ●...
-
Page 25: Specifi Cations
Specifi cations Model No. CZ-RTC4A Dimensions (H) 120 mm x (W) 120 mm x (D) 20 + 4.75 mm Weight 160 g Temperature/ 0 ˚C to 40 ˚C / 20 % to 80 % (no condensation) Humidity range *Indoor use only. - Page 26 Memo...
- Page 27 Memo...
- Page 28 Website: http://www.panasonic.com © Panasonic Corporation 2023 ACXF55-38730 Printed in China SS1023-0...
Need help?
Do you have a question about the CZ-RTC4A and is the answer not in the manual?
Questions and answers