Advertisement
Q U I C K I N S T A L L G U I D E
Installing the Enphase Envoy-S Metered
Multiphase for Europe | Multiphase +DRM for Australia and New Zealand
To install the Enphase Envoy-S Metered™ gateway with integrated meter, read and follow all warnings and instructions in this Guide
and in the Enphase Envoy-S Installation and Operation Manual at: enphase.com/support. Safety warnings are listed on the back of
this guide.
How It Works
Microinverters
Envoy-S
Switchboard
POWER LINE
COMMUNICATIONS
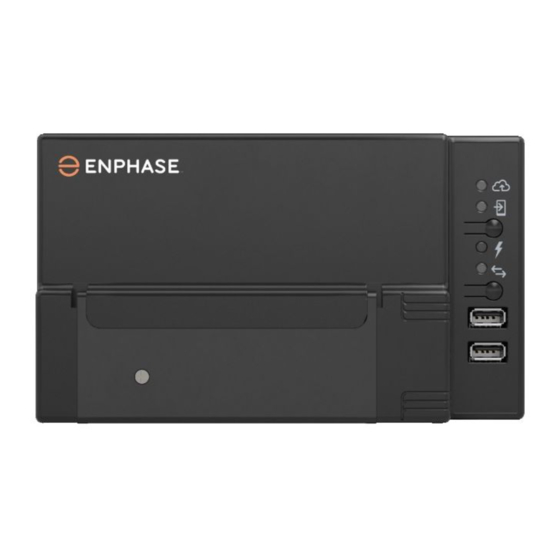
Envoy-S Display and Controls
Track system installation progress with the Enphase Installer Toolkit™
mobile app. The LEDs on the Envoy-S are solid green when a function is
enabled or performing as expected, flashing when an operation is in
progress, or solid amber when troubleshooting with Installer Toolkit is
required. For a legend of all LED states, see Troubleshooting
Network Communications LED
Green when Envoy-S is
connected to Enphase Enlighten™.
AP Mode LED
Green when Envoy's AP Wi-Fi
network is available.
AP Mode Button
Press to enable Envoy's AP Mode
for connecting with a mobile device.
Hold for 5 seconds to start WPS
connection to a router.
Power Production LED
Green when microinverters are
producing power.
Device Communications LED
Green when devices are
communicating with Envoy-S.
Device Scan Button
Press to start/stop 15 minute scan for
devices over the power line.
(Model ENV-S-WM-230)
Enlighten
To Internet
Router
NETWORK
COMMUNICATIONS
a
.
Enphase Installer
Toolkit mobile app
PREPARATION
A ) Download the latest version of the Enphase Installer
Toolkit mobile app and open it to log in to your Enlighten
account. With this app, you can connect to the Envoy-S
to track system installation progress. To download, go to
enphase.com/toolkit
or scan the QR code at right.
B ) Check the box for the following items:
Enphase Envoy-S Metered gateway
•
Two split-core current transformers (CTs) for production and
•
consumption metering
Length of DIN rail for mounting
•
Ferrite bead to attach to your Ethernet Cable, if used
•
Quick Install Guide (this document)
•
C ) Check that there is enough space in the switchboard to install CTs.
Do not install the CTs in a panel where they exceed 75% of the wiring
space of any cross-sectional area within the panel.
D ) Install the Envoy-S Metered in an IP54-rated, or better enclosure with
conduit attachment when installing outdoors. Do not drill holes on
the top of the enclosure or anywhere that allows moisture ingress.
Metallic enclosures may impair Wi-Fi signal strength. Use an appro-
priately rated enclosure if installing the Envoy-S indoors.
E ) If you are installing the Envoy-S in a multi-phase application, make
sure you have the following items:
• Additional CTs (CT-100-SPLIT) for multi-phase installations. Make
sure you have one CT for each phase monitored, for both produc-
tion and consumption.
• A phase coupler. Install a phase coupler on the load side of the
over-current protection device. See the Technical Brief on Phase
Coupling for your region at enphase.com/support. Consult En-
phase support for compatible devices.
F ) Decide how to connect the Envoy-S to the Internet: choose to use
Wi-Fi, an Enphase Mobile Connect modem, or Ethernet.
G ) Make sure you have the following optional items, if needed:
Enphase Mobile Connect™ modem (order CELLMODEM-02)
•
Ethernet over power line communication (PLC) bridge with Ether-
•
net cables [order EPLC-02 (EU), EPLC-03 (UK) or EPLC-04 (AU/NZ)]
Ethernet cable [802.3, Cat5E or Cat6, unshielded twisted pair
•
(UTP)]. Do not use shielded twisted pair (STP) cable.
H ) Install the PV system as directed by the installation manuals.
I ) If an Enphase PV system is or will be installed at the site, create a
paper installation map to record device serial numbers and positions
in the array. You will scan this map later using Installer Toolkit and
your mobile device.
As you did with the microinverters (and Enphase AC Batteries, if
•
installed), peel the removable label from the bottom of the Envoy-S
and affix it to the paper installation map.
Always keep a copy of the installation map for your records.
•
NOTE: If needed, you can find an installation map with any Enphase
Microinverter Quick Install Guide.
Advertisement
Table of Contents

Related Manuals for enphase ENP-ENV-S-EM-230


Summary of Contents for enphase ENP-ENV-S-EM-230
- Page 1 Multiphase for Europe | Multiphase +DRM for Australia and New Zealand To install the Enphase Envoy-S Metered™ gateway with integrated meter, read and follow all warnings and instructions in this Guide and in the Enphase Envoy-S Installation and Operation Manual at: enphase.com/support. Safety warnings are listed on the back of this guide.
-
Page 2: Installation
CT leads (4 meters) when choosing the location. If B ) When prompted, enter the number of devices that you installed and you need to extend the leads (up to 148 meters), refer to the Enphase select the grid profile. -
Page 3: Connect To Enlighten
(Order CELLMODEM-02 separately) A ) Connect the antenna to the antenna connector (marked CELL) on the modem. B ) Mount the modem as described in the Enphase Mobile Connect Installation Guide. Envoy-S C ) First, connect the USB cable to the Envoy-S and then connect the mini-USB connector to the modem. - Page 4 You will need to install one split-core CT per monitored phase for production metering and one split-core CT per monitored phase for consumption metering. Use a protected route in conduit (raceway) for the CT wires to the Envoy-S. If you need to extend the leads (up to 148 meters), refer to the Enphase Envoy-S Installation and Operation Manual at: enphase.com/support.
-
Page 5: Troubleshooting
Internet. If you are using the Enphase Mobile Connect modem and the Network Communica- tions LED remains off or lights solid amber, see Troubleshooting in the Enphase Mobile Connect Installation Guide. For any connection method, you can troubleshoot network issues with the Installer Toolkit mobile app by tapping the Network button, then Diagnostic Tools.
Need help?
Do you have a question about the ENP-ENV-S-EM-230 and is the answer not in the manual?
Questions and answers