
Related Manuals for The Singing Machine STVD-919


Summary of Contents for The Singing Machine STVD-919
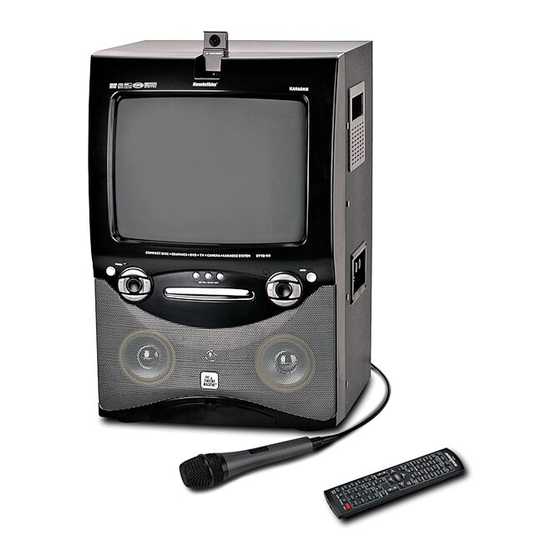
- Page 1 THE LEADER IN HOME KARAOKE AND BEYOND THE LEADER IN HOME KARAOKE AND BEYOND STVD-919 DVD / CD+GRAPHICS WITH BUILT-IN 13.5” COLOR TV AND VIDEO CAMERA KARAOKE SYSTEM Please read before using this unit.
- Page 2 WARNINGS WARNINGS WARNING : TO REDUCE THE RISK OF FIRE OR SHOCK HAZARD, DO NOT EXPOSE THIS PRODUCT TO RAIN OR MOISTURE. CAUTION RISK OF ELECTRIC SHOCK DO NOT OPEN C A U T I O N : T O P R E V E N T T H E R I S K O F ELECTRIC SHOCK, DO NOT REMOVE COVER O R B A C K .
-
Page 3: Important Safety Instructions
IMPORTANT SAFETY INSTRUCTIONS 1. Read these instructions. 2. Keep these instructions. 3. Heed all warning. 4. Follow Instructions. 5. Do not use this apparatus near water. 6. Clean only with a dry cloth. 7. Do not block any of the ventilation openings. Install in accordance with manufacturer's instructions. -
Page 4: Table Of Contents
REMOTE CONTROL CONNECTIONS CONNECTING TO A VIDEO SYSTEM CONNECTING TO AN AUDIO SYSTEM BASIC OPERATIONS BASIC SETUP BASIC FUNCTIONS TV FUNCTION DISC FUNCTION SETUP DISC FUNCTION CARE AND MAINTENANCE TROUBLE SHOOTING GUIDE SPECIFICATIONS THE SINGING MACHINE KARAOKE GLOSSARY OF TERMS... -
Page 5: Features E4
FEATURES Lift up camera lens to display your image on The Singing Machine’s monitor and/or another video component. 13.5” Color TV Built-in color monitor provides television and/or on-screen lyrics. Dolby Digital Sound This player can handle Dolby Digital surround sound having 5.1 channels when connected to a Dolby Digital Decoder. -
Page 6: Notes On Discs
NOTES ON DISCS PLAYABLE DISCS This DVD Player compatible with the following discs. Disc Types Recording (Logos) Types AUDIO VIDEO AUDIO SIMPLE GRAPHICS AUDIO-CD AUDIO CD-R / CD-RW / DVD R / DVD RW AUDIO IMAGE Characteristics DVD contains excellent sound and video due to Dolby Digital and MPEG-2 system. -
Page 7: Disc Types
NOTES ON DISCS PLAYABLE DISCS This Singing Machine conforms to the NTSC color system and Region Code 1, or for the discs that do not contain Region Code information. If there is any other Region Code encoded on a disc, the disc will not play and the message “WRONG REGION” will appear on the screen. Some discs include region codes as shown below. - Page 8 NOTES ON DISCS DISC TYPES CD-R / CD-RW / DVD R / DVD RW Data on a MP3 is divided into sections called "albums", and then into subsections called "tracks", each of which is given an album or track number. When you make MP3 data, you refer to the manual accompanying the disc. Example Track 1 Track 1...
-
Page 9: Introduction E8
- lets you add an echo to enrich your voice for a concert hall effect. Master Volume Control - adjust the master volume up and down buttons until desired volume level is obtained. - camera lens allows you to display your image on the Singing Machine’s monitor or another video component. Built-In Speakers - allows you to share the music with your family and/or friends. -
Page 10: Control Locations
CONTROL LOCATIONS FRONT VIEW 1. Adjustable Camera Lens 11. Volume UP button 2. Handle 12. DVD Door 3. Monitor 13. Loudspeaker 4. Karaoke Function button 14. VIDEO IN 2 Jack 5. Karaoke Function “-” button 15. MIC 2 Jack 6. CHANNEL UP button 16. -
Page 11: Rear View
CONTROL LOCATIONS REAR VIEW 35. Antenna adaptor CAMERA VIDEO OUT Jack AUDIO IN 1 (L) Jack AUDIO IN 1 (R) Jack VIDEO IN 1 Jack Antenna Jack VIDEO OUT Jack AUDIO OUT (R) Jack AUDIO OUT (L) Jack DVD VIDEO OUT Jack 45. -
Page 12: Remote Control
REMOTE CONTROL REMOTE CONTROL 1. TV/AV1/AV2 button. / ON button 3. Number buttons (0-9, -/--) 4. CAMERA button 5. CHANNEL UP/DOWN buttons 6. CURSOR buttons 7. DVD MENU button (PBC button) 8. STEP button 9. PLAY/PAUSE button 10. ZOOM button 11. -
Page 13: Connections
(2) Connect yellow video cable to the Video Output jack, red audio cable to the Audio Right channel Output jack and white audio cable to the Audio Left channel Output jack respectively on the back of the Singing Machine. (3) Connect the other end of the cords to the Video Input jack, AUX Right/Left channel Input jacks on your video system relatively. - Page 14 CONNECTIONS CONNECTING TO A VIDEO SYSTEM CONNECTING A VIDEO COMPONENT FOR INDEPENDENT DVD VIDEO OR FOR INDEPENDENT CAMERA VIDEO OUTPUT There are 2 separate Video Output jacks for Camera and DVD. (1) Locate the multicolored RCA patch cords. (2) Connect yellow video cable to your desired Video Output (CAMERA/DVD) jack on the back of the Singing Machine.
- Page 15 There are 2 individual group input jacks (AV1 and AV2) to connect another video component for input. Please follow the steps below to share the display on the Singing Machine’s monitor from the video source: (1) Locate the multicolored RCA patch cords.
-
Page 16: Connecting To An Audio System
Connect the Singing Machine to your home stereo system using the White and Red supplied RCA cords. Plug the white end of the RCA cord into the white Audio Output jack on the Singing Machine. Plug the red RCA cord into the red Audio output jack on the Singing Machine. -
Page 17: Basic Operation
BASIC OPERATION BASIC SETUP The MENU button on the front of the Singing Machine or on the remote control can be accessed to change functions on this unit. The menu is divided into three main categories: PICTURE, PRESET and SETUP. -
Page 18: Basic Functions
TV/DVD button on the remote control. TV / AV / DVD SWITCHING Function modes can also be switched by pressing the TV/AV/DVD button on the front of the Singing Machine. AV1 AV2 DVD VOLUME CONTROL Pressing VOL... -
Page 19: Tv Function
Press the POWER button, the power LED indicator will illuminate. After a few seconds the screen will display a picture along with the audio. The Singing Machine requires tuning to select an available TV station in your area. PRE-SETTING THE TV STATIONS ONTO... -
Page 20: Disc Function Setup
RATING DEFAULT EXIT SETUP SCREEN SAVER While the Singing Machine is in disc function and has been in idle for five minutes, the screen saver will appear to protect the screen. It can be switched ON/OFF in this menu. TV TYPE The aspect ratio of the display in disc function can be changed by selecting one of the following options. - Page 21 DISC FUNCTION SETUP VIDEO SETUP VIDEO SETUP VIDEO SETUP BRIGHTNESS CONTRAST SATURATION EXIT SETUP BRIGHTNESS Use CURSOR buttons to move/scroll and adjust the brightness in 12 levels. CONTRAST Use CURSOR buttons to move/scroll and adjust the contrast in 12 levels. Use CURSOR buttons to move/scroll and adjust the HUE in (+6 to -6) 12 levels.
-
Page 22: Basic Playback
DISC FUNCTION BEFORE PLAYING Please check “Playable Discs” on page E5 to make sure the disc is playable. Make sure the Singing Machine is connected to the components properly and the power of the Singing Machine is on. BASIC PLAYBACK PLAY A DISC 1. -
Page 23: Other Functions
DISC FUNCTION OTHER FUNCTIONS REPEAT This function is activated to repeat a particular chapter/title/track. The following sequence will display on the screen when pressing this button repeatedly. For DVD disc: CHAPTER TITLE For CDG and CD discs: Repeat 1 For MP3 and JPG disc: Repeat 1 Repeat Directory (DIR) Repeat All... - Page 24 “MIC VOL” on the top left corner of the screen Pressing Karaoke Function +/ - button on the front of the Singing Machine or on the remote control will adjust the microphone volume of the system audio output.
-
Page 25: Care And Maintenance
CARE AND MAINTENANCE POWER SWITCH After using the unit, turn off the power by pressing the POWER button. CLEANING THE UNIT To clean the exterior of the unit, simply wipe with a soft clean cloth moistened with plain lukewarm water. CLEANING THE CD LASER LENS For the Best Results: Use a CD-lens cleaning disc according to the cleaning disc manufacturer... -
Page 26: Trouble Shooting Guide
TROUBLE SHOOTING GUIDE If you have followed the instructions and are having difficulty operating the unit, locate the PROBLEM in the left column below. Check the corresponding POSSIBLE CAUSE column to locate and remedy the problem. PROBLEM No power plug connection at the AC No power when the unit is on. - Page 27 Singing Machine. The player does not respond Batteries are depleted. to the remote control. Batteries incorrectly inserted. The Singing Machine is not in the Disc function mode. No image displays on the The camera lens is down. system when attempting to use the camera.
-
Page 28: Specifications
SPECIFICATIONS AUDIO SECTION: SPEAKER OUTPUT POWER (MAX.) OUTPUT IMPEDANCE DVD PLAYER SECTION: FREQUENCY RESPONSE SIGNAL - TO - NOISE RATIO D - A CONVERSION NUMBER OF PROGRAMS DIGITAL OUTPUT TV SECTION: SYSTEM LO VHF CHANNEL HI VHF CHANNEL UHF CHANNEL CATV TUNER TYPE MICROPHONE... -
Page 29: The Singing Machine Karaoke Glossary Of Terms
THE SINGING MACHINE KARAOKE GLOSSARY OF TERMS In addition to all of the terminology associated with consumer electronics products, a few additional terms are used almost exclusively in karaoke. These terms are meant to familiarize you with the world of Karaoke. The features... - Page 32 The Singing Machine Company, Inc. 919-0606-ENG01 6601 Lyons Road, Bldg. A7, Coconut Creek, FL33073-9902, USA. PRINTED IN CHINA TEL: (954) 596-1000 FAX: (954) 596-2000 VISIT OUR WEBSITE www.singingmachine.com...
Need help?
Do you have a question about the STVD-919 and is the answer not in the manual?
Questions and answers
How to change tracks on 919 karoke manually
To change tracks manually on The Singing Machine STVD-919 karaoke:
1. Press the SEARCH button to enter search mode.
2. Use the number buttons (0–9) to input the desired chapter or track number.
3. Press the ENTER button.
The player will jump to the selected track immediately.
This answer is automatically generated