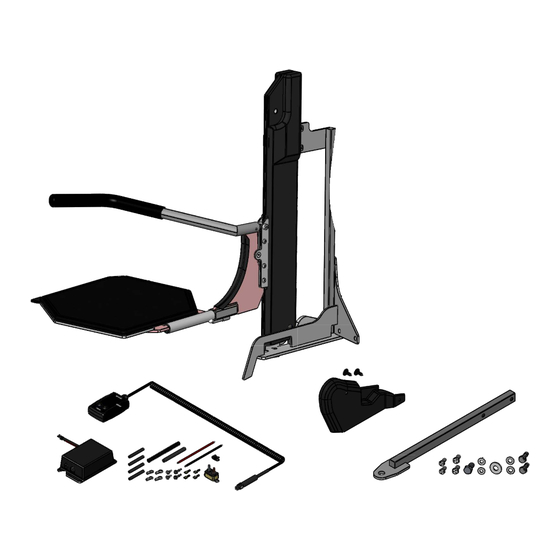
Summary of Contents for ASENTO EV-COLX15R
- Page 1 ASENTO INSTALLATION MANUAL EV-COLX15R CHEVROLET COLORADO/ GMC CANYON EXTRA CAB 2015 & UP PASSENGER SIDE...
- Page 2 ITEM PART NUMBER DESCRIPTION ASENTO CHEVROLET COLORADO EXTENDED CAB 2015+ EV000-01 Support Assembly EV100-05R Slider -Right- EV113-01 Slider Spacer EV122-01 Spring Rod L-EV141-01 Front Slider PRD 333-105 Nylon Insert Locknut 1/4-20 PRD 333-107M Nylon Insert Locknut 5/16-18 Thin PRD 337-194P Socket Head Cap Screw Zinc Plated 1/4-20 UNC x 7/8"...
- Page 3 ITEM PART NUMBER DESCRIPTION ASENTO CHEVROLET COLORADO EXTENDED CAB 2015+ EV000-01 Support Assembly EV100-05R Slider -Right- EV113-01 Slider Spacer EV122-01 Spring Rod L-EV141-01 Front Slider PRD 333-105 Nylon Insert Locknut 1/4-20 PRD 333-107M Nylon Insert Locknut 5/16-18 Thin PRD 337-194P Socket Head Cap Screw Zinc Plated 1/4-20 UNC x 7/8"...
- Page 4 ITEM PART NUMBER DESCRIPTION ASENTO CHEVROLET COLORADO EXTENDED CAB 2015+ EV000-01 Support Assembly EV100-05R Slider -Right- EV113-01 Slider Spacer EV122-01 Spring Rod L-EV141-01 Front Slider MC 90594A027P Tab base weld nut with barrel zinc plated 1/4 x 9/16 PRD 333-105...
- Page 5 ITEM PART NUMBER DESCRIPTION ASENTO CHEVROLET COLORADO EXTENDED CAB 2015+ EV-COLX15R-01 Floor Adapter -Right- EV600B-02L Pillar Trim -Left- Black PRD 302-138P Hex Cap Bolt Zinc Plated 5/16-18 x 3/4 G5 PRD 341-103P Flat Washer Zinc Plated I.D. 3/16 USS PRD 341-105P Flat Washer Zinc Plated I.D.
- Page 6 ITEM PART NUMBER DESCRIPTION ASENTO CHEVROLET COLORADO EXTENDED CAB 2015+ EV-COLX15-02 Floor Tarnsversal Fixing PRD 302-172P Hex Cap Bolt Zinc Plated 3/8-16 x 3/4 G5 PRD 302-263P Hex Cap Bolt Zinc Plated 1/2-13 x 1 G5 PRD 341-109P Flat Washer Zinc Plated I.D. 7/16 USS PRD 341-147P Flat Washer Zinc Plated I.D.
- Page 7 ITEM PART NUMBER DESCRIPTION ASENTO CHEVROLET COLORADO EXTENDED CAB 2015+ EV300-02R Safety Arm -Right- EV400-01R Transfert Platform -Right- XLS430B-01R Transfer Plate Cushion -Right- Black U-EV-UNI-01 Machined Socket Shoulder Screw PRD 333-107M Nylon Insert Locknut 5/16-18 Thin SCALE 1:6 PART NUMBER...
- Page 8 1. The first step of the installation will be to remove the right hand side plastic seat trim.
- Page 9 2. The plastic trim will have to be modified to allow clearance for the ASENTO. Cut along the red doted lines. Then reinstall the trim. 3. Drill a 1/4-inch hole in the trim support then install the provided seat trim # EV-COLX15B-03 with the...
- Page 10 ASENTO post to the floor adapter using the provided ½X1’’ bolt and flat washer. Install the two 5/16x3/4 bolts and flat washers at the top of the ASENTO post. Then tighten down all the bolts.
- Page 11 7. Fold the part of the carpet that covers the rear seat bracket under itself and then install the ASENTO under the rear seat bracket. Then install the brace # EV-COLX15R-02 using the two M10X40mm bolts to reattach the seat and the two 3/8x3/4 bolts to attach the brace to the...
- Page 12 ASENTO will beep to signify that it is ready to be programmed. 10. Before the ASENTO can be used it will have to be programmed. Once the control box is connected to the 12-volt power supply and has beeped to signify that it is active, the ASENTO will be in reduced power mode.
- Page 13 11. Install the transfer board by sliding it onto the chrome shaft of the ASENTO. Make sure that it slides all the way onto the shaft. Final Inspection: Make sure all bolts are all properly fastened. Make sure that ASENTO works well with and without a passenger.
- Page 14 ELECTRICAL INSTALLATION FOR ASENTO 1. Thread the lead power cable (red +) under the doorstep molding and through the firewall. WARNING: Pass through a grommet in the firewall to prevent the cable from chaffing. 2. Install the circuit breaker near the battery and then connect the battery to the circuit breaker.
- Page 15 ELECTRICAL BOX CONNECTIONS ASENTO...
- Page 16 ASENTO WITH SPEEDY LIFT...
-
Page 17: Warning Decals
WARNING DECALS After completing the installation of the ASENTO, please take time to install the warning decals. NOTE: The surface must be clean, dry and at ambient temperature for the sticker to stick to the surface. Start by locating a position to install the decals. -
Page 18: Year Limited Warranty
3 YEAR LIMITED WARRANTY XL-BASE, XL-SEAT, ASENTO, HI-LIFT, SPEEDY-LIFT, XL-BOARD, POWER-PULL Adapt-Solutions # 1 Ltd. (Adapt Solutions), warrants to the original purchaser of a XL-BASE, XL-SEAT, ASENTO, HI-LIFT, SPEEDY-LIFT, XL-BOARD or a POWER-PULL that the equipment is free from defects in material and workmanship for a period of three years from date of purchase.


Need help?
Do you have a question about the EV-COLX15R and is the answer not in the manual?
Questions and answers