Advertisement
WELCOME
 Charge it first!
While reading through the manual, you can start to charge your X7 with the 18W wall charger and type-c cable provided.

This unit is for vehicle(equipment)with 12V batteries. It may be dangerous if it is used with other types of batteries. Read starter. Failure to follow the safety information may cause damage to the jump starter, and may also result in electric shock, explosions, fire, property damage, and personal injury.
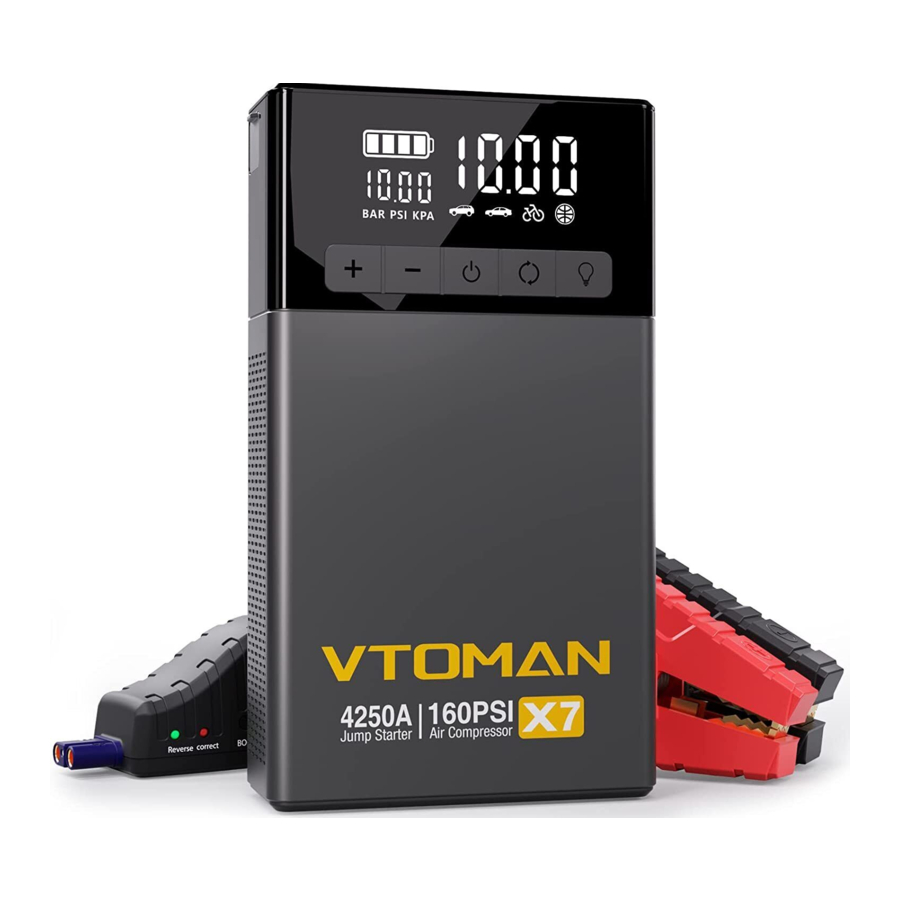
COMPONENTS AND FUNCTIONS

- Pressure adjustment
- Power switch / Inflatingpump starting button
- Settings
- Lamp switch
- LED display screen
- Air inflating port
- LED flashlight (distress signal light)
- 5V/9V/12V output port
- USB-C 9V/2A input port
- 15V 10A output port
- 12V Automobile starting port
KEY POINTS
UNMATCHED STARTUP PERFORMANCE: The X7 jump starter has a peak starting current of 4250A and a large battery capacity, especially professional for heavy-duty vehicles like trucks boats. The X7 battery starter is able to start all 12V vehicles (10L Gas/10L Diesel engines) up to 70 times at once. Additionally, our X7 battery jump starter is equipped with BOOST FUNCTION for TOTALLY DEAD BATTERY.
INTELLIGENT DIGITAL TIRE INFLATOR: The X7 car jump starter is equipped with a 5.1-inch smart screen and tire pressure detection function to make your operation more convenient. Not only that, our X7 jump starter with air compressor can adjust the inflation mode at any time during the pumping process. The jumper starter battery pack supports 3 optional units (PSI, BAR, KPA). A 160PSI air compressor takes about 2 minutes to inflate a typical car tire to 20 PSI.
5.1-INCH LARGE INTELLIGENT DISPLAY: A user-friendly 5.1-inch smart screen provides you with important data such as battery level, inflator mode and real-time tire pressure, making it easier and clearer to use the product.
MULTIPLE PROTECTION: The upgraded smart chip of the X7 jump starter battery pack makes it easy and fast to start the car in extreme environments (-4°F to 140°F), with 10 built-in safety protection technologies(over-charge, over-current, short-circuit, reverse-polarity, low-temp, high-temp, over-voltage, over-load, spark-proof, reverse-charge).
UPGRADED THERMAL DESIGN: The unique honeycomb heat dissipation design enables the X7 car battery booster to obtain more powerful heat dissipation performance, so the safety performance of the X7 car starter is Enhanced by 30%, and its service life is promoted by 50%.
MORE THAN A JUMP STARTER: X7 is not only jump box, power bank, Tire Inflator, LED flashlight, but it also supports 18W Type-c fast charging. The X7 jump pack takes just ten minutes to charge to fully inflate a tire. In addition, the 400-lumen LED light equipped with the X7 battery starter supports four lighting modes: constant lighting (white), constant lighting (red), flash and SOS.
WHAT YOU GET: 1 X jump starter with air compressor, 1 X wall charger, 1 X smart jumper cable, 1 X USB-A to USB-C cable, 1 X carrying bag, 1 X pump tube, 3 X air nozzle, 1 X user manual and 18 months warranty. If you have any after-sales questions about jump starter, please feel free to contact us.
BUTTONS AND DISPLAY SCREEN

- Long press the switch button for 2 seconds so that thestarter displays information on the electrical configuration (1), preset tire pressure value (2), static air pressure value (3), BAR, PSI & KPA (4), or icons of cars, SUVs, basketballs, bicycles or other inflatable items (5), The electric quantity will be displayed on the bar (see the illustration on the right), and the charger will enter the to-be-inflated mode.
- Short press the lighting button to turn on the LED light, and the white light will remain on. Press the switch button again, and the LED will enter the red flashing mode. Press again to turn off the light.
- After the load is removed, the product automatically entersthe dormant mode 30 seconds later.
- When the product is in the standby mode or workingnormally, press the "Set" key to enter the inflating pump editing mode, after which the SUV icon will display; at the same time, preset the tire pressure value (unit: BAR), where you can short press the "+" "-" key to adjust the pressure value, or long press the "Set" key to alter the unit (KPA, BAR or PSI); short press the "Set" key to switch the item to be inflated until the car icon displays, and preset the pressure value (unit: BAR), before short pressing the "+" "-" key to adjust the pressure value or long pressing the "Set" key to switch the unit (KPA, BAR or PSI). Then short press the "Set" button until the bicycle icon and the preset air pressure value (unit: PSI) are displayed; press the "Set" button again to adjust the air pressure value, and long press the "Set" button to switch the unit (KPA, BAR or PSI). Press the "Set" button again to display the basketball icon and the preset air pressure value (unit: PSI); short press the "+" and "-" button again to adjust the air pressure value. Long press the "Set" key to switch units between KPA, BAR and PSI under the free mode.
- While choosing the mode for the inflating pump for SUVs, cars, bicycles or basketballs, icon 4 will display the preset tire pressure value. Note that the preset value serves as reference only, and please adjust in accordance with the actual situation.
The preset values for different inflatable items are:
SUVs: 2.5 BAR
Cars: 2.4 BAR
Bicycles: 45 PSI
Basketballs: 8PSI
Please switch the unit accordingly on the left. Only one unit can be displayed for each item. - While charging, the bars at the battery icon will flash inaccordance with the actual level of remaining battery life.
- When a product's remaining battery life falls below 10%,the corresponding indicator will flash.
OPERATION GUIDANCE
Charging the host machine of the jump starter

How to Use the Smart Cable
- First, plug the blue connector of the intelligent battery clamp into the main unit, ensuring that the clamp's indicator light is off.
![]()
- Next, correctly connect the battery clamp to the positive and negative terminals of the car battery. Attach the red clamp to the positive terminal (+) and the black clamp to the negative terminal (-).
- Then, follow the corresponding operation based on the battery clamp's indicator light:

Solid green light: This indicates that the connection is correct and powered on. You can now proceed with the emergency jump-start.

Solid red light: This indicates that the positive and negative terminals are incorrectly connected. Please reconnect them correctly, and once the green light turns solid, proceed with the emergency jump-start.

Flashing green light: This indicates that the battery voltage is too low. Press the BOOST button, and once the green light turns solid, complete the jump-start within 30 seconds.

No red or green light: This may indicate that the battery is completely damaged. Ensure the positive and negative terminals are correctly connected, then press the BOOST button. Once the green light turns solid, complete the jump-start within 30 seconds.

Charging electronic devices such as smartphones or tablets
- Choose a proper charging plug to connect to the port ofthe mobile phone adapter cable
- Connect the USB plug of the mobile phone adapter cableto the USB output port of the host machine
- Connect the charging port to your phone/tablet
- Press the switch button to start charging your electronic devices


Powering 12 V electronic/on-board devices
- Insert the adaptor end of the adaptor cable to the 15Voutput port of the host machine
- Connect the 12V device to be charged to the other endof the adaptor cable
- Tap the switch button to start charging the on-boardproducts
Switch LED light modes
| No. | Name of the accessory | Quantity |
| 1 | Host machine | 1 |
| 2 | Inflating pump | 1 |
| 3 | Smartphone adapter cable | 1 |
| 4 | Intelligent battery clip | 1 |
| 5 | User manual | 1 |
| 6 | Multifunctional air cock | 3 |
| 7 | Wall Charger | 1 |
| 8 | Carrying Bag | 1 |
TECHNICAL SPECIFICATIONS
Size: 223*123*63mm
Weight: 1548 ±5g
Capacity: 88.8Wh
Output: Fast charging (5V=3A,9V=2A,12V=1.5A); 15V=10A, 12V car starting|
Input: 9V=2A
Time taken to charge to the full: Around 7 hours
Starting current: 800A (3S)
Peak current: 4250A
Temperature: -4~140°F
FAQS
- Q: How to turn off the jump starter?
A:- The product has an automatic detection function. Once it has no loading or the charging process is finished, the starter will automatically go dormant to save electricity.
- Press the switch button for 2 seconds to turn it off.
- Q: How long does it take to charge the host machine?
A: It takes 6-7 hours to charge it to the full with a USB 9V/2A charger. - Q: How many times can the host machine charge thesmartphone?
A: Take iPhone11 for example, then it can charge the phone from zero battery to full battery for 15 times in a row. - Q: How many times can the host machine start a car?
A: For over 70 times in a row. - Q: How long is the host machine's service life?
A: 3-5 years under normal circumstances. - Q: How long can the host machine be shelved after chargedto the full for it to work again immediately?
A: The host machine boasts scientific design that it can be shelved for 6-12 months. But it is suggested to charge it every three months to protect its service life.
TROUBLESHOOTING
Please stop using the product and contact the seller if the instructions below cannot solve the problems you have encountered.
| Phenomenon | Reason | Instruction |
| Tap the switch button and EPOWER does not react. | The EPOWER's voltage is excessively low that the lowvoltage protection function | Insert the charging plug into the 5V input port to activate it. |
is triggered to cut the circuits.
Product ingredients
| Product name | Toxic and Hazardous Substances or Elements | |||||
| Plumbum (pb) | Mercury (Hg) | Cadmium (Cd) | Cr(Vi) Chromium VI (Cr VI) | PBB Polybrominated biphenyls (PBB) | PBDE Polybrominated diphenyl ethers (PBDE) | |
| Jump starter | O | O | O | O | O | O |
REMINDERS
- Please carefully read through the user manual beforeusing this product.
- This product can only be used to start 12V cars. It can cause danger if used on other cars. It is prohibited on airplanes or ships.
- Please use it with care.
- Please stop using the product if the battery clips or cablesare damaged.
- It cannot be used as a replacement of car batteries.
- It cannot be used as a portable battery charger.
- Do not continue to clip the product to the battery afterthe car has been successfully started.
- Please use the battery clip attached with the product.
- Make sure the blue plug of the battery clip is fully insertedinto the product starter port; otherwise, the blue plug may melt. Before starting, make sure all battery connectors are clean and the battery clips are properly connected. If the battery end of the car is dirty or corroded, the product's starting performance will be reduced.
- Please do not continuously start for more than 3 times, otherwise it will cause overheating and damage the product. Please allow for 2 minutes of interval between multiple starts. Otherwise, the battery clip will overheat and separate from the product.
- Please remove the product from the car battery within30 seconds after starting, otherwise it may cause damage.
- Please connect the positive/negative polar of the clipcorrectly.
- Please make sure that 3-4 indicators are on before starting.
- Please keep the product away from children.
- Please do not use the product as a toy.
- Keep the product dry.
- Do not put the product in water.
- Please do not use the product in explosive environmentssuch as when there are flammable liquids, dusts or gas.
- Please do not modify or disassemble the product. It canonly be repaired by professional technicians.
- Do not expose the product to extremely hot conditions or fire.
- Make sure that you can be heard or helped while you use the product.
- Take off all metal items you wear such as such as rings, bracelets, necklaces before using the product.
- Please do not drop the product. In case it is damaged, please have eligible technicians to detect and fix it.
- Do not expose the product to heat of over 158°F.
- Charge at room temperature (32-140°F).
- Please charge with the charger attached.
- Do not start the car while the host machine is charged.
- In case of liquid leakage from the host machine, restorethe leaked liquid immediately with proper containers.
- Under extreme conditions, battery leakage can occur. Ifthe liquid is coming out of the product, it cannot be handled directly by hand. In case of skin contact, wash immediately with soap and water. If fluid comes into contact with eyes, flush the eyes with cold running water for at least 10 minutes and seek medical attention immediately.
- Products based on lithium batteries shall be disposedof at the end of their service life in accordance with local regulations.
MAINTENANCE AND SUPPORT
Attention
- Do Not Submerge In Water
- Do Not Disassemble
- Do Not Drop
- Avoid Extreme Temperatures
- Do Not Place Near or Into Fire

Overcharge/discharge

Fuse Protection
 Against-revers Protection Plug
Customer Service
- 18 Months Limited Warranty Service
- Lifetime Technical Service
Feel Free to Contact Us: Support@vtoman.com
For FAQ and More Information: vtoman.com

Documents / Resources
References
Download manual
Here you can download full pdf version of manual, it may contain additional safety instructions, warranty information, FCC rules, etc.
Download VTOMAN X7 - Jump Starter with Air Compressor Manual
Advertisement


Need help?
Do you have a question about the X7 and is the answer not in the manual?
Questions and answers